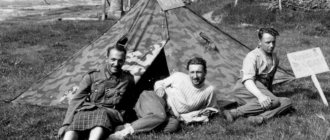
For overnight stays in open areas under unfavorable weather conditions, sleeping bags and tents are usually used. And going fishing or hunting for several days without them is highly not recommended. But if an unforeseen situation occurs and you are left alone with Mother Nature, then you can use an awning of suitable size or an army raincoat as a temporary shelter.
Temporary structures for protection from bad weather are divided according to the design principle into 3 types:
- fabric,
- frame-fabric,
- frame-deciduous.
Fabric shelters include shelters in which tarpaulins, films and rubberized fabrics are thrown over a stretched rope and fastened between stones, so that a closed space is formed at the foot.
Frame-fabric ones differ in that the fabric is stretched using poles, branches, twigs or special racks. A striking example of such a structure is a tent. These also include wigwams and canopies.
Frame-deciduous ones are constructed without the use of fabrics, from improvised materials. A frame is assembled, which is then covered with branches with leaves or spruce paws. Alternatively, hay can serve as a building material. Such shelters are represented by huts of different types and configurations.
How to use an army raincoat
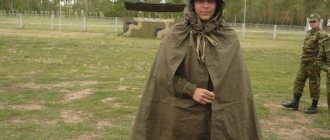
An army raincoat is a multifunctional piece of military equipment made of high-strength fabric. It can be used as a raincoat, blackout agent, cape, bedding, awning, blanket, and even as a stretcher and flotation device.
A raincoat-tent is indispensable for servicemen in combat, field and marching conditions. In addition, its advantages were appreciated by tourists, hunters and fishermen.
From the history of the origin of raincoats
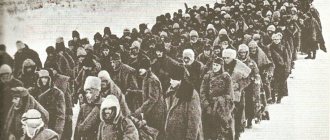
It is known that in 1882, raincoats were a mandatory attribute of soldiers' camping equipment. This cloak looked like a light gray bundle that soldiers wore over their shoulders and tied with belts to their overcoat rolls. The set of tents included wooden pegs and poles that were pushed between the tents and the rolls.
It should be noted that for that time this was a revolutionary decision. For the first time, soldiers received protective equipment against bad weather at a halt, as well as on the march. And this was important. Previously, soldiers' camp tents were transported in second-rate convoys, which, according to regulations, followed the regiments at a distance equal to half a day's march, which was usually as much as 20-30 miles. Now soldiers had personal resting places that could be installed at any time of the day.
At first, tents were simple panels with holes in the corners for ease of installation. However, soldiers more often covered themselves with tents from the rain on marches. They learned to use tents as a cloak. The authorities took a closer look at the soldiers' behavior, and in 1910 the tents were modernized.
In Soviet times, since 1936, command and rank and file personnel in the rifle units of the Red Army were provided with a set of raincoats, which included:
- The raincoat cloth measures 180×180 cm;
- A collapsible stand, which includes two half-racks-rods 65 cm long;
- Two jokes;
- Lacing rope.
If used skillfully, raincoats became excellent protection for commanders and Red Army soldiers from inclement weather. Moreover, these attributes were used to camouflage and carry the wounded. Also, with the help of raincoat tents filled with hay or straw, it was possible to overcome water obstacles.
Such raincoats were used to make tents for personnel for half of the squad, and they were also used to equip awnings, canopies, cover huts, open trenches, and entrances to dugouts. In addition, the panels could serve as bedding and blankets. Since 1942, the defense industry began producing fabrics with double-sided camouflage to improve the camouflage properties of the raincoat.
Preparation: fabric and taking measurements
The pattern of a raincoat with a hood should begin with taking measurements. It is worth remembering that the hood is sewn exactly to the size of the head, so that later it does not fit on the forehead or, conversely, does not fall back.
Hood fabric
To make a pattern for a raincoat with a hood and then sew it, the first thing you need to do is prepare everything you need. The most common raincoat with a hood is the poncho. To sew it you will need:
- centimeter. Useful for taking measurements. If a person sews a raincoat for himself, then to take measurements, you need to ask another person. Because in this case, you may not measure your parameters correctly, which will subsequently affect the product;
- a pen to write down dimensions;
- finished pattern of a cape with a hood;
- paper for creating a pattern;
- chalk to transfer the design to the canvas;
- fabric for sewing;
- thread and needle;
- sewing machine.
Sewing tools
Raincoat today
After 1910, soldiers' raincoats did not change anymore (apart from minor modifications) and remained until the beginning of the 21st century. It is clear that these days they are hopelessly outdated. Nowadays, these are no longer raincoats or tents.
So, in the case of putting it on as a raincoat, it is immediately discovered that the front panel is almost not enough to reach the knees. Drops flowing from the cloth soon make your knees wet. When moving, the angle chosen at the back makes it possible for water to flow alternately into one or the other boot. If you bend it, it will drag with a rustling sound, clinging to anything and getting dirty. The material for the canvas itself is also outdated - it is an ordinary thin tent fabric that does not have a serious water-repellent impregnation. Those who served in the army know that within a couple of hours the raincoat will get wet and will not protect at all from the rain.
Despite the fact that raincoats are currently unable to perform the real tasks assigned to them, no one particularly objects to them or demands that they be updated with something appropriate that meets today's realities.
Today, raincoat tents are used as:
- Bedding while cleaning weapons in the field;
- Bedding when firing from a machine gun;
- An improvised tablecloth when eating in the field;
- For carrying bread and other food;
- A stretcher for removing swept dry leaves and other debris;
- A stretcher for carrying sick or wounded soldiers;
- Bedding on bunks in camping tents;
- Doors in barracks or dilapidated dwellings from shelling;
- Material for closing windows in destroyed homes;
- In any other cases where durable, dense fabric is required.
For protection from rain today, the well-known combined arms protective kit (OZK) is more effective.
As often happens, since 1910 no one has been involved in modernizing soldiers' raincoats and this issue is not even raised. And this despite the fact that even during the Second World War, the Wehrmacht had more comfortable, practical raincoats made of waterproof tarpaulin. In addition, German raincoats had double-sided camouflage paint and could be used as a camouflage covering. There are also excellent examples of the American poncho-type raincoat.
Use for other purposes
DIY nunchucks: detailed instructions
Raincoat-tent as a canopy
In fact, this amazing invention can serve other functions besides being a shelter. Here's where else a raincoat can come in handy:
- Blackout. Due to its dense structure, the canvas fabric of the raincoat holds back the sun's rays well, from which it is sometimes necessary to hide. They can be used to curtain doorways or windows;
- Carrying. If suddenly someone is injured during a hike, and there is no stretcher at hand, a raincoat tent will come to the rescue. Its fabric is strong enough to support the average weight of a person. It can also be used to transport waste waste in large quantities;
- Bedding or blanket. Even in low temperature conditions, you can hope that the raincoat will try to retain as much heat as possible, since the material has a good level of thermal insulation;
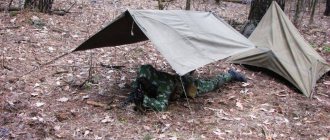
- Tent. It is not necessary to install a raincoat in the form of a tent if you need to create shelter for yourself. You can also make a small tent out of it. To do this, the cloak is stretched between two trees and secured with eyelets;
- Cloak or cape. This is its most standard purpose. For a simple cape, you need to pull out one lace and tie it around your neck. For the second option, you can pull out both laces to form a hood.
The downside of the raincoat is the lack of waterproofing. It is better to use it as a raincoat in light rain, as in heavy rain it will get wet in a few minutes. There is an officer version of the tent cloak. It features rubberized fabric with a good level of waterproofing, but its functions are limited.
https://youtube.com/watch?v=-7umGL5bYT8
Raincoat tent as a tent: design and manufacture
The raincoat itself is made of thick canvas. As mentioned above, the standard size of the pattern is 180 by 180 cm. If necessary, you can change the size for yourself, but in such cases it will not be possible to combine it with other raincoats if necessary.
Since in most cases this item is used in forest conditions, the color of the material should be close to khaki or camouflage.
You can sew a tent cape using the following pattern:
Pattern of a raincoat tent
The structure of the tent, in addition to the fabric panel, implies the presence of:
- Lacing ropes. Their diameter can be up to 5 mm, and there must be a winding at the ends;
- Racks;
- Wooden jokes. As a standard, birch is used for their manufacture. But if necessary, you can choose another hard rock;
- Metal jokes. A simple steel wire is suitable for them. Diameter – 4 mm.
The amount of inventory depends on the size of the proposed structure. The tent can be pitched for one person, or one large shelter can be created from several interconnected panels.
Varieties
Raincoats are available in several variations:
- Frame-deciduous. This is an army product that can be built on site from scrap materials. To do this, you will need branches to create a frame. Then a cloak is placed on the structure, which can additionally be covered with branches with leaves or spruce branches.
- Frame-fabric. Unlike the first option, the fabric is stretched thanks to the included stands, as well as twigs and branches.
- Fabric. To make the products you will need thick waterproof fabric. This can be film, tarpaulin or other rubberized material. The canvas is thrown over a stretched rope, and fixed from below using improvised means.
Description of the classic raincoat
The classic model is a square tarpaulin. There are 4 eyelets in the corners, which are designed for fastening. There are buttons on one side of the cloak, and loops on the other. They are designed to be able to increase in size by connecting several canvases.
A braid was threaded into the cloak, with the help of which a hood was formed in a matter of seconds. They were also used for attaching small but important things to outerwear.
Over time, a button was made on the back, to which the long corner of the cloak was attached.
Soldier's raincoat-tent
This is part of the soldier’s equipment, consisting of square-shaped panels. The standard size is 1.80*1.80 m. They are made of thick cotton fabric, and the kit includes fastening devices. Each canvas can be used by a soldier as a cape, and combining several allows you to create a spacious shelter.
DIY making
Some tourists and travelers try to make a raincoat tent with their own hands, which is quite simple to do:
- Take a piece of thick tarpaulin;
- Can be cut to size 180 by 180 cm or any desired size;
- The fabric can be treated with special water-repellent materials;
- For the hood, special lacing ropes with a diameter of no more than 5 mm with winding at the ends are used;
- The stands are made of wood or steel wire with a diameter of 4 mm.
Although you can make such a raincoat tent in a few evenings, it will not turn out very neat, and you will have to spend a lot of time searching for the necessary materials, so it is easier to buy a ready-made product.
A factory-made cape will weigh only 1.5 kg, and its price fluctuates around 400-600 rubles. It folds up and easily hides in a backpack. Some craftsmen make enlarged versions of the product, claiming that with their help you can shelter several people from bad weather at once, but it’s easier to connect several standard soldier’s tents together, because that’s exactly what they are designed for.
How can you make a complete shelter from bad weather from a raincoat?
A raincoat tent can be installed in a variety of ways, depending on how many people are trying to hide under it and how many products they have. The easiest way to build a weather protection shelter for one person is:
- First, install the stand; in this installation option, it rests on the middle loop of the tarpaulin side;
- A pull is made from the stand using a rope pulled through the loops of the fasteners;
- The corners of the cloak are fixed to the ground with pins. If you don’t have them at hand, you can use heavy stones as corner fixers.
One of the main disadvantages of a shelter for one person will be the inability to close on all sides, so you need to focus on the direction of the wind.
A tent for two people is constructed as follows:
- Two cloaks are connected to each other, creating two roof slopes;
- The open ends are secured using half-posts and two ropes;
- The free corners of each of the panels are fixed on the ground.
If there is a need to make a shelter for three, then the third raincoat-tent is secured as a side end. In the version for four people, all ends are covered with panels, and the end seams are laced.
In the history of Russian troops, it often happened that soldiers built shelters for five people; in this version, a slightly different technology was used:
- Each side slope is made of panels connected to each other;
- The fifth panel goes to the end;
- One side does not close;
- The structure is secured by 3 half-posts.
When installing shelters from raincoat tents, it is strongly recommended to use dug out turf; it is advisable to lay it out along the entire perimeter of the canvas below. This will provide a tighter fit and help the structure withstand sudden gusts of wind.
Application options
A raincoat tent is an invention that can perform many functions while camping. Use options for other purposes:
- The cloak is a standard feature. By pulling one cord you get a cape. And if you pull out two laces at once, a hood is formed.
- The tent is the second function for the invention. She is the main one.
- Blackout. The dense texture reliably protects from bright sun rays, keeping you cool in the shade. Sometimes they are even used at home to cover windows.
- Carrying. Along the way, you may get injured and not be able to continue moving on your own. The fabric used to sew the raincoat is quite strong. It can support the weight of an average person. It can also be used to transport other things.
- Bedding and blanket. The dense texture reliably protects a tourist or soldier in inclement weather. The material has heat-insulating properties and maintains temperature for a long time. Also in the army, such fabric is used as a tablecloth or for cleaning military weapons.
- Tent. By stretching the fabric between the trees, you will create a reliable shelter.
- Hammock. The fabric is stretched between the trees and secured at a convenient height.
How to make a complete shelter from bad weather from a raincoat
The simplest shelter is made in no more than 10–15 minutes. The volume of the covered area depends on the number of people and the available material. So, shelter can be created in the form of a tent. It will reliably protect you in cold and rainy weather.
The material will retain heat. It can be used for one person, or for six or more. If any end remains open, it is recommended to place it on the leeward side.
How to make a tent bed from a raincoat
For the bed you will need two long poles with a thickness of at least 6–7 cm. The canvas is folded in half and the edges are sewn together. Next, the poles are threaded into the resulting sleeve, and their edges are supported by four slingshots at the edges. Recommended height 20–25 cm.
This way you will make a bed like a folding bed. The second fabric is stretched from above at an angle of 45°. To do this, two ends are attached to high pegs on one side of the bed, and the other ends to the ground. Such a canopy will protect from rain and wind if placed on the leeward side. If the weather is good and no rain is expected, then the canvas can be used as a blanket.