Military tents are collapsible structures, designed for use as premises in the field both in peacetime and in wartime. Military tents are used for various purposes: - to protect the personnel of military units from bad weather in marching conditions - to accommodate the personnel of military units in camps and field work ( tents ) - as working premises for field bakeries, workshops and warehouses (canteens and technical military tents). When operating military tents, the following basic requirements must be met: - install tents - ensure constant monitoring and care of military tents while using them. tents in a timely and high-quality manner . - tidy up the tents after using them (at the end of camp training) - store them correctly. When operating and storing military tents, take into account that the quality condition of the tents is influenced by the following main factors: -sun rays gradually destroy the tent fabric (the loss of strength over a single camp period reaches 10%). - bacteria and fungi that cause rotting and destruction of tent fabric, tape, moisture and accelerate in case of contamination of military tents. — mechanical damage to tents. Military tents differ in design and structure: - non-frame (regular) and frame - solid and composite - winter, summer and demi-season. Non-frame military tents differ from frame tents in that they are pitched and stretched using stakes and guy lines, while frame tents instead have a wooden or metal frame on which all the fabric parts of the tent . Frame tents either do not have guy ropes and stakes, or they are present in a reduced number and only for attaching the tent to the ground in order to protect it from being blown away by the wind. The advantage of frame tents is easier installation on rocky or frozen ground and greater stability when exposed to strong winds. In all other respects, frame military tents are worse than non-frame tents; they are more complex in design, heavier in weight, have worse tension, and wear out faster. Tents considered solid, but those in which the outer cover is made up of several parts are considered composite. For example, the composite type includes a raincoat-tent. Winter tents are intended for use in the cold season; they have additional parts for insulation and special devices for the outlet of heating pipes. These tents include a winter camping tent . Summer tents are intended for use in the warm season; they are not suitable for heating. These include camp tents . Summer-winter tents are intended for use at any time of the year. Just like winter ones, they have additional insulation parts and special heating devices. Summer-winter tents are designed to accommodate warehouses, power plants, etc.; they are not heated and do not have additional parts for insulation. These tents include utility tent
Options for using universal army equipment
Dense and lightweight tent fabric makes it possible to use this invention for various needs:
- Blackouts. The structure of the material does not allow the sun's rays to pass through, from which you can hide in the summer. At night, under the tarpaulin, the light of a flashlight or the light of a match or cigarette is not visible, which can reveal the presence of a person to an outside observer or an animal. In domestic conditions, door and window openings are covered with tarpaulins;
- Carrying. There is no need to explain that an accident can happen to anyone on a hike, and your comrades will have to quickly deliver the victim to a hospital or first aid station. The dimensions and density of the material can easily support the weight of an average person; in extreme cases, the cloth is used as a drag;
- Blanket or bedding. The level of thermal insulation makes it possible to use a raincoat tent in this capacity. Many lie down on one part and cover with the other;
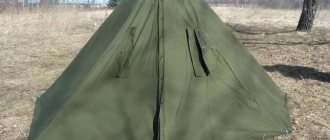
- Tent. If there is no desire to make a full-fledged shelter, then the panel is stretched between two trees and secured with eyelets;
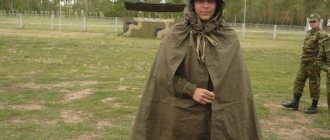
- Cape from bad weather. In the army, these products are most often used this way. It is enough to pull out one lace and tie the second one in the neck area. To make a hood, you need to pull out both laces.
Despite the variety of choices in the modern world of tourist equipment, soldier's raincoats are still very popular among fishermen, hunters and tourists. The combination of low price and light weight makes it a leader in the budget segment.
Use for other purposes
Raincoat-tent as a canopy
In fact, this amazing invention can serve other functions besides being a shelter. Here's where else a raincoat can come in handy:
- Blackout. Due to its dense structure, the canvas fabric of the raincoat holds back the sun's rays well, from which it is sometimes necessary to hide. They can be used to curtain doorways or windows;
- Carrying. If suddenly someone is injured during a hike, and there is no stretcher at hand, a raincoat tent will come to the rescue. Its fabric is strong enough to support the average weight of a person. It can also be used to transport waste waste in large quantities;
- Bedding or blanket. Even in low temperature conditions, you can hope that the raincoat will try to retain as much heat as possible, since the material has a good level of thermal insulation;
- Tent. It is not necessary to install a raincoat in the form of a tent if you need to create shelter for yourself. You can also make a small tent out of it. To do this, the cloak is stretched between two trees and secured with eyelets;
- Cloak or cape. This is its most standard purpose. For a simple cape, you need to pull out one lace and tie it around your neck. For the second option, you can pull out both laces to form a hood.
The downside of the raincoat is the lack of waterproofing. It is better to use it as a raincoat in light rain, as in heavy rain it will get wet in a few minutes. There is an officer version of the tent cloak. It features rubberized fabric with a good level of waterproofing, but its functions are limited.
https://youtube.com/watch?v=-7umGL5bYT8
Raincoat tent as a tent: design and manufacture
The raincoat itself is made of thick canvas. As mentioned above, the standard size of the pattern is 180 by 180 cm. If necessary, you can change the size for yourself, but in such cases it will not be possible to combine it with other raincoats if necessary.
Since in most cases this item is used in forest conditions, the color of the material should be close to khaki or camouflage.
You can sew a tent cape using the following pattern:
Pattern of a raincoat tent
The structure of the tent, in addition to the fabric panel, implies the presence of:
- Lacing ropes. Their diameter can be up to 5 mm, and there must be a winding at the ends;
- Racks;
- Wooden jokes. As a standard, birch is used for their manufacture. But if necessary, you can choose another hard rock;
- Metal jokes. A simple steel wire is suitable for them. Diameter – 4 mm.
The amount of inventory depends on the size of the proposed structure. The tent can be pitched for one person, or one large shelter can be created from several interconnected panels.
Description and technical data
A raincoat tent is a canvas made of tarpaulin, measuring 180 by 180 cm. In order to be able to stretch the raincoat and attach it to stakes, there are eyelets in its corners. They are usually made of leather. If you examine the canvas, you will find that on two sides it has buttons, usually wooden, and on the other two there are loops. Their function is to connect several tents together if it is necessary to install a large multi-person shelter.
Raincoat tent
There are ropes sewn into the cloak, with which you can create a hood or secure the item around the neck. The lower corner is fastened higher using the existing button. Otherwise, it will drag on the ground when walking. In such raincoats there is only one slot for the hand. The second hand goes between the buttons.
Modern models, which can be found in travel stores, are equipped with zippers for convenience.
How to assemble a raincoat tent correctly
Setting up a tent can be done in various ways. This is primarily influenced by the number of people who need to sit in it, provided that each of them has their own cloak. Example options:
- For 1 person. The stand is installed so that it rests on the middle loop of the tarpaulin side. Using a rope, a guy is pulled from the rack. The 4 corners of the raincoat are fixed to the ground using pins. But if there are none, then you can try to crush them with heavy stones;
- For 2 people. 2 cloaks are connected to each other so that each of them represents a separate roof slope. The 2 open ends are secured using two half posts and two pull ropes. 2 free corners of each panel are fixed to the ground using pegs;
- For 3 people. This design is installed similarly to the second type, where two canvases form the base. The third cloak is secured as a side end. This leaves only one part of the tent open;
- For 4 people. Such a shelter can already be completely closed from external influences, since both ends are closed with the help of canvases. 2 ropes are needed for guying, and two more for lacing the end seams;
- For 5 people. This is a fairly large structure, in which each slope consists of two connected cloaks, and the fifth goes to cover one end. The second end remains open. You will also need 3 half stands.
As you can see, using this scheme you can set up a tent for a larger number of people. The following points must be taken into account:
- It is better to install the structure on a dry surface;
- If there is an open end, it must be done on the leeward side;
- It is recommended to lay turf around the perimeter of the canvas. This will ensure that the tent flap fits more tightly to the ground.
USB-56
tent is a unified sanitary barracks tent, used for medical and sanitary purposes, as well as a barracks for temporary housing and work, for workshops, headquarters and other purposes. USB-56 has a hipped roof with a ridge and vertical walls, 2 entrances with vestibules, 12 windows on the walls, 2 chimney openings, 2 mantels, heating curtain walls and an installation device. Capacity of USB-56: - when placing the wounded on stretchers - 30 people - when placing people on separate beds - 20 people - when placing people on the floor or on shared bunks - 40 people, with two-tier bunks - 80 people. - when using a tent for a sanitary treatment point, 16 shower points.
Dimensions USB-56
| By external marking | By internal marking | |
| Length, m | 9.76 | 9.60 |
| Width, m | 6.26 | 6.10 |
| Height of side walls, m | 1.75 | 1.75 |
| Height to roof top, m | 3.55 | 3.31 |
| Floor area, sq.m. | — | 58.50 |
| Air cubic capacity, cubic meters | — | 138.00 |
USB-56 complete set
| Name of parts | Quantity per tent |
| Canvas outer mantle | 1 |
| Internal basting made of white calico | 1 |
| Heating curtain walls, 16.5 m long, made of brushed fabric, with four cutouts for windows | 2 |
| The comb is composed of two parts, 3.5 m long. | 1 |
| Medium racks made of two parts, 3.5 m long. | 2 |
| Side stands 1.89 m long | 22 |
| Tambour stands 1.79 m long. | 4 |
| Metal stakes made of angle steel, 0.60 m long. | 30 |
| Rope ropes 2.8 m long with a strap and a tension handle | 30 |
| Window frames with celluloid | 12 |
| Subframes | 12 |
| Iron sheets for chimneys | 2 |
| Vasiki | 2 |
| Tarpaulins for packaging fabric parts | 2 |
| Rigging bag | 1 |
| Cassettes for frames, subframes and iron sheets | 3 |
| Box for metal stakes | 3 |
| Sledgehammer with handle | 1 |
| Total weight of USB-56 in kg. | 455 |
DIY making
Some tourists and travelers try to make a raincoat tent with their own hands, which is quite simple to do:
- Take a piece of thick tarpaulin;
- Can be cut to size 180 by 180 cm or any desired size;
- The fabric can be treated with special water-repellent materials;
- For the hood, special lacing ropes with a diameter of no more than 5 mm with winding at the ends are used;
- The stands are made of wood or steel wire with a diameter of 4 mm.
A factory-made cape will weigh only 1.5 kg, and its price fluctuates around 400-600 rubles. It folds up and easily hides in a backpack. Some craftsmen make enlarged versions of the product, claiming that with their help you can shelter several people from bad weather at once, but it’s easier to connect several standard soldier’s tents together, because that’s exactly what they are designed for.
Setting up a children's tent
Installing a children's tent is even easier, because the design of such products is initially extremely simple and safe.
Typically, children's houses are packed in small round cases that are easy to transport or even carry in your hands.
To make a suitable house for children to play outdoors, you need to remove the awning from the cover and pull it up by the “ceiling”. The design of such houses is such that they unfold literally in seconds. All you have to do is secure the structure with pegs to prevent it from being blown away by the wind.
Application options
A raincoat tent is an invention that can perform many functions while camping. Use options for other purposes:
- The cloak is a standard feature. By pulling one cord you get a cape. And if you pull out two laces at once, a hood is formed.
- The tent is the second function for the invention. She is the main one.
- Blackout. The dense texture reliably protects from bright sun rays, keeping you cool in the shade. Sometimes they are even used at home to cover windows.
- Carrying. Along the way, you may get injured and not be able to continue moving on your own. The fabric used to sew the raincoat is quite strong. It can support the weight of an average person. It can also be used to transport other things.
- Bedding and blanket. The dense texture reliably protects a tourist or soldier in inclement weather. The material has heat-insulating properties and maintains temperature for a long time. Also in the army, such fabric is used as a tablecloth or for cleaning military weapons.
- Tent. By stretching the fabric between the trees, you will create a reliable shelter.
- Hammock. The fabric is stretched between the trees and secured at a convenient height.
Army photos on Shutterstock: Army and military photos.
How to make a complete shelter from bad weather from a raincoat
The simplest shelter is made in no more than 10–15 minutes. The volume of the covered area depends on the number of people and the available material. So, shelter can be created in the form of a tent. It will reliably protect you in cold and rainy weather.
The material will retain heat. It can be used for one person, or for six or more. If any end remains open, it is recommended to place it on the leeward side.
How to make a tent bed from a raincoat
For the bed you will need two long poles with a thickness of at least 6–7 cm. The canvas is folded in half and the edges are sewn together. Next, the poles are threaded into the resulting sleeve, and their edges are supported by four slingshots at the edges. Recommended height 20–25 cm.
This way you will make a bed like a folding bed. The second fabric is stretched from above at an angle of 45°. To do this, two ends are attached to high pegs on one side of the bed, and the other ends to the ground. Such a canopy will protect from rain and wind if placed on the leeward side. If the weather is good and no rain is expected, then the canvas can be used as a blanket.
How to put up a raincoat tent correctly
Method 1
- It needs to be strengthened at two adjacent corners through the eyelets with stakes to the ground.
- In the middle of the opposite side, install a central stake about 60 centimeters high.
- Stretch the remaining corners and also secure with stakes.
Not only is it quite difficult to set up such a tent alone (it’s better to pull it on both sides at the same time), but there’s also not enough space under it, even without a backpack. There is an option to install a shelter from a raincoat tent in another, more convenient way.
Method 2 (recommended)
- We strengthen one corner with a peg;
- We tie a rope to the grommet of the opposite corner;
- We insert the end of the main peg into it, the second end of which should rest vertically on the ground;
- Holding the main stake in this position, we make a temporary fastening of the rope to the ground next to the stake;
- Pulling first one side, then the other, we secure the remaining corners with stakes;
- We tie the rope fastening away from the main stake, tensioning the entire structure.
This option will not only provide more living space, but will also be more stable - by chance, knocking the main stake out of the grommet is more difficult than just resting it on the tarpaulin.
If travelers, hunters or fishermen have as many as three raincoats at their disposal, then they can be used to build a comfortable shelter for a group of people. Method 3
- Select a flat place, preferably higher than the surrounding surface.
- It is cleared of stones, large branches, cones, etc.
- Two raincoats are sewn together with rope through fastener loops.
- Two risers with a height of 110-120 centimeters are made.
- They are installed in the eyelets of the corners of the stitched sides.
- Ropes are tied to the same eyelets, which are pulled tight and secured with pegs.
- The remaining corners are pulled so that there are no folds and secured.
- The third raincoat tent is folded into a triangle and secured with a rope through fastener loops and eyelets to both stretched sides of the tent so as to cover the end.
It is best if three people are involved in setting up the tent. Two install the risers, tighten them, and the third makes sure that the structure is level and without distortions. A lopsided tent may not fall (although it has a higher chance of falling than a well-installed tent), but it will definitely get wet in the rain. If there are two adjacent trees or other supports at the installation site, you can do without risers. In this case, the ropes tied to the eyelets are secured to the supports with maximum tension.
5 tips for setting up a group tent:
- The raincoat-tent consists of two sewn panels. When stitching, the top panels of both tents should be higher and closer to the ridge. Otherwise, water, accumulating in the seams, will eventually leak inside.
- If the previous rule is taken into account, then the slot for the hand will be oriented so that water will flow over it without flowing inside.
- In places where the lower edges of the raincoat tents touch the ground, it is advisable to remove all grass. This will provide a tighter fit and therefore a seal.
- Around the tent, where the fabric touches the ground, you must dig a ditch about 5-10 centimeters deep and about 15 centimeters wide. This moat will collect water flowing from the tent and divert it to the side.
- It is better to sleep in such a tent across the ridge line. However, you need to make sure that nothing touches the tent fabric anywhere. The ability of the fabric to reflect water drops sharply if there is a stop on the reverse side and water can leak.
For all its advantages, such a tent will not be able to protect its inhabitants from mosquitoes and other biting and blood-sucking insects. Special protective measures will be needed, but in general it’s possible to spend the night.
General diagram of tent installation
Before setting up a tent, you first need to understand its structure. Installation of the tent should be carried out in the following sequence: - select a flat area of the required size and clear it. If you have to put up a tent on wet or damp ground, you need to lay branches, grass or straw at the installation site to protect the tent from getting dirty. - on the prepared site, unfold the inner tent with the outer side (on which ribbons and rings are sewn) - insert a comb under the straps of the internal tent, then insert the middle stakes, then the edge stakes, after stretching the tent, making sure that the middle stakes do not fall and fasten the guy ropes to the pins. - dig in the tent to protect it from water (ditches 25 cm deep); in winter the outer hem of the tent with snow. If you can’t drive stakes in the winter , you need to heat the ground with a fire and then drive the stakes into this place. After a while the ground will freeze and the stakes will hold on very tightly.
German raincoat Bundeswehr Zeltbahn 31
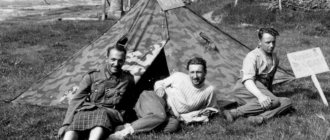
A shelter for several people from German raincoats can be built much faster
The German-made product of the 1931 model, which was in service with the Wehrmacht and was made of waterproof cotton gabardine, is distinguished by its triangular shape. It replaced the earlier quadrangular equipment models. The new products had camouflage colors in different shades: one side of the cloth was darker, and the other was lighter.
German raincoats could also be combined into panels and used to build large shelters for soldiers. Now similar models are found among collectors; reed-green and light bronze raincoats issued for the troops stationed in North Africa are considered of particular value. German models differed from Soviet ones not only in shape:
- The size of the panel is 203 by 250 cm;
- On each of the short sides there were 12 buttons with loops;
- The underside had 6 small rings and the same number of button loops.
Varieties
Raincoats are available in several variations:
- Frame-deciduous. This is an army product that can be built on site from scrap materials. To do this, you will need branches to create a frame. Then a cloak is placed on the structure, which can additionally be covered with branches with leaves or spruce branches.
- Frame-fabric. Unlike the first option, the fabric is stretched thanks to the included stands, as well as twigs and branches.
- Fabric. To make the products you will need thick waterproof fabric. This can be film, tarpaulin or other rubberized material. The canvas is thrown over a stretched rope, and fixed from below using improvised means.
Description of the classic raincoat
The classic model is a square tarpaulin. There are 4 eyelets in the corners, which are designed for fastening. There are buttons on one side of the cloak, and loops on the other. They are designed to be able to increase in size by connecting several canvases.
A braid was threaded into the cloak, with the help of which a hood was formed in a matter of seconds. They were also used for attaching small but important things to outerwear.
Over time, a button was made on the back, to which the long corner of the cloak was attached.
Soldier's raincoat-tent
This is part of the soldier’s equipment, consisting of square-shaped panels. The standard size is 1.80*1.80 m. They are made of thick cotton fabric, and the kit includes fastening devices. Each canvas can be used by a soldier as a cape, and combining several allows you to create a spacious shelter.
The history of the creation of the first models
Specialized clothing, vaguely reminiscent of modern raincoats, appeared in the Russian army during the time of Peter I. These were epanches, used to protect soldiers from rain and wind. In 1761 they received collars in the form of hoods. Starting from the second half of the 19th century, such things, combining the advantages of several items, became part of military equipment in many European countries. The Russian Empire included raincoats in the equipment of its officers only in 1894; these models were waterproof.
In Soviet times, European and tsarist experience was adopted only in 1936, securing tents as standard equipment for the rank and file and command staff of the Workers 'and Peasants' Red Army. The standard set of protective raincoats included:
- Panel size 180x180 cm;
- The stand is collapsible, consisting of two 65 cm rods;
- Lacing rope;
- Two jokes.
https://youtube.com/watch?v=-7umGL5bYT8
During the Great Patriotic War, soldiers immediately appreciated the best aspects of compact tents, using them for all sorts of needs:
- Weather protection;
- Use as camouflage ammunition;
- Carrying wounded soldiers.
On guard duty, such equipment was used as ordinary capes, and in open areas, soldiers often built large shelters, connecting several panels together. Entrances to dugouts were also often masked with raincoats. Beginning in 1942, the defense industry of the Soviet Union began to produce camouflage models with improved camouflage properties.
Meaning
This is the common name for portable camping equipment made of waterproof material that can be used as a tent or raincoat (when rolled up). If necessary, it is also used as a drag or stretcher for carrying the wounded and sick.
It is believed that the ancestor of this useful military equipment is an epancha raincoat with a hood and collar, which was worn by Russian soldiers under Peter the Great. In the second half of the nineteenth century, waterproof raincoats became a mandatory component of army camping equipment. At first they were part of the standard equipment of officers, and then of ordinary soldiers.
Thanks to such a useful item, you can hide from bad weather, disguise yourself, and carry the wounded and sick. If you fill it, for example, with straw or hay, you will get a fairly effective homemade watercraft that allows you to overcome water obstacles. When rolled up, this equipment often became a camp cloak or was used as a blanket or bedding. The standard option is a canvas panel measuring 180 by 180 centimeters, painted on both sides in camouflage camouflage colors.
The history of the creation of the first models
The first raincoat was invented back in the 18th century. The exact history of its origin is unknown, although historians claim that since 1882 it has become an integral part of military equipment. For those times, the creation of an individual army raincoat became a real salvation from inclement weather. According to the regulations, soldiers' raincoats were transported in a second-class convoy.
He walked behind at a distance equal to half a day's journey. That is, we had to wait for a place to sleep until late at night or in the morning. Individual products gave soldiers the opportunity not to wait for arrival and create shelter from inclement weather from a raincoat. At first, the raincoat-tents were fastened behind the back in the form of a bundle. Over time, the soldiers adapted to shelter her on the way.
Noticing the resourcefulness of the army, some of the equipment was modernized. Thus, the soldier's raincoat acquired its main form and name in 1910. After short use, the following disadvantages were noted:
- the front part went down to the knees, so heavy rain wet the trousers;
- the back part, due to its length, was bent and tucked into the belt. As they walked, raindrops dripped down into their boots;
- if the rear corner is not tucked in, it will drag along the ground, rustling annoyingly. After some time, a military man could even lose part of his equipment;
- the fabric was thin and after 3-4 hours it became thoroughly wet.
Raincoat today
The last modernization was in 1910. Since then, the officer's raincoat has not undergone significant adjustments and has retained its appearance until the 21st century.
A modern raincoat has been improved only in terms of fabric quality. It is more durable, water-repellent impregnation is applied to it, and modern coloring allows you to make a reliable and discreet military shelter.
Description and technical data
In addition to the textile fabric, the kit includes:
- laces with a diameter of about 5 mm;
- racks;
- wooden pegs. In production, hard wood species are used, most often birch;
- metal pegs. They can be made from 5 mm steel wire.
The officer's raincoat is made of durable tarpaulin. When folded, it is similar in size to a two-liter plastic bottle. When unfolded, it is a square measuring 1.80 * 1.80 m. Eyelets made of leather or metal are installed along the edges. The weight of the product does not exceed 1.5 kg.
Equipment
An important difference between military and civilian ones is that the package does not always contain everything necessary for assembly. When going to a military warehouse, carefully study the list of components. If something is not in the “native” kit, you can certainly buy it in the same store.
Frame tents are usually supplied in the following configuration:
- frame;
- stakes;
- jokes;
- guy lines.
Tents have a wider range of equipment:
- support posts;
- roof ridge;
- frames and subframes;
- guy lines;
- stakes;
- jokes;
- sledgehammer.
Whatever tent you choose, all its components will definitely fit into an army duffel bag. But an ordinary hiking backpack may not contain a kit for building a military tent.