1.1. Equipment for trenches for machine gun shooting
(Article: 1.1. Equipment of trenches for firing from a machine gun)
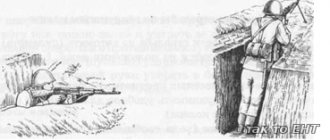
To conduct fire, observe and protect against weapons of destruction, the personnel in the occupied positions first arrange single trenches for shooting while lying down, then deepen them for shooting from the kneeling and standing.
Single trench for shooting from a machine gun while lying down
Before opening a trench, each soldier approaches the terrain, positioning himself so as to have a good view and fire in a given sector and not be visible to the enemy.
The soldier then opens a single trench for prone shooting and clears his view and fire if local objects interfere with him.
Single trench for prone shooting.
A single trench is a recess with an embankment in front and on the sides, providing convenient placement of weapons and soldiers when firing and protection from enemy weapons. In a single trench for prone shooting, a recess is made 60 cm wide, 170 cm long and 30 cm deep so that the soldier in it is completely hidden.
Excerpt from a single trench under enemy fire
For ease of shooting, a threshold 25-30 cm wide is left in the front part of the recess, 10 cm above the bottom of the trench, providing support for the elbows. The earth removed during the lifting is thrown forward (towards the enemy) and forms an embankment called a parapet.
When firing from a trench towards one of the flanks, the height of the parapet of the trench on the enemy side (from the front) is 20 cm greater than in the firing sector. The volume of excavated soil is 0.3 m3. 0.5 people required per device. hour.
An excerpt from a single trench for prone shooting under enemy fire is performed as follows:
- lying in the chosen place, the soldier places the machine gun to his right at arm's length with the muzzle facing the enemy;
- turning on his left side, pulls the shovel out of the case by the tray with his left hand, clasps the handle with both hands and cuts the turf or the top compacted layer of earth with blows towards himself, marking the boundaries of the excavation in front and on the sides;
- After that, he intercepts the shovel and turns the turf away from himself with blows, puts it in front and begins to tear it out.
During work you should:
- drive the shovel into the ground with the corner of the tray, not vertically, but obliquely;
- cut thin roots with the sharp edge of a shovel;
- to form a parapet, throw the turf and earth forward towards the enemy, leaving between the edge of the excavation and the parapet a small area called a berm, 20–40 cm wide;
- keep your head close to the ground, without ceasing to observe the enemy.
When the required depth is reached in the front part of the trench excavation, the soldier, moving back, continues to cut the excavation to the required length to cover the torso and legs.
At the end of the passage, the parapet is leveled with a shovel and disguised to match the appearance and color of the area with available material: grass, branches, arable soil, etc.
Each soldier, without waiting for orders from the commander, deepens the trench for prone shooting, creating a single trench for kneeling shooting, and then for standing shooting at the bottom of the ditch.
Single trench for kneeling and standing shooting.
A single trench for kneeling and standing shooting is constructed by digging into the depth of a single trench for prone shooting up to 60 cm and 110 cm, respectively. When the trench is pulled out, the soil is thrown forward and to the sides, creating a parapet 40–60 cm high. In the firing sector, the height of the parapet decreases up to 30 cm, forming a recess with gentle slopes - an open loophole.
Single trench for firing from a machine gun from the knee Single trench for firing from a machine gun while standing
The volume of excavated soil when equipping a single trench for firing from a machine gun from the knee is 0.8 m3; 1.2 people are required per device. hour. The volume of excavated soil when equipping a single trench for firing from a machine gun while standing is 1.4 m3; the construction of this trench requires 1.5 people. hour.
A single trench for standing shooting at the bottom of a ditch reduces the radius of the affected area by one and a half times when exposed to atomic weapons compared to placement in open areas.
Trenches from aerial surveillance are camouflaged with camouflage fabric woven into it with grass, branches and other available material.
Firing a shot
Services for shooting at the shooting range at Apothecary Ave., 14
90. To fire a shot from all shooting positions you must: select an aiming point; without ceasing to observe the target, extend your right hand with the pistol forward, holding the pistol by the handle with your right hand; place the index finger of this hand with the first joint on the tail of the trigger; extend the thumb of your right hand along the left side of the handle parallel to the direction of the barrel (Fig. 57);
Rice. 57. How to hold a pistol when shooting
hold the outstretched right arm freely, without tension, keep the hand of this arm in a plane passing through the axis of the barrel bore and the elbow of the arm (Fig. 58); Do not squeeze the pistol handle and hold it as uniformly as possible.
91. For aiming
hold your breath as you naturally exhale, close your left eye, and with your right eye look through the rear sight slot at the front sight so that the front sight is in the middle of the slot, and its top is level with the upper edges of the rear sight; in this position, bring the pistol under the aiming point (without dropping it) and at the same time begin pressing the tail of the trigger.
Rice. 58. Standing shooting position
Note. If it is difficult for the shooter to close his left eye separately, he is allowed to aim with both eyes open.
92. To release the trigger
it is necessary, while holding your breath, to smoothly press the first joint of the index finger on the tail of the trigger until the trigger, unnoticed by the shooter, as if by itself, falls off the cocking mechanism, i.e. until the shot fires.
When the hammer is pre-cocked, it should be borne in mind that the trigger has some free play, during which the shot will not fire.
When pressing the tail of the trigger, apply finger pressure straight back. The shooter must gradually increase the pressure on the tail of the trigger during the time when the top of the level front sight aligns with the aiming point, and when the front sight deviates from the aiming point, the shooter must, without increasing or weakening the pressure, straighten the aiming and, as soon as the level the front sight will again align with the aiming point, again gradually increase the pressure on the tail of the trigger. When releasing the trigger, you should not be embarrassed by slight vibrations of the front sight at the aiming point; the desire to make the trigger necessarily at the moment of the best coincidence of the front sight with the aiming point can entail tugging on the trigger, and hence an inaccurate shot. If the shooter, pressing the tail of the trigger, feels that he can no longer breathe, he must, without weakening or increasing the pressure of the finger, take a breath and, holding it again, continue to smoothly squeeze the tail of the trigger.
1.2. Protective properties of the area
(Article: 1.2. Protective properties of the area)
In any battle, it is necessary to make maximum use of the protective and camouflaging properties of the terrain and local objects, both from conventional and nuclear weapons.
When using shell craters, excavations, ditches, embankments, reverse slopes, and ravines available on the ground, the damaging effect of conventional weapons and the shock wave of a nuclear explosion is weakened.
In open areas, it is better to be located behind the reverse slopes of the hills.
Narrow, deep and winding ravines, hollows, and quarries located perpendicular or at an angle to the direction of propagation of the shock wave provide more reliable protection. However, when located in ravines, pits, behind reverse slopes of heights, it is necessary to keep in mind that covered slopes in soft soils can collapse, so they should be secured.
The protective properties of the area can be increased by deepening natural recesses, making special cuts into the slopes of heights, into the slopes of ravines, into the steepness of hills, etc.
The forest area weakens the impact of the damaging factors of a nuclear explosion. However, when troops are located in the forest, personnel and equipment should be protected from impacts from falling branches, debris and tree trunks by constructing simple shelters.
When performing tasks in a wooded area, it is better to use clearings, clearings and clearings covered with bushes.
1.3. Disguise
(Article: 1.3. Disguise)
The location of the trenches must satisfy the following basic conditions:
- allow a good overview and shelling of the terrain ahead at a distance of at least 400 m, overview and shelling of the approaches to neighboring trenches;
- contribute to the camouflage of the trench, thereby significantly reducing the effectiveness of enemy fire;
- provide the most covert communication possible with the rear and with neighboring trenches;
- favor the construction and equipment of the trench.
Good shelling means the absence of dead (unfired) spaces within the shelling sector.
The best view and shelling of the approaches to the position is provided by the location of the trench on the slope of the hill, facing the enemy. When the trench is located at the base of the slope, flat fire is ensured, in which targets are hit throughout the entire flight of the bullet.
Positioning a trench near a topographic ridge usually allows long-range visibility, but shelling without blind spaces is usually only possible at the shortest ranges.
From the point of view of shelling, the combat ridge is considered the most convenient location for the trench. A combat ridge is a line on the front (facing the enemy) slope of a hill, from which shelling is possible to the bottom of the slope without dead spaces.
Camouflage of trenches is usually achieved by skillfully placing them on the ground. The trench is well and easily camouflaged when located in bushes, in tall grass, in places that are poorly visible to the enemy and not visible from his ground observation posts.
However, when achieving a camouflaged trench location, one must strive to ensure that the conditions for performing the assigned fire mission are not complicated, and that the shelling of the area in a given zone does not deteriorate.
One of the main methods of camouflaging trenches is sodding. If there is not enough turf to camouflage the parapets, additional turf is harvested to the side or in the rear of the trench and carried on a stretcher to the work site. It is better to prepare turf in those places where the construction of false trenches is planned. The area from which the turf is removed should be similar in shape and size to a regular trench.
Read online “Tactical Shooting” by Potapov Alexey Andreevich – RuLit – Page 88
SHOOTING FROM A MACHINE AT GROUP TARGETS
In combat practice, there are often cases when, at short (up to 200 m) distances, identified group targets are sharply dispersed in different directions (Diagram 44). When asked by the author what to do in such situations, former MGB officers of the Stalinist formation answered that it is preferable to shoot in a “conditional way”, putting
| Photo 174. Technique for holding a machine gun when shooting with one hand |
Photo 175. Shooting “offhand from the hip”
1 - the machine gun captured by the collar is held by a force directed to the left - down
| Diagram 44. Firing from a machine gun at a moving group target |
machine gun on its side (photo 176), from the “assault” position, resting the butt between the shoulder tubercle and the biceps of the right hand, with the elbow raised as much as possible. This is an ancient hunting method of shooting at a target running from right to left. A machine gun or self-loading carbine, when prepared in this way, will shift its recoil to the left (away from the magazine), and this is used in the lead behind a running target. The automatic fire accompanying a group target “scattering” to the left once prevented many from reaching cover (1 in diagram 44). Targets running to the left of the shooter are the most dangerous, because their weapons are turned from right to left, that is, towards the employee. These targets are hit first. Targets running from left to right are less dangerous, since their barrels are turned “away from you”, in the opposite direction. These targets are hit in the same way (II in diagram 44).
With this method of shooting, you will have to apply force to the machine gun in order to move it “on course.” You can shoot standing, from two knees or from a kneeling position. When shooting while standing, you can turn behind the target at a greater angle by turning on your heels.
Photo 176. Butt rest between the humeral tubercle and biceps
Photo 177. Advancement to the shooting position at the lower level with pulling up on the elbows (1) and pushing off with the toes of the shoes (2)
Of course, you won’t meet all your goals. Your task is to pin the enemy to the ground, “chain” him to the spot and prevent him from shooting accurately.
When working in combat in labyrinths or in difficult terrain, the machine gun will have to be held in various positions according to the current combat moment, shooting with the butt resting on the shoulder, in a “conventional way”, in an “assault position”, with a grip “by the waist”, “from the stomach” " and "from the hip." The machine gun will have to be “thrown” from position to position, they will have to juggle, like in a circus. There is no single dogmatic way to hold a machine gun - dogmatists die very quickly. In ruins and basements you will have to turn in different directions, and you need to get used to this in advance.
TACTICAL WORK WITH A MACHINE AT THE LOWER LEVEL
There is a psychological phenomenon - goals that appear at the bottom are perceived slower and worse than goals found at the middle and top levels. Therefore, during both assault and defensive operations, it is very advantageous to fire from quickly occupied positions in the corners below, especially in shaded places.
It is best to crawl to such positions by pulling yourself up on your elbows and at the same time pushing off with the toes of your shoes (1-2 in photo 177). The extension must be calculated in such a way that in its final phase the toes are straightened and the elbows are tucked under (1-2 in photo 178). Simultaneously with the end of the extension, the fighter falls onto his left side, pulling his right leg bent at the knee towards him (1 in photo 179), and opens fire. Immediately after the end of shooting, sharply push back with your right foot (1 in photo 180), using the mass inertial moment, raise your body and sharply go back behind cover (photo 181), reach a vertical position (photo 182) and stand on your feet ( photo 183).
| Photo 178. The final phase of moving into position: elbows (1) tucked under you, toes (2) straightened |
If a tactical position at a shadowed angle must be taken on the move, the right heel (1 in photo 184) turns forward, the fighter, shock-absorbing on the right bent leg, lowers himself onto the left knee, pushing it as far as possible to the right behind the right heel (photo 185), and collapses on the left side (photo 186). The result is the position shown in photo 179. To rise after shooting, the actions with the go-ahead of the right leg are performed, shown in photos 179-183 (see earlier).
2.1. Features of developing standards for engineering training
(Article: 2.1. Features of developing standards for engineering training)
- Standards for equipping trenches during classes and training are practiced using an infantry (sapper) shovel.
- The standard is considered fulfilled if the conditions for its implementation are met during work and there have been no violations of safety requirements, as well as charters, manuals, instructions and manuals.
- If, while working through the standard, a student makes at least one mistake that could lead to injury (defeat) to personnel, breakdown of equipment, weapons, or an accident, fulfillment of the standard is stopped and assessed as “unsatisfactory.”
- For violation of the sequence of compliance with the standard, which did not lead to accidents, breakdown (damage) of equipment and weapons, as well as for each error leading to a violation of the conditions for fulfilling the standard, the requirements of charters, manuals, manuals, instructions, technological maps, the score is reduced by one point .
- When standards are met by personnel wearing skin protective equipment (OZK, L-1, etc.), the time increases by 25%, and when working in respiratory protection equipment (gas mask, respirator) - by 10%, except for standards, the implementation of which provided only in protective equipment.
- At an air temperature of minus 10°C and below, plus 30°C and above, with heavy rain, snowfall, altitude above 1500 m above sea level, the time to comply with standards increases to 20%, when operating at night, if the time for night conditions is not defined , it increases to 30%.
- When complying with standards related to the development of frozen (freezing depth of 1 m or more) and hard (rocky) soils, both manually and with the use of explosives and mechanization, the time increases by 3 times, and for rocky soils - by 5 times.
- In winter conditions, with a snow depth of 80 cm or more, trenches and shelters can be made of snow. In this case, the time to comply with the standards in relation to the specified is reduced by 1.5-2 times.
- When standards are met by a reduced-strength unit, the time is increased (decreased) by the corresponding percentage of absent personnel, but not more than 15%. In units staffed only by driver mechanics, when working out group standards, the fulfillment of which requires the joint work of two or more crew members, driver mechanics of other cars in their unit are involved.
- The time for fulfilling the standard by a serviceman (unit) is counted by a stopwatch from the moment the command “To fulfill the standard - START”
(or another established command, signal) until the moment the standard is fulfilled by all military personnel (unit) and the commander (trainee) reports on its implementation.
§ 12. Engineering equipment of the department position
War experience shows that skillful equipment of positions largely predetermined the success of the battle. Our soldiers, having high engineering training, successfully coped with the equipment of positions, areas and lines.
In modern combat, the role of engineering equipment for positions has increased significantly. This is due to a change in the nature of combined arms combat, an increase in the power of conventional and mass destruction weapons, and an increase in the technical equipment of units and subunits. An engineering-equipped position creates better conditions for firing and observation, protects personnel from enemy weapons, and provides the ability to covertly and quickly maneuver during battle along the front and from the depths.
The engineering equipment of the squad position includes the construction of trenches, shelters, communication passages, as well as the installation of mine-explosive barriers.
In the absence of direct contact with the enemy, the equipment of the position begins with the layout and routing of the trench into a squad. An earthmoving machine can be used. In conditions of direct contact with the enemy, the equipment of the position begins with self-entrenchment.
Trenches and gap
Single trenches
for riflemen, machine-gunners and grenade-throwers, they first break off for shooting while lying down, then by further tearing them off, trenches are made 60 cm deep for kneeling shooting and 110 cm deep for standing shooting. A trench for a grenade launcher is constructed in the same way as a single trench for a rifleman. Its difference is that on the side opposite to the sector of fire of the grenade launcher, the parapet is not poured. The trench has a ditch for the grenade launcher, a platform for the grenade launcher and niches for covering the grenade launcher and ammunition.
In order to ensure the protection of personnel from incendiary weapons and enemy fire, under-parapet niches for one or two people are installed in single trenches.
Trench for the squad
is formed after connecting single trenches (Fig. 16). It consists of a ditch (trench section) with front and rear parapets, cells for riflemen, main and reserve platforms for a machine gun and grenade launcher, communication passage to the rear, niches for ammunition and food.
Trench for BMP (armored personnel carrier)
comes off in the main and reserve positions. It consists of a rectangular pit with a platform for a car, a ramp for entry (exit) and a parapet.
Gap
breaks away in the front steepness of the trench ditch into a compartment. It is a ditch 1.5 m deep, 0.6 m wide at the bottom, at least 3 m long, with access directly into the trench. The gap is blocked with poles or logs.
Mine-explosive barriers
They are arranged in front of the front line from anti-tank, anti-personnel or mixed fields, as well as from separate groups of mines installed on the routes of movement of enemy tanks and infantry.
Anti-tank minefield
installed in three to four rows. The distance between the rows of mines is taken from 10 to 40 m. In each row, the mines are located one from the other at a distance of 4 to 5.5 m. The total depth of the minefield can be from 20 to 120 m.
Rice. 16. Trench for the squad: 1 - open loophole; 2 — cell for conducting flanking fire; 3 — platforms for machine guns; 4 — cell for the shooter; 5 - blocked gap or dugout; 6 — remote cell for a grenade launcher; 7 - remote cell with covered loophole; 8 — trench for infantry fighting vehicles at the main firing position; 9 — ramp; 10 - parapet; 11 - latrine; 12 - possible course of communication; 13 - trench for infantry fighting vehicles at a reserve firing position
Anti-personnel minefield
Press-action mines are usually arranged in two or four rows. The distance between rows of mines is taken to be from 2 to 4 m, and between mines in rows is at least 1 m.
Overcoming enemy mine-explosive barriers is carried out along passages. Passages 6-8 m wide are made mechanically or explosively, and sometimes manually by sappers. The completed passages are usually marked with clearly visible signs.
Questions
1. What does the engineering equipment of the branch position include?
2. Draw a single trench for prone shooting and name its elements and dimensions.
3. Name the elements of a squad trench using a diagram or poster.
4. Tell us about the installation of anti-tank and anti-personnel minefields and the procedure for making passages in them.
2.2. The procedure for determining the assessment for meeting standards
(Article: 2.2. Procedure for determining the assessment for meeting standards)
1. If the standard is practiced several times during the training process, then the grade for its implementation is determined by the last result shown or by the result of the control lesson.
2. An individual assessment for a military personnel for fulfilling several standards for engineering training is determined based on the marks received for fulfilling each standard, and is considered:
| "Great" | if at least 90% of the tested standards are rated positively, while at least 50% of the standards are rated “excellent” |
| "Fine" | if at least 80% of the tested standards are rated positively, while at least 50% of the standards are rated at least “good” |
| "satisfactorily" | if at least 70% of the standards are assessed positively, and when assessed according to three standards, two are assessed positively, one of them is not lower than “good” |
| "unsatisfactory" | if the conditions for a “satisfactory” rating are not met |
The grade for fulfilling single standards for the unit is derived from the individual assessments of students and is determined:
| "Great" | if at least 90% of students received positive grades, while at least 50% of students received an “excellent” grade |
| "Fine" | if at least 80% of trainees received positive assessments, while at least 50% of trainees received a rating of at least “good” |
| "satisfactorily" | if at least 70% of students received positive grades |
| "unsatisfactory" | if the conditions for a “satisfactory” rating are not met |
Related:
| Methodological recommendations for organizing and conducting drill training… | Methodological recommendations for organizing and conducting extracurricular educational activities in an after-school group The methodological recommendations present the basic methodological and pedagogical requirements for conducting extracurricular activities in the premises,… |
| Guidelines for organizing and conducting reconnaissance training classes Covers the rest of the space up to the limits of visibility | Guidelines for organizing and conducting fire safety training… |
| Guidelines for organizing and conducting tactical training classes Combat as a concept, its components (strike, fire, maneuver). Features of modern combined arms combat and requirements for it | Methodological recommendations for organizing and conducting classes in military ecology Covers an extremely wide range of issues and is closely intertwined with a number of related sciences: biology, geology, physics, chemistry,… |
| Methodological recommendations for preparing and holding the celebration of the 250th anniversary of the founding of Mozdok | Methodological recommendations for organizing and conducting the Unified State Exam (USE) for persons with disabilities. Appendix: 28 l Guidelines for organizing and conducting the Unified State Exam for persons with disabilities |
| Methodological recommendations for the preparation of documents for the purpose of organizing and conducting training on emergency evacuation of students, students, teachers and Methodological recommendations for preparing documents for the purpose of organizing and conducting training on emergency evacuation of students,… | Methodological recommendations for organizing and conducting the Unified State Exam (USE) for persons with disabilities. Appendix: 28 l These methodological recommendations have been developed in order to explain the features of the organization and conduct of a unified state... |
Documents
Documents