The invention of gunpowder can be called the most important event that changed the course of world history. Firearms, having completely replaced cold weapons over several centuries, became the main instrument of warfare. It remains so to this day... Over the past five hundred years, it has come a long way, from primitive muzzle-loading fittings to modern assault rifles. Parallel to this process was the evolution of ammunition. One of the main milestones in its development is the creation of a rifled barrel, which greatly increased shooting accuracy.
It is believed that rifled weapons first appeared in Europe at the end of the 15th century, although we do not have accurate data about this truly historical event. Despite this, until the first half of the 19th century, rifled weapons were not widespread. This state of affairs changed radically only towards the end of the century before last.
In Russia, the designation “rifle” was officially adopted only in 1856. It meant a short-barreled rifled weapon; before that it was called a fitting or a screw gun. It can be added that in Russian the word “gun”, as a rule, means a smooth-bore weapon, while a rifled weapon is called “rifle”.
Currently, the vast majority of military firearms are rifled. Exceptions are quite rare. For example, the use of smooth-bore guns has returned to use in tank building, and similar barrels are also used in artillery. Rifled weapons for hunting are also very popular, although weapons with a smooth barrel are also used for this purpose.
However, before talking about the history of the development of rifled weapons and its modern models, it is worth saying a few words about the barrel rifling itself, the functions they perform and their classification.
Why are rifling needed at all?
The barrel is the most important part of any firearm. It gives the bullet translational and rotational movement in a certain direction. We can say that the ammunition and barrel determine the basic ballistic characteristics of any small arms.
The rotation of the bullet is especially important, and if it is desirable for a round bullet, then for an oblong bullet it is simply necessary. Such a bullet, fired from a smooth-bore weapon, will immediately begin to tumble randomly. The fact is that its centers of gravity and the application of aerodynamic forces do not coincide, therefore, without the stabilizing gyroscopic effect that rotation creates, an elongated bullet is not capable of maintaining its position in space.
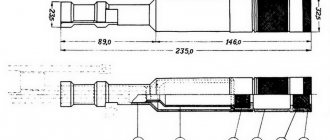
The barrel of a rifled firearm consists of a chamber, a connecting cone (or bullet entry) and a rifled part. The cartridge is fixed in the chamber before firing; in its shape and size it repeats the cartridge case. The connecting cone is necessary for the correct insertion of the bullet into the rifling of the barrel; the dimensions of the rifling in it gradually increase from zero to the usual size characteristic of a particular type of weapon. The rifled part of the barrel gives the bullet a rotational motion, which subsequently stabilizes it in flight. At the moment of firing, the bullet casing or the leading belt of the projectile fits tightly into the rifling, which prevents the breakthrough of powder gases between the bullet (projectile) and the walls of the barrel bore.
Rifles are grooves that run along the surface of the bore, from the connecting cone to the muzzle. Each such groove has a bottom and two sides. The spaces that protrude between the rifling are called rifling margins. The edge that “guides” the bullet is called the combat edge; it is clearly visible from the breech of the barrel. The edge opposite to it is called the blank edge; it is visible from the muzzle of the barrel. In some countries, the caliber of a rifle is the distance between the opposite fields of the rifling, in others it is calculated by the distance between the bottoms of the rifling.
The cutting of the trunk can go from left to right or curl in the opposite direction. This does not particularly affect the combat characteristics of the weapon. The direction of the rifling in different countries is determined rather historically; in Russia (USSR), the USA and Germany it is right-handed, and in England and France it is left-handed.
The smaller the rifling fields, the easier it is for the bullet to penetrate into them. However, if their value is less than necessary, then the bullet may break off from the rifling. On the other hand, excessive channel depth can cause the bullet casing to rupture or shatter. In addition, deep rifling creates significant protrusions on the bullet casing, which worsens its ballistic characteristics. Taking into account all of the above, the depth of rifling is usually made equal to 1/50 to 1/70 of the caliber of the weapon. Initially, the fields made fewer riflings themselves, thus reducing barrel wear, but after the advent of more durable materials, this practice was abandoned.
How to make a tree trunk from beads (master class)
Creating a tree trunk is a rather intensive process, but fascinating and simple. Having prepared all the necessary materials, you can safely get to work:
As a result, you will get an original tree that grows on a rocky mountain. A stand made of gypsum mixture will securely hold the tree. A layer applied over the top of the wire base can give the trunk and branches more naturalness.
We believe that thanks to the master class you have mastered, you know how to beautifully make a tree trunk from beads in a very simple way.
What types of rifling are there?
There are a large number of barrel rifling profiles: trapezoidal, rectangular, rounded, segmented, etc. In a rectangular rifling, the side edges of each rifling are parallel, in a trapezoidal rifling they are located at an angle to each other. Segmental rifling is part of a circle segment, etc. Rectangular rifling is most commonly used in weapon systems. They are reliable, durable and relatively easy to manufacture. Trapezoidal rifling is more complex and expensive to produce, but they provide better accuracy. It is even more difficult to produce a barrel with rounded or segmented rifling.
In different historical periods, other barrel rifling profiles were used. For one reason or another - usually because they are labor intensive or expensive - they are not widely used. For example, in the middle of the 19th century, the English engineer and inventor Joseph Whitworth proposed the so-called polygonal cutting of the barrel. In cross-section, it resembled a regular polygon; bullets for it were also supposed to be made in the shape of a twisted prism. Due to the high cost of production, this design was not widespread. Among modern weapons with a polygonal barrel rifling, we can note the American-Israeli Desert Eagle pistol.
Another important characteristic of the rifling of the bore is its angle of inclination or steepness. They determine the pressure of the bullet on the combat edge of the rifling and, accordingly, the wear rate of the weapon barrel. The most “advanced” are considered to be rifling with a progressive steepness, which significantly improves the accuracy of the weapon. However, due to the complexity of manufacturing, they are not widely used and are used only in a small number of sniper systems.
Speaking about rifled weapons, it should be understood that when passing through the barrel bore, the bullet fills it completely, to the very bottom of the rifling. To achieve this, the cross-sectional area of the bullet is slightly (1-2%) larger than that of the barrel. If it goes down the barrel freely (“with play”), then this leads to deviation from the aiming direction and damage to the barrel bore. In this case there is no need to talk about accuracy at all.
In general, the “correct” manufacture of the barrel is of utmost importance for the accuracy and accuracy of the weapon. Roughness, roughness of processing, uneven bottom of the rifling can reduce these indicators by 20-30%. The very first shooting of a rifled weapon will show such flaws.
Theory
plastic as a material for the barrel
, then I use it like regular plasticine. Using a stick (a toothpick or a sharpened wire), I apply a bark-type pattern to the trunk using varying amounts of pressure, and then follow the instructions for the plastic.
To make the barrel I also use a mixture of alabaster and PVA glue
.
Consistency
can be different and the texture of the trunk depends on it. I apply it to the bare wire frame of the tree, without first thickening it with different materials. From experience, when using them, the trunk cracks when the mixture dries (not always, but often). So for me it's better to apply more mixture than to regret the appearance of cracks. First, you can knead the mixture thicker. It is used to form just that thickening of the trunk. The mixture does not flow and dries faster. But the mixture dries very quickly, so you need to apply it as quickly as possible. Usually, in the first stage, I apply only to the trunk itself and mainly at the base, creating almost the desired thickness of the trunk (there will be another layer on top, the so-called bark). Then the mixture is diluted to be more liquid. While it is quite liquid, I quickly apply it with a thin brush to thin branches that need to be slightly thickened or smoothed out at the junctions. The thinner the mixture, the smoother the surface will be when dry. This is what we need on the branches. As the mixture thickens, I coat the branches closer to the trunk and the junction of thick branches with the trunk. And with a thicker mixture I already form the tree bark. In this case, the mixture should have the consistency of butter if it had been taken out of the refrigerator an hour ago (oh, I compared it :)) I just want to say that a liquid mixture will not lie down as it should, but a very thick mixture will fall out in chunks. With the required consistency, the mixture itself lays down as needed, in the form of a bark.
For work I use a wide synthetic brush
, she's tough.
pointed sticks
on hand to use for drawing the bark, if necessary. Typically the barrel takes at least an hour. Some people cast magic for 4 hours. This is a matter of taste, experience, desire and pleasure (not without this;)).
After the trunk has dried, you can correct it (if necessary) with a file
nail polish (I have an old artificial nail file for this purpose) or fine-grit sandpaper.
Painting a beaded tree trunk
- that's a different story