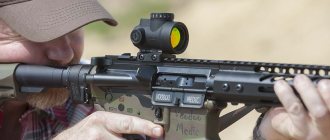
Any hunter or sports shooting enthusiast knows that accuracy depends on the quality of the sights. Of course, with a good weapon, the basic tools are good, but they are not capable of providing maximum accuracy and speed of aiming. If you have good eyesight, and you shoot quickly and at a distance of up to 100 meters, collimators will be the best choice, but be careful and do not buy Chinese fakes, but rather take good equipment, such as Gamo collimators.
Features of the design of mounts for weapon optical sights
To choose the right fastener, you should determine the model of the weapon, its purpose, overall dimensions, weight of optics, mounting locations and other individual parameters on which the design features of the fastener depend.
Brackets are divided into several types.
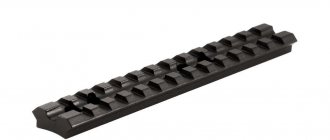
Planks. Weaver rail and Picatinny rail. These types are used in mountings for the Walther Lever Action optical sight.
The Weaver bar is a fastening rail, has a T-shape in cross-section, the width of the slots is 4.6 mm, the pitch between adjacent slots depends on the model. It was developed in 1930 by Ralph Weaver. Simplicity and reliability allow it to be installed on almost all types of weapons.
The Picatinny rail was developed from the Weaver in 1980. It was assigned the military standard MIL-STD-1913. The design of the bar has a fixed pitch of 10 mm.
Dovetail. This is a tenon joint fastener, attached to the trunk from the top or side. In the end section it resembles a trapezoid, which tapers downwards.
Side brackets. This mount is located on the side of the weapon, looks like a dovetail and works on the same principle. This type is popular in Russia; for example, the POPS 4×24 optical sight with side mount SVD is mounted on a side bracket.
Quick release brackets. This typology applies to all of the above adapters. They are united by a lock that allows you to quickly remove the optical sight from the weapon, without requiring an additional tool. The quick-release Picatinny rail mount on the Tiger (a domestically produced hunting weapon) has been successfully used.
Review of popular models
The optical-mechanical plant in the city of Vologda produces several models of collimator sights under the Pilad brand. The reputation of this plant and the quality of its products allow us to consider the Pilad sights the best in their class in terms of price-quality ratio.
All of them are made in a metal case and can be used not only for installation on pneumatic weapons, but also on firearms.
P1x20
The smallest open collimator with a single lens with a diameter of 23 mm. Its weight is 80 grams and its length is 50 mm. The housing is protected from dust and moisture. There is one aiming marker - a red dot. Light source – LED. Powered by coin cell battery. Its brightness is adjusted automatically, due to a photodiode in the front of the sight. Can be installed on weaver and picatinny rails.
Video review of the VOMZ Pilad P1x20 collimator sight:
Р1х25
A small closed-type collimator sight weighing 180 grams. Case length 90 mm. It has a lens and an eyepiece, but the magnification factor of the optical system is 1.
There is only one aiming marker – a red dot. Its brightness is adjusted with a round knob on the top panel of the sight.
The light beam is from the LED. Battery powered. Installs only on weaver bar. Suitable for long range shooting.
Photo of the VOMZ Pilad P1x25 collimator sight
PF01x25
Open type collimator with a single lens with a diameter of 25 mm. A special feature of the design is the autonomous illumination from the light guide. No batteries are required, but it only works during daylight hours. The aiming marker for the pfo1x25 cj collimator is a circle with a dot. It is installed directly on the ventilated barrel rib and is tightened with bolts. Sight weight 60 grams, length 127 mm.
Photo of the VOMZ PFO1x25 collimator sight
Р1х42
Open type sight with LED beam and battery power. Lens diameter 39 mm. You can select the type of aiming marker: S, stump, dot. Push-button control, hermetically sealed with rubber covers. Marker brightness adjustment is manual. The sight weight is 160 grams, length is 82 mm. Installed on a weaver type bar.
Video review of the P1x42 collimator sight:
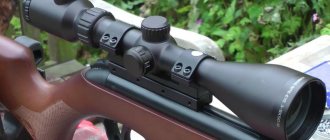
Types of optical sights
A sight is a device that is used to aim a weapon at a target. There are many types of optics. The simplest is open sighting mechanisms, consisting of one lens and an open light source.
Optical devices allow you to make a more accurate shot. This is facilitated by complex settings, which include calculating the bullet’s trajectory, wind correction and additional options.
Optical sights are divided into several types:
- With constant increase . Multiplicity - 1.5×, 2×, 2.5×, 3×, 4×, 6×, 8×, 10×, 12×, 16×, 20×, 24×, 36×, 40×.
- With variable magnification . Such models smoothly change the magnification depending on the distance or approach of the target, as well as when it is examined in detail.
- Low magnification devices (3×-4×). They are used when shooting at close ranges. Such sights have a small magnification, which ensures a bright image of the object and a large viewing angle.
- High magnification devices (6×-16× and higher). They are used if the target is stationary, at a distance of more than 20 meters.
It is also advisable to divide them into:
- devices for daytime and pre-dawn hunting;
- devices for night hunting.
Sights for daytime and pre-dawn hunting
When choosing a day sight, you should study the main characteristics:
- Magnification or multiplicity. This value can be both constant and variable. But devices with constant magnification allow you to see the image more clearly, thanks to the small number of lenses.
- Line of sight. The higher the value of this parameter, the lower the multiplicity, and vice versa.
- Exit pupil removal. This is the distance from the extreme lens of the scope to the eye at which the image will be clear. This value is selected individually and is equal to 7-10 mm.
- Exit pupil diameter. This is a circle of light in the eyepiece, in which the outline of an object is visible, transmitted by the lens. The larger the exit pupil diameter, the brighter the image.
- Sighting reticle. There are several options for the sighting reticle: dot, classic cross or reticle with a rangefinder scale, selected individually.
Sights for night hunting
A night vision sight is a device consisting of three interconnected elements:
- lens;
- electron-optical converter;
- eyepiece.
The principle of operation is as follows. At night the amount of light is limited. At best, the natural light sources are the moon and stars, and if there is some cloud cover, the light will be diffuse. The rays reflected from light objects fall on the sight lens, then the electrical signals of the photons are transmitted to a converter, which amplifies them several times. The resulting image is transmitted to the eyepiece and seen by the human eye. The picture turns out to be green, since the retina of the eye perceives it better than other colors. Additional equipment for the night vision sighting device is an infrared lamp. It helps you aim even in complete darkness.
Types of collimators
Pilade collimators are presented in two standard versions:
- Closed,
- Open.
A distinctive feature of closed collimators is the presence of two lenses - an eyepiece and an objective. The housing part is characterized by reliable tightness. Getting inside the body, the light flux does not scatter, but improves the quality of the aiming mark. Thanks to this optical system, it is possible to visually approach the target, with its scaling, and the ability to create conditions for the greatest targeting accuracy.
Open collimators have a larger viewing angle and work by scattering the light beam in open space. The stream of light produces a projection onto a single, built-in lens.
Based on the type of light source, all collimators are divided into artificially and naturally illuminated. The first category includes models with LED or lamp lighting, the second - with fiber optic elements.
How to choose the right mount for an optical sight
The choice of a bracket for an optical sight is carried out according to the following criteria:
- Find out the make or model of the weapon. Most fasteners are made for a specific model.
- Decide on sighting equipment (regular optics or for night vision) and its parameters (lens diameter, length, weight).
- You should raise the weapon, since each shooter has individual characteristics of using the weapon, this will help determine the height of the fastener and its extension.
- Decide on the fastening design: quick-release and removable using an additional tool.
Specifications
Technical characteristics of Gamo red dot sights:
| 1x22x33 | 1x40 | 1x35 | 30 mm | |
| Total length, mm | 82 | 98 | 98 | — |
| Weight, g | 190 | 220 | 210 | 120 |
| Frame | Aluminium alloy | Aluminium alloy | Aluminium alloy | Aluminium alloy |
| Lens diameter, mm | — | 40 | 35 | 30 |
| Reticle | dot; dot in circle, cross or grid | dot | dot | dot |
| Backlight levels | 7 | 11 | 11 | — |
| Optimal distance, m | up to 100 | up to 100 | up to 100 | up to 100 |
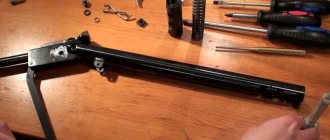
Installing a weapon sight mount
On all types of firearms there is a system for installing optics, which is expressed in the presence of grooves or holes on the body. All manufacturers have different positions, sizes and types of fasteners.
Installing the base
Installation of optics begins with choosing a base for mounting the bracket and a mounting location. The base (base) should be selected taking into account the weapon model. When installing fasteners, it is recommended to secure the weapon in a machine with rigid fixation to avoid displacement of the base. The base is installed on the weapon body and tightened with screws. The screws are tightened one at a time.
Thread lockers should be used when tightening screws. They will prevent them from twisting.
Installation of rings and lapping
In order to install the optical sight correctly and reliably, you first need to “grind in” the rings. This operation will minimize the installation error. To do this you need:
- Unscrew the upper half rings from the lower ones.
- Install the optical device on the bracket and tighten the rings.
- Do not clamp, the sight should move freely along the rings.
- They take the weapon in their hands, close their eyes and determine the position in which it will be as comfortable as possible to shoot.
- They open their eyes and look through the optics. The target image should occupy the entire space of the lens, excluding shadows at the edges.
- After determining the exit pupil, you should mark the location of the rings on the scope with a sticker.
- Remove the rings and optics.
- To lap the rings, a lap cylinder is used. Its diameter should be the same as that of the sight. A lap is installed in the rings pre-lubricated with diamond paste.
- The cylinder should be rotated clockwise and counterclockwise until the inner surface of the rings becomes perfectly flat and the axes of all rings coincide with each other. The effect is considered achieved if the rings are ground evenly.
- After grinding in, it is necessary to degrease the inner surface of the rings.
Shooting
Shooting is actually not the most difficult task. To do this, you will need standard targets, as well as ones with a diameter increased by 3-4 times. It is also necessary to look for a shooting location that will not be influenced by the weather. For example, abandoned cowsheds, of which there are quite a few in the suburbs, are a good choice.
Next, place a large target and move away 10 meters. If you are not an experienced shooter, it is better not to shoot while standing, but to find a weapon rest. Of course, you can also lie down, but not all weapons will be convenient to reload. Next, we aim at the center of the target and look at the barrel; if you see a very obvious deviation, you can make a preliminary adjustment. Next, we make a series of 3-5 shots with adjustments after each.
After the first stage, we increase the distance by another 10 meters and repeat the series of shots and adjustment again. In general, this can be done up to 100 meters away. After 20 meters, you can zero in at 40, 60, 80 and 100 meters.
The video shows a shooting test for the strength of Gamo and Taxco red dot sights:
Places of purchase and cost of mounts and sights
Mounts for optics can be purchased at any licensed weapons store for only types of weapons registered by citizens. You should not use other sights of dubious origin. Manufacturers offer a variety of mounting designs and optical devices. There is mass production, and there is custom-made production for weapons that require special mounting. This determines the price/quality of the product.
An important element of a weapon is all the component mechanisms, not only the optics itself and the optical sight mount. Any error in the mounting unit leads to a malfunction of the system, and using the sight loses all meaning. It is recommended to take a responsible approach to the choice of fastening. You should not save on both the design and the quality of installation, otherwise disappointment at the most crucial moment will not keep you waiting.
Did you manage to solve your problem using the recommendations from the article?
Yes!
46.69%
No. More answers required. I'll ask in the comments now.
37.74%
Partially. There are still questions. I'll write in the comments now.
15.56%
Voted: 726
Device
The collimator device is actually very simple. Essentially, there is simply an LED inside, the light from which is reflected on the surface of the lens, resulting in a marker. It is also worth noting that ordinary glass will not work, but must have a special coating, which is why if the lens is damaged, the entire sight will fail.
It is also worth noting that the quality of workmanship plays an important role, with which Gamo has complete order. For example, Chinese models may have a fuzzy marker, which can also double and be reflected on the outer surface of the lens or even on the second glass, which is often found on counterfeits of Eotechi.
The material is mainly aluminum alloy. Of course, these collimators cannot be compared to their military counterparts in terms of strength, but for hunters and fans of pneumatic shooting they are more than enough, and their low weight will only be an advantage.
The marker is adjustable only in the open model using a special wheel on the lower rear part.
There are two approaches to adjust the position:
- In an open sight, adjustment is made using hex bolts. One moves the LED horizontally, and the other bolt raises or lowers the back, which affects the vertical position of the marker.
- When closed, adjustment occurs without special tools and only due to two wheels.
It is also worth noting that the battery is stored in a special compartment in the brightness control. When replacing, be careful, otherwise you risk damaging the contact. To open it, you need to take a wide screwdriver and insert it into the groove on the cover, and then use your fingers to secure the walls of the wheel.