Tools and cleaning products
For basic care of an air rifle you will need the following minimum kit:
We also recommend reading:
Budget spinning reels Riobi Exiya Features of crucian carp killer gear and how to make such equipment Diagram of how to learn how to tie a hook to a fishing line Features of fishing with a retractable leash, selection of gear and installation
- Ramrod.
- Cleaning rod attachments.
- Cleaning agent.
- Lubrication.
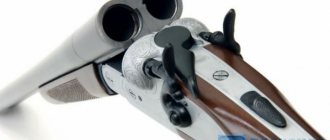
If you have a choice, then it is better to choose a non-removable cleaning rod. Three-element “Chinese” products are not very convenient to use, they deteriorate faster and can cause irreparable damage to the bore and the cut of the barrel. The ramrod rod must be covered in plastic braiding. You can make it yourself using heat shrink tubing.
Cleaning rod attachments are brushes made of various materials. The minimum set should consist of at least two such devices - plastic and fabric. For more thorough cleaning, you will also need a brush with brass bristles.
As a cleaning agent, acetone is considered the most acceptable option. You should not use gasoline for these purposes, as its vapors will detonate when fired, causing damage to the weapon.
Features of zeroing a rifle with an optical sight
Rifled calibers.
calibers of rifled hunting weapons: table Zeroing a rifle with an optical sight has its own characteristics. This procedure should be started from a minimum distance. Subsequently, it will gradually increase so that the result obtained is as objective as possible.
This is interesting: Shotgun Toz 106: technical characteristics
Zeroing an air rifle with an optical sight:
During zeroing, you should select an aiming point through an open sight and fix the weapon before firing. Then you need to bring the crosshairs to the point where the rifle is pointed with an open sight. This can be done by using an adjustment drum. And after that the first test shot is carried out.
The essence of the whole process is to bring the crosshairs of the sight to the point of impact of the bullet. When the desired result is achieved, you should gradually increase the existing distance and repeat the entire procedure.
Review of the Stechkin air pistol model Gletcher APS - read more. Characteristics, features, modification with the Blowback function, partial disassembly of the pistol.
Adaptations
Proper cleaning of smooth-bore and rifled weapons
Among the main devices for cleaning rifled weapons are patches, machines, and box inserts. The process is carried out both on tables and on rugs. There are special mats that help reduce the risk of damaging both the table and the weapon. In addition, they absorb oil from patches that may fall randomly, which prevents everything around from getting dirty.
But the best solution is to use a special stand designed for cleaning rifled weapons after shooting. There is a wide range of such devices. So, there are special types for revolvers, which clamp the weapon in such a way that you can twist it as you like. Plastic stands are often used, which look like troughs with horns holding weapons. These are fairly simple devices that are easy to use and easy to clean.
They have compartments for oil, cans of solvents, and cleaning rod holders for cleaning rifled weapons. They are easy to fold and put away, they do not require much space, which is an advantageous difference from professional machines. In addition, their price is low. They usually cost 3,000 – 4,000 rubles, and the price of a professional set is 9,000 – 12,000 rubles.
To prevent oil from getting into the rifle magazine, inserts are used to clean rifled weapons. They look like small plastic shutters that fit in place of the stock shutter. Thanks to them, the process is greatly facilitated. Sometimes they have holes for oil and rubber seals. Most often, inserts are divided into sizes corresponding to different calibers, but you can often find a universal variety.
Experienced shooters testify that inserts need to be selected in accordance with the caliber. This choice is a matter of taste, since any insert will easily cope with its function.
To prevent the cleaning process from getting too messy, you need to purchase a patch catcher. It resembles a small container that is attached to the end of the barrel. Patches fall into it. Sometimes there are catchers with separate containers. However, many gun owners use homemade containers such as plastic bottles.
Their use is convenient as they are disposable. The rifle cleaning kit contains the most useful tools from the listed components.
Cleaning the bore - easy and convenient
Not everyone pays due attention to the need to clean the barrel of a weapon, and not everyone likes this activity. However, every gun owner is well aware of this not entirely pleasant event. His motto can be formulated as follows: “With the lowest possible costs - to the maximum result.” In the following article, the author will give a comparative analysis of the three most common methods of cleaning the bore.
After a shot, carbon deposits form in the barrel bore, which is a mixture of various components of combustion products with moisture, which can cause corrosion. To prevent this, the gun owner should remove the carbon deposits after firing. The application of gun oil has worked well here, leading to the dissolution of carbon deposits, which simplifies the procedure for its subsequent removal. An oily substance, which is a mixture of gun oil and carbon deposits, can be removed from the bore using cotton patches, felt plugs, or pieces of felt of various configurations, widely available on the market for gun accessories. An appropriate weapon care product is applied to the front of the above materials, after which they are pulled along the barrel bore using a cleaning rod in the direction from the chamber to the muzzle. It is important that with each pass of the bore the cleaning agent captures as much of the oil and carbon mixture as possible and penetrates as deeply as possible into the rifling. Employees of the German edition of DWJ magazine tested three methods of bore cleaning for their cost, speed of the process and its effectiveness. The barrel of the Mercury 8×57 IS repeating carbine provided to the editors was cleaned. The shooting was carried out with RWS blank cartridges. Brunox's Waffenoel gun oil was used as a cleaning agent.
Cotton patches
Cotton patches are widely available on the market and come in various sizes, allowing you to select them according to the caliber of your weapon. The patches are placed on a needle-shaped tip that is screwed onto the cleaning rod and pulled along the bore. Once out of the muzzle, the patches can be turned over and reused. Thrifty gun owners turn the patches over several times when cleaning.
Left: Cross-shaped felt patches. In the center: cotton patches. Right: VFG felt plugs. Below: the results of the first pull along the bore with preliminary filling of gun oil into it. Above for comparison: bore cleaning aids before use.
The force with which the cleaning products are pressed into the grooves depends on the diameter of the tip and the thickness and size of the cotton patches. Round and rectangular patches are available for sale. However, it is impossible to say which of them fit better and more evenly to the walls of the barrel bore and fit deeper into the rifling, since both types of patches, when inserting the tip into the barrel, fit it completely arbitrarily.
Felt plugs from VFG
VFG cylindrical felt plugs have a longitudinal through hole in the middle part, which allows them to be screwed onto a thin threaded ramrod tip. After screwing, the plugs increase slightly in diameter. At the top of the tip there is a fastening nut that prevents the plug from moving while it is pulled along the barrel bore. The pressure on the walls of the bore depends on the diameters of the tip and felt plug, as well as on the degree of increase in its diameter after screwing onto the tip. After pulling along the barrel bore, the felt plug should be unscrewed. Of course, it can be turned over and reused.
Cross Felt Patches
Such patches are produced by Shot Flon. Their thickness is about 1 mm. In addition to these patches, the company also produces aluminum tips for them that are screwed onto a cleaning rod. The cross-shaped patch with its central part is threaded onto the needle-shaped upper part of the aluminum tip and inserted into the barrel bore. In this case, the four petals of the patch are bent back and fit around the tip in such a way that it ends up in a kind of felt shirt.
The cotton patch is pulled with a cleaning rod from the chamber to the muzzle.
The diameter of the tips is designed for barrels of four calibers and provides the pressure necessary for sufficient penetration of the felt jacket into the rifling. After passing through the bore, a cross-shaped patch falls out from the muzzle side. It can be turned over and reused. Gun owners who want to create increased pressure thread two cross-shaped patches onto the needle-shaped top of the aluminum tip.
After cleaning
First, employees of the German editorial office of DWJ magazine cleaned the bore with cotton patches using a tip for calibers from 8 mm. Due to the fact that the upper part of the tip is not needle-shaped, the patch should be strung on it with a certain sense of proportion, which, however, is not at all difficult. When entering the chamber, the patch fits around the tip and should be pushed firmly into the bore. To move it along the trunk it is necessary to apply considerable force.
On the muzzle side, the patch came out soaked in oil and products remaining in the bore after firing. The patch was removed from the tip, turned over and reused with similar results. Pulling the next cotton patch (double use) along the bore required greater effort, since there was no longer any oil left in the barrel, without which a correspondingly smaller amount of carbon was removed.
Similarly, a cross-shaped felt patch is used, which is first crimped manually around the cleaning rod tip.
In this regard, before the third cleaning, the editorial staff of DWJ magazine decided to re-fill the barrel with a small amount of oil. After pulling the patch through, traces of soot were visible on it. The next dry broach showed some residual contamination in the rifling, which could be determined by the characteristic deformation of the patch. When dry pulling again, there was a small amount of dirt on the patch. The last broach using oil showed residual gray contamination in the rifling.
Due to the fact that the upper part of the tip is needle-shaped, stringing a cross-shaped felt patch onto it was easy and simple. The procedure for cleaning the bore was similar to that described above with almost the same result. During the last two pulls, DWJ's German staff threaded two cross-shaped patches onto the tip, which created significantly more but controlled pressure. The last broach using oil also showed residual contamination in the light gray rifling. After this, cleaning was carried out using the last aid.
Among shooters, the felt plugs of the VFG company are primarily known. They are available for sale in various diameters in accordance with the calibers of the weapon.
A VFG felt plug was screwed onto the cleaning rod and then inserted into the bore. The stretching occurred evenly. The first plugs were so contaminated that DWJ employees did not dare reuse them. After eight pulls, the last plug was turned over and reused. Residual contamination began to gradually decrease, but no characteristic marks of rifling were noted on the plugs. The results of the last bore cleaning were significantly different from the previous two. The staff of the German edition of DWJ magazine have not yet established how many felt plugs should still be used to completely clean the bore. Their consumption and the effort applied to screwing and unscrewing the plugs, as well as screwing and unscrewing the fixing nut, are disproportionately large. From their experience, the DWJ editorial staff has found that the use of small felt plugs is very effective for applying chemical cleaners or oils used for cleaning to the bore walls.
The cost per unit of cleaning aids is easy to calculate. For example, 500 VFG felt plugs from Frankonia can be purchased for 36.95 euros, 200 cross-shaped felt patches cost 9.90 euros, and 750 cotton patches cost 16.95 euros.
Of course, you shouldn't skimp on the appropriate tip. In addition, a good cleaning rod makes cleaning the weapon much easier. The VFG cleaning rod for calibers from 8 mm, provided to the editors of DWJ magazine, fit well in the hand. It could be freely inserted into the chamber, and when further pulled along the bore with great effort, the ramrod did not bend. In any case, each gun owner must independently decide which gun cleaning aid he will prefer.
DWJ findings
The large surface area combined with the thickness of the cotton patches and cross-shaped felt patches allows a significant amount of carbon to be removed with each pull along the bore. For felt plugs from VFG this ratio is worse. However, the editorial staff of DWJ magazine did not expect to obtain ideal bore cleaning results.
Patches
From smoothbore to rifled: loose-bore rifled barrel
At the moment, the most popular are 2 types of patches - caliber barrels with a hole and fabric squares, the size of which is selected based on the caliber.
The first type is extremely effective, but has a higher price. The second type is cheaper, but is also capable of coping with the task assigned to it.
The barrels can be white or green, soaked in chemicals for cleaning rifled weapons. The latter option replaces even the most effective brushes. It is used even in cases where the barrel is too dirty.
Each shooter selects patches according to his own preferences, but experts prefer fabric squares, and amateurs prefer barrels.
What rules should you follow when cleaning rifled weapons?
In order for the cleaning to be successful and beneficial for the small arms, everything must be done in accordance with the “code of laws” presented below.
Cleaning is a rather lengthy process. Haste is not appropriate here, as is inattention, carelessness and negligence. Cleaning is always done from the breech to the muzzle, and under no circumstances is it the other way around (you can see this in many training videos). That is, according to the vector of movement of the bullet when fired. You can take a flexible cleaning rod made of plastic or cord for cleaning and use it if, due to certain reasons, using a solid cleaning rod, taking into account this simple truth, is difficult or impossible. The movement from the treasury to the barrel must be continuous and performed without stops or jerks - smoothly and slowly. The patch is used once - after being passed through the bore, it is removed and thrown away, and a new one is wound in its place, on the visher. When cleaning, the ramrod should be directed only forward, towards the muzzle; moving back and forth is strongly discouraged, since this can cause scratches inside the barrel and destruction of the edges of the rifling. When choosing brushes for cleaning, some owners of rifled weapons prefer products made from soft plastics due to their low cost. It is better not to do this, since cleaning with such devices will certainly lead to clogging of the surface with solid particles. You will need to try very hard to remove these particles later, because even washing the barrel does not always help get rid of them. It makes sense to pay attention to bristle brushes made of brass or bronze - they do not have such a drawback
To prevent the collection of solid particles, the brush must be kept dry when cleaning. The weapon should be cleaned, preferably immediately upon arriving home after shooting, in extreme cases, a little later, but always on the same day. Postponing such an important procedure until tomorrow and subsequent days is unacceptable. A rifled weapon must be cleaned even if it has been on the street and has not been used (not a single shot has been fired). In this situation, cleaning should be carried out according to a light schedule (neutral lubricant is used). Cleaning of weapons is carried out on the day of shooting, then again after several days from the date of the first cleaning, and for the third time again several days later.
You can put the product into long-term storage only after such “three-level protection”. At the same time, weapons lying unused in storage still need to be taken out and cleaned every month (at least once every 2 months). The correct performance of the rifle, its accuracy and accuracy, depend to a large extent on the condition of the bullet entrance, as well as the muzzle. That is why, when cleaning these areas, you need to be extremely careful and careful. To clean rifled weapons, only tools and devices intended for this purpose should be used. Do not use any homemade materials, machine oils, highly alkaline substances, drills, etc. By doing this you will only damage the weapon and will not gain any benefit.
Running in the rifled
“The issue of running in rifled weapons is more a matter of faith rather than actual benefits.”
In practice, I have become convinced that it is not always possible to achieve improvements in accuracy, and this improvement is insignificant, but it is possible to achieve better cleaning of weapons, or rather simplify and speed up cleaning, significantly. In addition, the copper plating of the barrel is reduced, which not only speeds up cleaning, but also allows you to shoot in future in larger series, in terms of the number of shots, without loss of accuracy. It was not possible to notice any harm from the run-in; the only disadvantages that can be noted are the large amount of time required for this operation and the consumption of cartridges and patches.
Everything else is a plus, getting used to the new weapon, simplifying further cleaning and, as a result, ultimately saving time and money. In addition, at the final stage of running-in, you can adjust the optics.
THEORY The main purpose of running-in is to smooth out micro-irregularities on the inside of the barrel by shooting. In fact, the barrel is polished with a bullet. But this will not work simply by shooting, since when fired, copper from the bullet casing and combustion products of gunpowder and primer are deposited on the surface of the barrel; these deposits, if not removed, will negatively affect the accuracy of the rifle. The purpose of running-in is to polish micro-irregularities, but to prevent copper and gunpowder combustion products from getting into them. According to some break-in theories, shooting not only polishes the barrel, but also hardens it; It’s hard to say how true this is, but it explains well why running-in is useless on a barrel that has been fired a lot. Ideally, a completely new barrel is broken in. It is interesting to note that no matter how well the barrel is polished, running-in still has a positive effect on it and goes much faster. The barrels of “gross” rifles may require up to 50-70 rounds, while weapons from piece weapons may require 7-10 rounds.
It is completely useless to break in chrome barrels, primarily because chrome cannot be polished. The barrels of shotguns are also not tested due to the specific nature of their ammunition.
| A good, non-separable cleaning rod greatly simplifies the cleaning procedure. |
The inner surface of the barrel of most serial rifles at a magnification of 10-20 times looks very unpresentable, it is more like a diamond needle file, running in allows you to bring it to shine, but, most importantly, it does not allow copper from the bullet casing to fill cavities and potholes in the barrel and form a hard-to-remove layer that makes cleaning difficult, promotes contamination and impairs consistency.
Many people wonder why they can't just polish the barrel by hand without shooting? There are several reasons: the barrel is polished with a special tool - a lapping tool; without such a tool, it is impossible to polish the barrel efficiently, and it is very easy to spoil it. It is impossible to polish the barrel simply with a patch of coarse polishing paste; the result of such polishing will most likely be littered edges of the rifling, which will definitely ruin the rifle.
| We choose cartridges for running-in with a copper shell, no substitutes. |
But, what is much more interesting, a perfectly polished barrel can still be improved by running in. After running-in, such a barrel is cleaned faster and easier, and this, in my opinion, confirms that running-in is not only polishing the barrel with a bullet, but a complex process and, of course, useful for the barrel.
It should be noted that occasionally you come across barrels that are almost impossible to break in. Despite efforts, they continue to quickly become dirty and copper-plated. This is usually due to a very rough barrel or an attempt to break in a barrel that has been shot a lot before.
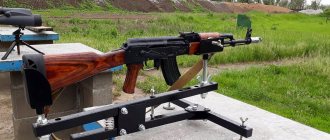
| When shooting with powerful calibers, a zeroing machine helps a lot. |
Sometimes special cartridges with lapping bullets are used to break in barrels. We do not produce such cartridges, but they are available for sale in the West. The problem is that these bullets can only be used in very limited cases, for example when the barrel has a high roughness. They cannot be used at all in rifles with polished barrels; these bullets are too rough; shooting with them will lead to a loss of not only the quality of the barrel, but also to the revocation of the warranty.
It is interesting that the quality of the cartridges is directly reflected in the copper plating; it was noted that the more expensive the cartridges, the more pure copper is used to make the bullet shell, the softer the shell and the more copper plating the barrel is, all other things being equal. Running in the barrel is not a quick process and It takes a lot of time and needs to be approached seriously. If the break-in process has begun, it must be completed, otherwise all efforts will be in vain. Therefore, when planning, allow enough time for break-in; the process itself can be divided into two or three parts, but firing a weapon before completing the entire procedure is highly not recommended.
| At the beginning of cleaning, we remove the combustion products of gunpowder. |
MATERIALS REQUIRED First of all, for break-in, as well as for cleaning, you will need a good cleaning rod. I highly recommend one-piece (not assembled from pieces) and with a handle on a bearing. Personally, it’s more convenient for me to use two cleaning rods when running in, one with a brush for patches, the second with a bronze brush. With this combination, cleaning is much faster and more convenient.
Vishers - for square patches of the required caliber.
Patches - they can be “barrels” or “cut squares”; when running in, I prefer the latter, they are cheaper, and for this operation you will need a lot of them. In addition, the main active element will be chemistry, and it works the same with any patches.
Chemistry. We will need several compounds: Hoppe's #9 or Shooter's Choice carbon remover, Sweet's 762 copper remover, Shooter's Choice Copper Remover, Ballistol, Brunox or Kano Kroil neutral oil. The latter is preferable, but it has a sharp, unpleasant odor, although this is not so important on the street.
Cartridges - FMG only (shell); I use inexpensive “Partizans” or “S&B”, they are relatively cheap and have proven themselves well during barrel break-in. For ease of cleaning, it is advisable to use a special weapon stand; a shooting machine will also work.
PRACTICE The break-in process itself cannot be called complicated, but it is quite long and labor-intensive. There are many break-in recipes that offer recipes that describe with mathematical precision the procedures and operations that must be performed during break-in. Practice has shown that the most economical and at the same time effective method is associated with visual control of the running-in process, without being tied to any specific schemes. It allows you to carry out the entire process with the highest quality and at the same time, in some cases, save ammunition.
So, let's get started: first of all, you need to clean the barrel of the rifle, before the first shot this is of great importance, otherwise you will not be able to control the break-in process accurately enough. When cleaning, you need to remember that when changing cleaning compounds, you must wipe the barrel dry, completely removing the previous composition. Mixing some solvents can harm the trunk, so this should not be allowed. After cleaning, we proceed directly to running-in. The first phase is firing one shot at a time, followed by cleaning until the copper plating of the barrel is completely removed. We clean it as follows: first we remove carbon deposits with Shooter's Choice, moving in patches from the chamber to the end of the barrel, this usually takes 3-5 patches. Then, using oil or gasoline (I use gasoline to refill lighters), we remove all remaining solvent, and at the same time control the quality of cleaning. If the quality is unsatisfactory, repeat cleaning. Now it's time to deal with copper plating. To do this, apply Sweet's 7.62 or Shooter's Choice Copper Remover with a brush, leave for 5-10 minutes for the composition to interact with the copper deposited on the surface of the barrel. Next, we clean the barrel with patches moistened with the same solvent, and run the patches until a bluish coating stops appearing on them. After this, we run the patch moistened with neutral oil, it should come out clean; If a blue coating appears on it, cleaning must be repeated. It is not possible to predict the number of patches; it all depends on the quality of the barrel and, to some extent, the cartridges.
After complete cleaning, we notice how many patches were needed to completely remove the copper plating; this information is key for carrying out this procedure. Now the entire operation, starting with firing one shot and ending with complete cleaning, must be repeated; You will be surprised, but the number of patches will most likely decrease significantly. Our goal is to ensure that copper removal takes place in one pass. This indicator is the basis for moving to the next stage. Cleaning in one pass indicates that the running-in is proceeding correctly.
Different rifles may require different numbers of rounds to achieve this result. Unfortunately, there are rifles on which it is impossible to achieve such a result at all. As a consolation, I note that cleaning such rifles still becomes much easier.
So, we were lucky and managed to clean the rifle in one step. Let's move on to the next phase. It is not much different from the first, the only thing is that we will shoot three times. Some people recommend shooting two rounds at a time during the second stage; we tried it, we didn’t notice any significant advantages, but the ammunition consumption with this scheme is higher (since it provides for series of 1, 2, 3, 4, 5 shots). It is important to pay attention to the fact that after each shot the rifle must be allowed to cool; rapid shooting without cooling results in greater copperization, and we do not need this. Thus, the operating procedure is as follows: three shots at intervals of 3-5 minutes to cool the barrel, followed by complete cleaning, as described above. Our goal is to achieve removal of copper plating in one cycle. The second phase can already be predicted; it usually fits into 2-5 cycles.
| The second pass with solvent, traces of soot and copper plating are visible. |
| Further patches come out with only traces of copper. |
After achieving the goal, we move on to the third phase - firing five shots, this is the final phase of our version of running in the rifle, if the first two phases went smoothly, the third phase will require 1-2 cycles.
The main thing is to be careful and do not forget to cool the weapon between shots. It is at this phase, seeing the previous success and wanting to quickly complete the run-in, that many begin to shoot without cooling and neglect the quality of cleaning. In principle, it is unlikely that the break-in process will be significantly spoiled, but it is very possible to delay it, so we will be patient and do everything right the first time. Five shots with an interval of 3-5 minutes, cleaning off carbon deposits, removing copper plating until we achieve removal in one cycle.
| Our goal is to get a clean patch, without traces of copper. |
After completing the break-in procedure, we completely clean the weapon and can begin to be proud that we have done a really necessary and difficult task. To maintain the weapon in good condition, it is recommended that at the first stage of its use, repeat the described cleaning procedure after 20 shots, and after five such cycles, subsequently clean the weapon after every 50 shots. This mode of operation of the rifle will allow it to please you with good accuracy for as long as possible and will simplify cleaning the weapon.
| Tools necessary for running in rifled weapons. |
In conclusion, I would like to emphasize once again that the break-in procedure for a rifle can only be carried out at the beginning of its operation. Attempts to test a rifle with even 100-150 rounds do not lead to any significant results. An experiment with running in the barrel with about 500 shots showed complete futility; it was not even possible to reduce the copper coating of the barrel during firing.
Alexander Kudryashov September 16, 2014 at 00:00
Barrel steels and their choice
According to gunsmith Jeffrey Coble, from a materials science perspective, the barrel is primarily a pressure vessel. When firing a steel barrel, you have to experience monstrous instantaneous loads (up to 4000 kg/cm2!) and stoically endure them over many hundreds, or even thousands of shots, holding and directing the enormous destructive force of the powder gases to accelerate the bullet along the barrel, and not to other destructive actions.
Shooting sport is an expensive hobby. Whether you shoot PRS or F-Class, sooner or later you will need to change the barrel
Not every steel is suitable for such a complex task, but there are quite a large number of grades of weapon steel. Here you need to know that in modern barrel production there are two classes of steels that differ radically in their properties: the so-called “black”, that is, chrome-molybdenum steel (grades 4140, 4150, 4340), and “stainless steel”, corrosion-resistant martensitic steel with a high content of chromium and some percentage of sulfur (grade 416).
Which one is better is an age-old question that can be answered in different ways. The advantages of stainless steel barrels include ease of care, their durability, accuracy, and low contamination by shot products (copper). According to gunsmiths, stainless steel barrels begin to shoot as accurately as possible immediately after running in, while “black” ones reach optimal accuracy gradually, sometimes after reaching 500-1000 shots.
At the same time, it is believed that with proper and regular care, the “black” barrel loses accuracy as it is fired more slowly, and the process of its deterioration will be gradual - removed from a match rifle, such a barrel can still be used for training or hunting
But stainless steel barrels “die” much more abruptly - sometimes right in the middle of an important match - and after that it is no longer possible to “revive” them
Statistics say that currently the vast majority of single-piece high-precision barrels are made from 416 stainless steel. At the same time, in mass arms production, predominantly “black” steel is used, since its processing methods make it possible to produce finished barrels much faster. Therefore, it is not surprising that a ready-made factory rifle is most often purchased with the original “black” barrel, and then a custom made stainless steel one is installed to replace it.
In any case, for safety reasons, the barrels of rifled weapons are hardened to a low hardness - no higher than 25-32 HRC - and during the manufacturing process they undergo a tempering procedure several times to relieve internal stresses in the workpiece caused by its machining.
Running in a new barrel.
Most of the rifles that have passed through my hands have shot and continue to shoot well, even those that I no longer own. They continue to shoot well because I wanted them to shoot well. I needed this because I am a hunter, and it is extremely important for me to have confidence in my weapon. But in order for the rifle to demonstrate its potential over time, it is important to properly break in the new barrel. After all, we are breaking in a new car: we drive in a gentle mode, regularly and more often change all sorts of fluids.
I would like to share with fellow hunters a fairly simple procedure for breaking in a new barrel. But the same procedure can be applied to a barrel with “wound kilometers”; it certainly won’t be any worse. Any barrel, be it virgin new or “polished” with several hundred bullets, will benefit from this run-in. Don't worry, friends, I didn't invent this procedure. I borrowed it from a very experienced rifle shooter, Jim Schultz, who has won multiple National Rifle Association (NRA) rifle competitions. He managed to achieve the title of "Outstanding Marksman" in the shortest period of time in US history. But I slightly changed some elements of his procedure for preparing the barrel for accurate shooting, and added a few things. Nowadays, weapon companies produce very accurate rifles, sometimes extremely accurate. And, typically, factory rifles have an accuracy potential that far exceeds the capabilities of their owners. But, as you know, you can’t sew a silk wallet from a pig’s ear. What I mean is that if the barrel is bad, then it is unlikely that it can be made to shoot at 1 arc minute. But a good quality barrel can be improved. This article focuses primarily on bolt-action rifles, but the procedure described can also be applied to other designs. Preliminary cleaning of the barrel Start by separating the barrel group from the stock. This must be done very carefully, using only the appropriate size screwdrivers, so as not to damage the screw heads. The separated barrel group must be placed in a special machine for cleaning long-barreled weapons, and it is very desirable that the barrel is located at a slight slope, that is, the barrel should point down. This first light cleaning is necessary to remove any remaining factory lubricant from the barrel and any fumes from test shots. Most manufacturers fire 3 test shots, and rarely clean the barrel after that. In addition to the cleaning machine, the following tools are needed: It is important to have a good one-piece cleaning rod of the correct length, preferably one with a Teflon or plastic coating and a bearing in the handle. Cleaning rods from Dewey, Remington and Kleen Bore have an excellent reputation among American shooters. Cleaning rods screwed together from several parts are good only as an emergency option, as they take up little space. But with serious cleaning at home, they can even be harmful. Under no circumstances should you use steel brushes; they must be bronze. I prefer to use brushes that are at least a smaller caliber. That is, if I have to clean the barrel for one of the 7 mm calibers (.280, 7 mm, .284), I take a brush designed for 6 mm. This allows me to wrap a couple of flannel-cotton patches (or “patches”) around the brush, allowing it to pass freely through the bore, or, conversely, tightly. Using a cleaning rod guide bushing will help prevent the cleaning rod from contacting the bullet entry and chamber surfaces. Since we are talking about cleaning a bolt-action rifle, the barrel must be cleaned from the breech, and not from the barrel crown (muzzle). If this is not possible (as, for example, with semi-automatic weapons), then to guide the cleaning rod (so that the cleaning rod does not touch the muzzle) you need to use some kind of funnel (made of copper or hard plastic). In a new barrel, after its test shooting at the factory, microscopic particles of metal and burning always remain. Cleaning a new barrel before serious testing at the range will help us remove all these unwanted elements, otherwise they will simply be driven into the surface of the bore. Since we separated the barrel assembly from the stock for this procedure, we can use cleaning agents liberally and do not have to be absolutely careful, which should not be allowed when the rifle is assembled. It is important to avoid chemicals from flowing into the spaces between the receiver and the stock, as this can cause serious damage to the wood. And damage to the stock never contributes to the accuracy of the weapon. To remove burnt and lubricant residues from the barrel, I usually use a well-proven and not very aggressive chemical called Hoppe's No. 9 (other chemicals of a similar type of action are quite suitable: Shooter's Choice, Break Free). I run several generously moistened patches through the trunk and let the solution “work” for a few minutes. Then I wipe the barrel dry with patches tightly wrapped around a brush. And now we come to the real cleaning. In general, I prefer to carry out all cleaning operations for my weapons in the kitchen, where there is a sink with water at hand (it is advisable to wash the brushes from time to time) and a trash can. So, my kettle is full of real boiling water (three liters). I hold the barrel group over the sink, placing the barrel itself on a sponge so that God forbid I damage the barrel crown. For the subsequent procedure, it is absolutely necessary to wrap a thick towel around the place where I hold the barrel with my left hand, since with my right hand I remove the kettle from the stove and slowly begin to pour boiling water into the breech. I also pour boiling water very generously over the entire bolt and trigger mechanism. Boiling water will remove all lubricants from the steel and open the pores of the metal (after all, when heated, everything expands), this is our main goal at this stage. Hot water helps get rid of any remaining dirty grease and also helps dry the metal almost instantly. During this hot bath, I pour dishwashing liquid into the barrel (I'm sure Fairy will do the trick here too), this helps loosen the oil from the surface of the barrel. After each liter of boiling water and one intermediate soap bath, I run a patch tightly wound on a brush through the trunk. You won’t believe your eyes how much dirt can be extracted from the trunk in this way. But she could have stayed inside! Well, after three or four liters of water, I begin the second stage of the process. Barrel Polishing For this part of the process I use one of two 10B vegetable based abrasives. If it is Rem Clean, then I first drain the excess oil from the tube (I do this before shaking the tube) to achieve the highest concentration of a soft abrasive substance. The second material is JB Cleaner paste, which is much thicker in consistency. Both of these abrasives are not capable of damaging the surface of the barrel, there is nothing to fear, they have been tested by many arrows for whom cleaning and finishing weapons have become a religion. So, now we begin the most important part of our process. So be patient and be careful, by the way, for this procedure it is not necessary to use a guide bushing for the cleaning rod. At least I prefer to do without it, I just need to be careful in my movements. Here, as with any other cleaning, you can use patches wound either on a visher or on a bronze brush. As I mentioned earlier, I prefer brushes one or two calibers smaller. After wrapping a dry, clean patch around the brush, I push the cleaning rod and brush from the breech until the brush appears about 4/5 of its width from the barrel. Then I start rubbing the polish into the fabric of the patch or squeezing it out of the tube (like Rem Clean). Once the entire surface of the patch is generously coated with polishing compound, I slowly and gradually begin to pull the cleaning rod into the barrel. Naturally, part of the polishing compound flows down, therefore, in order not to get scolded by your wife, I recommend placing some kind of vessel under the muzzle of the barrel. In this slow and even manner, I make ten movements in each direction, but without pulling the brush with the patch into the chamber. When I feel that the brush is approaching the bullet entrance of the chamber (before starting the procedure, measure the length of the barrel to the beginning of the chamber), I begin the reverse movement. The fact is that the first damage in the barrel usually appears in the neck of the chamber (in the bullet entrance), and I do not want to polish its surface even with the soft materials that I use. During uniform polishing broaches of the cleaning rod, I periodically remove the brush from the barrel and add polishing paste to the patch, thus the entire inner surface of the barrel is evenly polished. I assure you that another shock awaits you: the patches will come out very dirty. But if you really want to properly prepare your trunk for a long life, then this removed dirt should only make you happy. After all, otherwise it would all remain in the trunk. Between polishing operations, I wash the barrel with a patch soaked in one of the solutions mentioned above, and then wipe it with two or three dry patches. I usually perform three to five polishing operations (3-5 patches), which equates to 30-50 strokes of cleaning rod with polishing compound. After this, the trunk can be considered relatively clean, and I return to the kitchen sink, where I give my new trunk another hot bath with liquid soap. I wipe the barrel dry, and finally run a patch coated with good gun oil through the barrel. The internal surfaces of the receiver, including the chamber, are also wiped with one of the gun oils or an anti-corrosion compound. But you don’t need to overdo it, just lightly wipe all surfaces. While the barrel group is still separated from the stock, you can adjust the trigger pressure if you know how to do it, otherwise leave this operation to an experienced gunsmith. The trigger mechanism also needs to be well lubricated to prevent corrosion. Before assembly, I wipe all external surfaces of the barrel group with wax intended for polishing cars. The polishing operation carried out on the inner surface of the barrel removes residual elements of production processes and oils from the barrel. We polished out the pores and irregularities that are always present in the barrel as a result of the mechanical process of making the barrel. If we had not done this, then all these pores would be filled with copper from the bullet casing much faster, and copper plating of the barrel is the main reason for the loss of accuracy. The barrel is now ready for the next stage of proper break-in. Firing run-in And now you are at the shooting range. But you didn’t forget to take with you a cleaning machine and all other accessories: chemicals, cleaning rod, brushes, patches, etc., since today we also have to clean. But today we will finally shoot. For this first shoot, I usually bring to the range some leftover ammo of a given caliber from my stock that for some reason did not fit my other rifles chambered for that cartridge. If I do not have cartridges of this caliber, then I usually buy one box of the cheapest cartridges, loaded with a bullet with the smallest weight (light bullets are short bullets, that is, they have a shorter contact surface with the surface of the barrel). Before the first shot, it is necessary to remove the grease from the barrel. I wipe the chamber dry, then use one of the first solutions to wipe the inside of the barrel. Here you need to be careful and not allow chemicals to flow into the space between the butt and the receiver (an old, clean towel thrown over the butt at the very end of the receiver is simply irreplaceable). After that, using dry, tightly wound patches, I remove the remnants of all chemicals from the barrel. For the final wipe, I prefer to use grease-removing and very quickly evaporating aerosol products, they leave the barrel completely dry, but regular alcohol is also quite suitable for this. The next few shots can be combined with very rough zeroing. I try to ensure that these first shots are at least “on paper” at a distance of 50 meters. But that doesn't really matter. It is much more important to put a few kilometers on the barrel speedometer. I fire the first three shots. I remove carbon deposits using light chemicals. But now we must use “heavy” chemistry. This includes ammonia-based chemicals: Sweet's 7.62, Barnes CR-10 and some others. They are designed to remove copper from the barrel. A patch that is heavily wetted and loosely passes along the barrel is slowly and with several return movements driven through the barrel and removed at the muzzle. I give the chemical about ten minutes to react with the copper in the barrel. Then I wipe the barrel with dry, clean patches. Patches will come out of the barrel with traces of a blue-green substance, this is what we are fighting and will fight: copper deposited on the rifling and valleys of the barrel as a result of the passage of a bullet. It is advisable to repeat this operation several times until the patches begin to come out of the barrel clean. The dry wipe is followed by three more shots. And you already know well what follows three shots. My usual routine is three-shot groups followed by brushing. And so on for about 20 shots. Just don't despair, friends, just do what needs to be done. And in the end, your reward will be an accurate rifle, and, by the way, after break-in, the copper plating of its barrel will proceed much more slowly. And your friend, who was too lazy to do what you did, will be surprised at his mistakes and criticize his weapon. But let's continue. After firing the first 20 shots, I do a general and very thorough cleaning of the house, everything is at hand. After the first session at the range, before the actual shooting, I remove all the brass from the barrel. This is not a typo. I said: ALL. You can get very close to the ideal using the procedures described above, and sometimes even achieve it. But you can only be truly sure if you use the electrochemical method. This method will simply cause the copper to settle on the steel rod inserted into the barrel. For this purpose, there are two systems from Outers: Foul Out II and the more advanced and compact Foul Out III. The basic operating principle of this system can be formulated as reverse galvanization. But this is the topic of the next article. These first twenty shots and the subsequent ones required for final zeroing will help you properly prepare the barrel of your rifle for long and faithful service. A rifle broken in this way will shoot better and last longer than if it had not undergone this procedure. Maybe I was just lucky, but since I started using this barrel break-in procedure, I have seen it work every time on the range.
Gun master Mikhail Shukis
https://www.ohotniki.com/new/366.htm
When to clean your rifle
It is impossible to give an exact definition regarding the frequency of cleaning the barrel of an air rifle. This depends on many factors:
- quality of previous cleaning;
- power and type of rifle;
- bullets used;
- conditions of operation and storage of weapons.
For example, if the barrel was first hastily cleaned in the field, then loss of accuracy may occur after 50 shots, or may not occur at all. The more powerful the pneumatic, the more intensely it becomes dirty.
If cheap, low-quality and, moreover, unprepared bullets were used for shooting, then even a carefully maintained weapon will be enough for no more than 30-60 accurate shots. When operating pneumatics in difficult conditions (high humidity, dusty air), cleaning will also be required more frequently.
Advice from professionals
When cleaning weapons, it is permissible to use only those products that are intended for this purpose. The use of products for cars, watches and other mechanisms is prohibited. Be sure to follow the instructions given for each product.
The thing is that automobile and other substances were intended for completely different types of mechanisms. Therefore, their impact will be different than what the trunk needs. The chemistry included in their composition will be too aggressive for weapons. Therefore, the entire procedure aimed at keeping the trunk in good condition will only cause it harm.
General rules
Control shooting of rifled weapons is carried out in specially equipped rooms or shooting ranges in bullet traps. The equipment must provide a high-quality mark on each bullet and cartridge case. These traces are used in identification analysis.
The basis is the conclusion of the expert forensic unit of the Ministry of Internal Affairs for the republic, the Main Directorate of the Ministry of Internal Affairs of another region, the transport department/line management of the Ministry of Internal Affairs for railway, air, and water transport.
During the test shooting of firearms with a rifled barrel, the presence of unauthorized persons is not allowed.
What traces of a shot remain on obstacles?
Traces of a shot remain on the obstacles - displaying the effect of a shot from a firearm on the affected object in the form of mechanical damage to the material - the main traces of a shot, which can be penetrating or non-penetrating
. The first ones are formed by a projectile that has penetrated into an obstacle; they are divided into through and blind
(the bullet remains in the barrier), the second are
dents, tangential damage and ricochet marks
.
The results of the impact of various factors of a shot on an obstacle depend on the weapon system, ammunition, distance and order of the shot and, of course, on the characteristics of the obstacle itself. For example, the damage channel in sheet iron narrows as the projectile moves, and its diameter quite accurately matches the diameter of the bullet. When a sheet (window) glass is hit by a gunshot, the hole, on the contrary, expands as the bullet moves. The main and additional traces of a shot are most fully and qualitatively displayed on fabrics, suede, leather, felt and other similar objects.
Shot marks also include scorching of the object's material caused by the muzzle flash; introduction (deposition) of microscopic particles of shot products into the material of the object: on the hand of the shooter, this may be gunpowder residues, an abrasion between the index and thumb from the bolt moving back, when fired at close range - blood splashes, particles of the victim’s soft tissues. At close distances, the particles of the shot products form one or another configuration depending on the distance of the shot, the weapon and ammunition used, the structure of the weapon, and weather conditions at the time of the shot. Based on these deposits, a theory about the weapon used can be put forward, and the distance of the shot can be determined.
The impact of powder gases usually manifests itself at a shot distance of 2 to 15 cm. Deposition zone - deposition belt
- can have a different shape, up to a regular circle, consisting of unburned particles of gunpowder, drops of lubricant, and soot particles. A wiping band is visible in the center of the spot at the entrance hole
, a trace of contact between the surface of a bullet and the edges of the damage it created in clothing fabric, metal, wood, etc. It contains the metals that are part of the cladding of bullet shells, the core, the initiating composition of igniter capsules, lubricant and combustion products of the powder charge.
A point-blank shot is indicated by the so-called stamp mark
- imprint of the muzzle on the victim's body. The reason for its formation is that the gases from the shot penetrate into the soft tissues and press them from the inside to the muzzle.
Based on through, blind damage and traces of ricochet, the projectile's flight path is sighted to determine the location of the shooter. At short firing distances, when the bullet trajectory is almost straight, sighting can be done through a camera lens, a thread, a narrow beam of light or a laser.
CORRECT CLEANING AND CARE OF FIREARMS
CORRECT CLEANING AND CARE OF FIREARMS
The work of a gun barrel is hard. During a shot, high pressures develop in its channel, and the combustion products of gunpowder and primer composition are chemically aggressive and harmful to the metal from which the barrel is made. In addition, this creates solid products that spoil the polished surface of the bore.
The combustion products of the capsule composition are the most aggressive. For example, hot particles of potassium chloride combine with the metal surface of the barrel bore, as a result of which the steel in such places becomes fusible. The molten particles of this steel carry the powder gases outside; in their place, the barrel bore first loses its shine and becomes rough, and over time becomes covered with a rash, and then with small shells. This phenomenon is called trunk flaring. The height of the barrel is observed immediately after the bullet entry. But that is not all. Potassium chloride remaining on the surface of the bore hygroscopically “pulls” atmospheric moisture from the surrounding air. As a result, an electrochemical process of corroding the steel occurs, that is, intensive rusting of the barrel walls. These extremely undesirable phenomena are also accompanied by the effect of mercury in the capsule composition, which penetrates into the thickness of the metal, weakens the bonds between its particles and causes the appearance of microscopic cracks, thereby increasing the heat of the barrel.
Mechanical abrasion is the main cause of wear on non-chrome-plated gun barrels. Chrome-plated barrels with increased wear resistance fail mainly due to the strong heat of the barrel from the breech.
When a shot is fired under the influence of colossal pressures and high temperatures, the phenomenon of so-called occlusion occurs in the metal of the barrel bore (from the Latin occlusio - secrecy). It consists in the penetration of aggressive powder gases into the pores and microscopic cavities of the metal. When the walls of the barrel undergo elastic deformation, the pores of the metal expand, and hot gases under pressure penetrate deeply into them. After the shot, the barrel cools and, by the same elastic deformation, returns to its original volume, the pores decrease, and the absorbed gases are released from them gradually. The process of gas release from the metal ends after 3-5 days, and during this time the combustion products chemically act on the barrel metal, reducing its mechanical resistance to wear. The working surface of the barrel bore, weakened in this way, is more intensely actuated by friction when a bullet passes through it.
All of the above chemical processes in the barrel begin immediately after the shot and continue until the weapon is thoroughly cleaned.
Timely and proper cleaning and lubrication of the barrel bore and the entire weapon as a whole is the only way to preserve it for combat use for a long time.
The carbon deposits remaining in the bore after a shot have an acidic reaction. It is most fully neutralized by substances that have an alkaline reaction. Alkali and acid, as is known from chemistry courses, are mutually neutralized.
In stationary military conditions, the so-called RFC (weapon cleaning solution) is used to clean barrel bores and other parts of weapons exposed to powder gases.
RFS is prepared in the following composition:
- water suitable for drinking - 1l,
– ammonium carbonate – 200 g,
- potassium dichromate (chrompic) - 3-5 g.
The solution is prepared in the amount necessary to clean the weapon within one day. A small amount of solution can be stored for no more than 7 days in half-liter bottles, sealed with a stopper, in a dark place and away from heating devices. It is prohibited to pour RFC into oil cans.
The barrel bore is cleaned with a brush soaked in a solution, then the barrel bore is wiped with tow. Cleaning with the solution should continue until the carbon deposits are completely removed, that is, until a brush or tow moistened with the solution comes out of the barrel bore without signs of carbon deposits. Then wipe the bore with dry tow and then with a clean rag. The next day, check the quality of the cleaning performed and, if carbon deposits are found on it when wiping the barrel bore with a clean rag, clean again in the same order.
After cleaning the rifled part of the barrel bore, clean the chamber from the receiver side in the same order and clean the gas chamber, gas piston, gas regulator and other parts of the gas outlet unit (for automatic weapons) in the same order.
Attention: the RFS solution is the best means of neutralizing the combustion products of a combat charge and perfectly softens solid soot particles burnt to the metal. But it cannot be left on the surface of the weapon for a long time to avoid rust. After use, the remaining solution is carefully removed from the surfaces of the weapon. The weapon is wiped dry with a dry cloth, then the barrel bore, chamber, gas outlet parts, bolt, bolt frame and other surfaces are lubricated with any neutral weapon oil (the difference between neutral oil is that it does not smell like kerosene).
If there is no radiofrequency control, after firing, the barrel bore and all parts in contact with powder and capsule gases are lubricated with alkaline oil (it smells like kerosene) and left in this state for several minutes. Alkaline oil eats away carbon deposits quite well and neutralizes it. But alkaline oil also cannot be left on the surface of the weapon for a long time: the alkali it contains causes corrosion of the metal. After cleaning, the alkaline oil is carefully removed and the weapon is lubricated with neutral oil.
Ordinary kerosene cleans weapons very well. Kerosene has increased fluidity and therefore penetrates quite deeply into the pores of the metal. Kerosene has a strong alkaline reaction, so it quite easily neutralizes acidic combustion products and quickly “eats away” any carbon deposits, rust, and dirt. You can use ordinary kerosene, but it contains a small amount of water. To dehydrate kerosene, pour table salt, well-fried in a frying pan, into a bottle of kerosene (2 tablespoons of salt per 1 liter of kerosene), cap it and shake well. After two days, the dehydrated kerosene is poured from the sediment into another bottle and poured into oilers. Kerosene in an oil can can be carried with you in the field. Additionally, in winter conditions, kerosene works great as a winter lubricant.
Ordinary human saliva has a slightly alkaline composition and can be used to neutralize the acidic effect of combustion products of gunpowder and primer. In addition, it should be taken into account that the combustion products of a combat charge are more water-soluble than oil-soluble. Therefore, you will do the right thing if, immediately after shooting, you wipe the bore with a brush moistened with saliva. After a couple of minutes, wipe the barrel dry - you will see how much soot ends up on the brush and wiping tow. Of course, this cannot be done at sub-zero temperatures. In winter, it is better to clean weapons with the same kerosene.
In the old days, when there was no variety of special gun oils, rifles were cleaned with ordinary soapy water. Soap, as you know, has an alkaline reaction, and a brush moistened with a soap solution very well removes carbon deposits from the walls of the bore. Then, of course, the barrel needs to be wiped dry and lubricated with any mineral oil or lard.
In conditions of combat survival, when there is no gun oil, no soap, much less kerosene, instead of all this, gray ash from a fire is successfully used. It also has an alkaline reaction. Ash is applied to a wet brush or any rag. After cleaning, the barrel is immediately wiped dry and lubricated.
Proper cleaning will only be one that neutralizes the harmful chemical effects of occlusion (see above) of powder and capsule gases throughout the entire duration of their action until they finally leave the metal. The rifle should be cleaned as quickly as possible after shooting, even after just one shot. No amount of fatigue can be an excuse for putting off cleaning your gun until the next day. Cleaning is carried out in the following order: first, the barrel bore is wiped with a dry rag attached to a wiper. This removes a layer of soft carbon deposits. Then the barrel is rubbed with a hard fire, tightly wound on the rub and moistened with any alkaline composition from those described above. This is done to remove solid combustion products burnt to the metal. They are not removed with a soft cloth, but on the contrary, they are rubbed even deeper into the metal. Very well, almost ideally, special brass brushes are suitable for these purposes, also moistened with an alkaline composition, which perfectly remove not only solid particles of carbon deposits, but also layers of tombac from bullet casings that accumulate in the corners of the rifling grooves. It is under these envelopings and accumulations that the most intense rusting of the barrel metal occurs. Leave the alkaline composition in the barrel for a few minutes and then wipe the barrel bore with a clean dry rag. Using a brush, lubricate the bore with slightly alkaline oil (alkaline oil diluted 1:4) or neutral oil. If possible, plug the barrel with a plug and fill it with kerosene.
As already mentioned, the release of combustion products of a combat charge from the pores of the metal occurs over the course of A-6 days. The next day, repeat the cleaning - you will see how much smoke has “sweated” from the seemingly thoroughly cleaned trunk. Repeat the same the next day until all combustion products are neutralized, come out and are removed.
The process of gases being released from the pores of the metal occurs continuously, and these gases remain on the surface of the metal under a layer of oil and imperceptibly have a destructive effect in the future. Therefore, for almost a week after shooting, you will have to clean, clean and clean your weapon. And even if, a couple of weeks after such a thorough cleaning, you run a white cloth along the trunk, you will find traces of sweaty soot on it. If it is black, then it’s okay - this is a natural process of combustion products “sweating” from the metal. But if she's red, that's already bad. These are traces of rust. This means that you did not clean the weapon sufficiently immediately after shooting. Pick up a ramrod and start all over again. For these reasons, the military cleans weapons daily, whether they have been fired or not. Remember: immediately after cleaning the weapon, the barrel bore is lubricated with oil. If the weapon is to be cleaned the next day, a slightly alkaline lubricant may be used. If not, then the barrel bore is lubricated with neutral oil.
In a similar way, the chamber and all parts of the weapon that have had contact with the combustion products of the combat charge are cleaned and lubricated.
Pay special attention to cleaning the bolt cup. Capsule gases, which are more aggressive than powder gases, having broken through between the primer and the cartridge case, corrode the “circle” around the firing pin exit. If the deposits in this place are not removed and corrosion is not combated, not a circle appears, but a depression.
Thoroughly clean all working surfaces of parts of the gas vent assembly of automatic rifles. This place is very susceptible to rusting from the action of powder gases.
Non-chrome-plated bores of three-line rifles are very susceptible to rust. But the chrome-plated barrels of SVD rifles should be cleaned no less carefully: in “neglected” SVD barrels, sooner or later, chemical penetration of aggressive gases at the molecular level under the chrome coating occurs, invisible, extensive chemical processes hidden under the chrome develop, and the chrome coating suddenly begins to peel off, exposing rash-eaten, unprotected areas. Weapons cannot be launched. Even in combat conditions, snipers, at the slightest opportunity, wipe down barrels and carry out the necessary work to care for their weapons.
Do not immediately disassemble or clean weapons brought from frost into a warm room. After 20-30 minutes it will “sweat”, that is, it will become covered with droplets of condensed water vapor. Only after this the weapon is disassembled and wiped dry.
In the summer, during combat use, the weapon is wiped dry to avoid the adhesion of sand and dust. In autumn and spring, the weapon is lubricated with a thin layer of neutral oil.
In winter conditions, weapons begin to become sensitive to lubricant thickening. But it is necessary to lubricate the weapon for the reason that snowflakes and droplets of water stick to parts not covered with lubricant, and all this freezes to each other. Automation and moving parts stop working. Therefore, in winter, at very low temperatures (minus 30°C or more), the weapon in the joints of the moving parts is lubricated with kerosene (you can also use diesel fuel, but only with a very thin layer). This method has been tested in war.
When placing a weapon in long-term storage, after thorough cleaning, its metal parts are coated with a thin layer of neutral weapon oil. You cannot lubricate with a thick layer - the oil floats down under its own weight, collects in lumps, the metal is exposed and rusts. Do not use random or non-weapons oils for preserving weapons - liquid machine oils dry out quickly, liquid motor oils for automobiles contain sulfur, thick oils (solid oil) dry out and form a film under which the metal is not protected in any way. Never use vegetable oils - they thicken so much that the moving parts of the weapon stop moving.
Officially, the survivability of the barrels of three-line sniper rifles is 20 thousand shots, SVD rifles - 25 thousand shots. But with timely, competent care of the weapon, this resource can be doubled. One of the author’s friends, a taiga hunter, still shoots a three-line rifle made in 1912, which his grandfather and father used to shoot. Under any conditions, this taiga resident cleans and lubricates his rifle daily. There are signs of wear in the barrel, but there is no burn, no rash, much less shells. The firing of this run-in barrel is surprisingly accurate. When asked how many shots were fired from this weapon, the hunter replied:
“Nobody counted, but we shoot half a zinc every year.” (One zinc holds 440 rounds.)
How to properly clean rifled weapons
This procedure begins by removing particles of dirt from the surface of the rifle. For this purpose, wipes designed for cleaning the inside of the car are suitable. Wooden stocks will use wood wipes, and plastic stocks will use plastic wipes. They do an excellent job of cleaning weapons from external contaminants.
We must not forget to pay attention to the gap between the barrel and the forend in a bolt-action rifle. It is in this place that plant components and dust are often found
When the outside of the weapon has already been thoroughly cleaned, it is disassembled and the bolt and bolt box are cleaned.
You should definitely pay enough attention to the shutter mirrors; they need to be cleaned thoroughly. A regular toothbrush is often used for this purpose. To deal with this area, most often, oil is enough, but sometimes you cannot do without “heavy artillery” - solvents.
You can avoid purchasing expensive rifle wipes by replacing them with regular wipes from a hardware store. They are most often made of non-woven materials, do not have high prices and do an excellent job of absorbing oil.
Their main disadvantage is that they are difficult to clean a rough surface, as fibers remain on it.
Be sure to clean the gas pistons in the weapons that have them very well. They form carbon deposits that need to be removed using paste and sometimes steel wool.
At least once a year you need to set aside time to disassemble and clean the shutter. If you don’t have enough experience for this procedure, you should definitely contact someone who has it. As a rule, it is enough to observe the process once in order to master it and in the future not experience difficulties with assembling the bolt of a weapon.
MAKSIMOV.SU
On the splash screen: some of the tools and consumables
needed to polish the bore of a rifle
A2S GUN and CHISTOGUN products
can be purchased on the official website of the KVARTA company.
Manufacturer’s e-mail (Sergey or Alexander): Contact tel.: +7-987-832-54-19 (Sergey)
Preparation
a new rifle barrel is another stumbling block. High-precision shooters and advocates of proper weapon care are divided into two camps on this issue. Some are confident in the need for traditional “breaking in” of the barrel by shooting and tedious cleaning, others are confident that high-quality pre-polishing is sufficient.
In this
In this article we will talk specifically about polishing, which, while giving an excellent result, allows you to save a huge amount of time, and in some calibers, considerable money. I do not in any way claim to be orthodox about my point of view, but on my side there is numerous documented evidence of the effectiveness of this method, which will be given below.
More
One important point is the grinding in of the rifle's bolt group lugs.
This unit is essential for the stable combat of rifled weapons, so we will briefly touch on this issue. A properly prepared SV-98 rifle with a 7N1 gross cartridge shoots stably at 0.5 MOA
Polishing
a rifled barrel
That's all,
what happens to any weapon after its acquisition ages and reduces its resource. And only proper and timely care gives weapons a longer life.
Competently
The polishing of the new barrel allows you to avoid the tedious traditional “fire” break-in and greatly facilitates the shooter’s life in the future. Speaking in numbers, proper preparation and responsible cleaning of the barrel will extend its service life by 1.5-2 times. So there is an obvious meaning to these works. How to carry them out correctly - this will be discussed in our article.
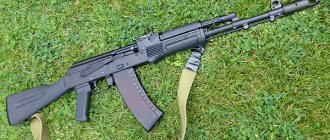
Polishing the barrel will not harm the SVD -
and the accuracy may improve and cleaning the rifle will become much easier.
For
To polish the barrel, red paste JB or Iosso Bore Cleaner is suitable. There are Russian analogues on sale, but they have not yet collected at least some statistics, so we will use proven consumables.
For
For work, we will need a high-quality cleaning rod from a well-known manufacturer. Of the foreign brands, we can safely recommend Dewey and Tipton; of the Russian brands, CHISTOGUN cleaning rods are becoming increasingly popular. In the September 2022 issue of MR, I already wrote about this manufacturer, whose cleaning rods are at least not inferior to famous brands with a twofold difference in price.
More
we will need
a needle adapter, felt patches
and oil, maybe Kano Kroil or any other with good penetrating properties. It is better to perform all manipulations on a machine or stand for cleaning weapons. The rifle must be securely secured. Before polishing a new barrel, you need to clean it after test shooting.
Eight pairs of felt patches
after polishing the “tired” and badly neglected barrel of a Mosin rifle. A total of 400 passes were made “back and forth”: 200 with blue paste and 200 with red paste.
Let's start work
Let's take it
needle adapter for felt patches, unscrew the nut, screw two felt patches onto the needle (if the second patch does not fit the length of the needle, it needs to be cut to the required size), tighten the nut. We soak the patches with a few drops of Kroil oil and apply the paste, lightly rubbing it into the surface of the felt.
Clean felt patches
threaded onto an adapter needle and prepared for use with JB blue paste
Now
insert the cleaning rod with the needle adapter and patches into the barrel and push. When the patches fit into the rifling, turn the cleaning rod by the rod clockwise, you need to make approximately 5-7 revolutions of the cleaning rod around its axis. This is necessary so that the patches fit more tightly in the trunk and do their job better. We make 50 passes along the barrel in both directions, for a total of 100 movements.
Very
It is important to prevent patches from coming out from the muzzle side. To do this, you can adapt a limiter board or make a mark on the back of the ramrod stem. Then we change the patches, paste and repeat the procedure. This needs to be done 4 times, i.e. make 200 reciprocating passes (cycles) along the barrel bore with paste. This will be 400 movements per circle.
Paste
applied to patches
After 50 passes along the trunk,
the patches turn black
Next
We put a nylon brush on the cleaning rod, moisten it with KanoKroil oil and make 5-10 passes along the barrel bore, also without the brush leaving the barrel bore from the muzzle side. We replace the brush with an adapter-needle and, alternating patches moistened with Kano Kroil oil and dry patches, clean out the remaining paste from the bore and chamber. As a result, the patches should come out clean. Don't forget about cleaning the chamber.
Example
selection of patches: in caliber 7.62 mm, .308 or 30-06, patches with a diameter of 8.5 mm are needed for the bore, and patches with a diameter of 9.5 mm and 12.5 mm are needed for the chamber.
Left: preparing patches for working with red JB paste
Right: this is what the patches look like after 50 passes along the barrel
For
To wash the paste out of the bore, you can also use more affordable means: kerosene, Galosh gasoline or VD-40. Experience shows that the bore is better wiped not with felt patches, but with flannel patches-napkins. Those. blow, for example, VD-40 into the barrel, moisten the patch napkin with it and push it through the barrel.
Polished barrel
with mesh flare
Then
push the dry napkin through and see if there are any traces of paste left on the napkin. If yes, then repeat the procedure. If not, then push a couple of felt patches or napkins with Kroil, and then wipe everything dry.
Don't forget
about cleaning the chamber after working with paste. Otherwise, its remains will definitely remain there, which will create a false picture when monitoring the cleanliness of the bore.
Polished barrel
of the new ORSIS T-5000 rifle
Results control
Let's go
at the shooting range, where we shoot several series or, for example, adjust the optical sight. At home we clean the rifle barrel using Butch's solvent and a bronze brush.
Our goal
– elimination of copper plating in the process of removing carbon deposits. Ideally, for such control you need a borescope, but you can get by with “folk” remedies using a dry patch 2 cm from the muzzle, a flashlight and breathing.
As an option -
using a solvent to remove copper plating to control the presence of copper in the barrel.
Finnish rifle Sako-85
( Model 85 Finnlight)
If
The copper still did not disappear during the process of removing carbon deposits, so we remove it with specialized solvents. Next, we repeat the process of polishing the barrel bore using the above method. This time we do 100 cycles. As a rule, this is enough for any “black” trunk. Chrome-plated barrels may require more passes to obtain a more or less high-quality polish.
This
It's labor-intensive work, but it brings wonderful results. For example, after polishing the chrome-plated bore of all my conversion carbines, cleaning the barrel of one weapon to “zero” began to take no more than 20 minutes. For those who clean barrels for several hours at a time, this is a good reason to think about it.
Rifle
CZ-550 Synthetic
About the benefits of pasta
Pasta
can and should be used during routine cleaning of the rifle. This is done to remove solid deposits in the bore - carbon.
Usually pasta
applied after every 100-150 shots in semi-automatic rifles and after every 30-50 shots in bolt-action rifles. Benchresters at competitions use the paste after every 10-20 shots, but for our purposes this is too much.
Apply paste
to patches
Scheme
The use of paste for cleaning is the same as for polishing. Only here it is enough to make 30-70 passes after cleaning the barrel with solvents, and then remove the paste from the barrel.
During work
using a cleaning rod, do not forget to regularly wipe its stem with a rag or paper towels to remove chemical residues and soot particles raised by the brush. Otherwise, you'll be rubbing corrosive dirt all over your rifle, hands, and clothing.
Blackening of the paste
after working in the bore.
Be careful with pneumatics!
Will not
It’s superfluous to remember that the barrels of small-caliber and air rifles are also polished. The barrels of these weapons are usually made of softer steel, so you need to be very careful here.
When
With inexpensive pneumatics, which most often use barrels made of cheap steel, it is better not to mess with polishing at all - the risk of “screwing up” the barrel is too high.
PCP air rifle
ATAMAN M2
Rifle preparation:
methods and documentary examples
Successful
I will give several examples of the preparation of rifled weapons. Let's start with the brand new ORSIS T-5000 rifle in .308 caliber, which was purchased for training and competitive shooting.
At first
The barrel was pre-cleaned using Butch's Bore Shine solvent, Sweet's 7.62 copper reducer and Kano Kroil high penetrating oil. Then Iosso Bore Cleaner paste was used, a total of 200 passes were made.
Results:
after 100 shots (in training, in 1 day), the barrel bore is cleaned of carbon deposits and copper using a solvent in 80 passes with a bronze brush for 10 minutes. Those. all the copper was gone at the stage of removing carbon deposits. Carbon, i.e. hard deposits in the barrel, removed using Brownells JB blue cleaning paste in 30 passes with CLEAN GUN felt patches.
To work
the pasta took 20 minutes. The weapon was cleaned 1 day after shooting. This rifle, with the selected cartridge, ultimately showed extreme accuracy of 0.15 MOA.
Remington-700
rifle Next time,
after 55 shots of one in training, the bore was cleared of carbon deposits and copper in 10 minutes in 80 passes with a bronze brush. The copper disappeared again during the carbon removal stage. Carbon was removed using paste in 30 passes with felt patches in 20 minutes.
Rifle
I cleaned myself 3 days after the shooting. Cleaning this specimen after all further firing of 70-130 rounds at a time was achieved with the same success. The results at various stages of cleaning were checked using an optical borescope.
Another example:
new Blaser R8 rifle, with three barrels: .243, .30-06, 300WM. All barrels were cleaned and polished with paste. Results: after 3 shots from each caliber (test, 1 day), the barrel bores were cleared of carbon deposits and copper in 7 minutes each in 40 passes with a bronze brush - the copper was gone at the stage of removing carbon deposits. No carbon deposits were found in the barrel after cleaning with an optical borescope. The barrels were cleaned within an hour after shooting.
Remington-700 rifle
Rifle
Remington 700 SPS Varmint, .308 caliber. In operation for 2 years. Fired - 230 shots. During testing, 5 shots were fired, cleaning was carried out 3 hours after shooting. Universal oil "Neva" was used, with which 80 passes were made with a bronze brush. Result: carbon deposits and copper have been removed, the copper is gone during the carbon deposit removal stage.
Same
Remington. 5 shots fired. The weapon was serviced 3 days after the shooting. For cleaning we used: universal oil “Neva”, universal oil Break Free CLP-12, oil with high penetrating ability Kano Kroil.
It was done
80 passes with a bronze brush with these oils, one at a time. The result is that carbon deposits are removed after using the Neva. The copper remained in the barrel. After using the other oils, the copper also did not go away, although all manufacturers claim that their oils remove copper along with carbon deposits.
Copper
was eliminated after 30 passes with Butch's Solvent. The results of the cleaning steps were checked using a borescope. Conclusion - Neva universal oil works well only on “fresh” soot and copper. If cleaning is done with such oils not on the day of shooting, then there is a high probability that copper will remain in the barrel.
For truly accurate complexes,
barrel polishing is a mandatory procedure
Another
a good example: the Tikka T3 Varmint Stainless rifle in 6.5×55 SE caliber. Fired by the previous owner - about 2 thousand shots. The current owner of the weapon has fired another 1,000 rounds of ammunition from it. The previous owner did not indulge Tikka with attention at all. Before polishing the bore, 4-5 hours of time were spent cleaning the rifle (after 100 shots in one training day). However, the rifle was never completely cleaned.
The words
desperate owner, the “blue” remained on the control patches even after noon of cleaning. The rifle chamber was almost never cleaned at all, only occasionally wiped. On the shutter mirror, under a layer of carbon deposits around the firing pin, shells have already appeared. After polishing the barrel bore using the method discussed above, the cleaning time was reduced to 1.5-2 hours (from 60 to 120 shots were fired during one training session). At the same time, the rifle was already thoroughly cleaned, with the copper completely removed from the heat.
In some
during this period, the cleaning of this “Tikki” after training days by the owner was carried out incompletely - only 80 passes with a bronze brush with Butch’s solvent, plus cleaning the chamber and bolt. Those. neither copper nor carbon was completely removed. When the firing without major cleaning exceeded 500 rounds and unpredictable “breaks” appeared in the shooting, it was decided to carry out a complete cleaning.
MTs-19-09
in caliber 9.3x64
Nastrel
rifles by this time had already reached almost three thousand. Let's take into account that the height of the trunk with such indicators is already decent. During cleaning, carbon deposits and surface copper plating were removed in 80 passes with a bronze brush and Butch's solvent. Next, felt patches with JB cleaning paste were used to remove the carbon in 50 passes.
For elimination
carbon from the heat in the barrel, another 20 passes were made with a nylon brush with the same paste. Then 8 cycles of 7 minutes were done with Sweet's 7.62 solvent to remove copper from the heat. The total cleaning time was 2.5 hours.
For everyone
rifles, cleaning the chamber takes approximately 5-7 minutes. As noted above, this procedure will require felt patches of two diameters. Several patches of each size are required.
First couple of patches
moisten it with any oil (the best option is Kroil) and thoroughly clean the chamber, then wipe it dry. Of course, if the chamber has never been cleaned correctly, it will take more time and consumables.
On this
The story about the method of polishing and cleaning neglected trunks is finished. Perhaps I missed something, but it is unlikely to be important. These methods are reliable in terms of effectiveness and have been tested many times. All this really works on any rifled weapon, regardless of its cost and specialization.
Good rifle barrel mod.
1891/30 after polishing it gives a noticeable improvement in accuracy, and the time for cleaning it is reduced several times
Grinding in
the bolt group
This operation
sometimes relevant even for expensive rifles from well-known manufacturers. But with one caveat - you can take on this task only when modifying a rifle with two lugs. And you need to understand that all these manipulations, if overzealous, threaten to increase the mirror gap.
With a problem
I once encountered the need to grind in the lugs on my three-line KO91/30M. The production M-ke uses a newly manufactured barrel: thick, with a sporty contour.
For some reason
For some reason, the craftsmen squandered the dimensions (twisted the barrel), which is why the mirror gap went into minus. The bolt with a cartridge in the chamber stopped closing. The assembler did not hesitate and used sandpaper (!) to remove the excess metal on the locking lugs of the bolt body.
Necessary
to say that he did it professionally - the locking remained two-way. But due to the coarse abrasive, the contact area between the protrusions of the cylinder head and the stops of the receiver became depressingly small. It was necessary to grind in with an eye to the specular gap standards.
MP-18MN
in .308 caliber
Diamond
pastes in the practice of processing the internal surfaces of weapon parts are evil. We need another abrasive that can be easily washed out of all grooves. One of the proven options is the DoneDeal abrasive paste for grinding metals, which contains silicon carbide instead of diamond.
In our case
you need to put a spent cartridge case into the chamber, apply a little paste on the stop surfaces, insert a strong long cleaning rod from the muzzle of the barrel and, resting the cleaning rod handle against the wall with moderate force, make about 100-150 cycles of opening and closing the bolt.
Loaded
the cleaning rod will provide the required force during grinding. Then remove the paste from the bolt stops and receiver with a cloth moistened with acetone. Next, we smoke or tint the polished surfaces of the cylinder with a marker and, with the cartridge case in the chamber, open and close the bolt a couple of times.
Result
will be visible immediately. It is necessary to achieve at least 70-80% fit of the stops on each side. In most cases, this gives a stable improvement in accuracy. A regular marker is great for quality control of work performed.
After
When cleaning your weapon, remember to thoroughly wash your hands, clean your tools, and meticulously clean your work area. Weapons "chemistry", regardless of the country of production, in the biological sense is not so harmless.
Polishing the barrels of historical rifles
not only improves their performance, in good condition longer.
Conclusion
In this
In this article we looked at one of the methods for preparing the bore of a new rifle. This issue is debatable. But this method, in the development of which professionals and leading Russian manufacturers of specialized products participated, works 100%.
Polished
Thus, the barrels of new rifles of various calibers have been “running” for more than one thousand shots, delighting owners with high accuracy and easy cleaning.
Small caliber rifle
CZ-452
The article was published
in the magazine “Master-Gun”, April 2022, No. 4 (265)
Chamber
Before moving directly to the barrel, they always clean the chamber of a rifled weapon. Dirt rarely accumulates in it, but sometimes when using steel cases with “dirty” gunpowder this happens.
If the charges were domestically produced, then they were probably sealed with varnish. For this reason, particles of this substance end up in the chamber. Therefore, it is extremely necessary to clean it. To do this, use enlarged brushes. Clean the chamber by making circular movements in the amount of 15-20 cycles. Once the initial cleaning is completed, you can move on to cleaning the barrel.
Drilling and honing
If you've ever tried to make a deep and perfectly straight hole in something using a drill, you probably understand how difficult it is. Of course, the barrel business uses its own methods. It is usually the barrel that rotates, not the drill, which here is more like a carbide cutter. The drilling process is carried out at low speed, and one workpiece takes about half an hour.
Machine for drilling barrel blanks
Drilling and forming rifling in the bore is a special process, and special equipment and specific machines are used here that are not used in other types of weapons work. This is one of the reasons why barrel manufacturers are often independent from the finished gun manufacturers and specialize only in barrels and nothing else.
Blank
The drill leaves characteristic marks - but in order for the rifled barrel to come out well, its channel, even before the formation of the rifling, must be perfectly round and even, and also have absolutely the same diameter along its entire length. Therefore, the bore of the barrel is not just drilled, but subsequently also machined with a reamer and ground, and sometimes additionally honed for maximum surface uniformity.
How close you can get to the standard depends on the tools and skill of the operator, as well as the quality and uniformity of the steel in the workpiece - after all, small local changes in hardness are quite capable of affecting the progress of the drill or reamer. As a result, inclusions and flaws in the steel may turn out to be areas where the bullet will “stumble” during acceleration, or even be partially deformed by its shell. Of course, this will negatively affect accuracy.
The first machines for forming rifling in the bore using the planing method were quite primitive
By the way, it is the design of the reamer and the technology for its use after drilling that is usually one of the most important “know-how” of each barrel manufacturer
After all, it is also very important to get the same bore diameter from the chamber to the muzzle. If on the muzzle side the diameter turns out to be even the slightest bit larger, then again there will not be the desired accuracy
But a looser barrel on the chamber side, on the contrary, is quite acceptable.
All these nuances are verified in production using special instruments - bore gauges and air sensors. It is extremely difficult to check this on your own when choosing a finished rifle, and people’s favorite method of measuring the barrel with calibers is relevant only for worn-out military weapons, since it can only diagnose changes in the diameter of the barrel based on the rifling fields. And this is only half the battle.
Polishing the rifled barrel and grinding in the lugs
20.04.2019
Preparing a new rifle barrel is another stumbling block. High-precision shooters and advocates of proper weapon care are divided into two camps on this issue. Some are confident in the need for traditional “breaking in” of the barrel by shooting and tedious cleaning, others are confident that high-quality pre-polishing is sufficient. In this article we will talk specifically about polishing, which, while giving an excellent result, allows you to save a huge amount of time, and in some calibers, considerable money. I do not in any way claim to be orthodox about my point of view, but on my side there is numerous documented evidence of the effectiveness of this method, which will be given below.
Another important point is the grinding in of the rifle bolt group lugs. This unit is essential for the stable combat of rifled weapons, so we will briefly touch on this issue.
Polishing a rifled barrel
Everything that happens to any weapon after its acquisition ages and reduces its resource. And only proper and timely care gives weapons a longer life.
Proper polishing of a new barrel allows you to avoid the tedious traditional “fire” break-in and greatly facilitates the shooter’s life in the future. Speaking in numbers, proper preparation and responsible cleaning of the barrel will extend its service life by 1.5-2 times. So there is an obvious meaning to these works. How to carry them out correctly - this will be discussed in our article.
To polish the barrel, we use red JB paste or losso Bore Cleaner. There are Russian analogues on sale, but they have not yet collected at least some statistics, so we will use proven consumables.
To work, we need a high-quality cleaning rod from a reputable manufacturer. Among foreign brands, we can safely recommend Dewey and Tipton; among Russian brands, CHITOGUN cleaning rods are gaining increasing popularity. In the September 2022 issue of MR, I already wrote about this manufacturer, whose cleaning rods are at least not inferior to famous brands with a twofold difference in price. We also need a needle adapter, felt patches and oil, maybe Kroil Capo or any other with good penetrating properties. It is better to perform all manipulations on a machine or stand for cleaning weapons. The rifle must be securely secured. Before polishing a new barrel, you need to clean it after test shooting.
Let's start work
Take a needle adapter for felt patches, unscrew the nut, screw two felt patches onto the needle (if the second patch does not fit the length of the needle, it needs to be cut to the required size), tighten the nut. We soak the patches with a few drops of Kroil oil and apply the paste, lightly rubbing it into the surface of the felt.
Now we insert the cleaning rod with the needle adapter and patches into the barrel and push. When the patches fit into the rifling, turn the cleaning rod by the rod clockwise, you need to make approximately 5-7 revolutions of the cleaning rod around its axis. This is necessary so that the patches fit more tightly in the trunk and do their job better. We make 50 passes along the barrel in both directions, for a total of 100 movements. It is very important to prevent patches from coming out from the muzzle side. To do this, you can adapt a limiter board or make a mark on the back of the ramrod stem. Then we change the patches, paste and repeat the procedure. This needs to be done 4 times, that is, make 200 reciprocating passes (cycles) along the barrel bore with paste. This will be 400 movements per circle.
Next, we put a nylon brush on the cleaning rod, moisten it with KanoKroil oil and make 5-10 passes along the barrel bore, also without the brush leaving the barrel bore from the muzzle side. We replace the brush with an adapter-needle and, alternating patches moistened with Kano Kroil oil and dry patches, clean out the remaining paste from the bore and chamber. As a result, the patches should come out clean. Don't forget about cleaning the chamber. Example of patch selection: in 7.62mm, .308 or 30-06 caliber, the bore requires 8.5mm patches, and the chamber requires 9.5mm and 12.5mm patches.
To wash the paste out of the bore, you can also use more affordable means: kerosene, Galosh gasoline or VD-40. Experience shows that the barrel bore is better wiped not with felt patches, but with flannel patches-napkins. Those. blow, for example, VD-40 into the barrel, moisten the patch napkin with it and push it through the barrel. Then we push the dry napkin through and see if there are any traces of paste on the napkin. If yes, then repeat the procedure. If not, then push a couple of felt patches or napkins with Kroil, and then wipe everything dry. Don't forget to clean the chamber after working with the paste. Otherwise, its remains will definitely remain there, which will create a false picture when monitoring the cleanliness of the bore.
Results control
We go to the shooting range, where we shoot several series or, for example, adjust the optical sight. At home we clean the rifle barrel using Butch's solvent and a bronze brush. Our goal is to eliminate copper deposits during the decarbonization process. Ideally, for such control you need a borescope, but you can get by with “folk” remedies using a dry patch 2 cm from the muzzle, a flashlight and breathing. An alternative is to use a solvent to remove copper plating in order to control the presence of copper in the barrel.
If the copper still does not disappear during the process of removing carbon deposits, we remove it with specialized solvents. Next, we repeat the process of polishing the barrel bore using the above method. This time we do 100 cycles. As a rule, this is enough for any “black” trunk. Chrome-plated barrels may require more passes to obtain a more or less high-quality polish.
This is labor-intensive work, but it brings wonderful results. For example, after polishing the chrome-plated bore of all my conversion carbines, cleaning the barrel of one weapon to “zero” began to take no more than 20 minutes. For those who clean barrels for several hours at a time, this is a good reason to think about it.
0 benefits of pasta
The paste can and should be used during routine cleaning of the rifle. This is done to remove solid deposits in the bore - carbon. Typically, the paste is applied after every 100-150 shots in semi-automatic rifles and after every 30-50 shots in bolt-action rifles. Benchers at competitions use the paste after every 10-20 shots, but for our purposes this is too much.
The procedure for using paste for cleaning is the same as for polishing. Only here it is enough to make 30-70 passes after cleaning the barrel with solvents, and then remove the paste from the barrel. While working with a cleaning rod, do not forget to regularly wipe its stem with a rag or paper towels to remove chemical residues and soot particles raised by the brush. Otherwise, you'll be rubbing corrosive dirt all over your rifle, hands, and clothing.
Be careful with pneumatic guns!
It would not be amiss to remember that the barrels of small-caliber and air rifles are also polished. The barrels of these weapons are usually made of softer steel, so you need to be very careful here. In the case of inexpensive pneumatics, which most often use barrels made of cheap steel, it is better not to mess with polishing at all - the risk of “screwing up” the barrel is too high.
Preparing a rifle: techniques and documentary examples
I will give several examples of successful preparation of rifled weapons. Let's start with the brand new ORSTS T-5000 rifle in .308 caliber, which was purchased for training and competitive shooting.
First, the barrel was pre-cleaned using Butch's Bore Shine solvent, Sweet's 7.62 copper reducer and Kano Kroil high penetrating oil. Then Iosso Bore Cleaner paste was used, a total of 200 passes were made.
Results: after 100 shots (in training, in 1 day), the barrel bore was cleaned of carbon deposits and copper using a solvent in 80 passes with a bronze brush for 10 minutes. Those. all the copper was gone at the stage of removing carbon deposits. Carbon, i.e. hard deposits in the barrel, removed using Brownells J-B blue cleaning paste in 30 passes with CLEAN GUN felt patches. It took 20 minutes to work with the paste. The weapon was cleaned 1 day after shooting. This rifle, with the selected cartridge, ultimately showed extreme accuracy of 0.15 MOA.
The next time, after 55 shots in one training session, the barrel bore was cleared of carbon deposits and copper in 10 minutes in 80 passes with a bronze brush. The copper disappeared again during the carbon removal stage. Carbon was removed using paste in 30 passes with felt patches in 20 minutes. The rifle was cleaned 3 days after shooting. Cleaning this specimen after all further firing of 70-130 rounds at a time was achieved with the same success. The results at various stages of cleaning were checked using an optical borescope.
Another example: the new Blaser R8 rifle, with three barrels: .243, .30-06, 300WM. All barrels were cleaned and polished with paste. Results: after 3 shots from each caliber (test, 1 day), the barrel bores were cleared of carbon deposits and copper in 7 minutes each in 40 passes with a bronze brush - the copper was gone at the stage of removing carbon deposits.
No carbon deposits were found in the barrel after cleaning with an optical borescope. The barrels were cleaned within an hour after shooting.
Remington 700 SPS Varmint rifle, .308 caliber. In operation for 2 years. Fired - 230 shots. During testing, 5 shots were fired, cleaning was carried out 3 hours after shooting. Universal oil "Neva" was used, with which 80 passes were made with a bronze brush. Result: carbon deposits and copper have been removed, the copper is gone during the carbon deposit removal stage.
Same Remington. 5 shots fired. The weapon was serviced 3 days after the shooting. For cleaning we used: universal oil “Neva”, universal oil Break Free CLP-12, oil with high penetrating ability Kano Kroil. 80 passes were made with a bronze brush with these oils, one at a time. The result is that carbon deposits are removed after using the Neva. The copper remained in the barrel. After using the other oils, the copper also did not go away, although all manufacturers claim that their oils remove copper along with carbon deposits. The copper was removed after 30 passes with Butch's Solvent. The results of the cleaning steps were checked using a borescope. Conclusion - Neva universal oil works well only on “fresh” soot and copper. If cleaning is done with such oils not on the day of shooting, then there is a high probability that copper will remain in the barrel.
Another clear example: the Tikka TZ Varmint Stainless rifle in 6.5×55 SE caliber. Fired by the previous owner - about 2 thousand shots. The current owner of the weapon has fired another 1,000 rounds of ammunition from it. The previous owner did not indulge Tikka with attention at all. Before polishing the bore, 4-5 hours of time were spent cleaning the rifle (after 100 shots in one training day). However, the rifle was never completely cleaned. According to the desperate owner, the “blue” remained on the control patches even after noon of cleaning. The rifle chamber was almost never cleaned at all, only occasionally wiped. On the shutter mirror, under a layer of carbon deposits around the firing pin, shells have already appeared. After polishing the barrel bore using the method discussed above, the cleaning time was reduced to 1.5-2 hours (from 60 to 120 shots were fired during one training session). At the same time, the rifle was already thoroughly cleaned, with the copper completely removed from the heat.
At some point, the cleaning of this Tikki after training days was carried out incompletely by the owner - only 80 passes with a bronze brush with Butch's solvent, plus cleaning the chamber and bolt. Those. neither copper nor carbon was completely removed. When the firing without major cleaning exceeded 500 rounds and unpredictable “breaks” appeared in the shooting, it was decided to carry out a complete cleaning.
The rifle's rounds by this time had already reached almost three thousand. Let's take into account that the height of the trunk with such indicators is already decent. During cleaning, carbon deposits and surface copper plating were removed in 80 passes with a bronze brush and Butch's solvent. Next, felt patches with JB cleaning paste were used to remove the carbon in 50 passes. To remove carbon from the heat in the barrel, another 20 passes were made with a nylon brush with the same paste. Then 8 cycles of 7 minutes were done with Sweet's 7.62 solvent to remove copper from the heat. The total cleaning time was 2.5 hours.
On all rifles, cleaning the chamber takes approximately 5-7 minutes. As noted above, this procedure will require felt patches of two diameters. Several patches of each size are required. We moisten the first couple of patches with any oil (the best option is Kroil) and thoroughly clean the chamber, after which we wipe it dry. Of course, if the chamber has never been cleaned correctly, it will take more time and consumables.
This concludes the story about the method of polishing and cleaning neglected trunks. Perhaps I missed something, but it is unlikely to be important. These methods are reliable in terms of effectiveness and have been tested many times. All this really works on any rifled weapon, regardless of its cost and specialization.
Grinding in the bolt group lugs
This operation is sometimes relevant even for expensive rifles from well-known manufacturers. But with one caveat - you can take on this task only when modifying a rifle with two lugs. And you need to understand that all these manipulations, if overzealous, threaten to increase the mirror gap.
I once encountered the problem of having to grind in the lugs on my three-line KO91/30M. The production M-ka uses a newly manufactured barrel: thick, with a sporty contour. For some reason, the craftsmen squandered the dimensions (twisted the barrel), which is why the mirror gap went into minus. The bolt with a cartridge in the chamber stopped closing. The assembler did not hesitate and used sandpaper (!) to remove the excess metal on the locking lugs of the bolt body. I must say that he did it professionally - the locking remained double-sided. But due to the coarse abrasive, the contact area between the protrusions of the cylinder head and the stops of the receiver became depressingly small. It was necessary to grind in with an eye to the specular gap standards.
Diamond pastes are evil in the practice of processing the internal surfaces of weapon parts. We need another abrasive that can be easily washed out of all grooves. One of the proven options is the DoneDeal abrasive paste for grinding metals, which contains silicon carbide instead of diamond. In our case, you need to put a spent cartridge case into the chamber, apply a little paste on the stop surfaces, insert a strong long ramrod from the muzzle of the barrel and, resting the ramrod handle against the wall with moderate force, make about 100-150 cycles of opening and closing the bolt.
A loaded cleaning rod will provide the required force during grinding. Then use a cloth moistened with acetone to remove the paste from the bolt stops and receiver. Next, we smoke or tint the polished surfaces of the cylinder with a marker and, with the cartridge case in the chamber, open and close the bolt a couple of times. The result will be visible immediately. It is necessary to achieve at least 70-80% fit of the stops on each side. In most cases, this gives a stable improvement in accuracy. A regular marker is great for quality control of work performed.
After cleaning your weapon, be sure to thoroughly wash your hands, clean your tools, and meticulously clean your work area. Weapons "chemistry", regardless of the country of production, in the biological sense is not so harmless.
Conclusion
In this article we looked at one of the methods for preparing the bore of a new rifle. This issue is debatable. But this method, in the development of which professionals and leading Russian manufacturers of specialized products participated, works 100%. The barrels of new rifles of various calibers polished in this way have been “running” for more than one thousand shots, delighting owners with high accuracy and easy cleaning.
Process Features
Of course, the fascination of the process of cleaning rifled weapons cannot be compared with the sensations that a person experiences during shooting. If the components necessary for high-quality cleaning have been collected, the procedure can become very entertaining. A variety of technologies have greatly improved the process. Nowadays, new means for cleaning rifled weapons have appeared. Their proper use helps to extend the service life of the rifle, as well as restore lost shooting accuracy.
Such beneficial effects occur when a person removes excessive copper or lead plating from the trunk. These negative processes most often occur in small caliber rifles. Often, after cleaning the barrel of a rifle, it turns out that it has already suffered from corrosion, and now no oil can prevent this harmful process
Therefore, it is worth paying attention to the care of your weapon. Running in a barrel can serve a person well
It makes cleaning your rifle a simple process throughout its life.
Cleaning process
Cleaning and lubricating the barrel is mandatory for any rifle at intervals that are determined individually according to the objective rule described above.
The process is carried out according to the following algorithm:
- Rough cleaning.
- Basic cleaning.
- Wiping.
- Lubrication.
To roughly clean the barrel of lead deposits, you will need a cleaning rod with an attachment in the form of a brush with brass bristles. Having previously moistened it with acetone, the ramrod must be inserted into the barrel from the breech side and moved along the barrel in a reciprocating motion. In this case, the brush must not be allowed to come out from the back side (to avoid damaging the cut of the muzzle of the barrel). If the design of the rifle does not allow this procedure to be performed from the breech side, then the brush is inserted into the muzzle of the barrel, but very carefully.
Modern methods for cleaning rifle barrels
Cleaning a weapon is not an idle question for any shooter, be it a hunter, an athlete, a sniper or just an amateur. At the same time, there are a great many recipes for “correct” cleaning, and this topic is the reason for writing more and more new articles and heated debates. Despite the variety of existing methods and recommendations, it seems possible to highlight some general tips for cleaning weapons. In addition, with the gradual increase in popularity on the Russian market of both new imported models of high-precision rifled weapons and various chemical care products, the appearance of an article devoted to methods for cleaning rifled barrels in the West seems very timely.
When firing from a rifle, as a result of the shot, both combustion products of gunpowder and the cartridge primer (carbon deposits) and sedimentation of bullet shell particles (copper plating) occur in the barrel as a result of the shot. It is immediately necessary to make a reservation that we will limit ourselves to primarily considering firing a bullet with a copper jacket and a non-corrosive primer from a non-chrome-plated barrel. Cleaning the barrel for other options (steel-jacketed bullets, lead bullets, chrome-plated barrels, etc.) does not differ significantly from the option under consideration, although some differences, of course, cannot be forgotten.
It is advisable to clean the rifle after finishing shooting, if possible without delaying it for too long. Despite the fact that modern Boxer primers do not emit corrosive products during the firing process, when shooting Russian-made cartridges or military surplus cartridges, in the vast majority of cases you will encounter corrosive Berdan primers. In addition, experience shows that in good weather, spending an extra half hour at the shooting range cleaning a rifle is much more pleasant than doing it at home, often in a poorly equipped room with insufficient ventilation.
Accessories
To clean the barrel of a rifle, it is advisable to acquire the following accessories:
— A good cleaning rod, suitable for the caliber of the rifle. It is desirable that the cleaning rod be one-piece, with a plastic coating and a bearing in the handle. Dewey is considered the quality standard in the American sports shooting community, although there are analogues from other manufacturers.
Rice. 1. Various accessories and chemicals for cleaning the barrel
— Visher, suitable for the caliber of the rifle (usually supplied complete with a cleaning rod).
— Bronze brush, rifle caliber. As a rule, with proper regular care of the trunk, there is no need to use a brush. Moreover, cleaning chemicals can interact with the brush material itself, and the use of steel brushes in high quality barrels is highly undesirable.
— Cotton flannel patches for cleaning the barrel (hereinafter referred to as “patches”). It is desirable that the size of the patches correspond to the caliber in such a way that when pushing the patch along the barrel, it passes under tension, that is, the force on the ramrod is felt, but is not excessive.
— Guide bushing for cleaning rod, suitable for rifle bolt group. When cleaning the barrel with patches, bending the cleaning rod can lead to unwanted contact of the cleaning rod with the surface of the chamber or bullet entrance, which can have an extremely negative impact on the accuracy of the rifle. If possible, cleaning the rifle should be done from the breech - the quality of processing of the muzzle significantly affects the accuracy of the combat, so any contact with the muzzle is extremely undesirable. This is why, in addition to cleaning from the breech, it is recommended to push the patch along the barrel in one direction only, and to be extremely careful when pulling the cleaning rod back into the barrel from the muzzle. In cases where the design of the rifle does not allow cleaning the barrel from the breech (some semi-automatic models), it is strongly recommended to use a special cap to protect the muzzle from possible contact with the cleaning rod.
Rice. 2. Guide sleeve
— Soot remover. Hoppe's No.9 Bore Cleaner (the choice of reconnaissance snipers of the US Marine Corps) has proven itself well; other brands include Kroil, Break-Free, and Shooter's Choice.
— Copper remover. These cleaners can be divided into two groups - weak alkaline (a typical example is Hoppe's Benchrest Copper Remover) and strong ammonia (such as Sweet's 7.62). The products from the first group, although significantly weaker in terms of removing copper plating, are more gentle on the trunk itself than the potent products from the second. Thus, Sweet 7.62 is not recommended to be left in the barrel for more than 15 minutes, while Hoppe's can be left in the barrel for several hours to combat heavy copper plating.
— A cradle, a slipway or a machine for holding a rifle. When cleaning the rifle, it must be firmly fixed so that the cleaning rod can be pushed through with force. If the rifle is equipped with a bipod, it is enough to use it. It is advisable that the barrel of the rifle be slightly tilted forward when cleaning to drain the chemicals.
Cleaning the rifle
The cleaning procedure begins with removing the bolt from the rifle (for bolt-action rifles) and installing the guide sleeve in its place. Often these bushings use a bolt retention system or bolt handle opening to securely lock into the bolt group. Sometimes the bushing is equipped with a rubber seal to prevent chemicals from leaking from the rifle barrel into the chamber and bolt group.
Rice. 3. The sleeve is inserted into the receiver and held by the opening for the release handle
Once the sleeve is securely installed in the chamber, you can proceed directly to cleaning the barrel. You should start by removing carbon deposits - the most easily cleaned component of contamination. To do this, you need to soak one patch in a cleaning agent, then put it on the visher and smoothly drive it through the bore. The easiest way to remove a dirty patch that appears from the muzzle (each patch is used only once!) is to place a garbage bucket under the muzzle - the patch will fall off the visor itself when the cleaning rod moves back. This procedure must be repeated several times, each time coating a new patch with a cleaning compound, until the patches come out of the barrel clean (or there are no obvious improvements in the quality of the emerging patch).
Rice. 4. A clean patch is put on the visher and pushed into the barrel through the bushing from the breech
Now you can proceed to removing copper plating from the barrel. The procedure itself in this case is similar to cleaning carbon deposits, but there are several differences. Of course, in this case, a copper remover is used. After running the first two or three patches, generously moistened with an anti-copper solution, you can pause for a few minutes to give the solution time to oxidize the copper deposits. The next time you run the treated patch along the trunk, it will show characteristic blue-green traces of copper oxides. This procedure must also be repeated until the patches come out of the barrel clean.
Rice. 5. At the exit from the barrel, a patch with traces of carbon deposits is removed from the cleaning rod during the reverse stroke
If it is not possible to completely get rid of copper in the trunk, there are several options for further action. The simplest is to treat the barrel with a cleaning agent and leave it to “soak” for 12-24 hours (it is advisable to place the rifle with the barrel down, resting it on a rag that will absorb the solution flowing from the barrel). After such chemical treatment, copper is removed from the barrel much easier. The second option is to use stronger ammonia-based products (under no circumstances leave it in the trunk longer than prescribed by the manufacturer!). The procedure for their use does not differ from that described above for weaker alkaline ones. And finally, you can try using a brush (under no circumstances a steel one!) to remove copper from the barrel. When using a brush, it is recommended to treat it with a cleaning agent, then make about 10 reciprocating movements through the sleeve, smoothly moving the brush along the entire length of the barrel. It is necessary to observe maximum caution and smoothness at the moment when the brush enters back into the barrel from the muzzle end - the quality of the cut is crucial for the accuracy of the rifle's fire.
Rice. 6. Some bushings allow you to wet the patch already on the cleaning rod through a special hole in the bushing - in this case, powerful Sweet's 7.62 is used
After completing the cleaning procedure, it is necessary to drive a dry patch through the barrel. If you find no traces of copper on it (very faint traces), the barrel cleaning is complete. Next, you need to run a few more untreated patches through the barrel until they come out completely dry, and, if the rifle is to be stored for a long time, run one or two patches with preservative lubricant through the barrel (in this case, before shooting, the lubricant must be removed with two or three dry patches ).
There are often cases when it is not possible to completely clean a rifle barrel of copper using the methods described above. This usually happens with rifles that have been improperly or irregularly maintained, or rifles with an unbroken barrel. In this case, you can try the barrel break-in procedure described below. There are examples when running-in improved the characteristics of even barrels with significant preliminary firing. There is also a more radical way to clean the barrel - using abrasive agents, such as JB Cleaner, however, opinions about the benefits and harms of using such products differ greatly and therefore it is not possible to definitely recommend them for use. If no cleaning really helps severe copper plating, there is a method of electrochemical cleaning, but using it at home is extremely difficult and therefore this method is beyond the scope of this article.
Barrel running in
The inner surface of the barrel of almost any new rifle is imperfect (the exception is hand-polished one-piece barrels) and has pores and irregularities left as a natural result of the barrel manufacturing process. When firing, these pores are gradually smoothed out, but at the same time they are filled with copper from the bullet casing, which leads to a strong increase in the rate of accumulation of copper deposits - as a result, the number of shots fired from the rifle without loss of accuracy due to copper plating will be small, and the barrel will be completely cleared of copper is often simply impossible.
To avoid filling the pores and micro-irregularities of the barrel with copper, it is recommended to carry out the barrel running-in procedure according to the following algorithm.
Fire one shot from a new rifle, after which the barrel must be cleaned of copper according to the cleaning procedure described above. This process (cleaning after each shot) must be repeated several times until the copper plating after the shot clearly decreases.
Next, you need to move on to shooting in series of several (in different sources the specific figure varies from 2 to 5) shots, after each series it is again necessary to clean the barrel from copper deposits. The number of series should also be determined by the apparent reduction in copper plating after the series.
Then you need to lengthen the series to 10-20 shots between cleanings, and after several such series the barrel of your rifle will be broken in.
It is not possible to find an exact technical description of the processes occurring in the barrel during break-in of a rifle in the literature, however, apparently, the break-in process is a gradual polishing of the barrel by firing while simultaneously removing copper from the pores and irregularities. This interpretation explains both the improvement in the quality of the new barrel after break-in, and the benefit of running-in barrels that have already been shot but not run-in.
Individual approach
Rice. 7. Cleaning your rifle at home
There are many legends, myths and beliefs associated with barrel cleaning procedures. Someone considers it unacceptable to use coated cleaning rods, due to the deposition of abrasive combustion products on this coating, which scratch the barrel as the cleaning rod passes (to the question, “Why will these abrasives scratch a steel barrel, and not a softer plastic coating?”, the answer is received usually fails); someone considers the use of potent agents in stainless steel barrels unacceptable; someone pushes the ramrod along the barrel only 5-10 cm at a time, and considers feeding the ramrod in one smooth movement absolutely unacceptable; The list can be continued almost endlessly. An article recently appeared in one of the American weapons publications in which the author deliberately subjected his rifle to numerous cleanings in the worst possible way - without a bushing, with a composite aluminum cleaning rod with a steel brush and a terrible pot of chemicals - and was convinced in practice that after such “bullying” the accuracy of the battle his rifle has not deteriorated. All these facts speak only of one thing - cleaning a rifle, in addition to being a practical exercise, is also a ritual that will certainly be unique to each shooter, different from all others. In this case, all of the above are just some general considerations, in accordance with which the process of cleaning a rifle can be structured in such a way that it brings both benefit to the barrel and satisfaction to the shooter himself.
Procedure
First of all, the weapon is unloaded and disassembled, disconnecting the magazine, removing the cartridges and putting them away
It is important to make sure that the weapon is completely unloaded
Then perform the actions in the following sequence:
1. Cover the bore with alkaline lubricants, leaving them for a while so that the acid residues have time to neutralize. Typically this process takes 15 minutes.
2. Alkaline grease and initial carbon deposits are removed using a dry, clean patch, which is then thrown away.
3. Take a ruff and pass it along the channel from the treasury to the barrel. This is done in one movement. It is best to use a brass device.
4. Using another patch, wrapping it around a visher and moistening it in a slightly alkaline composition, wipe the barrel.
5. After this, the same action is carried out with a dry patch.
6. All actions, starting from point 3, are repeated several times until the patch comes out clean. This may take a significant period of time. However, the procedure is extremely important. It is this that removes large deposits and copper plating of the barrel bore and rifling.
7. Proceed to the easy stage. Repeat points 3-5 with one difference: use neutral oil. This is done until the patches also come out in their pure form.
8. Using a caliber brush, clean the chamber. The conical part is especially carefully cleaned. You cannot insert a brush into the bullet entrance.
9. Having cleaned the chamber, wipe the entire bore using a patch with neutral oil, and then dry.
10. Lubricate the barrel.
11. Clean and lubricate the remaining parts of the mechanism. Gas engine parts usually require special attention, as they are covered with a carbon crust. This place is cleaned using a brass brush or a hard wooden stick. Never use solid steel devices for this purpose.
12. Assemble the weapon, lightly lubricating all parts with neutral lubricant. It would not be a bad idea to go over them with an anti-corrosion substance.
After a couple of days, the whole process is carried out again from point 2. Repeated cleaning of weapons that were not stored in a safe, but were not used for their intended purpose, is carried out according to schedule 2, but without carrying out the actions from point 12.
New in blogs
Cleaning a weapon is not an idle question for any shooter, be it a hunter, an athlete, a sniper or just an amateur. At the same time, there are a great many recipes for “correct” cleaning, and this topic is the reason for writing more and more new articles and heated debates. Despite the variety of existing methods and recommendations, it seems possible to highlight some general tips for cleaning weapons. In addition, with the gradual increase in popularity on the Russian market of both new imported models of high-precision rifled weapons and various chemical care products, the appearance of an article devoted to methods for cleaning rifled barrels in the West seems very timely.
When firing from a rifle, as a result of the shot, both combustion products of gunpowder and the cartridge primer (carbon deposits) and sedimentation of bullet shell particles (copper plating) occur in the barrel as a result of the shot. It is immediately necessary to make a reservation that we will limit ourselves to primarily considering firing a bullet with a copper jacket and a non-corrosive primer from a non-chrome-plated barrel. Cleaning the barrel for other options (steel-jacketed bullets, lead bullets, chrome-plated barrels, etc.) does not differ significantly from the option under consideration, although some differences, of course, cannot be forgotten.
It is advisable to clean the rifle after finishing shooting, if possible without delaying it for too long. Despite the fact that modern Boxer primers do not emit corrosive products during the firing process, when shooting Russian-made cartridges or military surplus cartridges, in the vast majority of cases you will encounter corrosive Berdan primers. In addition, experience shows that in good weather, spending an extra half hour at the shooting range cleaning a rifle is much more pleasant than doing it at home, often in a poorly equipped room with insufficient ventilation.
Accessories
To clean the barrel of a rifle, it is advisable to acquire the following accessories:
— A good cleaning rod, suitable for the caliber of the rifle. It is desirable that the cleaning rod be one-piece, with a plastic coating and a bearing in the handle. Dewey is considered the quality standard in the American sports shooting community, although there are analogues from other manufacturers.
Rice. 1. Various accessories and chemicals for cleaning the barrel
— Visher, suitable for the caliber of the rifle (usually supplied complete with a cleaning rod).
— Bronze brush, rifle caliber. As a rule, with proper regular care of the trunk, there is no need to use a brush. Moreover, cleaning chemicals can interact with the brush material itself, and the use of steel brushes in high quality barrels is highly undesirable.
— Cotton flannel patches for cleaning the barrel (hereinafter referred to as “patches”). It is desirable that the size of the patches correspond to the caliber in such a way that when pushing the patch along the barrel, it passes under tension, that is, the force on the ramrod is felt, but is not excessive.
— Guide bushing for cleaning rod, suitable for rifle bolt group. When cleaning the barrel with patches, bending the cleaning rod can lead to unwanted contact of the cleaning rod with the surface of the chamber or bullet entrance, which can have an extremely negative impact on the accuracy of the rifle. If possible, cleaning the rifle should be done from the breech - the quality of processing of the muzzle significantly affects the accuracy of the combat, so any contact with the muzzle is extremely undesirable. This is why, in addition to cleaning from the breech, it is recommended to push the patch along the barrel in one direction only, and to be extremely careful when pulling the cleaning rod back into the barrel from the muzzle. In cases where the design of the rifle does not allow cleaning the barrel from the breech (some semi-automatic models), it is strongly recommended to use a special cap to protect the muzzle from possible contact with the cleaning rod.
Rice. 2. Guide sleeve
— Soot remover. Hoppe's No.9 Bore Cleaner (the choice of reconnaissance snipers of the US Marine Corps) has proven itself well; other brands include Kroil, Break-Free, and Shooter's Choice.
— Copper remover. These cleaners can be divided into two groups - weak alkaline (a typical example is Hoppe's Benchrest Copper Remover) and strong ammonia (such as Sweet's 7.62). The products from the first group, although significantly weaker in terms of removing copper plating, are more gentle on the trunk itself than the potent products from the second. Thus, Sweet 7.62 is not recommended to be left in the barrel for more than 15 minutes, while Hoppe's can be left in the barrel for several hours to combat heavy copper plating.
— A cradle, a slipway or a machine for holding a rifle. When cleaning the rifle, it must be firmly fixed so that the cleaning rod can be pushed through with force. If the rifle is equipped with a bipod, it is enough to use it. It is advisable that the barrel of the rifle be slightly tilted forward when cleaning to drain the chemicals.
Cleaning the rifle
The cleaning procedure begins with removing the bolt from the rifle (for bolt-action rifles) and installing the guide sleeve in its place. Often these bushings use a bolt retention system or bolt handle opening to securely lock into the bolt group. Sometimes the bushing is equipped with a rubber seal to prevent chemicals from leaking from the rifle barrel into the chamber and bolt group.
Rice. 3. The sleeve is inserted into the receiver and held by the opening for the release handle
Once the sleeve is securely installed in the chamber, you can proceed directly to cleaning the barrel. You should start by removing carbon deposits - the most easily cleaned component of contamination. To do this, you need to soak one patch in a cleaning agent, then put it on the visher and smoothly drive it through the bore. The easiest way to remove a dirty patch that appears from the muzzle (each patch is used only once!) is to place a garbage bucket under the muzzle - the patch will fall off the visor itself when the cleaning rod moves back. This procedure must be repeated several times, each time coating a new patch with a cleaning compound, until the patches come out of the barrel clean (or there are no obvious improvements in the quality of the emerging patch).
Rice. 4. A clean patch is put on the visher and pushed into the barrel through the bushing from the breech
Now you can proceed to removing copper plating from the barrel. The procedure itself in this case is similar to cleaning carbon deposits, but there are several differences. Of course, in this case, a copper remover is used. After running the first two or three patches, generously moistened with an anti-copper solution, you can pause for a few minutes to give the solution time to oxidize the copper deposits. The next time you run the treated patch along the trunk, it will show characteristic blue-green traces of copper oxides. This procedure must also be repeated until the patches come out of the barrel clean.
Rice. 5. At the exit from the barrel, a patch with traces of carbon deposits is removed from the cleaning rod during the reverse stroke
If it is not possible to completely get rid of copper in the trunk, there are several options for further action. The simplest is to treat the barrel with a cleaning agent and leave it to “soak” for 12-24 hours (it is advisable to place the rifle with the barrel down, resting it on a rag that will absorb the solution flowing from the barrel). After such chemical treatment, copper is removed from the barrel much easier. The second option is to use stronger ammonia-based products (under no circumstances leave it in the trunk longer than prescribed by the manufacturer!). The procedure for their use does not differ from that described above for weaker alkaline ones. And finally, you can try using a brush (under no circumstances a steel one!) to remove copper from the barrel. When using a brush, it is recommended to treat it with a cleaning agent, then make about 10 reciprocating movements through the sleeve, smoothly moving the brush along the entire length of the barrel. It is necessary to observe maximum caution and smoothness at the moment when the brush enters back into the barrel from the muzzle end - the quality of the cut is crucial for the accuracy of the rifle's fire.
Rice. 6. Some bushings allow you to wet the patch already on the cleaning rod through a special hole in the bushing - in this case, powerful Sweet's 7.62 is used
After completing the cleaning procedure, it is necessary to drive a dry patch through the barrel. If you find no traces of copper on it (very faint traces), the barrel cleaning is complete. Next, you need to run a few more untreated patches through the barrel until they come out completely dry, and, if the rifle is to be stored for a long time, run one or two patches with preservative lubricant through the barrel (in this case, before shooting, the lubricant must be removed with two or three dry patches ).
There are often cases when it is not possible to completely clean a rifle barrel of copper using the methods described above. This usually happens with rifles that have been improperly or irregularly maintained, or rifles with an unbroken barrel. In this case, you can try the barrel break-in procedure described below. There are examples when running-in improved the characteristics of even barrels with significant preliminary firing. There is also a more radical way to clean the barrel - using abrasive agents, such as JB Cleaner, however, opinions about the benefits and harms of using such products differ greatly and therefore it is not possible to definitely recommend them for use. If no cleaning really helps severe copper plating, there is a method of electrochemical cleaning, but using it at home is extremely difficult and therefore this method is beyond the scope of this article.
Barrel running in
The inner surface of the barrel of almost any new rifle is imperfect (the exception is hand-polished one-piece barrels) and has pores and irregularities left as a natural result of the barrel manufacturing process. When firing, these pores are gradually smoothed out, but at the same time they are filled with copper from the bullet casing, which leads to a strong increase in the rate of accumulation of copper deposits - as a result, the number of shots fired from the rifle without loss of accuracy due to copper plating will be small, and the barrel will be completely cleared of copper is often simply impossible.
To avoid filling the pores and micro-irregularities of the barrel with copper, it is recommended to carry out the barrel running-in procedure according to the following algorithm.
Fire one shot from a new rifle, after which the barrel must be cleaned of copper according to the cleaning procedure described above. This process (cleaning after each shot) must be repeated several times until the copper plating after the shot clearly decreases.
Next, you need to move on to shooting in series of several (in different sources the specific figure varies from 2 to 5) shots, after each series it is again necessary to clean the barrel from copper deposits. The number of series should also be determined by the apparent reduction in copper plating after the series.
Then you need to lengthen the series to 10-20 shots between cleanings, and after several such series the barrel of your rifle will be broken in.
It is not possible to find an exact technical description of the processes occurring in the barrel during break-in of a rifle in the literature, however, apparently, the break-in process is a gradual polishing of the barrel by firing while simultaneously removing copper from the pores and irregularities. This interpretation explains both the improvement in the quality of the new barrel after break-in, and the benefit of running-in barrels that have already been shot but not run-in.
Individual approach
Rice. 7. Cleaning your rifle at home
There are many legends, myths and beliefs associated with barrel cleaning procedures. Someone considers it unacceptable to use coated cleaning rods, due to the deposition of abrasive combustion products on this coating, which scratch the barrel as the cleaning rod passes (to the question, “Why will these abrasives scratch a steel barrel, and not a softer plastic coating?”, the answer is received usually fails); someone considers the use of potent agents in stainless steel barrels unacceptable; someone pushes the ramrod along the barrel only 5-10 cm at a time, and considers feeding the ramrod in one smooth movement absolutely unacceptable; The list can be continued almost endlessly. An article recently appeared in one of the American weapons publications in which the author deliberately subjected his rifle to numerous cleanings in the worst possible way - without a bushing, with a composite aluminum cleaning rod with a steel brush and a terrible pot of chemicals - and was convinced in practice that after such “bullying” the accuracy of the battle his rifle has not deteriorated. All these facts speak only of one thing - cleaning a rifle, in addition to being a practical exercise, is also a ritual that will certainly be unique to each shooter, different from all others. In this case, all of the above are just some general considerations, in accordance with which the process of cleaning a rifle can be structured in such a way that it brings both benefit to the barrel and satisfaction to the shooter himself.