In order to ensure trouble-free and efficient shooting from pneumatics, it is necessary to periodically adjust the sight. This is not a difficult procedure that can be performed by anyone with sufficient shooting experience.
Let's look at how to properly set up a sight on an air rifle, starting with preparation and ending with recommendations for the frequency of sighting the air rifle.
Reactivation of pneumatic weapons
The shooting must be preceded by a procedure for re-opening the weapon. This is the name for removing preservative lubricant, which is present in large quantities in the compressor.
Failure to perform such actions may result in a significant reduction in the spring life and lead to contamination of the barrel.
In this case, it is most advisable to follow the following sequence of actions:
- weapon disassembly;
- removing the piston;
- removal of conservation grease;
- cleaning the compressor with a dry cloth;
- cleaning the piston from Vaseline.
Cleaning work can be carried out using a solvent or a special lubricant. It should be noted that the barrel of the weapon does not need lubrication.
Security measures
Safety Tips:
- Before shooting, check the fastening of parts;
- load weapons with shells only before shooting;
- do not touch the trigger before firing;
- do not point the gun at your face or towards people;
- do not shoot if a stranger is near the target;
- After finishing shooting, put the rifle on safety;
- do not use live ammunition (the barrel will explode);
- use native caliber shells.
Preparing for the first shots
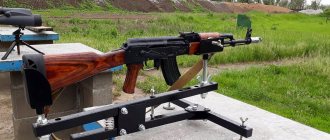
Machine for zeroing pneumatic weapons
During the preparatory work, sufficient attention should be paid to resolving a number of issues related to arranging the shooting area, choosing the optimal distance and the most suitable variation of bullets.
Correction using the front sight
The front sight should be positioned evenly. It should not have obvious blockages or distortions. To determine the correctness of its placement, simply look at this element from different angles. The barrel line, which should coincide with the axis of the front sight, can act as a guide here.
How to choose the right target picture? Animal targets, pectoral, full-length, with concentric circles and many others. The ataman air rifle, model M2R, is described in detail in this article. Main characteristics, price, assembly, disassembly, application features and a short video review.
Using the rear sight
Adjustment of the point of impact during zeroing of the weapon can also be carried out using the rear sight. If after a shot the bullet goes down, then this element must be raised a little, and if it goes up, lower it. Here it should be emphasized that if the front sight needs to be moved in the direction opposite to the displacement of the point of impact, then the rear sight moves in an identical direction.
Selecting a distance
Sighting of pneumatic weapons should begin from a short distance, gradually increasing it. At a longer distance, flaws can be traced in accuracy much better. This is due in part to the addition of bullet dispersion.
It is recommended to start zeroing from a distance of 15-25 m. Subsequently, these indicators should be gradually increased.
Correction should be made through the use of the front sight and rear sight. It is important to ensure that the point of impact is as close as possible to the point of aiming. Gradually the distance should be increased to 200-300 meters.
Bullet selection
Bullets for pneumatic weapons today are represented by a fairly wide range. When choosing the most suitable projectiles, you should take into account the recommendations of the weapon manufacturer, as well as the shape and material of the bullet.
We must not forget about the weight indicators of the projectile. It is better not to use heavy bullets for weak pneumatics. The speed at which such a projectile leaves the barrel will be minimal, so certain problems with accuracy may arise. At the same time, light bullets are not the best option, since they quickly lose their initial speed.
Preparing the shooting area and target line
One of the important conditions for preparing a place for shooting is the absence of the likelihood of people and animals getting into the line of fire. Targets can be located on boards or have a paper version. It is very important to pay attention to the equipment of the shooting area.
You must first install a rifle rest. You can use regular sandbags for this. For maximum stability, the rifle should be rested on the rest with the fore-end, not the barrel.
What is MOA?
Often the cost per click is indicated in MOA. MOA is an angular value. One arc minute.
It is one sixtieth (1/60) of a degree.
1 degree = 60 minutes of arc (60 MOA); 360 degrees (circle) is equal to 360x60 = 21,600 arc minutes (21,600 MOA).
Why the angular measurement value is used is clear from the figure below:
Alas, as you can see, everything is in “English” inches and yards. But there’s nothing to be done about it. The conversion to the meters and centimeters we are used to is given in the diagram.
And again, we see that this angular value can be converted into millimeters only as a certain projection onto a plane removed at a specific given distance. As the distance increases, the cost of converting MOA to mm will increase.
1 MOA at 100 meters = 2.9089 cm
Thus, knowing the distance to the target and measuring the distance from the STP to the desired aiming point, you can calculate how many divisions (clicks) you will need to turn the drum in one direction or another while making adjustments.
Also note that the direction of the reticle offset is indicated on the drums in English. Everything here is simple: UP - UP, DOWN - DOWN, RIGHT - RIGHT, LEFT - LEFT. Nothing complicated, where it is written, the aiming mark will go there. Up means up. Down means down.
For greater clarity, we recommend referring to the following diagram:
It also happens that the cost per click is stated in MIL. MIL – milliradian.
1 MIL = 3.4377 MOA = 10 cm at 100 meters.
Naturally, the markings of the tuning drum scale in MIL are convenient for use with a Mil-Dot reticle.
In exactly the same way as in the described method of zeroing the mechanics, after several series of shots and adjustments you will be able to zero your sight. This operation can then be repeated, gradually increasing the distance.
If you know the range at which you will be shooting most often, you can zero your scope at that range. That is, you can return the drums to the zero position and then, if you need to fire at a greater or lesser distance from the standard distance, you can make adjustments based on this position. You can find out exactly how to reset your scope (and whether it allows such an operation at all) from the instructions for your scope.
Determining the midpoint of impact
Determining the average impact point is one of the main tasks that should be resolved during weapon zeroing. First you need to fire three shots, aiming at one point. Then two holes located in close proximity to each other should be connected with a straight line.
This segment is divided in half and from its middle another straight line is drawn to the third hole. The resulting line is also divided in half. The division point located immediately adjacent to the middle of the first connecting line will act as the midpoint of the hit.
Bullet selection
A variety of ammunition can be used to zero a firearm, as each has unique ballistic properties, but with pneumatics everything will be much easier. If you decide to shoot a domestically produced air rifle, then use standard Alpha bullets of 4.5 millimeter caliber. For imported analogues, you should purchase those ballistic projectiles that are recommended by the manufacturer of your weapon.
Features of zeroing a rifle with an optical sight
Zeroing a rifle with an optical sight has its own characteristics. This procedure should be started from a minimum distance. Subsequently, it will gradually increase so that the result obtained is as objective as possible.
Zeroing an air rifle with an optical sight:
During zeroing, you should select an aiming point through an open sight and fix the weapon before firing. Then you need to bring the crosshairs to the point where the rifle is pointed with an open sight. This can be done by using an adjustment drum. And after that the first test shot is carried out.
The essence of the whole process is to bring the crosshairs of the sight to the point of impact of the bullet. When the desired result is achieved, you should gradually increase the existing distance and repeat the entire procedure.
In this article you can learn how to make an air gun. We use available tools that can be found in any home. Review of the Stechkin air pistol model Gletcher APS - read more. Characteristics, features, modification with the Blowback function, partial disassembly of the pistol.
Cheap pneumatics and possible problems when setting up
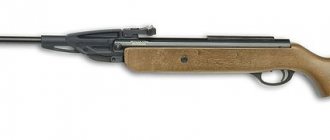
It's worth mentioning that inexpensive and readily available air guns can often have their sights tilted to the left. This is usually noticeable upon visual inspection of the gun. In particular, the common Baikal air gun has such a sight.
In fact, such a defect is more of an aesthetic nature; such a sight does not affect the accuracy of fire. Therefore, if such an external drawback does not bother you, this is not a reason to refuse to buy cheap pneumatics. With the correct settings of the sight, it can show high shooting accuracy at any distance.
Another feature of cheap pneumatic air guns that needs to be explained is the lack of notches on the scope scale. In this case, make adjustments only for one distance from which you will most often shoot, for example, from 25 or 50 meters.
Without optics
It cannot be said that the absence of optics greatly simplifies the shooting procedure. Despite this, you can try to solve this issue even at home. At the same time, we should not forget about the need to comply with safety measures.
Zeroing an air gun without an optical sight is carried out in several stages.
Shots are fired in series of several. In one case, you should aim at the center of the target, and in the second, at its lower edge.
There is a certain analogy here with the procedure for zeroing a rifle with optics.
Correction of the results obtained can be carried out using a rear sight or front sight. However, the method for adjusting the accuracy in both cases will be slightly different.
It is most advisable to zero in pneumatics without optics in several stages. This will allow the shooter’s hands and eyes to rest a little, as a result of which the results obtained will be as objective as possible.
All of the shooting methods described above can be applied to any type of PV, including the Hatsan 125 and MP-512 rifles.
Recommendations
Buy a decent optical sight, of good quality. You can choose one of those in the “ OPTICAL SIGHTS”
Our online store has both inexpensive and practical models, as well as more advanced sights, suitable even for high-precision sports shooting “on paper”.
For the beginning shooter
- Vector Optics 4×32-Javelin
- 4x32-BSA - M
These sights are perfect for CO2 and PCP air rifles and will be comfortable even for a beginner.
For experienced shooters
- Discovery HI FFP 4-14×44 SF
- Discovery VT-3 FFP 6-24×50 SFAI
For rifles with strong recoil
We remind you that spring-piston air rifles have much more noticeable recoil than their gas-cylinder “brothers”. For this reason, a sight that can be used effectively with them must be selected separately.
Discovery HD 10x44 SFIR - It not only has excellent coated optics, but also successfully withstands the recoil of both MAGNUM class spring-piston rifles and firearms chambered for the 50BMG cartridge, inclusive.
HI FFP 4-14×44 SF is also suitable for spring-piston pneumatics .
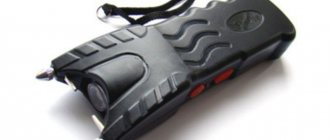
Using a laser beam
Zeroing a rifle with a laser beam is called cold zeroing. In this case, accuracy adjustment is carried out using a universal system equipped with a choke nozzle. A special laser cartridge can also be used for this. You can purchase equipment of this type at any specialized retail outlet.
The advantage of such zeroing is that there is no need to use cartridges, as well as the possibility of making adjustments before the actual shot. In this case, the essence of zeroing is to align the crosshair with the spot of the laser emitter.
The laser projection cartridge is lightweight and has a very convenient shape. As a result, you can always carry it with you and, if necessary, use it for its intended purpose.
Shoot at 100 meters
The rifle barrel must be completely cold. The weapon must be mounted as firmly as possible. The person sits comfortably and makes 3 neat shots with a rhythm that is comfortable for him. You need to make sure the hits are correct , to do this you should evaluate them using binoculars.
To ensure maximum range, you need to adjust the scope slightly higher than the middle of the target. Then, when fired at the central point, the bullets will fly about 7-8 cm higher.
How often should I shoot?
Zeroing an air rifle is not a one-time procedure. The frequency of repeated adjustments will depend on the characteristics of the weapon’s operation. Provided that an optical sight or other updated elements are installed, zeroing is simply vital.
In addition, it is advisable to make additional adjustments in case of changing cartridges or shifting the center of gravity of the rifle. The latter can happen due to the weight of the butt or barrel of the weapon. The need to re-zero also occurs when the rifle is dropped.
Ceasefire
Any rifle must be completely unloaded. Be it the performance characteristics of Mosin rifles, Russian-made small-caliber rifles, Gama air rifle or any other. You need to keep your eyes on the target when using binoculars. The largest possible sequence of successful shots is detected in order to set the sight as correctly as possible.
This trend can be traced . If the largest group of impact marks is in the upper right corner, you need to point the target down to the left. Before completing the preparations, you should read the instructions that came with the specific scope upon sale.
It is necessary to perform a large number of repetitions until each bullet is fired with high accuracy and hits the central area of the target.
Video: How to zero an optical sight
Additional tips on video:
Required Devices
You will need the following devices for zeroing pneumatics:
- weapon machine (stand);
- choke tube with laser target;
- binoculars;
- rangefinder;
- chronograph.
You also need to prepare stop bags to better fix the air gun, protect the stock from mechanical damage, and increase comfort when shooting. At the request of the weapon owner, a screw bipod is purchased. Among the tools, a set of screwdrivers is useful for adjusting the optics.
arbalet-airgun
All data presented here applies primarily to 4.5mm spring-piston air rifles and comparable power pre-pumped (PCP) air rifles.
Basically, it is customary to shoot them at 50 meters. For the shooting range, I did exactly the same, meaning target shooting at the classic “small” distance. But for quite some time now the “far zero” of my rifles has shifted to 40 meters. I think this is more suitable for hunting and recreational shooting, the so-called “plinking”.
Near and far “zero” for pneumatics
But first, let's figure out what these “zeros” are and where they come from. It's easier to do this with illustrations.
The sight always “looks” not parallel to the shooting line (bore), but at some negative angle to it. And that's why.
This is an example, absent in reality, of parallel optical axis of the sight (aiming line) and the axis of the barrel bore (firing line). The distance between them is on average 35-70 millimeters. This is how low your rifle will hit even at the initial, relatively straight, section of the bullet’s flight path, which is called the direct shot distance. For an “air” it is about 15 meters. That is, even at such a minuscule level, when aiming, say, at the center of the bottom of a beer can, the bullet will go below the target. As the distance increases and the bullet slows down, the magnitude of the decrease in trajectory (deviation of the point of impact) will no longer be measured in cans, but in buckets :).
Therefore , in practice, the sight is set with some tilt. At the same time, the barrel, as it were, lifts up, and when fired, the bullet, in full accordance with the laws of ballistics, flies along a crooked parabola, crossing the aiming line twice. The first intersection point is called “near zero”, the second is called “far zero”.
At any other distances, the point of impact will be higher or lower than the aiming point. For simplicity, we will also call the section of the distance at which this deviation is small and does not require corrections “direct shot distance ,” although in reality the bullet flies through it in an arc.
A little lower, when we move on to the graphical ballistic calculator, all this will be remarkably clearly displayed in the pictures. First, let's decide on weapons and ammunition.
Selecting an air rifle and a bullet
In Russia, the maximum power of hunting pneumatics is limited to 25 joules. The vast majority of spring-piston rifles purchased in recent years have initially (with the original spring, piston, bypass) from 16 to 25 joules. These are almost all “Dianas”, “Wayraukhi”, “Gamo”, their clones - “Crosmans”, “Rugers”, “Stoegers”, “Smershis”, etc. Also here, closer to the upper limit, are the popular “Hatsans”, with the exception of the 125th model and others like it. Details in the article “Air rifles for hunting“.
Read about the nuances of using powerful and large-caliber pneumatics in the articles “Hunting with pneumatics: finding your niche” and “Expensive and angry: American “air gun”. A very detailed analysis of the damaging factors of “magnums” and “supermagnums” is carried out in the article “What is more powerful - a bow, a crossbow or a pneumatic weapon?”
Let's settle on the average value - about 20 joules. We will also choose a classic bullet for magnum pneumatics - 0.68 grams (10.5 grains). The sight height is 35 mm, there is no wind, we “shoot” in complete calm.
Calculating on a ballistic calculator
Let's enter these indicators into a graphical ballistic calculator and perform calculations for shooting distances (“long zero”) of 50 and then 40 meters.
Necessary clarification. To obtain the most desirable “pneumatic” trophies, such as a wild pigeon and even a duck, due to the low stopping effect of a light high-speed bullet, you have to shoot not in the body, but in the head and neck. Hence, it is desirable to deviate the trajectory from the aiming line by no more than 20-25 millimeters - remember the approximate dimensions of these birds.
Figure 1 (can and should be enlarged).
So. The lower scale is the firing distance of up to 60 meters in 5 meter increments. The vertical line on the left is the excess/decrease of the bullet’s flight path relative to the aiming line, again in meters, that is, 0.035 is 35 millimeters. “Far zero”, as expected, is at 50 meters, “near”, according to the calculation results, turned out to be 7.5. The maximum elevation at the peak of the trajectory is 45 mm .
Now the ballistic table. It will be useful to us too.
Here X,m is the distance in meters, Y,m is the elevation of the trajectory relative to the aiming line in meters, V,mps is the bullet speed m/sec. Well, for those who are interested, T,s is the flight time in seconds, E,J is the bullet energy in joules. We are only interested in excesses and speed.
The trajectory, as we see, is much more flat (flat), which is pleasing. “Far zero”, of course, is at 40 meters, “near” - 9.5. The maximum elevation at the peak of the trajectory is 22.5 millimeters , which is half as much as in the previous case.
Ballistic table again
Let's repeat the legend: X,m is the distance in meters, Y,m is the excess of the trajectory relative to the aiming line in meters, V,mps is the bullet speed m/sec.
Novice hunter: there is reason for optimism
So, what do we see in the graphs and tables?
In the first case (“far zero” at 50 meters), the most optimal shooting distances will be from 2 to 14.5 meters and from 43 to 55 meters. In the interval between them (a “hole” as much as 29 meters long!) you need to quickly determine the distance, then mentally calculate the corrections and shift the aiming point, and this is the prerogative of advanced shooters, especially since the “target” is mobile and is not going to pose for you for a long time.
The second option (“far zero” at 40 meters) makes it possible to stupidly (or wisely?) hit “cross” at all traditional hunting distances “along the feather” - from 2.5 to 47 meters without any breaks, since there is no deviation anywhere beyond the coveted 25 millimeters. Absolutely no thought about the cost of dividing the reticle and other “non-Euclidean geometry”.
It is clear that all this is “theoretical mechanics”; in reality, the shot will be influenced by the weather, the degree of the hunter’s curvature, and the technical accuracy of the rifle as its main qualitative indicator. But in the case of zeroing a rifle at long distances, all these factors will not go away either.
Will the calculated distance of 47 meters suit us as hunters and at the same time lovers of trouble-free shooting? Yes - for the vast majority of real situations. In the article “Varminting with Pneumatics” we also carried out calculations, only for a 30-joule “supermagnum” - in this complex type of hunting, the optimal distance again did not exceed fifty meters. Moreover, at a “distant zero” of 40 meters, the deviation was generally only a few millimeters.