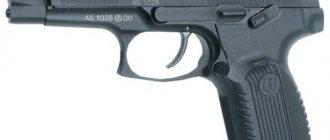
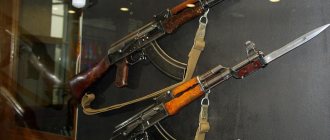
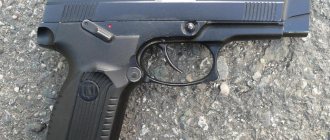
Yarygin’s pistol is known to most as the “Rook”. Before us is a combat self-loading pistol, which was invented in the Russian Federation by the Honored Weapons Designer of the Russian Federation Vladimir Yarygin.
See also the article Ministry of Defense of the Russian Federation and command staff
Yarygin pistol, photo
| TTX | Meaning |
| Weight | 950 grams |
| Caliber | 9mm |
| Initial bullet speed | 340-450 m\s |
| Sighting range | 50-100 m |
| Shop | 18 rounds |
At the moment, these weapons are produced at one of the largest weapons factories in the country - the Izhevsk Mechanical Plant . It also has many modifications, including pneumatic and traumatic models created for police and civilian self-defense.
See also the article Makarov traumatic pistol and its history
Options and modifications
- MP-446 "Viking"
is a commercial model with a plastic frame and an adjustable sight, an 18-round magazine. Available for export. - The MP-446C Viking
is a plastic frame sporting pistol modified to meet IPSC regulations. Magazine for 10 rounds. - MP-446C “VIKING-M”
is a further development of the MP-446C pistol for practical shooting. The frame of the pistol is supplemented with a Picatinny rail, the barrel life is increased, and sights are used that are interchangeable with Glock pistols. The pistol barrel is thickened, its length increased to 120 mm. According to the manufacturer, the trigger has also been modified to increase the smoothness of the descent. The locking unit has been modified - the geometry of the groove of the lower barrel boss has been changed. The balance of the pistol has changed, which made it possible to increase the rate of fire due to less toss of the barrel. The stores have also undergone changes and have a single-row exit (a double-row store with a rebuild). The single-row exit made it possible to insert the magazine with less effort and made it easier to insert it into the receiving window. The sharp edges of the magazine jaws have been removed. The shape of the feed ramp is adapted for the use of both new magazines with cartridges exiting in one row, and old ones. The magazine release button and trigger have been enlarged. By strengthening a number of parts and refining individual components, the pistol's service life was increased to 50,000 shots. The pistol is offered in several configuration options. - PYa chambered for 9x21 mm
- a demonstration sample was shown in 2013, at the arms exhibition "Russia Arms Expo-2013" in Nizhny Tagil. - MP-353
is a traumatic pistol chambered for .45 Rubber, produced since 2010. - MP-472 “Vintuk”
is a traumatic pistol chambered for 10×23 mm T. The magazine capacity is 16 rounds, the pistol frame is made of blue plastic. - MP-655K
- 4.5 mm pneumatic gas pistol, produced since 2008 - LT-110ПЯ
- training "Yarygin laser pistol" based on the MMG Yarygin pistol (with laser emitter LT-510 - visible red beam, pulsed mode of operation).
Production (St. Petersburg, Russia) [ source not specified 1735 days
]
Tactical and technical characteristics of the Yarygin pistol (TTX)
All performance characteristics described in the table fully correspond to reality, since the data is stated by the manufacturer itself - the Izhevsk Mechanical Plant.
| Performance characteristics, size and weight | Meaning |
| Weight | 950 grams |
| Caliber | 9mm |
| Cartridge |
|
| Principle of operation | Short-stroke recoil |
| Length | 198 mm |
| Height | 145 mm |
| Initial bullet speed |
|
| Sighting range (effective) |
|
| Shop | 18 rounds (may vary depending on version) |
| Aim | Open |
Yarygin pistol
In 1990, the Ministry of Defense announced a competition to create a new weapon that was supposed to replace the outdated Makarov pistol.
It was necessary to improve ergonomics and performance characteristics, to increase the magazine for higher power cartridges. At the same time, the new pistol had to be superior to foreign analogues. The R&D program was called "Rook". The Izhevsk Mechanical Plant competed with Tula and Klimov gunsmiths and submitted not one, but three models to the competition. As a result, after extensive testing and several years of improvements, a pistol designed by Yarygin was chosen for implementation. In 2003 it went into production. Experience with high-precision sporting weapons helped Vladimir Yarygin make a pistol that met the conditions of the competition. It became the first pistol of its own design at the Izhevsk Mechanical Plant. The new semi-automatic self-loading pistol was given the number MP-443 and the name “9-mm Yarygin pistol,” or PY for short. Since 2003, the pistol has been supplied to the Armed Forces of the Russian Federation, the prosecutor's office, the Ministry of Internal Affairs, special purpose departments and is exported. Based on the PJ, a number of modifications were created, including a lightweight version, sports, traumatic, gas and pneumatic models. The MP-446 “Viking” sports pistol for practical shooting has received wide recognition among athletes and law enforcement officers who use it during training. One of the important advantages of the PJ is its high reliability in almost any conditions: at temperatures from -50 to +50, in conditions of rain, dust, and in the absence of cleaning and lubrication for a long time.
Video: Concern "Kalashnikov"
Today, Vladimir Yarygin continues to work at the Izhevsk Mechanical Plant, modernizing existing sports pistols for the Russian Practical Shooting Federation, improving the ergonomic and combat characteristics of manufactured weapons.
Vladimir Aleksandrovich has 20 inventions, 4 certificates for industrial designs and more than 40 improvement proposals. He was awarded honorary titles: Honored Designer of the Russian Federation, Honored Worker of Industry of the Urals, Best Designer of the Ministry of Defense Industry of the USSR. Vladimir Yarygin is a regular participant in scientific and practical conferences of Izhevsk State Technical University on small arms, works a lot with students and has trained more than one generation of engineers.
The history of the creation of the Yarygin pistol (PYa)
| date | Event |
| 1990 | Competition for a new main pistol The Ministry of Defense of the Soviet Union was not satisfied with the tactical and technical characteristics of the PM pistol (Makarov pistol) that was in service with the army and police at that time. They announced a competition for a new, more modern pistol. The project was codenamed "Rook" |
| 1993 | PY emerges as a leader from the competition In comparison with other candidates, the pistol designed by Yarygin became the main one for adoption as the main combat pistol |
| 2000 | PY satisfied the requirements of the Moscow Region. Yarygin's pistol/model MP-443 successfully passed tests and won the competition. The combat materiel of the PYa weapons, performance characteristics and reliability satisfied the Ministry of Defense of the Russian Federation |
| 2003 | PYa adopted for service The Ministry of Defense of the Russian Federation officially adopted the Yarygin pistol for service |
| 2010 | PYa began to enter service The pistol began to enter service with units of the Military Forces of the Russian Federation, special forces, police, internal troops, and other law enforcement agencies |
| 2011 | Full-fledged production of the PYa has begun. Mass production of the Yarygin pistol for the Russian army has begun. However, already at that time, many designers and military personnel understood that the model was still quite crude and therefore required improvements. The manufacturer corrected some design flaws, which only partially corrected the situation |
| 2013 | The popularity of the PU in law enforcement agencies is increasing. Officers of the Western Military District began to use the PU as a standard weapon - they were satisfied with the rate of fire, ease of wearing and the destructive power of the PU |
The main purpose of the pistol is to equip police units and special internal units, as well as the army, with it to replace the old Soviet models. Modifications with non-lethal traumatic cartridges have also been developed for the police.
See also the article Stechkin automatic pistol and its characteristics
Replicas
Due to the growing popularity of the pistol, the market was simply obliged to satisfy the needs of the average civilian consumer and provide him with several options for copies. Of course, in addition to MMG copies of the Rook, its younger shooting brothers are of interest. And these exist in all industries:
- Sporting weapon - MP-446S "Viking"
- Trauma – MP-353, MP-472 “Vintuk”
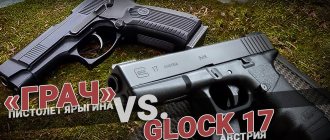
- Airsoft – Gletcher Grach-A
- Our pneumatics are MP-655k, Gletcher Grach NBB
We see that, as in the story with the Makarov pistol and the peculiarities of Russian rejection, there are many of our MRKs. We’ll talk about the 655th pneumatic gun another time, but today we’ll focus on the Gletcher Grach air pistol.
Appearance
In appearance, without any particular quibbles, you can easily recognize the combat weapon "Rook". The silumin body, weight and dimensions delight the owner with their combination. The shutter, as always, is covered with intimidating white inscriptions from the manufacturer. The fuse box, as in the combat version, is presented on both sides.
The handle is plastic and tries to copy the appearance of its older brother. There is also an eyelet for a training jacket. The Gletcher Grach air pistol has retained its original square shape, an experienced hardball player will recognize exclusively our thousandth Anixes.
There's nothing good about the sights here. Yarygin's air pistol has lost the functionality of its transverse rear sight adjustment, and now it has an absolutely dead design. Taking into account the feedback from some owners regarding the inaccuracy of the factory zeroing, it remains to think about such a step by the manufacturer. The rear sight and front sight have white reflective dots, but given the impossibility of adjustment, this is just a drop in the ocean.
The process of assembling and disassembling the pistol
The process of assembling and disassembling the Yarygin pistol is similar to disassembling the PM. Partial disassembly exists to inspect internal mechanisms, clean and lubricate parts. Complete is used for cleaning particularly heavy contaminants, changing lubricants and repairs.
The disassembly sequence is as follows:
- an external inspection of the weapon is carried out for damage;
- the magazine is removed, after which a control descent is made;
- then you need to remove the receiver, pull out the spring and bolt carrier.
Assembly is carried out in reverse order. For convenience, all parts and mechanisms are laid out in a certain order. Place a clean mat under the weapon. Do not use excessive force or blows. Upon completion of assembly, its correctness is checked.
Disassembling and assembling the pistol
Disassembly of the pistol can be incomplete or complete.
Partial disassembly is carried out for cleaning, lubricating and inspecting the gun, complete disassembly is for cleaning when the gun is heavily soiled, after it has been exposed to rain or snow, as well as during repairs.
Frequent complete disassembly of the pistol is not recommended, as it accelerates wear of parts and mechanisms.
When disassembling and assembling the pistol, the following rules must be observed:
1) disassembly and assembly of the pistol is permitted after a detailed study of the pistol and the procedure for disassembling and assembling;
2) disassemble and reassemble on a table, and in the field - on a clean mat; when disassembling and assembling, avoid excessive force and impact;
3) place parts and mechanisms in the order of disassembly and handle them carefully;
4) when assembling, pay attention to the numbering of parts so as not to confuse them with parts of other pistols.
Incomplete disassembly
Partial disassembly of the pistol should be carried out in the following order:
1) separate the magazine from the pistol, to do this, take the pistol by the handle and press the magazine latch with your thumb. Separate the magazine released from under the latch tooth from the pistol with your free hand;
2) check that there is no cartridge in the chamber, to do this, turn off the safety (turn the flag down), move the bolt to the rear position by hand, inspect the chamber, release the bolt and perform a control release of the hammer;
3) separate the lock from the frame by pushing it out on the right side of the gun and, holding the lock rod on the left side of the gun with your fingers, remove it from the hole in the frame (Figure 4);
Figure 4
4) separate the bolt from the barrel, moving the frame forward along the guides;
5) separate the barrel with the rod and return spring from the bolt, for which, holding the protruding part of the coupling, rotate the barrel and move it forward until the breech exits the bolt rammer and separate the barrel with the rod and return spring;
6) disconnect the rod and return spring from the barrel.
Reassembly after partial disassembly
Reassemble after partial disassembly in the following order:
1) put the return spring on the rod;
2) insert the rod with the return spring into the coupling groove;
3) insert the front part of the barrel and the front part of the return spring into the corresponding cavities of the bolt, holding the barrel by the protruding part of the coupling and, compressing the return spring, insert the breech of the barrel behind the rim of the bolt (Figure 5);
Figure 5
4) insert the bolt with the barrel, rod and return spring into the guide frames;
5) insert the lock into the frame hole, aligning the groove in the coupling by moving the bolt with the barrel backwards (Figure 6) and perform a control release of the hammer;
Figure 6
6) turn on the fuse (turn the flag up);
7) insert the magazine into the gun until it engages with the latch tooth. Hitting the magazine with the palm of your hand is not allowed.
Checking the correct assembly of the gun after partial disassembly
.
Check for correct assembly in the following order:
1) turn off the fuse (turn the flag down);
2) move the bolt to the rearmost position and release it; the bolt, having moved slightly forward, should stop, held by the contactor;
3) separate the magazine from the pistol;
4) move the bolt to the rearmost position and release, the bolt should return to the forward position, and the hammer should be cocked;
5) holding the trigger with your thumb, pull the trigger and decock it, pull the trigger and release the hammer by self-cocking;
6) insert the magazine into the gun;
7) turn on the fuse (turn the flag up).
Complete disassembly
Complete disassembly of the pistol is carried out in the following order:
1) perform incomplete disassembly of the pistol, guided by the section Incomplete disassembly;
2) separate the handle from the frame, to do this, from inside the groove for the magazine in the frame, press the protruding part of the handle stopper latch with your finger, use a cleaning rod to move the handle stopper (Figure 7), pull it out of the hole, move the handle back and down until it separates from the frame (Figure 8);
Figure 7
Figure 8
3) remove the trigger mechanism, to do this, use the end of the cleaning rod to press the trigger axis, extend it and remove it. Using the finger of one hand to press down the protruding part of the releasing lug of the trigger rod, with the other hand, grasping the trigger, pull the mechanism out of the cavity of the frame upward (Figure 9);
Figure 9
4) separate the pusher with the mainspring, to do this, put the trigger on the firing pin, insert the thin end of the ramrod into the pusher hole and fix the mainspring (Figure 10), remove the hammer from the firing pin by pressing the lower end of the sear with your finger from the groove under the frame magazine and turn the trigger all the way to the reflector, remove the upper part of the pusher from engagement with the trigger pin and the lower part from the hole in the handle stopper latch;
Figure 10
5) remove the main spring from the pusher, for which, holding the pusher and the spring, remove the cleaning rod from the hole;
6) use a cleaning rod to push the stopper out of the frame and separate the latch of the handle stopper;
7) remove the trigger from the frame, first push it out with a cleaning rod and remove its axle from the frame;
 remove the sear with the spring, first push it out with a cleaning rod and remove the sear axis from the frame, then, turning the sear 90°, remove it through the groove in the frame, remove the spring from the socket in the sear;
9) remove the fuse, to do this, use the thin end of a ramrod to press the fuse lock and, moving it forward, remove the flag from the fuse guides, remove the fuse from the hole in the frame;
10) remove the reflector from the frame, to do this, rotate its front part by 45°, and remove the back part from the groove of the frame, moving forward;
11) remove the magazine latch, to do this, use the end of a cleaning rod from the side window of the frame to press the end of the latch (Figure 11) and release. The latch with its protrusion from the end should rest against the latch stopper (Figure 12). From the side of the groove under the magazine of the frame, use a cleaning rod to press out the stopper from above (Figure 13) and remove it from the frame. Holding the latch with your finger, remove the cleaning rod pressed by the latch from the cavity of the frame. Remove the magazine latch from the frame hole;
Figure 11
Figure 12
Figure 13
12) disassemble the magazine latch, for which, using a cleaning rod, remove the retainer with a spring from the hole;
13) remove the spring from the clamp;
14) disassemble the trigger mechanism, to do this, extend the axis of the trigger rod from the rod side and separate the rod and spring from the trigger;
15) remove the firing pin with the spring from the bolt, for which you need to use a ramrod to press the protruding part of the firing pin until it stops in the hole of the bar, push the bar down along the guides and, holding the firing pin, remove the parts from the hole, separate the spring from the firing pin;
16) separate the ejector and the ejector bore with the spring from the bolt, for which, using a ramrod, push the bore into the hole of the bolt and at the same time pressing on the front part of the ejector, remove it from the groove, remove the bore with the spring from the hole, separate the spring from the bore;
17) disassemble the magazine, to do this, use a cleaning rod to press the protruding part of the magazine spring into the groove of the cover, push the cover forward from the magazine guides, remove the feeder with the spring from the body, and separate the spring from the feeder.
Reassembly after complete disassembly
Reassemble the gun after complete disassembly in the reverse order:
1) assemble the magazine, to do this, insert the spring into the feeder and fix the upper turn with the bend of the feeder, insert the feeder with the magazine spring into the body and insert the cover into the magazine guides, the bent end of the spring should fit into the groove of the cover and fix it;
2) attach the ejector to the bolt, for which put the spring on the oppressor and insert it into the bolt hole, place the ejector in the bolt groove with the hook to the bolt cup and, pressing it against the oppressor, lower its heel into the socket so that the ejector oppressor is located above the protrusion of the heel ejector;
3) assemble the firing pin with the bolt, for which put the spring on the firing pin and insert them into the bolt hole, pressing the spring with the firing pin, insert the bar into the guides with the edge without cuts forward until the strap rests against the firing pin, then, pressing the bar against the firing pin, in In this position, push it down with a ramrod and continue moving the bar until it is fixed by the striker;
4) assemble the trigger rod with the trigger, for which purpose insert the upper side wall, which has a groove, of the trigger into the groove of the rod, insert the rod spring into the groove of the trigger, insert the rod axis with its end without a diametrical depression into the hole of the trigger, while stitching the spring, insert the axle until the coils of the spring are not in the groove and insert the bent end of the spring into the rod recess;
5) assemble the magazine latch assembly with the frame, for which:
— insert a spring with a latch into the latch hole, having first put the spring on the latch;
— insert the latch in this form into the frame hole, ensuring that the plane of the latch recess is parallel to the front plane of the frame groove for the magazine. When separating the magazine with the finger of your right hand, the notch of the latch should be on the left side; when separating the magazine with the finger of your left hand, the notch should be on the right side of the frame;
— from the side of the trigger guard, insert a stopper into the hole in the frame, with a slot into the frame. The stopper should fit into the cutout of the latch and the top part should rest against the latch. Holding the stopper in this position, from the side of the groove under the magazine of the frame from above, insert the end of the ramrod into the hole in the latch, press the latch into the latch;
— holding the latch from the notch side (Figure 14), insert the stopper into the frame and into the latch. Release the lock and remove the cleaning rod. The end protrusion of the retainer should fit into the groove of the stopper. If the end protrusion of the clamp does not fit into the groove, it is necessary to make small longitudinal movements of the stopper using a ramrod up or down until the clamp locks the stopper.
Figure 14
Check the operation of the magazine latch assembly by pressing and releasing it. The latch should return vigorously to its original position;
6) at a slight angle with respect to the frame guides, insert the reflector into the groove of the frame, move it all the way back and lower it down;
7) attach the fuse to the frame, to do this, insert the fuse into the holes of the frame and reflector on the left side, insert the fuse spring into the upper hole of the frame, press the latch with a cleaning rod on the right side and insert the fuse box into the dovetail guides until it snaps into place with the latch, fuse switch to the off position;
attach the sear to the frame, to do this, insert the spring into the sear socket, check whether it falls out of the socket, insert the sear with the spring into the frame slot (Figure 15), turn it with the spring forward, insert the free end of the spring into the frame socket, align the holes under sear axle and frame and insert axle;
Figure 15
9) attach the trigger, to do this, insert the trigger into the slot of the frame until the holes coincide and insert the axis;
10) insert the handle stopper latch into the frame groove and insert the latch stopper through the top hole of the frame and the latch hole;
11) assemble the pusher with the mainspring onto the pistol, to do this, press the lower end of the sear from inside the groove under the magazine frame and turn the trigger until it stops in the reflector. Place the mainspring on the pusher, insert the large eye of the pusher into the groove behind the trigger axis. Lifting the lower end of the mainspring with your fingers, insert it into the latch socket. Grasping the pusher in the area of the upper end of the mainspring, pressing it, place the small eye of the pusher behind the trigger pin;;
12) install the trigger mechanism in the frame, for which, by turning the trigger relative to the axis of the trigger rod (Figure 16), insert the mechanism into the cavity of the frame, after aligning the holes in the trigger and frame, insert the axis into the hole;
Figure 16
13) attach the handle to the frame (the safety must be on), to do this, put the handle on the frame and align the holes in the handle and frame, insert the stopper into the hole, having first pressed the latch from the side of the magazine groove, the stopper should snap into place;
14) further assemble the pistol, guided by the section Assembly after partial disassembly
Checking for correct assembly after complete disassembly.
Check the correct assembly of the gun as indicated in the section Checking the correct assembly of the gun after partial disassembly.
Weapon Combat Check
This check is carried out when:
- the arrival of new weapons in the unit;
- after repairing the pistol;
- in case of violation of the characteristics of the Yarygin pistol, the photo of which is presented in the article.
The combat check is carried out in the presence of an experienced shooter and the employee to whom the pistol is assigned. Before inspection, the weapon is thoroughly inspected and faults are eliminated.
Do not check in windy weather. Shooting is carried out at a target at a distance of 25 meters. In this case, a prerequisite is the use of cartridges from the same batch. The target is fixed on a shield, the width of which is 1 meter and the width is 0.5 meters.
The aiming area is a point on the target, and the aiming point is at the shooter's eye level.
The fight is checked from a standing position, while the hand should not touch the stop. The shooter fires 4 shots. At the end, the accuracy of fire is checked and the average point of impact is calculated.
Features of PYa disassembly
Disassembly of the Yarygin pistol is carried out for thorough cleaning of the pistol and can be either complete or incomplete. Complete disassembly is carried out in cases where the gun needs repair or is heavily soiled. Also, complete disassembly must be carried out in cases where the gun has been exposed to rain or snow for a long time.
In order for the disassembly process to proceed without problems, you need to follow a few simple rules:
- Before disassembling, you need to carefully study the structure of the pistol; it is advisable to have its diagram with you;
- Disassembly should be carried out only on clean litter;
- There is no need to make a lot of effort when disassembling, much less blows;
- When disassembling the gun, it is necessary to place all the parts, strictly following the disassembly order;
- Assembly of the pistol must be completed by checking its correctness.
If you follow these simple rules, the disassembly and assembly process will not cause any problems. At the same time, you need to remember that unless necessary, you should not completely disassemble the gun.
Adjusting the pistol firing
If the grouping of fire is four holes (or three, if only one of them deviates from the rest), and these holes do not extend beyond the circle with a diameter of up to 15 cm. The hole is considered normal if the hole forms an area larger than 150 mm and is removed from the middle of the rest , the most crowded holes formed at some distances that exceed the diameter of the dispersion circle, and also if there is no hole on the target at all, but the parameters of the three holes are acceptable, and the center of the dispersion area is located on the midline of the impact of the three holes.
If this point deviates by 75 mm or more, then the weapon should be handed over to a gunsmith or to a repair shop to carry out the necessary operations: moving or replacing the rear sight from the supplied repair kit of spare parts and accessories. Bringing the weapon to normal combat can be considered complete when it confirms the specified characteristics both in terms of accuracy and shooting accuracy.
Upon completion of bringing the weapon to normal combat, you should attach the rear sight and fill in a new mark instead of the old one.
Disadvantages of weapons
Among the disadvantages are:
- lack of interchangeability of some types of cartridges;
- the angular handle is not very comfortable to hold;
- inconvenience in using the fuse;
- lack of a safe descent function;
- wide front sight;
- increased trigger travel;
- lack of grooves for attaching tactical flashlights;
- low warranty round;
- possibility of delay and jamming of cartridges in the chamber;
- the presence of many small parts, due to which breakdowns often occur;
- impressive weight;
- the need for sighting after changing the type of cartridges;
- low service life in sports training models;
- unreliable plastic frame.
Inspection of live ammunition
Live ammunition is inspected to detect malfunctions that could cause delays in firing the pistol.
When inspecting cartridges, you need to check:
1) absence of green deposits, bruises, scratches on the cartridges and primer that would prevent the cartridge from entering the chamber;
2) the strength of the bullet in the case by hand;
3) no protrusion of the primer above the surface of the bottom of the sleeve;
4) the absence of training cartridges among live ammunition.
If the cartridges become dusty or dirty, or covered with a green coating, they must be wiped with a dry, clean rag.
Note - All defective cartridges must be returned to the warehouse.
Modifications of the Yarygin pistol
The self-loading pistol designed by Yarygin has several modifications:
– MP-446, called “Viking”, is a variant that is mainly used as an export model.
– MP-446S is the same “Viking”, only this is a sports modification of Yarygin’s pistol.
– MP-655K – “Grach” pneumatic pistol.
– MP-353 – a traumatic version of the PYa pistol.
Practice has shown that pistols that were made according to Yarygin’s design have excellent characteristics and are practically universal weapons to carry out a wide variety of tasks necessary to achieve the goal.
The design of the Yarygin pistol and its technical characteristics
A review of the Yarygin pistol should begin with its general design, which is all-metal. This provides the gun with general indicators of reliability and durability, although it significantly reduces the manufacturability of production. In addition, the overall weight of the pistol also increases.
The automatic operation of the pistol is based on the basic principles of bolt recoil with a short barrel stroke. The trigger mechanism of the pistol, which has an open trigger, allows you to fire single shots, both in self-cocking mode and with mechanical cocking. The trigger itself is covered on the right and left by bolt protrusions, which virtually eliminates accidental cocking when caught on ammunition or clothing.
The pistol grip fits very comfortably in the hand (according to the developer), and the trigger guard has a special device in the form of a protrusion, which ensures reliable holding of the weapon when shooting with two hands. The barrel of the Yarygin pistol is made of stainless steel, while the remaining parts are made of high-quality and traditional weapon steel. All PJ parts that may be subject to corrosion are subjected to a chemical oxidation process.
For the safety of the shooter, the firing pin is spring-loaded, which eliminates the possibility of spontaneous puncture of the primer in the cartridge.
The Yarygin pistol magazine is of a two-row box type. For that? so that you can visually determine the number of cartridges in it, there are two holes in the magazine body. The kit comes with two magazines. For those who are not satisfied with a standard holster, there are many different options for holsters for the Yarygin pistol, which require different types of wear and are made of different materials.
Since the magazine holds 18 rounds, this is not at all conducive to quick reloading, so having a spare magazine is extremely desirable. The magazine feeder spring is quite rigid, since its task is to prevent cartridges from skipping and to eliminate their distortions during feeding. The magazine release can be installed for both right-handed and left-handed use.
Success at work
From the very first days, the novice specialist proved himself to be a skilled inventor and developer of weapons for both military and sporting purposes. In collaboration with colleagues, Vladimir Yarygin developed free and standard self-loading pistols of 5.6 mm caliber, models Izh-34 and Izh-35, for training Olympic-level athletes. Already in 1979, pistols were put into mass production. At international fairs in Brno in 1984 and Plovdiv in 1989, they received gold medals and brought Yarygin wide recognition among the sports community. Using weapons from the Izhevsk designer, shooters from around the world became Olympic champions and won awards at the World and European Championships.
Photo: Kalashnikov Concern
Over the years, Yarygin was involved in the development of such shooting models as the small-sized sports and training self-loading pistol "Margo" for special forces and security services, pistols 6P36, 6P37 commissioned by the Russian army and self-defense pistols Izh-77-8, Izh-77-7.6 , Izh-78-7.6. In addition, the group led by V.A. Yarygin, developed such pistols as MP-448 “Skif”, “Bars”, MP-438 “Olympian” based on Izh-35 for training athletes.
Disadvantages of the model
- Heavy weight.
- Multiple misfires when shooting cold.
- The pistol has two types of non-interchangeable magazines chambered for the 9x19 mm Parabellum cartridge.
- Sights tend to get caught on holsters, clothing, etc.
- The sharp edges of the magazine jaws, when loaded with cartridges, cut your fingers until they bleed.
- The magazines on the pistol have jaws that are very bent towards each other. Because of this, the cartridges linger in the magazine when firing. Sometimes stores completely collapse.
- Not very convenient and reliable. It consists of many small parts, which increases the likelihood of breakdowns.
- When firing, there are frequent delays that are difficult to eliminate. There are cases when, during shooting, a spent cartridge case got stuck in the chamber and did not allow the next shot to be fired.
- On some models, the plastic frame in the handle part burst.
Notes
- ↑
- (unavailable link). Retrieved July 11, 2013.
- ↑ Galina Valeeva. Once again about Yarygin’s pistol. // “Kalashnikov. Weapons, ammunition, equipment", No. 1, 2013. pp.52-54
- ://www.lasertools.ru/products/trainer/weapon.html
- ↑
- « PYa pistol of 9 mm caliber - 15 pcs.
»Resolution of the Ministry of Internal Affairs of the Republic of Belarus No. 223 of July 16, 2015 - “ Registration number: 2.2.1/002 Sports training pistol MP 446 VIKING
” Resolution of the Government of the Republic of Kazakhstan No. 1367 of December 25, 2002 “On approval of the State Cadastre of civilian and service weapons and ammunition for them” - " Registration number: 3.1/017 Service pistol MP 443 GRACH
" Resolution of the Government of the Republic of Kazakhstan No. 1305 of December 28, 2006 "On approval of the State Cadastre of civilian and service weapons and ammunition for them for 2007" - Fedor Maksimov, Kabai Karabekov. The Kyrgyz authorities sold award weapons to three hundred Russians, including the person under investigation // Kommersant newspaper, No. 17 of February 1, 2012. p. 1
- Decree of the Government of the Russian Federation No. 166 of March 21, 2003
- Decree of the Government of the Russian Federation No. 718 of December 5, 2005 “On awarding weapons to citizens of the Russian Federation”
- Decree of the Government of the Russian Federation No. 568 of September 16, 2006
- . Kommersant (October 9, 2008). Retrieved August 14, 2010.
- Decree of the Government of the Russian Federation No. 776 of October 2, 2009 “On the provision of combat hand-held small arms and other weapons, ammunition for them, special means, equipment and equipment for the federal bailiff service”
“Rook” - airsoft pistol
Recently, some airsoft organizations have begun to receive a very large number of domestically produced Grach pistols, which are adapted specifically for these purposes. The “Grach” airsoft pistol began to be supplied to Russian stores, but there was a small nuance: the entire batch was without a blowback, which is necessary for installing CO2 cylinders. The manufacturer promises to fix this problem, but no one says anything about whether the shutter will have full travel. The very first thing that catches your eye after purchasing is the weight of the product. The Grach glacier pistol is quite heavy for its overall dimensions. The weight without the CO2 canister and the balls is almost a kilogram (960 g).
The material that was used in production is aluminum alloy, to be more precise, silumin. The handles are made of polymer material. In the place where the original manufacturer's markings (IZHMASH) are located, a small stamp of the company that manufactured the airsoft version was pressed onto the plastic. The frame also has markings applied using laser technology. All inscriptions and marks have absolutely nothing to do with combat samples.
pistol store
Due to the fact that the pistol has very high power, but at the same time there is no hop-up, the range is short, and it turns out that shooting is carried out at a standard distance, but the target is much more painful. With such a range, bullets will not be allowed into the building, that is, closed airsoft grounds are not for PY. One solution is to shoot several magazines in order to obtain the necessary power as a result, only then can you join the competition in the building. The magazine of the “Grach” pistol is full-fledged, i.e. the gas canister is installed directly into it, and not, like the others, into the handle. On the one hand, this is a plus, but for some it is also a minus. A full-fledged magazine is much more convenient when reloading, but, on the other hand, the resource of one can allows you to shoot about 180 balls. Based on this, we can say that it is much easier to insert a cylinder and load a pistol with narrow clips than to equip a magazine that is charged with gas with the required number of balls to continue shooting. But still, the pistol, the price of which is much lower than similar Western-made models, has an excellent cost-quality ratio. The speed of the bullet at the first departure is on average 139-142 m/s. After the 60th shot, the initial speed of the bullet begins to drop; already at the 80th shot, the speed is 120 m/s. One cylinder of gas is enough for about 5-6 stores, but the speed will drop to 80 m/s. A small disadvantage is that the magazine is single-row, resulting in a capacity of only 15 balls.
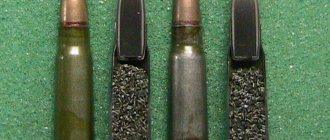
Ammunition for MPN
The cartridge used here is 9x19 Parabellum. It holds more than other pistol cartridges. The cartridge provides high bullet speed and high penetration power. The design includes a steel core.
The mass of the bullet is 5.4 g. When flying out of the barrel, it has an initial speed of 450 m/sec. The muzzle energy is 550 J. The pistol can fire various types of 9x19 cartridges. In particular, the Tula plant produces those in which the bullet has a lead core. They are not as expensive as armor-piercing ones.
Weapon Combat Check
This check is carried out when:
- the arrival of new weapons in the unit;
- after repairing the pistol;
- in case of violation of the characteristics of the Yarygin pistol, the photo of which is presented in the article.
The combat check is carried out in the presence of an experienced shooter and the employee to whom the pistol is assigned. Before inspection, the weapon is thoroughly inspected and faults are eliminated.
Do not check in windy weather. Shooting is carried out at a target at a distance of 25 meters. In this case, a prerequisite is the use of cartridges from the same batch. The target is fixed on a shield, the width of which is 1 meter and the width is 0.5 meters.
The aiming area is a point on the target, and the aiming point is at the shooter's eye level.
The fight is checked from a standing position, while the hand should not touch the stop. The shooter fires 4 shots. At the end, the accuracy of fire is checked and the average point of impact is calculated.
Rook
The Yarygin pistol is a modern weapon that can cause a lot of controversy. Many experts talk about it as a good replacement for the Makarov pistol. But there are also those who talk about weapons as extremely unreliable and completely unsuitable for use as weapons in the police or army. In this situation, one could say that there are as many opinions as there are people, but this is not the case. The fact is that most of the bad reviews about this pistol are based not on personal experience of use, but on what someone said or read someone’s negative opinion before. Recently, criticism of weapons made by domestic factories has become fashionable, and because of this, this opinion has formed. Yarygin's traumatic pistol breaks all stereotypes about domestic weapons as a combat unit.
Scope of application and operating principle
The Yarygin combat pistol is designed for close combat and is also a personal weapon for officers of the Armed Forces.
Locking and unlocking of the barrel occurs after the coupling and the front plane of the window are engaged (disengaged). As a result of the interaction of this clutch and the cam groove, instantaneous locking or unlocking occurs.
The trigger mechanism also has special features and allows combat by self-cocking and with pre-cocking of the hammer. The pistol frame is steel and the handle is plastic.
In the safety position, the trigger, bolt and sear are locked. The features of the pistol allow you to fire a shot after removing the safety at low speed and trigger pull.
The chamber should be filled at least halfway. This is due to the need to apply a certain force to the spring. If the effort is not enough, the next round of ammunition may be missed.
The magazine latch is located near the trigger guard and can be set for combat with either hand.
Sights (non-adjustable) consist of a rear sight and a front sight
An important feature of the Yarygin pistol is the ability to install phosphor capsules on the sight to facilitate shooting in the dark
Gun assembly and lubrication
After cleaning and inspection, wipe the parts dry and lubricate them with liquid gun oil. Pay special attention to the presence of lubricant on rubbing surfaces: guides and internal surfaces of the bolt, guide frames, outer surfaces of the barrel.
Apply oil to the parts and mechanisms of the gun in an even, thin layer. Excessive oil on gun parts and mechanisms contributes to contamination and can cause delays in gun operation.
After lubrication, reassemble the gun.
Note - A gun brought into a warm room from a frost cannot be lubricated until it sweats. If drops of water appear, without waiting for the moisture to dry, wipe the parts and mechanisms of the gun dry and lubricate them.
Inspection of the pistol in disassembled form.
When inspecting a pistol in disassembled form, it is necessary to check whether all parts (frame, barrel, bolt, magazines) have the same numbers.
During a control inspection of the barrel bore, check:
1) cleanliness of the rifled part of the bore;
2) cleanliness of the chamber;
3) serviceability of the muzzle and breech parts of the barrel;
4) the absence of swelling of the barrel, noticeable in the bore in the form of a transverse dark solid ring (semi-ring) or detected by the convexity of the metal of the outer surface of the barrel. If there is swelling, send the gun to a repair shop;
5) absence of cracks in the trunk;
6) absence of fraying of the bore and chamber, abrasion or rounding of the rifling fields, scratches and nicks.
When determining the quality condition of chrome-plated barrels, follow the Instructions for the Categorization of Artillery Weapons.
When inspecting the frame, pay special attention to the absence of cracks in the rear part, in the area where the trigger is located, and inspect the fuse.
When inspecting the valve, check:
1) the condition of internal grooves, sockets and protrusions, which should not be dirty and should not have nicks;
2) movement of the striker in the bolt channel;
3) absence of crushing of the ejector hook and the firing pin;
4) absence of rubbing and jerking when turning the ejector;
When inspecting the return spring, check for burrs, rust, bends, dirt and breaks.
During the control inspection of the trigger mechanism, pay special attention to the serviceability of the hammer, sear, trigger rod and check for the absence of chipping and wear of the hammer and sear cocking, the safety lug and the trigger self-cocking tooth and the trigger rod self-cocking tooth.
During a control inspection of the main and spare magazines, check:
1) serviceability of the feeder;
2) serviceability of the edge of the magazine body for the magazine latch;
3) no bending of the upper edges of the magazine.
Inspect the remaining parts of the gun and check for chipped metal, cracks and nicks, bends, rust and contamination.
Functional
Let's start with the mechanics. The trigger mechanism is double action, you can shoot with or without pre-cocking the hammer. As with any glacier, the Gletcher Grach air pistol is equipped with a fully functional slide stop, safety, and magazine release button, similar to its combat counterpart. There is also an incomplete disassembly, although it differs from the original:
In the same version, disassembly occurs in the following order:
- Removing the magazine
- Removing the slide stop (press the button on the back side)
- We remove the safety, cock the hammer, remove the bolt (using the method towards you and upwards)
- Removing the return spring
When you take it apart, the store catches your eye. The Gletcher Grach air pistol, unlike other domestically produced analogues, has a full-size magazine with a built-in valve. To pierce the balloon, a clamping screw is used, hidden behind a plastic cover.
The declared shot speed is 115 m/s. Many owners write off the average 100 capes. The accuracy is mentioned above - in the absence of adjustable devices it’s not worth talking about, the accuracy is average - it’s enough to destroy bottles and big hardball players in defense.
Cleaning and lubricating the gun
Cleaning and lubrication of the pistol is carried out in the order set out in the “Shooting Manual”, section “Cleaning and lubrication of the pistol”.
A 6P35 pistol sent for long-term storage must be thoroughly cleaned, the barrel bore and trigger mechanism lubricated with liquid gun oil RZH TU 38-1011315-90, followed by a single layer of wrapping in anti-corrosion paper UNIK 22-80 TU 5453-003-05773103 -96 (anti-corrosion paper MBGI 8-40 GOST 16295-93 is allowed) and one layer of waxed paper BP-3-35 GOST 9569-79 and sealed in a cardboard box.
The gun is always kept clean. This is achieved by timely and correct cleaning and lubrication. Cleaning the disassembled pistol is carried out simultaneously with its inspection.
For cleaning and lubrication, use the following materials:
1) gun oil TU 38-1011315-90 - for lubricating parts and mechanisms of the gun after cleaning them;
2) barrel cleaning solution (BCS) - for cleaning parts of the pistol exposed to powder gases;
3) tow (short flax fiber), peeled from the stems - for cleaning the bore;
4) rags - for cleaning, wiping and lubricating the gun.
To make cleaning grooves and holes easier, you can use wooden sticks.
Clean the RChS pistol only after shooting. If after shooting the pistol was cleaned with liquid gun oil, then upon returning from shooting, clean the pistol with an RFC solution.
In field conditions, clean the pistol only with liquid gun oil.
Clean the gun in the following order:
1) prepare a cleaning rod and the necessary material for cleaning and lubrication;
2) clean the barrel bore, for which:
- insert tow or rags through the ramrod slot; the thickness of the tow layer should be such that the ramrod with tow is inserted into the barrel bore with a slight hand effort;
- soak the tow with liquid gun oil;
— insert the ramrod into the bore from the breech;
— place the barrel of the pistol on the table and, holding it with your left hand, smoothly move the ramrod along the entire length of the barrel several times with your right hand;
- change the tow and repeat the cleaning again;
- thoroughly wipe the cleaning rod;
- wipe the barrel bore first with tow and then with a clean dry rag;
— repeat cleaning the barrel bore until there are no traces of soot on the rags. Clean the chamber in the same way. The chamber must only be cleaned with the breech
parts by rotating the cleaning rod with tow (rags).
Cleaning with the RFC solution is carried out in the same order as with liquid gun oil and continues until the carbon deposits are completely removed.
After this, wipe the bore with dry tow or a rag. After cleaning the rifled part of the bore, clean the chamber in the same way.
Carefully inspect the bore and chamber against the light. When inspecting, pay special attention to the chamber and the corners of the rifling, in which dirt and carbon deposits should not remain; wipe the remaining parts and mechanisms with a rag until dirt and moisture are completely removed.
Remove rust with a rag soaked in liquid gun oil. Do not lubricate the holster, but only wipe it dry with a rag and dry it.
Note - Prepare the RFC solution in the amount necessary to clean the weapon for one day. A small amount of RFC solution can be stored for no more than 7 days in bottles, sealed with a stopper, in a dark place, protected from sunlight and away from heating devices. It is prohibited to pour RFC solution into metal lubricants.
Composition of the RChS solution:
1) water suitable for drinking - 1 l;
2) ammonium carbonate - 200 g;
3) potassium dichromate (chrompic) - 3-5 g.
When inspecting the assembled pistol, you must check:
1) correspondence of the number on the bolt, barrel and magazines to the number on the frame;
2) the absence of rust, scratches, nicks and cracks on the parts and mechanisms of the gun;
3) the absence of nicks on the front sight and in the rear sight slot that interfere with aiming, the strength of holding the rear sight in the bolt grooves when the marks on the rear sight coincide with the marks on the bolt;
4) normal switching of the fuse from one position to another and reliability of fixation in extreme positions;
5) the presence of a “release” of the trigger as follows: when the hammer is released and the trigger is pulled back as far as possible, the trigger head, when pressed with a finger, should move forward, and after the pressure stops, it should vigorously return to its original position. When the trigger is released and when the trigger head is pressed forward, the trigger should be limited to the safety cock and in this position should not be torn off it. After the pressure stops, the trigger should return to its original position;
6) absence of bending of the walls and upper edges of the magazines, as well as freedom of movement of the feeder in the magazine;
7) freedom of attaching the magazine (spare magazine) to the pistol and separating it from the pistol, as well as the reliability of holding the magazine with the magazine latch;
correct operation of the assembly units and mechanisms of the gun, for which:
- turn off the fuse (turn the flag down), pull the bolt back all the way and release it, the bolt, having moved a little forward, should stop with the lock;
- separate the magazine from the pistol, pull the bolt back and release, the bolt under the action of the return spring should vigorously return to the forward position, and the trigger should be cocked;
— insert the magazine into the pistol;
- press the trigger, the hammer should be released from the cocking position, hit the firing pin and move to the “release” position;
- turn on the safety (turn the flag up), the shutter must be locked, the hammer must not be cocked when the trigger is pressed (self-cocking), when the trigger is directly pressed with the thumb, the hammer must not turn back;
- turn off the safety (turn the flag down) and press the trigger, while the hammer should be cocked and, without engaging the safety cock, strike the firing pin and move to the “release” position;
- cock the hammer, put it in cocking position, turn on the safety (turn the flag up) and press the trigger, the hammer must not be disengaged and the bolt must be locked;
— check for dirt and other defects in the bore. To do this, you need to place the shutter on the lock and look into the bore from the muzzle, inserting white paper into the shutter window;
— check the reliability of the stopper’s fixation in the handle; to do this, press the stopper with a cleaning rod; with a slight pressing force, the stopper should not fall out of the handle.
Simultaneously with the control inspection of the pistol, carry out a control inspection of the accessory:
1) check the spare magazine as indicated in the section Assembling and lubricating the gun;
2) check that the ramrod is not bent and that there are no nicks or scratches on it, as well as cracks in the slot;
3) check the strength of the fastening elements in the holster and the absence of tears or irregularities in the seams and material.
Trigger mechanism
It is worth noting that a double-action trigger mechanism was used. The channel in the barrel is locked during a shot by bevelling the bolt to one clutch stop. While the movement of the barrel during unlocking or locking is performed as a result of the interaction of a special shaped groove, which is located on the lower protrusion and has a special lock. The return spring in the impact mechanism, together with the guide, is located in the lower part of the barrel. There is a special indicator on the bolt itself, which indicates the presence of a cartridge inside the chamber; this role is played by a small protrusion on the ejector. A mechanically controlled flag is installed as a fuse. If you turn on the safety, certain parts of the firing mechanism are blocked (shutter, trigger, sear, hammer). The trigger can be blocked both when cocked and when it is deflated. For ease of use, the magazine latch is located on the handle, placed opposite the trigger guard, it can be installed on both the left and right sides, and can be double-sided if necessary. On pistols that were of later production, the sight was changed, in addition to which special notches were added to the front of the casing and on the bolt. The picture shows the basic principle of feeding cartridges in the Yarygin pistol.
One downside is the non-adjustable sight. Aiming is carried out by placing three points in one line. The “Grach” pistol, whose technical characteristics are much better than its classmates, has an aiming range of 50 m. If necessary, it is possible to install an additional adjustable sight with a range from 25 m to 100 meters. To improve ergonomics, a plastic handle with special rubber pads was created.
Without going into details, we can say that the gun is quite ergonomic, reliable, and also comfortable. The descent, unlike its classmates, is rightfully considered very soft.
MPN structure
One of the important innovations was the use of a firing mechanism, which provided for automatic installation of the trigger on the safety. Another interesting improvement was the use of a two-row magazine. With its help, it was possible to double its capacity compared to the Makarov pistol.
The fuse is on both sides here. This makes it convenient to use not only for right-handed people, but also for left-handed people. When it is turned on, the trigger is locked in the position in which it is currently located. The bracket covers the trigger on both sides. This prevents accidental release when removed from a holster or clothing.
When using the self-cocking mode, the trigger pull force is 5.8 kg. If the hammer was pre-cocked, then it will be equal to 2.6 kg. These characteristics ensure safe handling of a loaded pistol. The trigger mechanism has a long trigger pull, but it is smooth and comfortable.
The sighting device includes a front sight and rear sight. They are equipped with white inserts to facilitate the aiming process. Even in low light conditions they are clearly visible. The front sight is made wide. This improves its visibility, but makes aiming less accurate.
The mechanism works as follows:
- When the trigger comes off the sear, it sets the firing pin in motion.
- After hitting the capsule, a fire occurs.
- Burnt powder gases push the bullet out of the barrel. At the same time, their force is applied to the bolt, pushing it back.
- The barrel disengages from the bolt. The last one moves backwards. During this movement, the used cartridge case is ejected. This is due to the fact that it hits the shutter window reflector.
- At the extreme point of movement, the trigger is cocked, which moves in the opposite direction under the action of a return spring. At this time, the upper cartridge in the magazine is engaged and removed from the magazine. It is placed in the chamber. The barrel engages with the bolt and they perform further movement together.
- The barrel is locked with the loaded cartridge.
The pistol is now ready to fire.
There is a Weaver bar here. It is designed for attaching various types of body kits. In particular, you can use a laser target designator or a tactical flashlight.
There are several modifications of this pistol:
- The export model is called "Viking". Its model is MP 446. It uses a polymer frame, which is lighter than a traditional mechanical one. The sight you use has the ability to adjust the distance.
- This pistol has a sporting version. It's called MP 446c "Viking". The model has characteristics that fully comply with the requirements of the International Confederation of Practical Shooting. A lightweight polymer frame is used here. The magazine is reduced in size and can only hold 10 rounds. It can be used for sporting purposes, for training, to learn how to assemble or disassemble a weapon in the shortest possible time.
- The MP 446C "VIKING-M" has improved characteristics. The store here is of a higher quality, and other design elements have been improved. A polymer frame is used. Recoil is significantly reduced compared to other variants of this weapon. The pistol uses a Picatinny rail, which can be used to mount various types of body kits.
- Based on the Yarygin pistol, a civilian weapon was created - the Rook pneumatic pistol. At the same time, the device is completely different from the main version, and the appearance is exactly copied from it.
- Another type of civilian weapon created on the basis of the PY is the MP 443 “Rook”. This pistol fires rubber bullets and is intended for use in self-defense. Its caliber is 13 mm. Rugger bullets are used for shooting. The magazine capacity is 9 rounds.
- A cooled version of the PYa is produced. This model can be used for educational or collection purposes. It is called “cold SHP”. This weapon can only fire blank shots. The chamber is adapted for use of 10x31 ammunition. The combat stop was removed from the breech, and a bushing was installed inside the barrel. The design of the extractor window was also changed.
The presence of various modifications allows the weapon to be used in a variety of areas.
Details about Yarygin's new pistol are provided
In the modernized version, the barrel length was increased to 120 mm. The bottom of the store was made metal. Now the magazine latch has become more prominent. The balance of the pistol has become more accurate. The sharp edges have been removed, making the shape of the weapon more ergonomic.