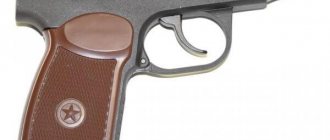
Technical characteristics of PM49
| Characteristic | Parameter |
| Caliber | 4.5 mm |
| Shot source | CO2 gas cartridge |
| Ammunition | Copper-plated balls |
| Trunk | Metal, no rifling |
| Bullet speed | 125 m/s |
| Shots per cylinder | 60 |
| Number of cartridges in the magazine | 17 pieces |
| Shot strength | No more than 3 Joules |
| Material of manufacture | Aluminium alloy |
| Blowback system | absent |
| Weight | 0.65 kg |
| total length | 16.5 cm |
This is a classic design of a short-barreled pistol, where a CO2 gas cylinder is used as the source of the shot. Shoots copper-plated steel balls with a caliber of 4.5 mm. It is almost completely similar to the Makarov combat pistol. Manufactured in Taiwan under license from Borner.
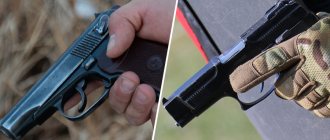
Pneumatics are used for entertainment and shooting at short (no more than 15 m) distances. But due to its similarity with combat PM, it can also be used for self-defense purposes - if a conflict arises, an ordinary person will not be able to determine whether it is a real pistol or a pneumatic one. Due to its low power, the bullet will not cause serious harm (only if it hits the eye), especially if the attacker is wearing thick clothing, but the weapon has a psychological effect.
The operating principle of the pistol is simple. It contains an air chamber into which part of the gas enters when the can is pierced with a needle, and a bypass valve with a rod, which is hit by the trigger when the sear breaks. The gas mechanism is connected to the barrel with a plastic attachment (this is the only plastic element in the pistol). The charging chamber is connected to the magazine. From the chamber, the bullet is fed into the barrel by the needle of the bypass valve when the trigger hits the gas valve rod.
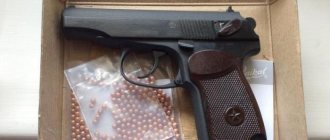
The magazine for loading bullets is removed after pressing the button, which is a design element of the clip. There are no buttons or flags directly on the pistol body for this. The magazine holds 17 copper-plated steel balls with a caliber of 4.5 mm.
After installing a magazine loaded with bullets and a gas can into the handle (clamped with a hexagon, which is included in the package), the gun is ready for use.
Air gun device
Firearm and pneumatic versions of weapons have structural similarities. True, a sample with a bore diameter of 4.5 mm is used for entertainment and training purposes, and also helps a beginner hone his skills in handling a pistol or rifle. A number of “aircraft” models are repetitions of serious solutions of military analogues; for example, some identical parts are used.
Impact mechanism
This unit opens the exhaust valve through which gas exits the can. When the shooter presses the trigger, the mainspring acts on the valve using rods. A portion of gas rushes to the shank of the projectile, subsequently pushing it out of the barrel channel. A shot occurs.
Trigger
The system keeps the air gun in “combat readiness.” It is developed taking into account two technological ideas. Single-action mechanics involve manual cocking of the hammer (revolvers), and double-action mechanics involve automatic hammer return (pistols). There is a third system - combined, combining the 2 previous types of mechanics.
Dispensers
To reproduce a shot, compressed air of a specific volume is required for a short period of time. This is done in different ways, but the easiest is to open the exhaust circuit with a trigger. The valve closes the supply chamber when the pressure increases. The CO2 output volume is controlled by the spring tension of the outlet valve.
A complex option involves using a high pressure regulator (reducer) in the design of the gun. It helps stabilize the CO2 supply when the total amount as well as the pressure level fluctuates. This system is used in PCP pneumatics.
Nodes
The locking assembly helps prevent carbon dioxide leakage by sealing the bolt and barrel. Other pneumatic samples use different locking options. So, for example, in the PPP the receiver is in contact with the housing gasket - sealing occurs. On gas-cylinder analogues, sealing is ensured differently - either the sleeve of the metering unit is extended, or the barrel is displaced.
Bullet feed unit
There are 3 types of pneumatic magazines:
- drum;
- linear;
- gravitational
Single-shot pneumatic models do not provide for self-feeding - the shooter places the ammunition in the receiver manually.
Trunk
The main part of the pneumatics. Firearms are equipped with weapon-grade steel barrels. There are “air” models that use a plastic element - naturally, the service life is short. A smooth-bore channel is provided for firing spherical bullets. Barrels with rifling are designed for firing lead projectiles and increase the accuracy and accuracy of shots.
Pressure supply system
Performs an important function in pneumatics - it gives the projectile an initial speed. The working principle depends on the type of weapon: gas, PSP or PP.
Technical characteristics of TT pneumatics
Before moving on to the main topic, let's first get acquainted with the pneumatic "Tula Tokarev" in a little more detail. To do this, the easiest way is to look at the passport with technical characteristics, which is necessarily included with the weapon. Here's what information you can find there:
| Characteristic | Parameter |
| Caliber | 4.5 mm |
| Barrel length | 190 mm |
| Barrel type | threaded |
| Ammunition type | BB balls |
| Magazine capacity | 18 + 1 balls |
| Shot speed | up to 120 m/s |
| Rate of fire | 78 rounds per minute |
| Power | 3 J |
| Aim | front sight, dovetail |
| Energy source | gas cylinder |
| Weight | 740 grams |
Thus, it immediately becomes clear that the air TT is a pistol designed for recreational purposes and airsoft. The power of the muzzle energy is not enough to hunt even small game. But a fairly spacious magazine allows you to effectively use the model for training purposes. In addition, this is also evidenced by the possibility of modifying the weapon - on the receiver there is an 11-mm dovetail sighting rail, suitable for attaching almost any existing body kit.
Precautionary measures
To ensure that shooting only brings pleasure and does not lead to undesirable consequences, you must always adhere to the safety rules for handling weapons:
- Treat the pistol as if it were loaded (the safety may not work);
- Aim only in a safe direction;
- The target should not be too hard to avoid unwanted ricochet;
- Do not point weapons at people or animals;
- The pistol must be kept on safety until there is a need to fire it;
- Do not touch the trigger until you are ready to shoot;
- It is better to use safety glasses for shooting;
- The weapon must be stored unloaded;
- You cannot make any changes to the design of the device.
Device and circuit
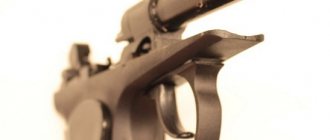
During the manufacture of this model, parts from a real PM are used, this gives the air pistol the closest appearance to a combat pistol. The barrel is slightly shortened and extends beyond the muzzle, which creates the appearance of a real 9 mm caliber. The most obvious difference between the MP54K and the Makarov pistol is the absence of an ejector for spent cartridges.
Features:
- a can of carbon dioxide is placed in the holder and tightened until it is pierced with a needle;
- carbon dioxide in the can begins to change from a liquid state to a compressed state, and is located in a sealed container;
- the balls are installed in a cage that has a feeder and a spring;
- when you press the trigger, the trigger hits the valve, which releases a certain portion of gas;
- the escaping carbon dioxide has high pressure, acting on the bullet and pushing it out of the barrel at a certain speed.
Before transportation, the weapon must be unloaded - for which it is necessary to shoot the remaining bullets in the clip and carefully unscrew the cylinder with the remaining carbon dioxide.
Performance characteristics:
- Initial flight speed – 115 m/s.
- Caliber – 4.5 mm. Copper-plated explosive balls or lead shot of the appropriate diameter can be used as ammunition.
- Weight – 730 g.
- The number of cartridges in the magazine is 13 pieces. The holder also contains a device for breaking through and attaching a gas cartridge. One cylinder is enough for about 70 shots, then the air pressure is not enough for the normal trajectory of the bullet.
- The case material is weapon steel, the handle lining is plastic.
- Dimensions (LxHxW) – 16.9x14.5x3.5 cm.
- The trigger mechanism is double.
- The barrel is metal, with rifling.
- The standard sight is an open, non-adjustable front and rear sight.
- The fuse is mechanical.
The main advantages of this model include simplicity of design, recognizable appearance and high initial speed of the bullet. This made the pistol the most popular among airgun enthusiasts.
Ease of partial disassembly and ease of maintenance minimize labor costs when caring for the gun. Multi-charging makes it possible to fire several shots in a row without being distracted by frequent charging.
The disadvantages of the model include:
- a problem common to all gas-cylinder air pistols, which is associated with a decrease in the temperature in the can during active shooting, which leads to a significant decrease in the initial speed;
- not always high quality workmanship;
- possible defects in some pistols that impair the tightness of the gas fittings;
- quite high cost;
- inaccurate resemblance to a combat PM - an experienced person can see the absence of an ejector and a screw installed to press the canister from below on the handle;
- It is not possible to install sighting equipment other than a laser pointer on the front of the trigger guard.
Device
The pneumatic replica is produced on the basis of the original combat pistol, with many parts and mechanisms remaining unchanged. Therefore, the design of the Makarov air pistol largely coincides with the original. Before you climb inside, I suggest you look at the interactive diagram of how the combat PM works:
PM operation scheme. Click "DEVICE" to get started
PM Information Poster (click to enlarge)
Now let’s apply diagrams of the pneumatic Makarov. A little different, but overall still the same.
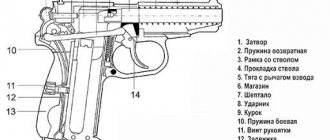
Diagram of the Makarov MP-654k air pistol (general structure and magazine)
Key points about the design of this Makarov:
- The general diagram of all mechanisms of the pneumatic Makarov is shown in the figure above.
- The bullet is ejected from the barrel due to the energy of the compressed gas of the cartridge located in the magazine. The gas portion per shot is cut off due to the operation of the firing mechanism.
- The bullets are fed to the barrel line by a spring in the magazine.
- The USM allows firing by self-cocking or pre-cocking.
- The safety is located on the left side of the bolt. When switched to the safety mode, the trigger is released safely without firing a shot, ensuring that the trigger does not hit the firing pin.
- The gun can use two types of cans - 7 g. (when using the supplied adapter) and 12 g.
How to completely disassemble a pneumatic PM
Partial disassembly of the device is carried out mainly in the field. Considering the “pneumatic” design, there are basically no problems with cartridges, sticking, etc. Therefore, we disassemble it only for light wiping and lubrication during long-term storage. It is necessary to completely disassemble it if it breaks down, the weapon gets into water, or is heavily soiled. Then you need to carefully disassemble everything, wipe it and lubricate it.
Complete disassembly
Step 1 - press the magazine release.
Step 2 - take out the magazine.
Step 3 - move the bracket to the side, having first removed the fuse.
Step 4 - move the bolt back, lift it in the extreme position and move it forward.
Step 5 - twist the spring with rotational movements.
Step 6 - carefully lay out all the parts on a clean cloth.
Gate
The shutter is disassembled, like any large module, into individual elements.
Step 1 - take the bolt in your left hand. Using the thumb of your right hand, turn the fuse clockwise all the way and pull it out.
Step 2 - shake out the firing pin into your palm. The shutter is disassembled.
Frame (numbering according to the device diagram)
Let's return to the frame. For further disassembly, it is necessary to remove the return spring, if it is not removed during partial disassembly.
Description of the scheme:
- Handle screw (11);
- Lever;
- Gate valve (12);
- Mainspring (10);
- Sear (7);
- Shutter stop;
- Trigger (9);
- Traction (5);
- Trigger (14);
- Trigger guard;
- Barrel (3);
- Barrel nut.
The frame in the diagram is listed as No. 1.
Step 1 - take the gun in your left hand.
Army photos on Shutterstock: Army and military photos.
Step 2 - unscrew the screw securing the handle pad using a screwdriver.
Step 3 - remove the trim.
Step 4 - use a screwdriver to remove the sear spring from the bolt stop. We pry it up, pull it back and pull it out. A thin screwdriver with a narrow tip is suitable - it is easier for it to pry off the spring.
Step 5 - turn the sear clockwise half a turn, then pull it out, removing it from the groove. The sear is removed complete with the bolt stop.
Step 6 - remove the mainspring by unscrewing the nut with a wrench or pliers.
Step 7 - turn the trigger half a turn inside the structure and remove it in the same way as the sear.
Step 8 - get the rod.
Step 9 - lower the trigger guard and pull out the trigger. We return the trigger guard to its place.
Step 10 - unscrew the barrel. Be careful not to lose the barrel washer. Hold the barrel nut as it houses the trigger guard spring.
Step 11 - remove the barrel washer.
Step 12 - pull out the pin into which the spring rests. We leave the drift in place of the pin and slowly pull it out, keeping the spring from jumping out.
Step 13 - remove the spring.
Step 14 - remove the trigger guard using a drift. We knock out the pin and separate the bracket.
The frame is now completely disassembled. Let's go to the store.
Shop
Step 1 - the first thing to start with is to unscrew the cylinder release screw. It is not difficult. It can even be twisted with your fingers.
Step 2 - remove the magazine head by unscrewing the screw. This is done using special keys, but it can also be done with a knife. The main thing is to hold the spring with the ball feeder.
Step 3 - remove the spring, resting the magazine on the table.
Step 4 - unscrew the valve with a screwdriver.
Step 5 - take out the valve.
We check the integrity of the spring and gaskets.
Incomplete disassembly of a Makarov pistol
7. Perform partial disassembly of the pistol in the following order.
1) Remove the magazine from the base of the handle (Fig. 3). Holding the pistol by the handle with your right hand, with the thumb of your left hand, pull the magazine latch back as far as it will go, while simultaneously pulling back the protruding part of the magazine cover with the index finger of your left hand, remove the magazine from the base of the handle.
Rice. 3. Removing the magazine from the base of the handle
Check to see if there is a cartridge in the chamber, to do this, turn off the safety (move the flag down), move the bolt to the rear position with your left hand, place it on the bolt stop and inspect the chamber. Press the shutter stop with your right thumb to release the shutter.
2) Separate the shutter from the frame. Taking the pistol in your right hand by the handle, with your left hand pull the trigger guard down (Fig. 4) and, tilting it to the left, rest it against the frame so that it is held in this position. During further disassembly, hold it in this position with the index finger of your right hand.
Rice. 4. Pulling the trigger guard
With your left hand, move the bolt to its rearmost position and, lifting its rear end, allow it to move forward under the action of the return spring. Separate the bolt from the frame (Fig. 5) and put the trigger guard in its place.
3) Remove the return spring from the barrel. Holding the frame with your right hand by the handle and rotating the return spring towards you with your left hand, remove it from the barrel.
Rice. 5. Separating the shutter from the frame
Operating principle
To understand how to properly disassemble an air gun, you first need to study the principle of its operation.
Without this, a novice gunsmith may have questions regarding the importance of a particular system. Here are the three stages according to which a shot occurs in a pneumatic TT:
- Cocking the trigger and loading a cartridge. To send a bullet into the bullet receiver, it is enough to pull the bolt frame back. After this, the spring located on the trigger will move into the firing position, but the automatic safety will prevent an accidental shot.
- Shot and automatic reload. As soon as the shooter removes the safety and pulls the trigger, the gas cylinder will release a charge of energy and direct it to the bullet in the mechanism. At the moment of the shot, the weapon will also automatically reload, that is, a new bullet will be fed into the cartridge receiver.
- The movement of the bullet inside the barrel and its ejection. At the moment when the bullet moves inside the metal rifled barrel, it begins to gradually twist, which is why the accuracy of the shot increases noticeably. As soon as it leaves the muzzle, there is a loud bang as a significant portion of the energy has still not been released from the gun.
That's the whole operating principle of the TT. Its difference from other air pistols is its automatic reloading system. However, we will return to this issue in more detail in the section on the design of weapons.
Charging an air gun with a CO2 cartridge
When you get a new pistol, the first thing you need to do is insert a can into it. Before doing this, you need to carefully study the instructions, which describe the entire process in detail. It most likely states that you need to use a 12g CO2 canister. Each model may be slightly different and have its own nuances, but, in general, everything happens according to the algorithm:
- Put the gun on safety (pull the trigger and move the safety lever to the lower position so that the red indicator is not visible). All manipulations must be carried out with the barrel pointed to the side.
- If the gun has already been charged, then first you need to remove the old cylinder. To do this, you need to remove the cover on the handle and unscrew the screw. After this, you can remove the used container.
- To insert a new CO2 tank, you first need to fold down the cover. The canister is inserted with the narrow side up. It needs to be completely placed in the handle, then tighten the screw until it punctures. Next, you should return the cover to its place. To determine that the gas tank is punctured, it is necessary to remove the weapon from the safety and fire in a safe direction.
CO2 should not come into contact with exposed areas of the body; if it gets on the skin, frostbite can occur. Before removing the old gas tank, you need to make sure it is empty. To do this, slowly turn the cap counterclockwise until the gas stops coming out.
It is important to remember that at a temperature of +50, the cylinder can explode; you should not knock on it or throw it into the fire.
Repair of TT air pistol
The Tula Tokarev air pistol is largely loved due to the fact that it can be repaired at home without having much knowledge in the field of weapon design. Here is a list of the main problems, as well as recommendations to get rid of them:
- Elimination of defects or deformation of the sighting device. A crooked rear sight and front sight is one of the main problems that TT owners encounter during operation. However, even if you come across a defective model, this is not a reason to hang your nose. You can deal with the defect yourself by making an additional slot in the rear sight using a file. This will expand the horizontal adjustment function.
- Repair of the trigger mechanism. Problems of this kind are usually associated with wear of the mainspring (the standard version is enough for no more than 5 thousand shots). The problem is resolved by replacing the part with a new one. As for other parts of the trigger, they almost never break, since they are made of high-quality weapons-grade alloy. The most important thing is not to damage anything yourself in the process.
- Troubleshooting problems with the store. The main problem with the TT is that its cartridge reservoir is made according to a different design than the pistol itself. Because of this, the tightness of the puncture unit in the gas cylinder is often broken. To prevent this from happening, it is necessary to monitor the amount of air being released. If a problem does arise, then it will be cheaper to replace the magazine with a new one than to try to repair it.
- Air valve depressurization. Unlike the Makarov pistol, the TT uses a system with a large number of screws and pins. This simplifies the weapon manufacturing process, but increases the risk of depressurization. However, in most cases, the problem is resolved by replacing the fastener with a larger one (you will also have to create a new fastener).
- Deformation of the mainspring. Any owner of a TT air pistol will sooner or later encounter this problem. The best option would be to replace the element. However, if you have the opportunity to take the gun to a service center, then you can do without radical measures. Craftsmen will be able to put the old part back into service if the level of damage allows this.
As you can see, you can cope with most problems even at home. The most important thing is to have a good repair kit on hand and follow advice from the professionals. However, you should not go to extremes when a cheap part breaks. It is much easier and faster to replace it with a new one than to try to fix a complex defect.
About the complete disassembly of the Makarov pistol
The procedure for disassembling the PM consists of the following operations:
Separating the sear and slide stop from the frame.
Produced by simultaneously pressing the shank in the trigger and the hammer.
Removing the sear spring from the bolt stop.
This is done using the rubbing tab. The sear and bolt stop rise up and are separated from the frame.
Separating the mainspring from the frame and the handle from its base.
Using a blade placed on the wiper or a bolt deflector, remove the screws and slide the handle to the rear position. The mainspring is removed by pressing it to the base and removing its bolt located on the handle. This will allow you to remove the mainspring located on the base boss.
Separating the trigger from the frame.
To do this, you need to turn the trigger all the way forward, while the trigger moves towards the barrel. This will allow you to remove the trigger.
Separation of the trigger rod and cocking lever from the frame.
The rear end of the trigger rod rises upward with the simultaneous removal of its pin from the hole in the trigger.
Separation from the trigger frame.
To do this, you need to remove the pins on the trigger from the special sockets that the frame contains. This is done by turning the shank of the hook forward.
Separating the safety and firing pin from the bolt.
After turning it to the upper position, the safety flag is moved out of the socket to the side, which will allow its removal from the bolt socket.
Separating the ejector from the bolt.
Before the operation, the ejector bend must be recessed using the protrusion on the wiper. The ejector must be untwisted along the hook until it comes out of the groove.
Disassembling a pistol magazine.
It is produced by depressing the feeder spring while simultaneously removing the magazine cover, which is possible due to the protruding part in it. After this, the feeder spring is sequentially removed, and then the feeder itself.
After complete disassembly has been completed, the Makarov pistol is assembled in the reverse order.
View gallery
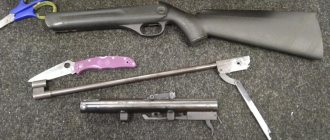
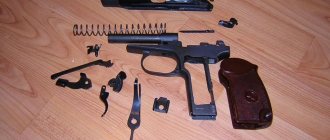
Pneumatic Makarov pistol Borner PM 49 and its complete disassembly/assembly
To completely disassemble a product such as a pneumatic PM, follow the step-by-step instructions:
1. Unscrew the Borner PM clamping screw with a hex key.
2. Take a Phillips screwdriver and unscrew the 8 screws of the PM 49 pneumatic housing. 7 are located on the right side of the pneumatic, and one, the longest, is under the barrel.
3. Take a flathead screwdriver and remove the barrel plug that is firmly in place.
4. The body of the Makarov Borner PM 49 air pistol consists of two parts. Once they are not fixed by anything, you can separate them.
5. Separately, I would like to note the story with the trigger rod, which flies off immediately after the parts of the pistol are separated. When assembling the PM 49 pistol, install it as shown in the photo.
6. During further disassembly and removal of the trigger, pay attention to how it is installed relative to the pistol barrel. When you remove it, the trigger spring immediately flies out of place.
7. Remove the trigger guard and trigger spring.
8. Remove the pistol trigger and the part with the spring that supports it.
9. Remove the barrel and gas chamber of the Borner PM 49 air pistol.
10. Unscrew the screw, remove the silumin part inside the housing that secures the weapon safety and remove it. Be careful not to lose the gasket that is located between the safety and the outside of the gun body.
Pros and cons of TT pneumatics
Summarizing all of the above, I would like to figure out whether an air pistol is worth the money. To understand this, it is necessary to study what positive and negative aspects a weapon has. Here is the basic information on this matter, left on the forums by experienced users:
| Advantages | Flaws |
| Appearance (the weapon is an almost exact copy of the legendary TT, known in many countries around the world | Narrow specialization (without modifications, weapons cannot be used for hunting) |
| Maintainability (as already mentioned, if you have good spare parts, replacing parts will not be difficult) | The quality of the gas cylinder (over time, the air begins to bleed) |
| Tactical and technical characteristics (the pistol is perfect for training or recreational shooting, as well as for airsoft) | The presence of double recoil (an eternal problem with 90% of air pistols with the Blowback system) |
| Availability (pneumatic TT can be found in almost any gun store, as well as spare parts for it) | Cost (for 6,000 rubles you can find many analogues with more powerful performance characteristics) |
Of course, for some people the listed pros and cons may seem insignificant, but we still recommend that you read them carefully before going to the store to make a purchase. Also, do not forget about the possibility of eliminating certain shortcomings yourself by upgrading (although this will require some knowledge about the design of air guns). For example, to prevent air from bleeding out, it is enough to install several rubber gaskets inside the receiver.
However, if you are looking for a model that can be used for hunting or self-defense, then it is better to focus on something more powerful. Although we should not forget about the possibility of modernization
If desired, you can replace the gas cylinder with a more powerful one and get a weapon that differs not only in quality, but also in destructive power.
Complete disassembly
Complete disassembly of a TT air pistol is a rather labor-intensive and very complex procedure that not every owner will be able to do. The thing is that each system has a large number of small parts that are difficult to remove without special tools. However, if you have a good spare parts kit, you can try to disassemble certain systems, following the instructions:
Step 1 – Remove the receiver
First, you need to arm yourself with a Phillips screwdriver (and only it, since a flat tool can “lick” the bolts), and then unscrew the 7 fixing parts located on the body (more detailed location in the picture). Carefully remove the top part and repeat the procedure on the other side.
Step 2 – Disassemble the trigger mechanism
The trigger mechanism of the TT pistol consists of three elements: a hook, a spring and a rod. Each part is secured to the other using small fixing plugs that can only be removed with an awl. As for disassembling the fuse, you just need to press it and move it to the left so that the spring does not bend.
Step 3 - Removing the Pistol Valve
On the left side of the body there are three small bolts (one external and two internal) - you need to unscrew them, and then remove the pistol valve by moving it towards you. This part consists of a small cylinder and a firing pin, which are quite easy to disassemble (turn the firing pin clockwise).
That's all.
DIY valve needle PM 49
To disassemble a product such as the Makarov Borner PM 49 air pistol, you will need:
Determine the working space, prepare the box so as not to lose important parts of the pneumatics. So that nothing interferes with the further procedure, remove the PM49 magazine, and then remove the plastic cheeks of the Makarov pistol. Do not break the fixing tendrils, after removing them there should be four left - 2 on top, 2 on bottom.
Common faults
Most often, pneumatic repairs consist of installing new seals instead of deformed ones and replacing a dead spring.
When installing sealing gaskets, they must be carefully removed from their seats.
Excessive haste often leads to the appearance of chips in the areas of contact between the metal surface and the seal, this negatively affects the tightness.
To get rid of air leaks, the gaskets can be treated with silicone grease. You should not use VD-40, a popular product among car enthusiasts, as it destroys rubber seals.
To install a new recoil spring, you need to partially disassemble the weapon. Installing the bullet feeder spring in the magazine is more labor-intensive, since the magazine will need to be completely disassembled. To replace broken elements of the trigger mechanism, the weapon must also be completely disassembled.
If the purchased pistol initially has a low initial bullet velocity, it is worth inspecting the weapon for the presence of a gap between the top of the clip and the barrel channel. The larger the gap, the more air is wasted.
To eliminate the gap, a thin silicone gasket is glued to the breech side of the barrel channel or the factory bushing in the barrel is replaced with one made of fluoroplastic. Getting rid of the gap will increase the speed of the ball by almost 20%.
Defects of a gas cylinder gun (CO2)
The structure for diagnosing a non-working sample is standard - first you need to determine the problem, and only after that begin to eliminate it. The method of “disassembling the gun completely, and then you’ll see” is not suitable. The fault detection steps for various causes are as follows:
- poisons gas from the cylinder - check the place where the gas is released from the magazine by immersing it in a container of water (preferably with alcohol, so that it evaporates faster). After this, the leak will be easily visible visually. The repair will consist of replacing the rubber seals at the sealing point of the cylinder and the pneumatic chamber;
- low bullet speed - look to see if the barrel gasket is damaged. The problem is often solved by replacing it;
- balls sticking into each other when shooting or they fly out of the barrel in pairs - the problem may lie in a deformed barrel gasket or a magazine spring that is too powerful;
- The trigger mechanism does not work - shake the gun in a quiet room. If an extraneous sound is heard from inside, similar to the knocking of metal fragments, it means that the parts are broken and need to be replaced (including the spring);
- the cylinder is enough for a small number of shots - listen to see if the cylinder hisses (whether the gas is released). Place a drop of alcohol on the rubber seals in the gun - if gas escapes, the gaskets must be replaced;
- visual damage - finding chips, cracks and shifts of sighting devices.
Cleaning and Lubrication - General Recommendations
Weapons need to be given time, even air guns. If it is not cleaned and lubricated, the shooting quality will decline over time. After each shooting, the weapon must be visually inspected. If it gets wet, wipe it with a dry cloth, disassembling it if necessary. Check for rust, cracks, and chips.
We start cleaning from the barrel. There is always lead left in the rifling. The barrel must be freed from it with a cleaning rod and rags. Apply a little lubricant. The barrel has been cleaned.
If a weapon is used, it must be given due attention. https://www.youtube.com/embed/LPK7vs-0_FM
TT pistol design
The Tula Tokarev air pistol gained such fame not only due to its high reliability and build quality, but also due to some design features that the arms company Gletcher decided to equip it with
Here are just the main points that the manufacturer himself recommends paying attention to:
- The presence of a Blowback system that complements automatic reloading. The main problem with air pistols is that they behave completely differently when fired than their combat prototypes. However, this drawback is completely overcome by the Blowback mechanism, which simulates the movement of the bolt frame during a shot. Because of this, the shooter gets the impression that he is using a truly military weapon that throws away spent cartridges.
- The Quat Trigger system is another confirmation of the words that the pneumatic TT will perform well not only for entertainment, but also for training purposes. This mechanism allows you to adjust the rigidity of the trigger so that novice shooters do not jerk the barrel while firing. To make the descent smoother, simply adjust the position of a special bolt, having first partially disassembled the weapon.
- Adjustable front and rear sight. Most pistols costing up to 6,000 rubles do not have the ability to customize a standard sighting device. However, Gletcher decided that it would be incorrect to equip the TT with a fixed bar. That is why the engineers placed two drums on the rear sight, which adjust the vertical and horizontal position of the sight. This allows you to customize the weapon “to suit you”, as well as adjust the sight if it breaks.
- Magazine for 18 balls. Most air pistol manufacturers do not pay enough attention to the capacity of the container in which ammunition is stored. However, Gletcher believes that this aspect is important. Thanks to the presence of 18 explosive balls and one in the barrel, you don't have to worry about running out of ammunition. This feature will be especially useful when participating in airsoft.
- 12 gram gas cylinder. Most air guns with a power rating of less than 3 Joules are equipped with 10 gram reservoirs. Despite the fact that the difference seems insignificant, in fact the difference is 30 atmospheres. Thanks to this feature, the gas tank capacity is enough for at least 100 shots. After this, the power of the shot and the speed of the bullet begins to rapidly drop. However, replacing the gas cylinder with a new one completely corrects the problem.
Well, don’t forget about the quality of the material from which the pneumatic TT is made. Despite the fact that the cost of the pistol is only 6,000 rubles, the engineers did not skimp on the use of carbon steel in the manufacturing process. This material significantly extends the service life of metal parts, including the rifled barrel. As for the decorative elements, they are made of plastic with a high content of polymer fibers. Thanks to this combination, the weapon is highly durable and does not break even when dropped.
Safety when handling air guns
Despite the fact that purchasing pneumatics up to 3J does not require a permit, and anyone can buy it, it is still a weapon, which means it must be handled with extreme care.
A few tips to protect yourself and extend the life of the product:
- There are low-quality gas cylinders that cannot provide a high-quality shot or “poison.” It is better to refuse to use it and choose gas from another manufacturer;
- Pneumatics are used at temperatures of +10-35 degrees. At high levels, CO2 expands greatly and when fired, a greater release of gas occurs, which can damage the valve. At low temperatures, the shot will be very weak or not at all. At temperatures below 0, carbon dioxide freezes. This is important to remember when shooting indoors in the cold season if the gun was brought in from the street;
- Even if you have experience in handling weapons, you need to study the instructions for an unfamiliar model, because it may have its own characteristics;
- To make the product last longer, it needs to be cleaned and lubricated (especially the barrel). This should be done after 1.5-2 thousand shots. A special lubricant is used (you can also use machine silicone spray), which is applied in a thin layer (excess must be removed immediately);
- You cannot shoot a wet pistol, you need to wipe it (in particular the barrel);
- You need to shoot no more than once per second (preferably every 2 seconds). If you quickly pull the trigger, there may be two balls in the barrel at once, which will lead to jamming and damage to the product;
- Do not fill the clip more than specified by the manufacturer;
- Most often, pneumatics are made from not very strong alloys, so it is better to avoid falls;
- For shooting, it is better to use copper-coated balls. Lead bullets can only be used if indicated in the product data sheet;
- To protect the valve, it is not recommended to leave an unfired cylinder for more than a day;
- You cannot pull the trigger if the weapon is on safety;
- Dry shooting is not allowed.
Recommendations
Assembly/disassembly of the PM is carried out on a flat surface
This could be a table or bench, the surface of which must be covered with clean oilcloth. When disassembling the PM, it is very important to ensure that the mechanism being removed and its spare parts are placed on the table surface in a certain order. It is recommended to place them in the same order as they were removed, excluding their impacts against each other
The work should be carried out very carefully and carefully, without excessive effort. If not one firearm, but several PM pistols are assembled/disassembled, then in this case the spare parts and mechanisms must be numbered. This will make assembly work easier, since the parts being assembled cannot be mixed up.
Disassembly and assembly of PM: types, when used
Correct aiming from the PM (Makarov pistol). what does the number on the rear sight of a Makarov pistol mean?
Testing the ability to use a Makarov pistol, knowledge of its design and the purpose of all its component elements is carried out by carrying out complete and incomplete disassembly of the weapon. These procedures are also performed in some emergency cases when the gun needs to be cleaned.
Partial disassembly of the PM is performed when the gun needs to be cleaned, all parts need to be lubricated, and its combat effectiveness must be checked.
Complete disassembly is recommended only if the gun is heavily soiled, if it has been exposed to rain or snow, or if it has fallen into water. The mechanism of a weapon that has been subjected to such influences urgently needs complete cleaning and inspection.
Complete disassembly of the PM is a procedure that is used very rarely. This is due to the fact that it greatly reduces the resistance of the mechanism and its components to wear, which reduces the service life of the weapon.
Complete disassembly of the PM is also carried out when switching to a new weapon lubricant. It is also performed if necessary to repair the entire mechanism of the pistol or its individual parts.
Disassembly and cleaning
In order to completely disassemble the pistol, the usual operating instructions are not enough. It is best to observe the entire procedure from the outside. If there is no one to show this process in practice, training videos can help.
Complete disassembly of the weapon may be necessary after accidentally dropping the pistol into the mud. It is not worth disassembling pneumatics unless absolutely necessary.
During routine lubrication or cleaning, partial disassembly and maintenance of components and mechanisms can be performed. For disassembly you will need:
- remove the clip;
- pull the trigger guard down - it becomes delayed on the left side and allows you to remove the bolt frame;
- Pull the shutter towards you all the way and lift the rear part up. The front of the bolt carrier is then released from the hook and it is removed through the barrel;
- the return spring, which is located on the barrel, is removed.
To clean the barrel you will need a metal cleaning rod. Cleaning the barrel consists of wiping it with a rag soaked in silicone oil with a cleaning rod, which is pushed into the bore. Then, when there are no dirty spots or residues from lead bullets on the rag, the barrel is wiped dry.
To clean different parts, use a regular toothbrush. A small amount of oil should be dropped into the contact areas of the moving mechanisms using an aerosol liquid or an oil can with an extended tip.
When disassembling pneumatics, you must follow the manufacturer's instructions, which are indicated in the operating manual. Lubrication and cleaning are carried out in several stages:
- treating the surface of the case with oil, without wiping dry. This will allow the oil to create a small film that will protect the steel surface from corrosive processes;
- USM lubricant. It is more convenient to do this if you add a little oil on top of the moving mechanisms, then fire 2-3 blank shots. There is no need to completely disassemble the firing mechanism once again;
- cleaning the barrel with a rag on a cleaning rod until foreign deposits are completely removed (especially after using lead shot). At the end, the remaining lubricant is wiped dry with a rag.
The pistol is assembled in the reverse order.