10 meter targets
At a distance of 10 m, you can choose a target of any shape. This can be a round or shaped target. The main condition is that it must be significantly larger than the rifle itself. This distance will be optimal for beginners. You can download the targets on the Internet in pdf or jpg formats.
Target No. 6
The sixth target is used for training or as a test in competitions.
Target #8
The dimensions of the target 8 depend on the shooting distance. The eighth target can be an excellent solution for preparing for competitions or improving sports skills. Most often used at a distance of 10 meters.
Target #9
The ninth target is also used for skill improvement or athletic competition.
Darts target in A4 format
You can feel like a participant in a noisy party and practice shooting. A clear division into zones will be an excellent solution for beginners. The presence of zones will allow you to accurately know the number of points earned.
Target "Heart" in A4 format
You can find romance even in air shooting. A heart-shaped target will be an excellent solution for charming shooting lovers. It will also be a great way to spice up your date. The target is divided into zones, which makes it easy to calculate the number of points earned.
Cold shooting
You can adjust the accuracy of the sight without optics using a special laser, which is inserted into the muzzle channel of the rifle. This technique does not require a large amount of ammunition, and its noiselessness allows it to be used immediately before hunting.
A special muzzle attachment is purchased. They consist of a cartridge used as a target designator and special attachments with an adjustable tail section - it is adjustable for various calibers. The attachment is attached to the front of the gun barrel. By rotating the tail part, you can adjust the device and align its axes.
The laser is installed in such a way that its point is aligned with the front sight and fore-end. After adjusting the open sight, it is recommended to fire a test shot at the target, first removing the laser from the barrel of the rifle. In addition to the muzzle attachment, you can use a laser cartridge.
25 meter targets
For a distance of 25 meters, a completely different version of the target is suitable. You can print a target for shooting from an air rifle using the link.
Round target 25 meters
This target is perfect for fans of pneumatic shooting. Zoning will help you accurately determine your success. Long range shooting is more suitable for experienced shooters and those who want to improve their skills. This is a great chance to test your strength.
Round targets
Round aerial or air rifle targets are among the most popular. This is the most common type of target, differing in a number of features. Each shooter will be able to choose the version of the round target to his liking.
Target "Bird" in A4 format
The usual round target appears in a very original and unexpected version. In the image you can see a funny parrot, who clearly found himself in a very tricky situation. Even an inexperienced shooter can improve his skills and have a good time by choosing such a target.
Round target “Black” in A4 format
This version of the target can be classified as a more classic type. This is a regular black target, made in black. Having white zoning will help the shooter focus on his target, as well as identify progress made. This target will be an excellent solution for both beginners and experienced shooters.
Human targets
Targets are produced not only in standard, but also in more original versions. Is it possible to shoot a person? This is a real crime. But sometimes, after a hard day at work, everyone involuntarily thinks about the prospect of becoming a serial killer. Human-shaped targets can be a great way to relieve stress and relax.
Target "Killer" in A4 format
Why not try yourself as a horror movie hero. Only now the maniac in a hockey mask with a chainsaw does not pose a threat to you. You have your own weapons and can easily send the scoundrel to the next world. The target is distinguished by detailed drawing and zoning, which will help determine your success in shooting. You will not only be able to shoot, but also have a good time.
Target "Man" in A4 format
The target is made in a minimalist style and is devoid of additional attributes. As a result, you can engage in shooting without being distracted by details. The presence of zoning will allow the shooter to aim and determine the level of his success. Shooting at such a target, you can involuntarily feel like the hero of a crime thriller.
Target "Fighter" in A4 format
The realistic target is made in the shape of a person who clearly threatens your safety. By shooting at such a target, you can give free rein to your imagination and imagine yourself in the role of a secret agent. You have to fight a dangerous enemy and perhaps save the world. What could be more important than this? The target is equipped with zoning, which will allow you to accurately aim and determine your success.
Target "Hostage" in A4 format
An unusual target will allow you to play out a very dramatic scene. Here is a killer who has put the trigger to the head of someone you care about. Perhaps your future life will depend on it. Remember that there is no room for error. The task is complicated by the fact that you can accidentally shoot the victim. You will have to make an effort to save an innocent person.
Compact shooting range for pneumatics
Have you ever seen portable boxes at shooting ranges that house multiple targets? In many Soviet schools, such boxes were used for training shooting on the subject of life safety. Moreover, this design shows itself exclusively from the best side. So why not try to make something similar at home, while making modern adjustments to make the process of creating a shooting range even simpler. In the following sections you will find detailed instructions for making such a box, as well as a list of materials needed for the work.
What is required for production
Before you begin the process of making a shooting range, you need to prepare all the necessary materials and tools so that during the process you do not have to be distracted for another trip to the hardware store or a visit to your neighbor for a drill. Of course, it is worth first of all considering the possibility of using what is already available on the farm, so that production costs are minimal. However, ideally it is recommended to acquire the following materials:
- metal sheets (thickness of at least 5 millimeters) for welding the box;
- a pair of door awnings to make the shooting range openable and more compact;
- metal rods for fixing the box (something like a “stick” under the hood);
- geotextiles or foam to catch bullets and prevent ricochet;
- primer paint to prevent rust.
You can also use wood instead of metal - a simpler, but not the most durable material. You can even use some old chest that is no longer used by anyone (for example, from a mechanical sewing machine from the USSR). However, it should be remembered that the dimensions of the shooting range must be at least 1 meter wide, 80 centimeters high, and 50 centimeters deep. It is on the basis of such indicators that it is worth making a shooting range.
As for the tools that may be needed during the work process, they are entirely related to the list of materials. For example, to process metal parts you will definitely need welding, electrodes, a grinder and discs. The wood will have to be processed with a jigsaw, and then cut using a hacksaw or circular saw. The only recommendation is not to use cheap fastening options if you don’t have any tools. It’s better to get a self-tapping screw and connect the boards with screws than to pound nails with a hammer.
Step-by-step execution
As soon as the preparatory procedures are completed, we proceed to the construction work. If you don’t know where to start, then just follow the step-by-step algorithm of actions left below:
Step 1 - making a box
First you need to weld a large box in which the foam and targets will be located. We cut two sheets of metal measuring 100 by 50 cm, as well as two sheets of 80 by 50 cm. After this, we weld the resulting elements using electrodes. It is recommended to carefully process the seams formed during the process with a grinder so that the shooting range looks more even. All that remains is to weld the wall, which has dimensions of 100 by 80 centimeters.
Step 2 - making the lid
To prepare the box lid, you first need to make a frame. It is best to use a slightly denser metal for this purpose, but in the absence of such, “five” will do. The dimensions of the parts are as follows: two 80 by 10 cm and two 100 by 10 cm. After welding, we cut out the cover itself (100 by 80) and connect it to the body in the same way.
Step 3 – fastening and painting
The main part of the work is completed, so all that remains is to connect the two elements using door hinges. After that, take a can of primer paint and thoroughly paint the box (including the inside). Let the shooting range dry for 12 hours. During this time, you can prepare a piece of geotextile or foam that serves as a bullet catcher. Place the soft material inside and you're done!
Several important points to consider when making a wooden box.
- Firstly, do not use sheets of plywood or chipboard - yes, they are much easier to process and easier to make something from. However, such material is extremely short-lived and quickly breaks at the first injury to the box on the floor.
- Secondly, be sure to make a wooden frame, and not just connect the boards together. This is done approximately according to the same principle as with the lid for the box.
- Well, thirdly, after joining the parts, use not a primer, but a stain, which prevents the appearance of parasites in the wood (you can also additionally coat the box with varnish).
Animal targets
Targets for sighting for pneumatics can be produced not only in the form of figures or people, but also animals. Such a target will allow you to engage in safe hunting and hone your skills.
Target "Running Rabbit" in A4 format
Perhaps this rabbit is running to find Alice in Wonderland. Or maybe he just saw you as a dangerous enemy. Using a rifle, you can improve your skills and feel like a real hunter. True, here you don’t have to kill the poor animals. Zoning will allow you to aim accurately and determine your successes.
Target "Crow" in A4 format
The target is made in the shape of a gloomy and creepy crow, which involuntarily brings to mind thoughts of haunted houses. True, the crow will not harm you if you manage to shoot it. The drawing has a high degree of detail, which will allow the shooter to be completely immersed in the process. And zoning will give you the opportunity to determine your success.
Setting up for shooting while sitting at a table
This exercise is the simplest and most convenient for initial training in bullet shooting. The shooter's body position is familiar, almost no tension is required, the stability of the rifle and hands is greatest, and loading the rifle is the most convenient.
The shooter sits at the table or stands near the counter, choosing the most comfortable position for himself. The whole body is slightly turned to the right of the aiming line. When shooting, it is recommended to lean your chest slightly against the edge of the table, but at the same time maintain a free posture with minimal muscle tension.
The rifle must be grasped with the right hand by the neck of the stock so that the thumb clasps the neck of the stock on the left, and the other four fingers on the right. With your left hand, grasp the stock fore-end from below so that your thumb clasps the left side of the fore-end, and the other four fingers clasp the fore-end from the right side. The rifle should rest not on your fingers, but on your palm. Then lean over the table and rest your elbows on the table or, if shooting is carried out standing near the counter, rest your elbows on the counter. In this case, the left elbow and shoulder should be pushed forward as far as possible, and the left elbow should be exactly under the rifle. The right elbow is placed on the side, closer to you. The rifle must be inserted with the butt plate into the notch of the right shoulder and pressed against it. Lower your head onto the ridge of the butt. The shooter places his legs in a way that suits him. The body position should be calm and stable.
Self-checking the accepted position consists of the fact that after accepting the position, the shooter closes his eyes for a few seconds, then opens them and checks the alignment of the rifle pointing and aiming points.
Rice. 1 Shooting position while sitting at a table with your elbows resting on the table. Rifle above the left elbow: a - side view; b - front view
If it turns out that the rifle’s front sight does not coincide with the aiming point, then it is necessary to clarify the aiming of the rifle, but without violating the “shooter-weapon” system, that is, without moving the rifle relative to the shooter’s body.
If the aiming point of rifle 4 (Fig. 2) is on the side of aiming point 6, then you need to rotate the entire body along with the rifle around the vertical axis 2, passing through the fulcrum of the left elbow, until the aiming point of rifle 4 aligns with aiming point 6.
Rice. 2. Clarification of the rifle's horizontal aiming when shooting while sitting at a table: 1 - direction of rotation of the shooter's body; 2 — axis of rotation of the gunner’s body; 3 - aiming line until the rifle aiming is clarified; 4 - rifle aiming point until aiming is specified; 5 - the bull's eye of the target was on the right; 6—combined pointing and aiming points; 7 — location of the sight after clarifying the aiming of the rifle; 8 - aiming line after clarifying the rifle aiming
If the aiming point of the rifle 6 (Fig. 3) turns out to be lower (higher) than the aiming point 4, then you need to move a little away (move) with a chair from the table or stand a little further (closer) from the counter, but without moving your elbows 8.
Rice. 3. Clarification of the rifle's vertical aiming when shooting while sitting at a table: 1 - direction of movement of the shooter's body; 2 - aiming line after clarifying the rifle aiming; 3 — location of the sight after clarifying the aiming of the rifle; 4 — combined pointing and aiming points; 5 - the bull's eye of the target - turned out to be higher; 6 - rifle aiming point before clarification: 7 - aiming line before rifle aiming is clarified; 8 - elbows and arrows should be motionless
Accurate shooting is only possible if the rifle is applied uniformly for all shots of the exercise being performed.
The placement of the stock in the shoulder notch is also important. If the butt of the rifle is higher than the middle of the shoulder notch, then the recoil force increases due to the increase in the distance between the pair of forces: the recoil of the rifle and the resistance of the shoulder, and then the bullets will hit above the center of the target
If the butt of the rifle is below the shoulder notch, the bullets will hit below the center of the target.
From this it is clear that even with minor changes in the position of the butt in the shoulder recess, a large vertical dispersion of bullets will result.
After attaching the rifle, the index finger must be placed with the first joint on the trigger. In this case, the index finger should not touch the rifle stock. Lower the elbow of your right hand freely onto the table (stand). Tilt your head slightly forward and rest your cheek against the ridge of the butt.
Touching the cheek in the same place on the butt ridge for all shots will ensure good shooting accuracy. To uniformly touch the cheek to the ridge of the butt, it is recommended to touch the tip of the nose with the thumb of the right hand, grasping the neck of the butt.
Then you need to make sure that the position of the body and arms is comfortable and that no muscles are overly tense.
Cool targets
Targets are produced not only in the classic, but also in a more original version. These targets are a great way to relax and practice your favorite activity. The pictures will definitely appeal to both beginners and experienced shooters.
Target "Zombie" in A4 format
The invasion of the dead is no longer a filmmaker's invention. Zombies have overrun the planet and you will have to fend for yourself. The target is depicted as a very creepy and almost real living dead man who clearly poses a threat to you. But you have a weapon that will give you the opportunity to fight the monster and escape. Having zoning will allow you to understand how far you have progressed in your business.
Target "Creepy Clown" in A4 format
What's worse than a creepy clown with a knife? The target will make you feel like the hero of a nightmare or horror movie. The detailed picture depicts a clown with a creepy and very unfriendly smile frozen on his face. Only you can cope with the monster and save yourself. The target is equipped with zoning that will allow you to determine your success.
Target "Terrorist" in A4 format
The target is made in the form of a very dangerous person. He is armed with an explosive device and poses a great threat to others. Practicing with such a target will not be easy. You will have to be vigilant, because if you hit a bomb, you yourself will cause the explosion. Act quickly and smoothly, measure your progress using zoning and hone your skills.
By finding interesting pictures for shooting, everyone can improve their skills. This is a great hobby if you want to improve your concentration, get rid of negative emotions and just have a good time.
How to properly sight a red dot sight
So, you will need:
- the scope itself and the gun;
- paper target;
- a bullet board on which the target is attached;
- vice for fixing weapons.
How to set up a red dot sight: instructions
Step 1
Install the sight by securing it to the weapon using brackets. When tightening the screws, make sure that the collimator is installed tightly enough - the stability of the shooting results will depend on this (a sight that is not tightly installed can go astray).
Step 2
Secure the gun with the scope in a vice. Place the board with the paper target at the desired distance. What distance will be needed depends on the type of weapon and the expected hunting conditions. Experienced hunters say that ideally, the zeroing distance should approximately correspond to the distance from which real shooting will be carried out.
Since it is quite difficult to comply with this condition, you can perform zeroing in three stages: setting the target at 50, 100 and 150 meters. A series of shots are fired at each range.
However, before zeroing in a red dot sight, keep in mind: in real hunting conditions, you most likely will not encounter distances of 150 m or more. Firstly, using a collimator it is difficult to hit a small target at such a distance, and secondly, visibility in the forest is usually limited to a maximum of 70 meters. It often makes sense to start zeroing at 30-35 m, increasing the distance in increments of 10-15 m.
Step 3
You set up the sight, clamped the weapon in a vice and set up the target. Now, looking through the collimator eyepiece, align the center of the reticle with the aiming point on the target. To do this, use flywheels (drums) for entering corrections.
Having achieved the alignment of these two points, you can remove and reinstall the sight - this way you can check whether the settings are lost.
Step 4
Fire a series of shots at the target - usually from 5 to 10, but for the initial zeroing, less is possible. Determine the displacement of the point of impact relative to the aiming point vertically and horizontally, and then enter corrections (using the flywheels). Fire another series of shots. And so on until you reach the correct alignment of the collimator.
As a rule, experienced shooters get by with 2-3 series, but if you are zeroing a red dot sight for the first time, you may need more shots. You should not strive for a perfect hit “in the top ten” - a good result will be improved accuracy of fire.
Zeroing in the Aimpoint Micro H1 red dot sight
Tips for sighting a collimator
- After each series of shots and adjustments, mark the results in a notebook - this will help you achieve success faster.
- Before zeroing the collimator, choose a place with minimal external interference - away from bodies of water, highways and railways. Dry, windless weather is preferable.
- Measure the width of the concentric rings on your target - this will make it easier to calculate corrections and zero in on other distances.
- If you zeroed the collimator with a bullet cartridge, when shooting with shot at short distances (35-50 m), you can also count on acceptable results - the shot scree will cover possible deviations.
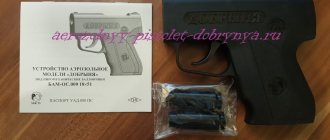
How to target a collimator with a laser cartridge
Adjusting a scope using a laser cartridge is called cold zeroing. Since it does not involve actual shooting, it can be carried out anywhere at any time.
Technically, cold zeroing is quite simple:
- secure the gun in a vice,
- insert the laser cartridge either into the muzzle or into the chamber (depending on its type);
- turn on the cartridge for cold zeroing and direct the beam that appears at the target;
- Mark the point of impact of the beam and align it with the center of the collimator aiming mark using the handwheels.
To ensure a guaranteed result, after cold zeroing, carry out a series of control shots. As you can see, setting up a red dot sight is not that difficult.
Cold shooting