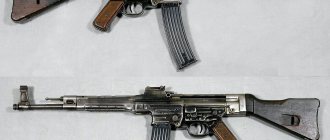
general information
So, we have the SVD (or its civilian version, the Tiger). The first step is to disassemble the rifle and make sure it is in working order. You should look for factory or acquired defects (for used ones). You should also pay attention to the optical sight. It is necessary to check whether it is broken, whether there is a battery and an aiming scale illumination light, and whether the windage and elevation adjustment flywheels work. If problems are identified, then you need to address them. Otherwise, you can immediately begin to bring the rifle to normal combat (zero it). It uses 7.62 x 54 caliber cartridges. It is in this version that the majority of samples are produced. Various deviations can also be considered, for example, the ballistic table of the 7.62x39 cartridge, but since this is a special case, it will not be considered. Only standard indicators.
Inspection and preparation of a sniper rifle for shooting.
The procedure for inspecting a rifle by soldiers and sergeants
During a daily inspection, make sure that all parts of the rifle are present and check that the outer parts are free of rust, dirt, dents, scratches, nicks, chips and other damage that could cause disruption of the normal operation of the mechanisms, rifle and optical sight; in addition, check the condition of the lubrication on parts visible without disassembling the rifle, the presence of magazines, a bayonet, accessories, a cover for an optical sight, a bag for an optical sight and magazines, as well as a bag with a winter reticle lighting device, spare batteries and an oil can.
When inspecting a rifle before going out for training and in a combat situation, check the same as during daily inspection; in addition, check the serviceability of the optical and open sights and front sight; make sure that there are no foreign objects in the bore; check the correct operation of parts and mechanisms.
When checking the serviceability of the optical sight, make sure that the eyepiece and objective lenses are intact (checked by looking into the sight from the eyepiece and objective side), and also check: whether the sight reticle moves freely when the handwheels rotate (checked by looking through the eyepiece); do the handwheels rotate smoothly and are fixed in the set position and are there any movements; Does the fluorescent screen move smoothly? is there any movement of the scope and is it securely fastened with a clamping screw on the rifle; Is the illumination of the reticle working properly? To do this, put the cap on the lens, turn on the toggle switch and look into the eyepiece (if the device is working properly, the reticle is clearly visible, if the reticle is not visible, replace the battery or light bulb); Is the winter reticle illumination device working properly? To do this, connect it to the scope, turn on the toggle switch and look through the eyepiece.
If the scope has a wobble or the bend of the handle does not fit into the cutout on the bracket when the scope is firmly attached to the rifle, you need to adjust the clamping screw. To do this, separate the scope from the rifle, press the slider against the handle (compress the spring) and screw or unscrew the adjusting nut of the clamping screw.
When checking the serviceability of the open sight and front sight, make sure that the clamp moves smoothly along the sighting bar and is securely secured in the installed position with a latch; the spring securely holds the aiming bar; the slot of the sighting bar has no nicks; the front sight is not bent and is firmly held in the front sight guard; the mark on the safety coincides with the mark on the base of the front sight; The front sight safety is held firmly in the base of the front sight.
When checking the correct operation of parts and mechanisms, remove the rifle from the safety lock, move the bolt frame back by the charging handle until it stops and release it; the bolt carrier must stop in the rear position by stopping the bolt. Separate the magazine, pull the bolt frame back a little by the handle and release it; The bolt carrier should forcefully return to the forward position. Put the rifle on safety and pull the trigger; the trigger should not move back, and the hammer should remain cocked. Shoot the rifle with the safety on and pull the trigger; a click should be heard - an energetic blow of the trigger on the firing pin. Put the rifle on safety again and attach the magazine; the bolt carrier should not move back; The fuse must be securely held in position.
When inspecting the rifle during cleaning, check each part and mechanism separately and make sure that they are in good working order and that there are no chips of metal, nicks, bends, rust, carbon deposits and dirt on the metal parts, and cracks and bruises on the wooden parts. Pay special attention to the condition of the barrel bore, gas chamber, gas tube and gas piston.
When inspecting the accessory, check the presence and serviceability of all accessory items.
To check the ramrod, unscrew its links and check if it is bent; The ramrod links must screw together freely and be firmly connected to each other.
To check the wiper and brush, screw them onto the cleaning rod one by one: the wiper and brush should be held firmly on the cleaning rod, and the upper part of the wiper should rotate freely. The brush should be clean and the bristles should not fall out.
Check the pencil case for cracks, bruises and damage; Is the lid of the pencil case firmly held on the flame arrester, does it have significant lateral wobble, and does rubbing pass through its opening.
No lubricant should leak from the oiler; The oiler cap should be screwed tightly onto the oiler.
Make sure that the screwdriver has no chips or nicks on the blade, on the side edges for cleaning the gas chamber and gas tube, and on the walls of the cutouts.
The punch should be straight and not have a blunt end.
Soldiers and sergeants must immediately report to their commander about all malfunctions discovered during inspection of the rifle, optical sight and accessories.
The procedure for inspecting a rifle by officers
Officers inspect rifles assembled and disassembled.
Inspect the assembled rifle in accordance with Art. 65 and 66. Also, check:
1) Feeding cartridges into the chamber, removing and reflecting cartridges (cartridges): equip the magazine with training cartridges, attach it to the rifle and, without pressing the magazine latch, try to separate the magazine with your hand - the magazine must fit freely into the receiver window and be securely held by the latch store. Reload the rifle several times, while training cartridges should be sent from the magazine into the chamber without delay and vigorously thrown out of the receiver.
2) Serviceability of the barrel linings: they must be firmly held on the barrel, when pressed down they must lower slightly, and when released they must return to their original position under the action of the springs of the lower thrust ring.
3) Serviceability of the stock: a serviceable stock does not swing in the receiver; The stock screw and buttplate screws are fully screwed in, and the cheek piece is firmly held by the lock on the stock.
3) Serviceability of magazines: magazines should not have dents and burrs on the body and bends, which may make it difficult to feed cartridges; the protrusion of the locking bar must securely hold the magazine cover, and the feeder, under the action of the spring, vigorously returns to the upper position.
4) Serviceability of the bayonet-knife: a serviceable bayonet-knife is firmly held on the rifle, can be easily removed from it and is firmly held in the sheath. There should be no nicks on the blade, no dents on the sheath, and no chips or cracks on the handle. The insulation of the sheath and bayonet-knife must not be damaged.
To inspect the rifle in disassembled form, perform partial or complete disassembly and wipe the parts dry.
When inspecting a rifle in disassembled form, compare the numbers on its parts and carefully inspect each part and mechanism to make sure that there are no chips, nicks, dents, bends, rashes, traces of rust and dirt on the metal parts, and cracks and bruises on the wooden parts .
1) When inspecting the barrel, pay special attention to the quality of the barrel bore. To check the quality of the barrel bore, you need to raise the rifle to eye level, pointing the barrel at the light source so that the light rays fall not directly into the eyes, but onto the walls of the barrel; then, turning the rifle, carefully inspect the channel from the muzzle and breech sides; when examining the middle part of the channel, bring the barrel closer to the eye, and when examining the muzzle and breech parts, move it away from the eye. Inspect the chamber from the breech.
The following shortcomings may be observed in the barrel bore:
- a reticle in the form of intersecting thin lines, usually from the breech (at the beginning of the rifling); Subsequently, when shooting, cracks form in the areas of the reticle and chrome begins to chip away in the form of individual points, then the chipping increases and turns into chrome chips; if cleaning is not thorough enough, rust may appear in places where the chrome is chipped;
— sinks – significant depressions in the metal, in places where chrome has been chipped, formed as a result of a large number of shots fired or prolonged exposure to rust in places where chrome has been chipped; the barrel in which shells have formed must be cleaned especially carefully after shooting;
- wear of the rifling margins or rounding of the corners of the rifling margins, especially their left edge, visible to the eye;
- swelling of the trunk, noticeable in the form of a transverse dark (shadow) solid ring (semi-ring) or detected by the convexity of the metal on the outer surface of the trunk. The ability to fire a rifle with a swollen barrel is determined by the officer. A rifle that has a small annular swelling of the barrel without a metal bulge on the outer surface of the barrel is suitable for further shooting if it meets the requirements of normal combat.
Detected changes (deficiencies) in the quality condition of the bore must be entered into the rifle quality card.
When inspecting the barrel from the outside, check for nicks on the cut of the gas tube. Check the action of the gas tube latch: when pressed with a finger, the latch should come out of the cutout on the gas tube, and after release it should return to its original position. Check the action of the upper thrust ring closure: it must be firmly held by the bend in the cutout of the moving part of the thrust ring.
When inspecting the receiver, check: whether the reflective protrusion is broken or rounded; are there any bends or nicks on the folds? is there any wobble in the butt; Is the shutter stop spring working properly (after lifting the shutter stop up, it should move down freely and vigorously); Is the receiver cover lock securely held on the latches?
3) When inspecting the bolt frame, check for nicks in the figured cutout and on the guide protrusions.
4) When inspecting the bolt, pay attention to whether there are any cracks around the hole for the firing pin to exit; are the firing pin and ejector in good working order? does the firing pin move freely in the bolt? whether the firing pin protrudes from the hole in the cylindrical cutout and whether it is chipped or strongly burnt.
To check the serviceability of the ejector, move it to the side with your finger and release it - the ejector should vigorously return to its previous position under the action of the spring. Insert a training cartridge into the bolt and try to remove it forward - the cartridge must be firmly held by the ejector hook. The ejector hook must not be chipped.
When inspecting parts of the return and trigger mechanisms, check for broken or bent springs, breaks or cracks on their parts.
When inspecting an optical sight, check whether all the divisions of the sight are set at different settings of the lateral correction scale.
Inspection of live ammunition
Cartridges should be inspected before firing, as well as by order of the commander.
When inspecting cartridges, check:
— is there any rust or bruises on the cartridges, is the bullet wobbling in the barrel of the cartridge case;
— is there any green deposits or cracks on the capsule, does the capsule protrude above the surface of the bottom of the sleeve;
- Are there any training cartridges among the combat cartridges?
All faulty cartridges are returned to the warehouse.
If the cartridges are dirty, covered with a slight green coating or rust, they must be wiped with a dry, clean cloth.
Preparing a sniper rifle for shooting
Preparing a rifle for shooting is intended to ensure trouble-free operation during shooting.
The rifle is prepared for firing under the direction of the squad commander.
To prepare the rifle for shooting you must:
clean the rifle;
inspect the rifle disassembled and lubricate it;
— inspect the assembled rifle;
— inspect the optical sight and recharge the luminescent screen.
Immediately before shooting, wipe the barrel bore (rifled part and chamber) dry, inspect the cartridges and equip the magazine with them.
If the rifle has been in the cold for a long time, then before loading it, manually pull back and push the bolt frame forward several times.
About barrel wear and ammunition used
In the sniper business, you can come across a large number of different conjectures and misconceptions. They are transmitted both orally and through cinema. For example, some people believe that armor-piercing incendiary and tracer bullets wear out the barrel very quickly, literally in a couple of magazines. This is a fallacy in the category of “a drop of nicotine can kill a horse, but a rabbit will simply be torn to pieces.” The rifled weapon in question can use all types of standard ammunition with a caliber of 7.62 x 54. Of course, some of them can wear out the barrel a little faster than simply using target cartridges. But this process manifests itself to an insignificant extent. Although something else is important here. The use of ammunition of different types and purposes must be accompanied by the understanding that they have different ballistics. At short distances this is not very important. But if you are shooting at a distant target, this can lead to a miss. Therefore, if you have zeroed in on armor-piercing incendiary cartridges, then when you change the type of ammunition you will have to start all over again or sacrifice accuracy. Therefore, it is necessary to immediately focus on what will be worked with in the future.
A short digression about specific points
To shoot from the SVD, it was necessary to have a special sniper cartridge. In ballistic tables for SVD, it is usually assumed that it is used (or, alternatively, target ammunition) for specific conditions. But you can also use what machine gunners and tankers have. Although it will be necessary to make adjustments to the use of weapons. Before starting zeroing, you must make sure that the optical sight is tightly placed in the mount and there is no play anywhere. If necessary, tighten the adjusting screw.
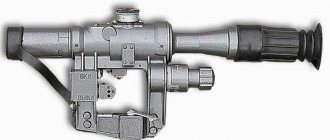
About the sight
The most popular option, which is used in conjunction with the SVD, is the sniper optical sight (PSO). There are several variations that can be used from 100 to 1,300 meters. If you look through the scope, you can understand that there are no crosses, and you can’t see the magnification like a telescope either. Among the devices present, there is a scale for lateral corrections and rangefinder calculations, a main square for shooting at a distance of up to 1,000 meters and additional ones for 1,100, 1,200 and 1,300 m. Thanks to this simple set, you need to hit the target.
PRACTICAL SIGHTING OF A SNIPER RIFLE
PRACTICAL SIGHTING OF A SNIPER RIFLE
Zeroing a weapon under an optical sight is a painstaking process that requires time and patience. In any case, the rifle first has to be sighted under an open sight. To immediately “catch” the target and save time, ammunition and nervous energy, use the following practical method.
The rifle is clamped in a sighting machine (or simply secured with a clamp to something massive) and with the bolt removed, it is aimed along the barrel bore at a target located at a distance of 100 meters from the shooter. If the design of the receiver does not allow you to look inside the barrel, an oblong fragment of a mirror is used for this purpose. The target should be visible strictly in the middle of the round field of the barrel bore, along its axis (1 in diagram 94). Without disrupting this aiming and constantly checking with it, they install an open sight, adjusting the height of the front sight (by screwing it in or out, or changing the front sights by numbers, or processing them with a file) and shifting it horizontally. The open sight is mounted so that its aiming point is in the center of the same target with the sight setting "1" (2 on diagram 94). Constantly checking with these two aiming points, the threads or the aiming reticle of the optical sight are brought to the same aiming point in the center of the target (3 in Diagram 94). At the end of this process, the STP will be located near this aiming point, common to both open and telescopic sights. For hunting purposes this is quite enough.
But this is not enough for sniper practice. For a sniper, such zeroing is only a preliminary “binding” of the weapon to the target. Why? Because as a result of such “linking,” the optical sight may turn out to be oriented toward the target not by the center of the visual field, but by its edge (Diagram 95). In the above zeroing diagram 94, the final result is ideally presented when the target is in the middle of the visual field of the sight and the center of the aiming crosshair is also there.
Scheme 94. Linking an optical sight to a target:
1 — target in the lumen of the barrel;
2 - the same target in open sight;
3 - the same target in the optical sight;
4 — optical sight bracket
Scheme 95
Why do you need the center of the crosshair to be in the center of the visual field, and not somewhere on the edge? Because, firstly, the clarity of the target image in the center of the visual field will be much higher than at the edges. Secondly, if the crosshair is located in the center of the field, you can turn the adjustments in any direction and move the aiming crosshair to where you need it. For an illustration, look at diagram 95. When shooting at a moving target, in order to get ahead, you need to make an adjustment (in this case) to the right “2” so that the barrel of the weapon also goes to the right and the bullet meets the target with anticipation. To do this, the threads must be moved to the left, but since they are already there, there is nowhere to move them to the left.
Therefore, in the sniper version, the sight is aimed at the required aiming point when zeroing with the aiming threads (reticle) already positioned in the center of the visual field.
Zeroing a rifle with an optical sight for purely sniper purposes is carried out in accordance with the statutory provisions, namely
I stage of shooting
- after “roughly” linking the weapon to the target, the rifle is sighted on a black sighting square measuring 25x35 cm with an open sight “3” so that the average point of impact is 14 cm above the aiming point for the SVD rifle and 17 cm for the three-line rifle ( see table of excess of average trajectories and diagram 96). A weapon sighted in this way with sight “I” at a distance of 100 meters will hit exactly in the center at the aiming point, and at a distance of 300 meters with sight “3” it will also hit exactly at the aiming point “by turning” the sight body itself, not touching the flywheels. This process is painstaking, since during the movements of the sighting gun the weapon is confused, albeit slightly, from aiming with an open sight. Therefore, the sighter periodically looks into the open sight and corrects the correctness of its aiming.
Scheme 96
Scheme 97
If, with a well-aimed open sight with an aiming point under the bleed, the rifle hits 14 cm higher from the aiming point, then with an optical sight aimed at the same aiming point at the same distance, the result of hits will be the same.
After the aiming points of the open and optical sights are visually combined with the same aiming - under the edge of the aiming square, the sighter checks the fulfillment of the above with three combat shots, aiming under the edge of the aiming square with an optical sight.
As a rule, at a distance of 100 meters, the average point of impact is obtained at the desired height of 14 cm (for an SVD rifle) from the aiming point. Sometimes, very rarely, it is necessary to make minor adjustments with the flywheels. If everything turned out correctly, with or without adjustments, after checking, establish the correct position of the lateral correction flywheel scale and the remote flywheel. In a combat situation, the flywheels of the sight have to be constantly turned, making various adjustments for height, wind, a running target, etc. And each time one or another division of the flywheel scale must indicate the correct amount of the correction taken. Therefore, trying not to move the flywheel, Using a screwdriver, unscrew the fixing locking screws (7, 2 in photo 152) of the remote vertical flywheel, while the scale (dial) of the vertical adjustment flywheel is “released” and can rotate independently of the flywheel. Without moving the flywheel, rotate the scale and set the number “3” opposite the control mark. With this you will install the sight “3”. Why this way? Remember - with a sight “3” at a distance of 100 meters you hit with an excess (according to the table of excesses of average trajectories) 14 cm above the aiming point, therefore, with the same sight “3” at a distance of 300 meters you will hit exactly in the center - that the point where they were aiming. The ballistics of the sighting process is presented in Diagram 96.
Photo 152
Once sight “3” is aligned, slowly and carefully “tighten” the retaining locking screws. Now, if you need to shoot at 100 meters, set the sight to “1” and aim at the center - that’s where you’ll hit it. If you need to shoot at 400 meters, set the scope to “4” and also aim at the center. Same thing at other distances.
When the horizontal position of the point of impact satisfies you (not to the right, not to the left, but where it should be), loosen the locking screws of the lateral correction flywheel and set the scale (dial) of this flywheel against the control lateral mark to “0”. Then carefully “tighten” the fixing screws. It will be better and more convenient for you if you loosen these screws in advance, even before zeroing.
The above-described process of zeroing an SVD rifle is the same for all types of optical sights. When zeroing other rifles or carbines, you should keep in mind that the excess of average trajectories at a distance of 100 meters is different for different weapon systems. Therefore, this manual provides tables of excesses of average trajectories for long-barreled small arms systems released to the public for free sale.
For sighting, squares (rectangles of black paper measuring 25x35 cm), standard general-purpose sighting targets are used, on which lines of bending (shortening) of the lower edge are marked for specific types of weapons - machine guns, machine guns, sniper rifles. With the specified fold line of the sighting target for a sniper rifle, the distance from the bottom edge to the center will be equal to 14 cm. More or less trained shooters use black round pistol sports targets No. 4 with a black circle diameter of 25 cm for sighting. In any case, sighting is carried out on the initial distances of 100 meters with bleed aiming and scope “3”.
ATTENTION! The cartridges for the same weapon are not the same. Manufactured at different factories, at different times, from different materials, they, although slightly, differ from each other in the height of the trajectory. Therefore, the rifle must be shot with one batch of absolutely identical cartridges. This gives a compact, stable, and most importantly, uniform battle in height. The weapon must be re-sighted for different batches of cartridges - batches of cartridges vary in trajectory height.
You cannot shoot a weapon with a “rabble” of random cartridges of different batches, markings, years of manufacture and various purposes. Even when firing a “rabble” of randomly selected cartridges from a machine gun, unpredictable increased dispersion is observed.
The tables for exceeding average trajectories are compiled based on the average ballistic qualities of ammunition and are given for a general orientation “reference”. The barrels of weapons of the same systems, despite all the care in manufacturing, also turn out to be unequal: one barrel will “take” higher, the other lower.
Therefore, do not be surprised if you find discrepancies between the actual hits in range and the numbers on the distance handwheel scale. Such things make themselves felt at distances of over 400 meters, and with a heaped barrel it’s not scary. Make the appropriate marks on the distance scale and continue shooting.
Even very prepared and trained shooters have different weights, heights, arm lengths, and most importantly, perceptions of reality. Therefore, shooters with different “estatures” will shoot from the same rifle noticeably differently. If you get your hands on an SVD rifle that has already been shot by someone, you can very easily and quickly shoot it “for yourself.” Let’s say that when shooting at a distance of 100 meters with three cartridges, you hit 5 cm to the left and higher from the desired point. Knowing that at this distance one click (half a division) of the side flywheel is 0.5 thousandths, or 5 cm, turn the flywheel clockwise by half a division (one click) - “pull” the bullet into your palm for the desired 5 cm. Vertical remote flywheel turn counterclockwise by half a division - “lower” the bullet from the palm 5 cm down. If this scope has a ratchet, it will be one click. Check with three shots what happened. If necessary, add or subtract something from the scope. And now that the rifle is zeroed in for you, set the scale in accordance with the results of your zeroing.
DO NOT FORGET! The flywheel dial (scale) is closed to the ratchet. When it rotates freely (with the fixing screws released), fixation clicks will be observed. They do not affect the process of correctly setting the scale, and you should not be afraid of this. The flywheel on the ratchet is not closed and, with the fixing locking screws released, rotates without clicks. It rotates with clicks only when the fixing screws are tightened.
For all the above reasons - the difference in ammunition, the dissimilarity of the barrels, the individual characteristics of perception - sniper weapons of precise and highly accurate combat are sighted by a permanent “owner” assigned to him, with reference to specific shooting distances - from 100 to 700 meters, and, if necessary, and at more distant specific distances.
Shooting an SVD rifle, which has a barrel of normal accuracy with a working sight, is not particularly difficult because it is made as one piece with a seat (“dovetail”) for an optical sight, and this seat is very accurately oriented strictly parallel to the axis of the barrel bore . Therefore, when placing the PSO-1 sight on this weapon, the target appears in the middle of the optical field of the sight, and when zeroing, bringing the aiming square to it is close and convenient. It is very good when an optical sight, when installed on a weapon, is immediately oriented with its optical axis towards the target and it is in the middle of the visual field. Firstly, the resolution (clarity) of any optical device in the center of the field is much higher than at its edges. Secondly, it is very inconvenient when the optical axis of the sight, and accordingly the center of the visual field, is not oriented towards the target. Look again at diagram 95, the rifle was clearly sighted incorrectly and inconveniently. This is still suitable for shooting at a stationary target, but not for shooting at a moving target.
This disadvantage often characterizes hunting carbines equipped with optics: SKS, Saiga, Kaban and other systems on which the mounting for an optical sight is not provided by the manufacturer.
On three-line rifles of the 1891-1930 model. The installation of an optical sight was also not provided for at first. Therefore, the system for installing optical sights on this weapon provides for correction of their orientation. The center of the visual field is aimed at the target (target) vertically (up and down) using the upper and lower micrometric screws of the bracket base (photo 94).
To do this, lightly “release” the main clamping screw and alternately rotate the micrometer screws to move the sight to the desired position. In this case, the shank of the bracket (in photo 94) moves up and down, and the sight also moves accordingly. Horizontal guidance is carried out by placing a lining between the shank of the bracket and its base using brass or steel strips, made at least from tin cans. Sometimes such gaskets have to be installed in the joints of the PSO-1 sight bracket in case of its horizontal residual displacements from deformations due to impacts.
After the center of the sight's visual field is aligned with the target, the micrometer screws are clamped relative to each other to avoid vertical play. The clamping screw is then tightened with a force of 10-15 kg using a screwdriver. PU sights on three-line rifles are attached “tightly” in the manner described above and are not removed from the rifle when carrying (transporting) the weapon.
On PB sights (photo 90, 91), the horizontal alignment of the center of the visual field to the target is done by rotating screws 2 (photo 90) and 3 (photo 91), moving the sight along the horizontal guide of the bracket. The visual field in this sight is not oriented vertically due to its very precise fit in the wedge-shaped “dovetail”, and only minor adjustments are made using the remote handwheel up and down during the zeroing process.
No one has invented a better shooting method than the statutory one described above. The question arises: why is this necessary? Answer: walking to inspect targets at 100 meters is still closer than at 300. In addition, bullet holes through a 20x telescope at a distance of 100 meters are clearly visible, but at 300 meters they are no longer visible through any tube at all due to the atmospheric haze.
Another question arises: why can’t you set the sight to “1” from the very beginning and immediately shoot at the center of the target at a distance of 100 meters. Answer: the black front sight will merge with the black square, and you will never “feel” the center of the target with the front sight. And it is much more difficult to “take” a small point target, even a bright one, into an open sight than to aim with a rectangular front sight with a clearance under the edge of the sighting square, which in the real sighting projection is the same as the front sight (Diagram 98). A small “gap” between the front sight and the bottom edge of the square (2 in diagram 98) will help control their relative position and will not allow the black front sight to “crash” into the black square. For these reasons, the accuracy of shooting at the sighting square will always be better than when shooting at other targets. This has been noticed in practice.
Scheme 98:
1 — sighting square;
2 - clearance
DO NOT FORGET! One rotation of the front sight of an SVD rifle raises or lowers the aiming point by 16 cm. One line on the horizontal scale of the front sight base is equal to 10 cm (one thousandth). All this helps to quickly zero the rifle with a minimum number of rounds. Let’s say the first three shots hit the lower right corner of the sighting square (or even the chest target) 8 cm below the calculated point (let’s call it “X”) and 10 cm to the right. “Twist” the front sight half a turn down, the barrel will rise up, and on the target we will get an STP rise of 8 cm. There is no need to shoot for this. Next, we move the front sight along the dovetail to the right with a front sight or careful blows of a copper hammer by one division of the scale - the barrel will go to the left and the STP will move to the left by 10 cm. Now with three shots we check what we have achieved. As a rule, in the vast majority of cases, the STP goes where the targeter needs it.
There is a practical sighting formula:
D=(A x B)/100000
where D is the correction value;
A is the length of the sighting line of a particular weapon (from the rear sight to the front sight);
B - deviation of the bullet from the desired point of impact.
Example.
Determine the amount of movement of the front sight of the SKS carbine if, during zeroing, the average point of impact deviated from the desired point by 10 cm (100 mm).
Solution:
D = (480 mm (length of the SKS aiming line) x 100 mm)/100000 = 0.48 mm.
Sometimes (very rarely) additional adjustments have to be made.
The above-described zeroing technique allows you to save ammunition. This is what the military has been doing since time immemorial. The men who bought a rifled barrel begin to shoot it “in a simple way”, shooting at the newspaper from a distance of ten steps and gradually putting it further and further away. At the same time, a monstrous amount of cartridges is wasted, but the desired result is still not achieved.
ATTENTION! Only weapons with a compact firing pattern that comply with the instructions for this weapon system are subject to zeroing with an optical sight. There is no point in shooting a rifle or carbine that does not have sufficient accuracy with an optic.
When you shoot a rifle at 100 meters with a scope “3”, aiming under the bleed, exceeding 14 cm in height (meaning SVD), then rest assured: with a scope “1” at the same 100 meters it will hit exactly in the center , at 200 - with sight "2" - strictly in the center, at 300 - with sight "3" - strictly in the center. At 400, 500, 600 meters and further with sights “4”, “5”, “6”, respectively, the rifle will also hit strictly in the center.
Contrary to the widely held belief among snipers that it is not necessary to shoot a rifle with an open sight, bitter combat experience indicates the opposite. Falls are common in war. According to the law of meanness, the rifle hits something hard with the optical sight. The optical sight may be hit by a stray bullet or shrapnel. Sights begin to “breathe” with correction devices (for all sights these are the weakest points) at the most inopportune moment. And you never know what can happen to optics - a precision instrument requires careful handling. A well-worked and verified open sight is simply necessary in such cases and in case of optics failure.
The displacement of the average point of impact (MIP) when working with sights of small-caliber rifles with a barrel length of 65 cm is presented in table. 35 and 36.
Table 35
STP movement, cm, when changing the height of the open sight
Table 36
STP movements when moving the front sight
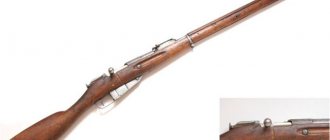
The process of zeroing a three-line sniper rifle model 1891-1930. is presented very well and in detail in the sighting instructions § 16.
Learn more about using the features
So, in the very center of the sight there is a main square. It is at this point that you need to aim if the target is at a distance of up to 1,000 meters. Below it are three additional squares. They indicate 1,100, 1,200 and 1,300 meters. To fire at them, you need to set the upper flywheel to 10. 1,300 meters is the maximum at which fire is usually fired. Theoretically, shooting can be carried out at an even greater distance, but this occurs only as a rare exception. There are ten marks around the main square. They are thousandths. Thanks to them, you can carry out a large number of calculations. For example, you can determine the distance to the target (albeit, if its dimensions are known), measure values and carry out lead when shooting. In the most popular samples, in the lower left part of the field there is a graphic rangefinder made in the form of a parabola.
Determining the distance from the drawings
How to use a graphic rangefinder? It is designed so that rifled weapons can be used quickly and with acceptable accuracy to determine the distance to the target. What does this process look like? Below the horizontal line of the graphic rangefinder are the numbers 1.7 - the average height of a person. It is necessary to bring the rangefinder to the visible figure of the enemy and place it under the parabola. But so that he rests his head against it and his feet in a horizontal line. For example, if this was done under the number 4, then this means that the enemy is about 400 meters away. Although sometimes the rangefinder fails. For example, let's take a person with a height of 180 centimeters. Let's place it at a distance of 700 meters. But through the rangefinder it will seem that he is at about 600-odd. Thus, when shooting at the head, the bullet will actually hit the body armor. If you take a short one, there will be a flight. It is best to measure distance using a digital rangefinder, which provides data accurate to the nearest meter.
Equipping the magazine with cartridges and loading the weapon.
To equip the magazine, you need to take the magazine in your left hand with the feeder up and the convex side to the left, and in your right hand - cartridges with bullets to the magazine so that the bottom of the cartridge case rises slightly above the thumb and forefinger. While holding the magazine, press the thumb (Fig. 46) to insert the cartridges one at a time under the bends of the side walls of the magazine with the bottom of the cartridge case towards the rear wall of the magazine. If the magazine is fully loaded (10 rounds), then a cartridge is visible in the hole on the rear wall of the magazine.
Rice. 46. Loading the magazine with cartridges
To recharge the luminescent screen, you must turn the screen flag to a horizontal position, place the sight with the window with a light filter facing the light, or expose it to radiation from a light source containing ultraviolet rays.
Charging time: in diffuse daylight - 15 minutes, in direct sunlight and irradiated with an electric lamp with a power of 100 - 200 W at a distance of 20 cm - 7 - 10 minutes.
A charged screen retains the ability to capture infrared rays for 6–7 days, after which it needs to be charged again.
About zeroing
Since it is impossible to find a convenient target on the battlefield, before entering the position you should take a large sheet of white paper/cardboard, secure it at a distance of 100 meters and practice at a point of 1 cm. In the process, you need to make sure that the rifle barrel rests on something. That. After all, under pressure and weight, the barrel will bend, and this will lead to errors in shooting. In this case, you should not practice focusing on the barrel. What’s interesting is that you can look at many other sniper-type rifles and see that in them the bipod is attached to the forearm, closer to the chamber. First, you can ensure that the hits go vertically to the point, and then horizontally. Sniper ballistic tables greatly help in determining the situation in real conditions. They are necessary to determine a number of factors that are encountered in real conditions.
Useful tables
First of all, let's remember about anticipation. It is believed that a running person moves at a speed of 4 meters per second. Ours is at a distance of 500 meters. In this case, you need the following ballistic table:
| Range (meters) | Time (seconds) |
| 100 m | 0.13 s |
| 200 m | 0.26 s |
| 300 m | 0.42 s |
| 400 m | 0.61 s |
| 500 m | 0.82 s |
| 600 m | 1.05 s |
| 700 m | 1.29 s |
| 800 m | 1.59 s |
| 900 m | 1.88 s |
| 1,000 m | 2.19 s |
In the specified time you can run about 3.28 m. And here thousandths are needed. At a distance of 500 meters, one unit occupies about 50 centimeters. This means that by dividing 3.25 by 0.5 you can get a value of 6.56 thousandths. The value is rounded to 6.5. This is exactly the amount of advance that is made. But at the same time, corrections are also needed for the lateral/longitudinal wind when shooting, the deviation of the bullet, temperature and atmospheric pressure, readings of the mercury column and sea level. In this case, the following table comes to the rescue:
| Firing range | Horizontal adjustments | Vertical adjustments in centimeters | |||
| Side wind at an angle of 90 degrees in centimeters and the equivalent in thousandths | Deviation of the bullet flight path in centimeters (thousandths) | Longitudinal wind at a speed of 10 meters per second | Deviation of air temperature by 10 degrees from the zeroing value | Change in atmospheric pressure by 10 millimeters of mercury | |
| 100 m | 3 cm (0.15) | ||||
| 200 m | 10 cm (0.35) | 1 cm | 1 cm | ||
| 300 m | 26 cm (0.6) | 2 cm (0.1) | 2 cm | ||
| 400 m | 48 cm (0.95) | 4 cm (0.1) | 1 cm | 4 cm | |
| 500 m | 72 cm (1.3) | 7 cm (0.1) | 2 cm | 7 cm | 1 cm |
| 600 m | 110 cm (1.7) | 12 cm (0.2) | 4 cm | 12 cm | 3 cm |
| 700 m | 160 cm (2.1) | 19 cm (0.2) | 8 cm | 21 cm | 5 cm |
| 800 m | 235 cm (2.6) | 29 cm (0.3) | 15 cm | 35 cm | 9 cm |
| 900 m | 320 cm (3.1) | 43 cm (0.5) | 26 cm | 54 cm | 14 cm |
| 1,000 m | 490 cm (3.7) | 62 cm (0.6) | 42 cm | 80 cm | 20 cm |
At long distances, adjusting for the wind when shooting is very important!
Shooting at moving targets
141. When the target moves frontally (toward or away from the shooter), fire with the sight set corresponding to the distance at which the target may be at the moment of opening fire, and taking into account corrections for air temperature and side wind. At a distance not exceeding the direct shot range, fire can be carried out with the sight installed corresponding to the direct shot range.
142. When flanking and oblique (oblique) movement of the target, fire should be carried out with the sight installed, as indicated in Art. 141, and with the side handwheel set to a value corresponding to the lead and correction for the side wind. The distance that the target moves during the bullet's flight to it is called lead.
The lead is taken in the direction of the target's movement. So, when the target moves from left to right, move the middle point of impact to the right, and when the target moves from right to left, move it to the left. If shooting conditions do not allow you to take lead using the side handwheel (set the side handwheel to the desired division), then lead is taken using the lateral correction scale of the sight reticle or by moving the aiming point out in the target figures. When using the scale of lateral corrections of the sight reticle, aiming should be done by markings located in the direction from which the target is moving (Fig. 71).
Rice. 71. Taking into account the lead on target movement using a scale of lateral corrections (the lead is equal to 4 thousandths)
To determine the lead when firing at targets that have flanking movement (at right angles to the direction of fire), use the following table:
| Firing range in meters | Target running at 3 m/sec (approximately 10 km/h) | Motorized target moving at a speed of 20 km/h (approximately 6 m/sec) | |||
| Lead (rounded) | |||||
| in meters | in human figures | in divisions of the side handwheel scale (sight reticle) | in meters | in divisions of the side handwheel scale (sight reticles) | |
| 100 | 0,4 | 1 | 4 | 0,7 | 7 |
| 200 | 0,8 | 1,5 | 4 | 1,4 | 7 |
| 300 | 1,3 | 2,5 | 4,5 | 2,3 | 8 |
| 400 | 1,8 | 3,5 | 4,5 | 3,2 | 8 |
| 500 | 2,3 | 4,5 | 4,5 | 4,3 | 8,5 |
| 600 | 3,0 | 6 | 5 | 5,5 | 9 |
| 700 | 3,7 | 7,5 | 5,5 | 6,8 | 10 |
| 800 | 4,5 | 9 | 5,5 | 8,3 | 10 |
| 900 | 5,4 | 11 | 6 | 10,0 | 11 |
| 1000 | 6,3 | 12,5 | 6,5 | 11,5 | 12 |
| 1100 | 7,3 | 14,5 | 6,5 | 13,5 | 12 |
| 1200 | 8,4 | 17 | 7 | 15,5 | 13 |
| 1300 | 9,5 | 19 | 7,5 | 17,5 | 13 |
When the target moves at a speed different from that indicated in the table, the lead should be increased (decreased) in proportion to the change in the speed of the target
.
When oblique (oblique) movement of the target, the lead determined for the flank movement of the target is halved
.
Move the aiming point away from the middle of the target. When making adjustments to the installation of the side handwheel, aim at the middle of the target. To make it easier to remember the leads in divisions of the side handwheel scale (sight reticle) for the flank movement of the target at a speed of 3 m/sec (10 km/h), the lead values can be rounded and it can be assumed that when shooting at a distance of up to 600 m, the lead is equal to 4.5 thousandths (scale divisions), and at long distances - 6 thousandths (scale divisions).
143. Fire at a target that has flanking and frontal movement is carried out by tracking the target or by waiting for the target (fire attack).
When firing using the escort method
target, the sniper continuously moves the rifle in the direction of the target's movement and, at the moment of the most correct aiming, fires a shot.
When firing by waiting method
target (fire attack), the sniper takes aim at a point (local object) selected in front of the target, and as the target approaches this point, fires a shot (taking into account the lead by installing the side handwheel). If the target is unhit, then the sniper selects a new point on the target’s path, aims at it, and when the target approaches, fires the next shot. Firing in this manner continues until the target is hit.
If the lead is taken by moving the aiming point, the shot must be fired at the moment when the target approaches the intended point by the amount of the calculated lead.
144. The use of cartridges with tracer bullets when shooting at moving targets provides better observation of the results of shooting and the ability to clarify the amount of lead.
Shooting at enemy personnel on armored personnel carriers, cars and motorcycles should be carried out with cartridges with ordinary and armor-piercing incendiary bullets (at a ratio of 1: 1 or at a different ratio depending on the availability of cartridges with the specified bullets).