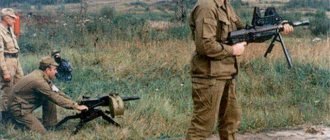
The RPG-7 is a truly unique and legendary weapon, not much inferior in popularity to the famous AK-47. RPG-7 is an anti-tank grenade launcher, an effective means of combating tanks and other armored vehicles. It allows the infantryman not to feel defenseless in the face of an armored mechanical monster.
The RPG-7 was adopted by the Soviet Army back in 1961, and despite its advanced age, it still remains in service. This grenade launcher has participated in countless conflicts and wars on all continents. And the emergence of new, more advanced ammunition makes the RPG-7 dangerous even for modern tanks and armored vehicles.
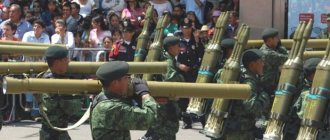
RPG-7 is the favorite weapon of partisans and revolutionaries. It was used by Viet Cong fighters in the Vietnamese jungle and by the Afghan Mujahideen against Soviet troops. A photograph of a rebel or partisan with an RPG pipe on his shoulder is almost as natural as with a Kalashnikov assault rifle in his hands. In its simplicity, cheapness and effectiveness, this weapon is in no way inferior to the Kalashnikov assault rifle.
No one knows how many copies of the RPG-7 are fighting in different countries around the world today. Experts believe that only “legal” (that is, released by the manufacturer or under his license) copies were produced more than a million units. No one can say how many grenade launchers were produced without a license or were stolen from military warehouses after the collapse of the USSR.
History of the creation of RPG-7
Experts call the predecessor of this weapon the German grenade launcher (or rather grenade launchers, because there were several of them) Panzerfaust, created by the Germans in the second half of World War II and which caused a lot of trouble for tank crews. The anti-tank weapon turned out to be very cheap and effective. Moreover, it was so simple that even a teenager could knock out a tank. Some experts point to some similarities between RPGs and American bazookas, which the US Army armed anti-tank crews with in Europe.
In the middle of the last century, the Soviet Army used anti-tank hand grenades, rifle grenade launchers, an RPG-2 hand grenade launcher and recoilless rifles to combat tanks. Several enterprises were involved in the development of grenade launchers, but for all of them this weapon was not the main focus, and therefore the products were not of the highest quality.
In 1958, the Moscow GSKB-47 (in the future - the famous “Basalt”) was appointed the main enterprise for the production of anti-tank grenade launchers. The RPG-7 hand-held anti-tank grenade launcher was developed under the leadership of Vladimir Vasilyevich Degtyarev, the son of the famous Soviet gunsmith.
From 1948 until that time, the Red Army was armed with the RPG-2 grenade launcher, the technical characteristics of which no longer satisfied the military. In particular, the firing range of the RPG-2 was only 50-80 meters. An RPG-4 grenade launcher was created with a higher grenade speed, but the firing range did not increase significantly. This grenade launcher went into production; it was also produced under license in China and Vietnam. At that time, the Shmel ATGM had already entered service with the Soviet Army, capable of hitting a tank at a distance of six hundred to two thousand meters, but at a distance closer than six hundred meters there was nothing to hit enemy armored vehicles.
The designers were given the task of “teaching” a hand grenade launcher to hit enemy tanks in close combat, and they coped with this task. A new PG-7V grenade was developed, on which a jet engine was installed, which made it possible to significantly increase the firing range. The new grenade launcher is called RPG-7.
The RPG-7 was specially created for use against tanks, self-propelled artillery and other types of enemy armored vehicles, as well as against manpower, both in open areas and in shelters. With the advent of the RPG-7 and the PG-7V grenade, the infantry received a simple and effective weapon for various purposes.
The design of the RPG-7 turned out to be so simple and successful that despite the appearance of more advanced versions of the same grenade launcher, the RPG-7 is still fighting in different parts of the planet.
Firing delays and ways to eliminate them
A grenade launcher, with proper care and conservation, and careful handling, is a reliable and trouble-free weapon. However, as a result of careless handling of the grenade launcher, contamination and wear of parts, as well as a malfunction of the grenade, there may be delays in firing.
If there is a delay when firing, re-cock the hammer and continue shooting. If the delay repeats, reload the grenade launcher and continue firing. If recharging does not eliminate the delay, find out and eliminate the cause of the delay as indicated below.
| Delay | Reasons for delay | Remedies |
| 1. Misfire (no shot) | 1. The shot into the grenade launcher barrel was not fully fired. 2. Malfunction of the grenade igniter primer. 3. Wear or breakage of the striker. 4. Low impact of the firing pin on the igniter primer due to contamination or hardening of the lubricant of the trigger and firing pin mechanisms | Send the shot until the lock stops at the bottom of the cutout on the muzzle of the grenade launcher barrel. Replace the grenade. Change. Clean the trigger and firing mechanism. |
| 2. The shot does not enter the grenade launcher barrel | The barrel is dirty (remnants of a cardboard cartridge case, powder residue) | Clean the barrel |
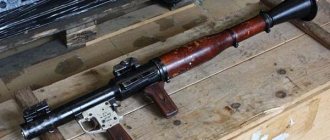
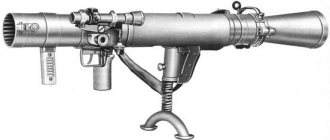
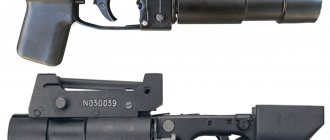
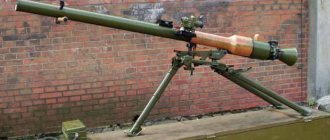
Design of RPG-7
The design of the RPG-7 grenade launcher is extremely simple. It consists of a barrel (essentially a pipe), with an optical and mechanical sight installed on it, a trigger mechanism and a firing pin. We can say that this is a smooth-bore recoilless rifle. According to the instructions, the RPG-7 must be fired from the shoulder, so a heat-insulating casing is installed in the middle part of the grenade launcher. On the back side of the grenade launcher there is a nozzle for more efficient removal of powder gases when fired.
RGP-7 has two handles: the front one comes in conjunction with the trigger mechanism, and the rear one is made for more comfortable holding of the weapon. When fired, the firing pin hits the primer, which, in turn, ignites a small powder charge, which pushes the grenade out of the barrel and gives it a rotational movement.
After leaving the grenade launcher tube, the grenade's stabilizers open and the charge of its main jet engine ignites. It should be noted that the jet engine starts working at a safe distance from the grenade launcher. After leaving the barrel, the grenade fuse is cocked.
The grenade's jet engine accelerates it at the initial stage of its trajectory to a speed of 300 m/s; after it burns out, the grenade flies by inertia. If it does not encounter any obstacle on its way, then after a distance of 1000 meters the self-destruct device is triggered and the grenade explodes.
Since the grenade launcher is designed using a recoilless design, it has virtually no recoil. Powder gases flow back through the weapon's nozzle, and this balances the recoil force when fired.
At first, the RPG-7 grenade launcher had a PGO-7 optical sight with a range scale, as well as marks for making lateral corrections. However, in the mid-60s, the grenade launcher was equipped with a more advanced PGO-7V sight. Models equipped with these sights were designated RPG-7V.
Operation of parts and firing mechanisms for a grenade launcher
After the striker strikes the primer - the grenade igniter, the latter is triggered and first the gunpowder located in the radial and axial channels of the jet engine, and then the powder charge, are ignited.
The gases formed during the combustion of the powder charge rupture the cardboard sleeve, push a foam wad through the barrel nozzle, ignite the tracer and eject the grenade from the grenade launcher barrel. In addition, powder gases passing through the turbine give the grenade stability during flight. When a shot is fired in the retarder, the primer is pinched onto the tip and the retarder begins to burn. At the end of the combustion of the retardant composition, the powder charge of the jet engine is ignited. The gases formed during the combustion of the powder charge of a jet engine push out the sealers and the outflow of powder gases through the nozzle openings begins. As a result, a reactive force arises, increasing the speed of the grenade.
When fired, cocking of the fuse begins and ends at a distance of 2.5 - 18 m from the muzzle of the barrel, during which the engine moves to the firing position and the electric detonator is switched on in the electrical circuit: the head of the fuse with a piezoelectric element - the internal circuit of the grenade - the bottom of the fuse with an electric detonator – the external circuit of the grenade is the head of the fuse.
When meeting a target (obstacle), the piezoelectric element is compressed and an electric current is generated, under the influence of which the electric detonator explodes, causing the head of the grenade to rupture.
When fired, the pyrotechnic composition of the self-destructor ignites. After 4 - 6 seconds, if the grenade does not meet an obstacle or the electrical part of the fuse fails, the pyrotechnic composition burns out and the primer is activated - the self-destructor detonator, causing the grenade to explode.
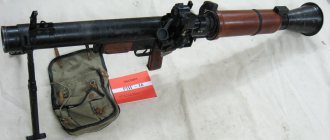
Technical characteristics of RPG-7
The grenade launcher has several modifications and is produced in several countries around the world, but its main technical characteristics remain unchanged:
| Combat characteristics | RPG-7 |
| Caliber | 40 mm |
| Weight | 6.3 kg |
| Length | 950 mm |
| Maximum shot range | 700 m |
| Grenade weight | 2 – 4.5 kg |
| Initial grenade speed | 112 – 145 m/s |
Video about RPG-7
Grenades for RPG-7
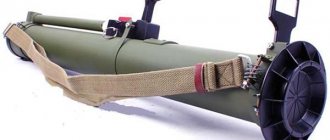
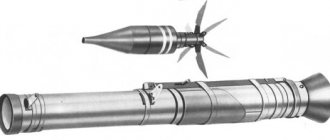
Any weapon, no matter how perfect it may be, is just a means for using ammunition. This is also true for the RPG-7. The success of this weapon is associated with the creation of the PG-7V grenade, which made it possible to significantly increase the firing range. The design of the grenade should be discussed in detail.
A grenade (or shot) consists of a body with an explosive and a cumulative funnel, as well as a pipe in which the grenade's jet engine and powder charges for them are located. The tube contains a primer and a powder charge that pushes the shot out of the grenade launcher barrel. There are four stabilizers on the tube, which, after leaving the barrel, open and stabilize the grenade in flight. At the leading edge of the pipe are the nozzles of the grenade's jet engine, which accelerate it in flight.
There is a fuse on the front edge of the body, which is triggered when the grenade hits an obstacle. The PG-7V is a cumulative grenade designed to combat enemy armored vehicles. When a grenade is detonated, a thin cumulative jet is formed, it burns through the armor and creates enormous temperature and excess pressure in the armored space.
Grenades for the RPG-7 grenade launcher were improved following improvements in armor protection. Currently, several types of grenade launcher shots are known. In addition to grenades with cumulative warheads, there are fragmentation and thermobaric ammunition.
| Year of issue | Index | Warhead | Caliber | Armor penetration |
| 1961 | PG-7V/ 7P1 | cumulative | 85 mm | 260 mm |
| 1972 | PG-7VS | cumulative | 72 mm | 400 mm |
| 1988 | PG-7VR “Summary | tandem cumulative | 65/105 mm | DZ + 650 mm |
| 1988 | TBG-7V "Tannin" | thermobaric | 105 mm | radius of destruction of manpower: 10 m |
| 1998 | OG-7V "Shard" | Fragmentation | 49 mm | Scattering area 150 m² |
Disassembly and assembly
Disassembly of the grenade launcher can be incomplete or complete: incomplete - for cleaning, lubricating and inspecting the grenade launcher; full - for cleaning when the grenade launcher is heavily soiled, after leaving it in the rain or snow, when switching to a new lubricant, for disassembled inspection and during repairs. Excessively frequent disassembly of the grenade launcher is harmful, as it accelerates the wear of parts and mechanisms.
Disassemble and assemble the grenade launcher on a table or clean mat; Place parts and mechanisms in the order of disassembly and handle them carefully. When separating or attaching parts of the grenade launcher, do not use excessive force or sharp blows.
When disassembling and assembling the grenade launcher, use the tool included in the spare parts kit.
The procedure for incomplete disassembly of a grenade launcher:
1.Remove the covers from the breech and muzzle of the grenade launcher.
2. Separate the trigger mechanism: place the grenade launcher on the table with the rail for the optical sight bracket down; press a key - a screwdriver or a device for assembling and disassembling the trigger mechanism on the split part of the pin and press it in, then push out (knock out) the pin with a drift, holding the handle, separate the trigger mechanism with the breech and handle from the barrel.
Pushing out the trigger mechanism pin.
3. Separate the firing mechanism: turn the grenade launcher with the firing mechanism upward (or put it in a vertical position); hold the barrel with your left hand, and with your right hand, using a key or screwdriver, unscrew the nipple and remove the firing pin, the firing pin spring and the support sleeve from the base of the firing mechanism.
Unscrewing the nipple of the striker mechanism.
4. Separate the cover of the trigger mechanism housing: take the trigger mechanism in your left hand, with your right hand, using a key-screwdriver, unscrew the four screws and remove the cover of the trigger mechanism housing.
The procedure for assembling a grenade launcher after partial disassembly
- Attach the trigger housing cover: replace the housing cover and screw in the four screws.
- Attach the striker mechanism: put a spring on the striker, insert the support sleeve and the striker with the spring into the base of the striker mechanism and screw the nipple with a wrench or screwdriver until it stops into the support sleeve.
- Attach the trigger mechanism: insert the protrusion of the base of the firing mechanism into the cutout on the body of the firing mechanism, press the trigger mechanism to the barrel and insert (hammer) the pin into the hole on the left side.
- Check that the grenade launcher is assembled correctly: cock the trigger (a click should be heard): when you press the trigger, it should hit the firing pin vigorously.
5. Put the covers first on the muzzle and then on the breech of the grenade launcher.
RPG-7 modifications
- RPG-7 - the first version of the famous grenade launcher
- RPG-7V – with improved sight
- RPG-7D - landing version
- RPG-7N / RPG-7DN - landing version, equipped with a night sight
- RPG-7V1 – with optical sight
- RPG-7V2 – with universal sighting device UP-7V
- RPG-7D3 - modern modification of 2001.
RPG-7 and its variants are produced under license in various countries: Romania, Bulgaria, Iraq, Iran, China, Sudan and many others. Even the USA produces its own version of the RPG-7. The American modification has seven Picatinny rails, which allows you to install anything you want on the grenade launcher.
Combat use of RPG-7
For the first time, the RPG-7 took an active part in combat operations in Vietnam. His debut turned out to be very successful. The target firing range of the RPG-7 is 330 meters. During the Chechen campaign, the tactics of attack by Chechen separatists on federal troops were based on the use of grenade launchers. To date, due to improved tank protection (multi-layer armor, dynamic protection, active protection), the effectiveness of hand grenade launchers has decreased somewhat, especially for older types of grenades. For example, in Iraq, American and British tanks endured up to 15 grenade hits without breaking through the armor.
One of the design features of the RPG-7 is that the jet blast hits everything that is behind the shooter, therefore, according to the instructions, the fighter must make sure that there are no people behind him. However, this disadvantage is typical for any type of recoilless rifle.