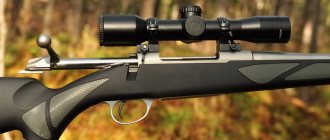
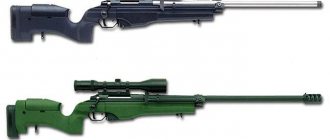
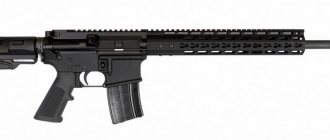
Today I want to share the new brainchild of Finnish gunsmiths, who have released another new product. The Sako S20 carbine has a rather interesting modular design, which is a hybrid of traditional plastic and chassis. The basis of the complex is an aluminum chassis, consisting of two parts, with a composite stock attached to it. Let's take a closer look at the main characteristics of the new Sako S20 model.
Chassis
The aluminum chassis is the base of the carabiner with all the other components attached to it. The chassis also carries all recoil-related stresses. The rigidity of the aluminum chassis ensures constant precision. The exposed parts of the cabinet (the areas around the receiver) have a black, non-reflective anodized finish. The weight of the S20 carbine, depending on the modification, ranges from 3.2 to 3.4 kg.
Sako Precision Solution
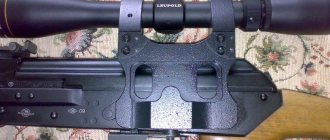
Sako Precision Solution is a collection of functions that together are responsible for the accuracy of the rifle. These features include a Picatinny top rail that is integral with the receiver, as well as a three-point mounting of the receiver to the chassis. The company claims sub-1 MOA accuracy for this carbine.
Lodge
As mentioned above, there are two stock options for the Sako S20 rifle: a hunting version and a tactical version for precision shooting. The tactical stock features adjustable stock height and M-LOK slots. The hunting version has an orthopedic stock. Both configurations come with quick-release swivels and an adjustable cheek pad. The carabiner handle is coated with “soft touch”. The length of the stock can be adjusted by replacing the rubber butt pads.
Trunk
The Sako S20 carbine is equipped with a cold forged barrel. Each barrel is hand inspected to ensure the bore is straight and smooth. To reduce the weight of the weapon, there are flutes on the barrel. Also on the carbine there is a thread on the muzzle for installing various devices (DTK, flash suppressor or sound moderator). The barrel length is 51 or 60 cm. Versions for hunting and precision shooting are available in the following calibers: 243 Win, 6.5 Creedmor, 270 Win, 7 RemMag, 308 Win, 30-06 Spr and 300 WM.
Shop
The Sako S20 carbine features a detachable, fiberglass-reinforced polymer magazine. The company calls the magazine Cartridge+ because it can accommodate cartridges with a longer overall length than standard ones. This will be a useful feature for reloaders as it will allow them to use a wide range of different bullets. The magazine holds 5 rounds (3 rounds for the magnum version). Additionally, you can purchase an increased capacity magazine for 10 and 7 rounds, respectively.
USM
The trigger is adjustable, the trigger force is adjustable from 0.8-1.6 kg. The safety locks the firing pin and prevents the carbine from falling.
Accessories
The S20 carbine also has a number of accessories that can be purchased separately. These accessories include: adjustable and foldable monopod, scope base, DTK, 5mm LOP spacers (the carbine comes with two spacers), the aforementioned larger capacity magazine.
The price on the European market for the Sako S20 carbine is $1,600.
Material prepared by Peter Senin, source,
More on the topic:
SAKO 85 varmint. through the eyes of the owner
Hunting rifle
Many copies :) have been broken in the HUNTING-SPORT debate, but personally I don’t see the difference. The rifle is always prepared according to the full program. For me there is no difference, I do everything according to the same scheme and there are no problems 
This is not my first SAKO, before there were TRG 42 in 338, a small one.
I used to shoot a lot with this caliber, but with a 12mm twist, I used 52 SMK and A-max 52 bullets,
Heckler also used bullets weighing 77 and 69 (twist 7) on it.
So I have some idea about this cartridge
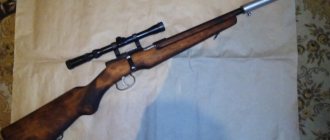
This time I decided to go with the heavy 80 gram VLD Berger bullet; the most suitable option was this SAKO 85 varmint model, twist 8, barrel length 24, no buckles.
I had a choice, stainless steel with fullers in laminate and black without fullers in walnut (wood). After long inspections with a baroscope, I chose black. Appearance plays an important role for me and when hunting, black in wood will look preferable (although not for everyone).
External and internal inspection did not reveal any defects, I was once again surprised by the quality of SAKO products. There are, of course, exceptions, but for the most part, the quality is excellent. When examined with a baroscope, the bore did not reveal any deviations (visual), everything was as it was there should be no jambs. BAROSCOP our ffso!!!
Since all the moves were written down :) and the plan was outlined, I immediately got down to business :) Lapua cartridges (200 pcs) were prepared in a couple of days,
I always cook according to the same recipe
I use this tool
Once again I was pleased with the sharpener :) THING, working with it is a pleasure
I sharpened the muzzle to size 0.0125, this is the minimum that allows you to sharpen the muzzle to equal thickness, I did everything in one go, the sharpener allows me to:) I will use 248 bushing, 247 in stock (just in case)
I consider the bullet entrance to be an important point, and the first thing I do is check where the BITING POINT is. 80 vld Berger is not in stock yet, I used what was on hand 69 smk. The biting point is very easy to find, a bullet with a slightly larger reach fits into the case than usual, the cartridge is inserted into the chamber and the bolt is closed (the cartridge is blank, the bolt is disassembled without a firing pin), the bullet is pushed into the sleeve with rifling, this will be the BITING point. Ideally, the biting point should be found on the molded sleeve, the shoulders are lowered by 0.001-0.002 and with the bullet which will be used. The photo shows a new, unmolded cartridge case with a smk 69 bullet.
The only minus ( a big minus ) is the lack of magazine feed; the cartridge, even with this bullet (69 smk), does not fit into the magazine.
But I foresaw this, I have experience with single-shot shooting :) for those hunts for which this rifle is planned, one shot is enough
The preliminary result pleased me; when compared with this picture, the bullet sits very well and comfortably, which is a good sign. I hope that 80 wld will be no worse
Before running in, I cleaned the rifle to zero, it doesn’t take much time, I always use the same scheme (AND I RECOMMEND IT TO EVERYONE)
A friend made me a custom cleaning guide (made of ebonite) and I was ready to start running it in.
I always combine running-in with inflating the cartridges, why waste the resource just like that, everything should be reasonable. About ten years ago, we ran in a relative SAKO 75 in 223 8th twist in stainless steel without a dollar. After the first shot and cleaning according to the scheme, I didn’t find any copper, the patch came out white, and so on every time for five shots. I was very surprised at the quality of the barrel and have never seen anything like this in factory rifles. This time I was lucky, a miracle happened
Weighed 22g in cuts (snack) with a mixture of 133+140 :) Sanya Shakovets fitted this for me back in 2008, take it, he says, this is my recipe, we’ll increase the speed :) (it was at the European Championships in Sweden) so we went crazy then :) Sanya's know-how :).
I use this mixture for inflating cartridges (RRS, 223.6 BR) and this time I did not change traditions :). I usually do the running-in on the hacienda in complete silence and nirvana, no one bothers or distracts, full concentration
There is no point in describing the running-in diagram, everything is in the link (with pictures and point by point). The cartridge case is lubricated with KROYL, I fire a shot. I clean it thoroughly,
After the first fill, the patch comes out white, this is a very good sign!!!
I take a second shot, clean it, fill it, the patch comes out white!!! Rushing :) I take the third shot and again, the patch (CONTROL) comes out white and wet from the Croyle!!! I stop, do an inspection with a borescope and understand that the barrel is of very good quality ( processing) and the running-in can be completed, there is nowhere for the copper to collect.
I encountered this for the second time in my life!!! (not a custom one, a factory barrel). I had nowhere to rush, I started preparing the cartridges, to order a custom matrix (full-size bushing), you need to prepare three cartridges, shot + nexize (three times, after the fourth to crimp )
I switched to three shots + cleaning, it was interesting to see what kind of patch would come out. Looking ahead, I’ll say at least three, at least five, ten, twenty and in the end I fired 35 shots in a row :) the situation did not change, the patch came out WHITE AND WET!!! + borescope control!!!
I was lucky :)!!!(in the run-in)
There was no nexize matrix available (only the factory full), I got out of the situation very simply, after the shot I crimped the barrel with bushing, threw it on top and pressed it a little with a pressure press, removed the bushing by hand, a crimp of 2 mm was enough to hold the bullet.
I successfully inflated the cartridges (four times), inflated four cartridges, three were as identical as possible (body top, bottom, total length, runout) I put it aside to order a matrix, and from the fourth I will make a test cartridge on it, I will look for points (biting-touching) and do everything settings (full size, landing) it remains to get 80 vld :)
During the preparation of the cartridges, I looked (measured) the runout on the muzzle after the shot, after the third shot the runout returned to normal, on all prepared cartridges the shooter barely trembled, we can say that this is almost zero
This made me very happy :). Once again I was convinced that the cartridge case is completely formed after three shots. I will use a hundred cartridges, and then in the process, maybe I’ll blow off the second hundred, or maybe I won’t touch it :) let it lie, everything will depend on samples on which the final adjustment of the cartridge will be made.
A preliminary result can be made as follows, the borescope is ours :),
thanks to the borescope, a normal barrel was chosen, without any visual jambs, the running-in was quick and easy, there was no beating on the muzzle after the shot. One hundred cartridges were inflated (one cycle) and were waiting for a custom matrix:) full-size bushing (custom) + pressure Wilson (not custom), without a micrometer. After a hundred shots and inspection of the barrel with a borescope, the bullet entrance became ideal, the transverse grooves on the rifling (fields) from the cutter disappeared, now they are simply gone. The bullet entrance is ready to work with a test cartridge (finding points, biting and touching)
Some numbers after the first shot
As practice has shown (measurements after each shot), the 223 (lapua) case inflates in one shot, the dimensions change after the first shot, and then there is no change, but there is a nuance :) the runout on the muzzle returns to normal after the third shot
Bipods, today there is a large choice, if you wish, you can get and put anything you want :) but there must be an explanation for everything. This rifle is sharpened for hunting, an ordinary hunting rifle with all that it implies, the bipod should be compact, folding, light, with a rocking arm, fast can be removed and installed.Harris 6-9 with a rocking chair and stepwise leg adjustment will be an ideal option for the tasks at hand.
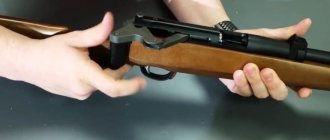
The shutter can be disassembled and assembled in one motion using a key (included)
An important point is the lubrication of the lugs and the rotating mechanism of the bolt. To avoid enveloping (according to Tony Boyer), the lugs must be lubricated before each series . For these tasks, thick lubricant is used (sold by Sinclair and many others)
The turning mechanism does not need to be lubricated every time:) it should simply be lubricated (there should be lubrication)
The trigger on the rifle is equipped with a trigger, it works correctly, there are no complaints. If the rifle is considered only for hunting, then it is quite possible to get by with the original one with a trigger . But I plan to run the rifle through the BR competition in Krasnoyarsk and I will have to change the trigger to a sports one from Bixandy
Unfortunately, there is no Jewel for this model (Jewel is the best thing available today for BR shooting), Bixandy does not have the same characteristics as Jewel, but in any case, there are no options.
Replacing the trigger does not take much time, you just need to unscrew one bolt, install another trigger and tighten it
Replacing the spring and adjusting the force is carried out with one bolt, the bolt is unscrewed, the spring is changed (if necessary), the bolt is tightened and thereby the trigger force is adjusted, everything is simple
I had all the bixandy models (Blaser sport, hunting and SAKO-TIKKA), the Blazer models are much more reliable because there are no rods and there is nothing superfluous :) everything is simple and reliable, the SAKO model requires attention, all the rods are loose, bolts are unscrewed (they are very small), the split tube requires special attention, it can simply fall out and get lost, then this unit will need to be modernized (welding, polishing, etc.) The trigger requires adjustment and checking, in general it is delicate :) but unfortunately for others there are no options. I repeat, if you use the rifle for hunting, something native to the sneller is enough IMHO
Little by little, the jambs of the Bix are coming out, the shutter touches the fuse bracket (the switch itself) when working. IT DOESN’T HIT ANYTHING ON THE NATIVE!!! I found the reason :) the bracket is close to the receiver, you can bend the bracket, but it’s so gentle, I decided not to get excited yet :) But there is still a problem :) when installing the lower bracket and tightening the bolts, it stops working altogether, it pinches something, it seems that the bix is a little out of size :) I’m still racking my brain on how to get out of the situation :) It doesn’t even want to work with half of the bracket :)bitch
I figured out the bracket , ground off the partitions that are inside and everything worked
Rings. There were two options with the rings, native OPTILOCKS or weaver + nightforce rings. The second option did not suit me because of its bulkiness and complete lack of aesthetics, all little towns :). I decided to stick with the OPTILOCKS, they were invented for this receiver and they simply have to perform their function on five points.
I made it in a hurry :) it seems ok, let’s see how they will work to return to the proven scheme (weaver-knight) it’s never too late
I decided on the height of the rings and set them to 6mm (there were 6 and 9 mm)
Adapters.
Made of American walnut, the rear one has a Devcon layer, it is attached with one bolt, the swivel is an additional guide. The rear one is made with a minimum angle, it rolls away just perfectly on the bag.
The front adapter comes as a sample, all the dimensions are given on it and the required angles are specified, I will give it to the milling machine as a sample, let him make it from aluminum
It's ready made of aluminum, all that remains is to fit it in place
The next stage of fine-tuning and a headache will be bedding; the design of the recoil paw and the incomprehensible plate are very confusing.
I need to figure out and make a decision on how to do the bedding, what to do with the plate, whether to make bushings or not. Now I’m racking my brains and annoying the specialists with stupid questions :) There’s no decision yet, but I hope that I’ll make a decision in the near future
Slowly we started bedding (photo from phone)
Grooved steel bushings
Devkon 10110, we froze the bushings, we will do it in stages because we can’t do everything in one go with SAKO. IMHO.
Devcon from old stocks turned out to be a little thick, now we’ll do an experiment, dilute it with acetone and see what happens in the end, Devcon should be like thick sour cream, store bought
The bushings are drying, tomorrow we’ll see what happened and we’ll work on the recoil claw (large), we’ll seat it tightly. (glue it in)
The bushings are adjusted to the metal (to the receiver), and the other side will approach the bracket through the devcon. The night has passed :) the bushings are frozen solid, they fit perfectly, the fit to the metal is 100%, the bolts of the bushing walls do not touch, they stand strictly in the centers (a good sign) .Now we are wise with the claw of recoil, as my friend said, and now high (nano) technologies have come into play :).The whole process was divided into stages; it wouldn’t work any other way due to the complex design.
Devcon diluted with acetone (to the required viscosity) froze overnight into stone, so you can dilute it if necessary
Made a selection for Devcon
They applied Devcon, inserted the plate, it was glued tightly and tightened with bolts (stock-receiver) and let it dry. The task was to make a 100% fit between the plate and the receiver and glue the plate tightly.
The night has passed :) the plate is glued in, the fit is 100%, so far everything is according to plan.
Let's move on :) unfortunately, there is no milling machine and we have to prepare the wood using a burr machine. On Remah I did this operation using a machine, it turned out very well.
We attached it with electrical tape (according to Feng Shui :)), now it’s drying.
The night passed and the day passed:) the bed turned out perfect!!!
A heel was left in the rear part (the part of the stock that was not selected, it served as a beacon and guide, about 5 mm)
The photo clearly shows the rest of the wood that served as a guide base. Now you need to remove it, make a selection of wood for the back of the receiver and fill in the devcon. And then the bed will be completely ready, without touching the wood at all.
It is already clear that the fit in the right places is 100%, one gets the impression that you can shoot without bolts at all :):), when laying the iron, everything sticks, ideally, I threw the bolts into the hole and they immediately fell into the thread, everything is strict coaxial, parallel, perpendicular, etc. :):):)
The night passed :) the back turned out great.
All that remains is to glue the staples and put the finishing touches on :) (clean out all unnecessary things, make them beautiful)
In my opinion, it’s better to have such a bedding than a native insert :):):):)
While I'm waiting for the front adapter (made of aluminum), we made bedding on another Sako (Hunter 223)
This time it was easier, it went smoothly :). We came to the conclusion that it is more difficult to do bedding on SAKO than on others due to the complex design of the recoil paw. On SAKO you have to do it in several stages, on rem-like ones you can do everything in one two stages. IMHO
EVERYTHING :) the preparation of the rifle is over! The rifle is ready to adjust the charge. The weight with adapters and optics is 5.5 kg, the balance is +2 cm to the muzzle, you can move it back if necessary by adding lead to the rear adapter (there is a place there). I will test and Then I’ll make a decision. I covered the adapters with slip to ensure even movement on the bags when firing, it slides perfectly now. The front adapter is through the devcon, I had to align it so that the barrel would stand strictly parallel to the adapter.
To be continued...( targets , competitions, hunting)
Modified on March 22, 2022 by NSK-I