Preparing a sniper rifle and ammunition for combat use
Military Encyclopedia - historical and archival military-patriotic portal
home☆Soviet military encyclopedia☆military equipment☆military science☆military review☆history of weapons☆forum
military science ☆ Sniper. Methodological preparation. ☆
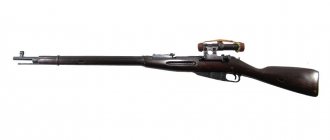
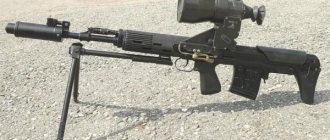
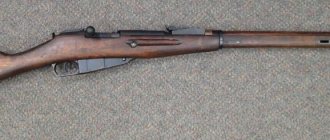
The sniper's main weapon is the 7.62 mm Dragunov sniper rifle (Fig. 21), designed to destroy various emerging, moving, open and camouflaged single targets.
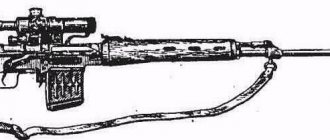
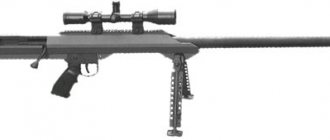
In some cases, snipers use the 12.7 mm B-94 sniper rifle (Fig. 22), which weighs 13.4 kg, length 1448 mm, barrel length 737 mm. With an initial bullet speed of 854 m/s, the target range is 1800 m. This weapon is used to fire at embrasures, lightly armored objects (such as armored personnel carriers) and helicopters.
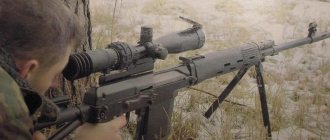
To destroy manpower in light personal protective equipment, a 9 mm special sniper rifle (VSS) (Fig. 23). The weight of the VSS is 2.6 kg, the length with the butt folded down is 894 mm, the barrel is 200 mm long, the initial bullet speed is about 290 m/s (SP-5 cartridge), the sighting range is up to 400 m.
Regardless of the weapon used by the sniper, the main activities for his preparation remain the same and include the following activities:
- preparing the rifle for shooting;
- inspection of cartridges;
- checking the combat and bringing the rifle to normal combat;
- performing camouflage measures.
Preparing the rifle is intended to ensure its safe operation during shooting and is carried out before each mission. To prepare a rifle for shooting you must :
- clean it;
- inspect disassembled and lubricate;
- inspect in assembled form;
- inspect the optical sight and recharge the fluorescent screen.
Immediately before shooting, wipe the barrel bore (rifled part and chamber) dry, inspect the cartridges and equip the magazine with them. If the rifle has been in the cold for a long time, then before loading it, manually pull back and push the bolt frame forward several times. Inspection of live ammunition is carried out before each shooting. When inspecting cartridges, you need to check :
- are there any rust or bruises on the cartridges?
- Is the bullet wobbling in the cartridge case;
- whether there is a green coating or cracks on the capsule, whether the capsule protrudes above the surface of the bottom of the cartridge case;
- Are the cartridges of the same type and batch?
All faulty cartridges are confiscated. If the cartridges are dirty, covered with a slight green coating or rust, they must be wiped with a dry cloth. The choice of cartridges for SVD must be approached carefully. Different masses of bullets and powder charge mean different trajectory steepness (Fig. 24). The PSO-1 sight reticle is designed for the sniper cartridge (SN). In all others there will be other deviations in height.
In addition, the following cartridges can be used for shooting from a rifle: a) with an ordinary bullet:
- rifle sniper cartridges with an ordinary bullet with a steel core “SN”, color - silver stripe (Fig. 25), until 1976 - PP, LPS (Fig. 26);
- target cartridges “Extra” (Fig. 27) with a light bullet “L”, have no color and with a heavy bullet “T” - yellow stripe
b) with a special bullet:
- tracer "T-46" - green color (Fig. 28);
- armor-piercing incendiary "B-32" - black stripe with a red belt (Fig. 29);
- sighting and incendiary "PZ" - with a red stripe (Fig. 30).
Ordinary bullets are intended primarily to destroy manpower and unarmored vehicles that are open or located behind light cover and do not have any special effects. They are characterized by lethal, stopping and penetrating actions.
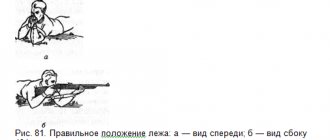
Target cartridges are designed to destroy various single targets at a range of up to 1300 m. The most effective shooting is at a range of up to 800 m. Bullets with a steel core are designed to destroy manpower located openly and behind obstacles pierced by bullets and located in unarmored vehicles. A bullet with a tool steel core that has undergone heat treatment (PP) provides penetration of armor up to 10 mm thick at an impact angle of 900 at a distance of up to 200 m. For air targets - up to 500 m. Special bullets are designed to simultaneously perform different types of destructive actions, belong to combined action bullets. The 7.62 mm cartridge with the T-46 tracer bullet is designed for target designation and fire adjustment, as well as for engaging manpower. Tracing range is at least 1000 m. The B-32 armor-piercing incendiary bullet is designed to ignite liquids and destroy manpower located behind light armored cover at ranges up to 500 m. Pierces a steel sheet made of steel-3 6 mm thick at a range of 950-1000 m , armor 10 mm thick at a meeting angle of 90° at a range of 200-250 m and bullet-resistant body armor at a range of 700-745 m. An armor-piercing incendiary bullet combines armor-piercing and incendiary effects. They are the most effective means for shooting at lightly armored targets, armored aircraft targets, gas tanks of combat vehicles, etc. The penetrating effect of the bullet is ensured by a core made of high-carbon tool steel that has undergone heat treatment. The PZ sighting and incendiary bullet is designed to target targets in range and direction, as well as to ignite flammable materials not protected by armor at a range of up to 1000 m. The bullet provides ignition of a flammable liquid (gasoline), protected by a 1 mm thick steel sheet, at a range of 100 m. Checking the combat of a sniper rifle and bringing it to normal combat is carried out at a shooting range in calm weather, in an indoor shooting range or in a protected area under normal lighting. The sniper rifle is checked and brought into normal combat with an open sight, after which the optical sight is aligned and test firing is carried out with an optical sight. When testing combat and bringing it to normal combat, firing from a rifle is carried out without a bayonet. To check the fire and bring the rifle to normal fire, ordinary cartridges with a steel core, taken from a hermetic closure, are used. The cartridges must be from the same batch. Firing range 100 m, sight 3. Firing position - lying down. Shooting is carried out at a black rectangle measuring 20 cm in width and 30 cm in height, mounted on a white shield 0.5 m wide and 1 m high. The aiming point is the middle of the lower edge of the black rectangle; it should be approximately at eye level of the shooter. Along a plumb line at a distance of 16 cm above the aiming point, the normal position of the midpoint of impact when shooting with open sights is marked with chalk or a colored pencil. This point is the control point (CT) (Fig. 31).
When checking the combat rifle, separate the optical sight and the butt cheek. To check the battle, the sniper (shooting) fires four single shots, carefully and uniformly aiming through an open sight under the middle of the lower edge of the black rectangle. At the end of the shooting, the target and the location of the holes are inspected, the accuracy of the battle and the position of the midpoint of impact are determined. The accuracy of the combat is considered normal if all four holes fit into a circle with a diameter of 8 cm. If the accuracy of the holes does not satisfy this requirement, the shooting is repeated. If the shooting result is unsatisfactory again, the rifle must be sent to an artillery repair shop. If the accuracy of the battle is normal, the average point of impact and its position relative to the control point are determined (Fig. 32). To determine the average point of impact for three holes, you need to connect any two holes with a straight line and divide the distance between them in half. Connect the resulting division point with the third hole and divide the distance between them into three equal parts. The division point closest to the first two holes will be the midpoint of the three holes.
To determine the average point of impact for four holes, you need to connect any two holes with a straight line and divide the distance between them in half. Connect the resulting division point with the third hole and divide the distance between them into three equal parts. Connect the division point closest to the first two holes with the fourth hole and divide the distance between them into four equal parts. The division point closest to the first three holes will be the midpoint of the four holes. If the holes are located symmetrically, the midpoint of impact can be determined in the following way: connect the holes in pairs, then connect the midpoints of both straight lines and divide the resulting line in half. The division point will be the midpoint of the hit. The rifle's engagement is considered normal if the average point of impact coincides with the control point or deviates from it in any direction by no more than 3 cm. If, when checking the engagement, the average point of impact deviates from the control point in any direction by more than 3 cm, then accordingly it is necessary change the position of the front sight in height or its fuse in the lateral direction. If the average point of impact is below the control point, the front sight must be screwed in; if it is higher, it must be unscrewed. If the middle point of impact is to the left of the control point, move the fuse to the left, if to the right - to the right. When the front sight guard is moved to the side by 1 mm and the front sight is screwed in (unscrewed) one full turn, the average point of impact when shooting at 100 m shifts by 16 cm. The divisions on the front end of the front sight base are 0.6 mm, which corresponds to a shift in the average point of impact in the lateral direction by 10 cm. The correct movement of the front sight is checked by repeated shooting. After checking the combat of the rifle or bringing it to normal combat, the optical sight is aligned. To do this you need:
- attach an optical sight and butt cheek to the rifle;
- by rotating the handwheels, set the sight to division 3 and the lateral correction scale to 0;
- fix the rifle in the sighting machine and aim it along the open sight, placed on division 3, at the aiming point in the middle of the lower edge of the rectangle at which shooting was carried out with an open aisle, then cover the lower part of the black rectangle with a white strip of paper 2 cm wide;
- look at the optical sight and notice where the main (upper) square of the sight reticle is directed: if it is directed towards the middle of the lower edge of the black rectangle, then the optical sight is considered aligned;
- if the main square of the sight reticle is not aligned with the aiming point, it is necessary to loosen the locking (side) screws of the handwheels by one or two turns, and then by rotating the end nuts, bring the tip of the main square of the reticle under the aiming point and carefully screw in the locking screws of the handwheels until they stop;
- check whether the reticle square has moved relative to the aiming point when screwing in the locking screws; if it has moved, re-align the sight in the sequence described above. After aligning the optical sight, carry out test shooting with an optical sight under the same conditions as when checking the combat of a rifle with an open sight, only the control point is now marked at a height of 14 cm from the aiming point. If, as a result of test firing, all four holes fit into a circle with a diameter of 8 cm, but the average point of impact deviated from the control point by more than 3 cm, you should determine the deviation of the average point of impact, release the locking screws of the handwheels and make appropriate adjustments to the settings of the end nuts. Moving the end nut by one division of the additional scale when shooting at 100 m changes the position of the midpoint of impact by 5 cm.
Example. When shooting at 100 m with sight 3 installed, the average point of impact deviated from the control point up by 5 cm and to the left by 7 cm. To align the average point of impact with the control point, it is necessary to release the locking screws of the upper handwheel by rotating the end nut in the “Down STP” direction. move the nut pointer relative to the additional scale of the handwheel housing by one division, carefully tighten the locking screws until they stop. Then loosen the locking screws of the side handwheel, by rotating the end nut in the “Right STP” direction, shift the nut pointer relative to the additional scale of the handwheel housing by one and a half divisions, and then carefully tighten the locking screws until they stop. After making adjustments to the settings of the end nuts, it is necessary to fire again. If, upon repeated shooting, all four holes fit into a circle with a diameter of 8 cm, and the average point of impact coincides with the control point or deviates from it in any direction by no more than 3 cm, then the rifle is considered to be in normal combat. Once the rifle has been brought to normal combat, the position of the midpoint of impact is entered into the rifle's logbook and the sniper's individual notebook.
Tags: ammunition ☆ cartridges ☆ sniper training ☆ svd ☆ sniper ☆ sniper rifle ☆
| Techniques and methods of action of a sniper in battle < Prev. | Track. > Training and operations of US Army snipers |
We recommend electric pancake makers for restaurants
Production and sale of professional equipment for the restaurant business.
- Contacts:
- 8
- Moscow
© Military Encyclopedia. Map of site.
Summary
According to the Austrian military, the 8.6 mm mSSG medium sniper rifle has established itself as a high-precision weapon, which is confirmed by snipers from the Austrian Army. The weapon is not comparable to the previous SSG 69 model, as between them lies half a century of development and development in the sniper business.
The mSSG has proven to be able to withstand the demanding demands of the modern battlefield and meet multiple combat scenarios thanks to its modular design and the ability to combine accessories. The mSSG rifle enhances the effectiveness of snipers in various types of combat with its high accuracy, penetration and firing range. The Austrian Army Command views the weapon as a modern and long-needed means of enhancing the firepower of infantry and special forces units.
Based on materials from the resource truppendienst.com