General provisions
Shooting from a pistol is carried out from a standing position, from a kneeling position, lying down, from a hand and from a rest, or while moving in a car, etc. The shooter performs all shooting techniques quickly, without ceasing to observe the target.
83. Pistol shooting consists of performing the following techniques:
— ready to fire
(loading a pistol, taking a shooting position);
— firing a shot
(aiming, pulling the trigger);
— stop shooting
(stopping pressing the tail of the trigger, turning on the safety, i.e., moving it to the “safety” position, unloading the pistol).
84. In battle, the pistol fires independently.
For training purposes, for shooting in various positions, the command is given (approximately) “At such and such a target, lying down
(from the knee, standing) -
fire
. Upon this command, it is necessary to take the position indicated by the command, turn off the safety (lower the flag down) and, while aiming, fire a self-cocking shot. A shot at this command can also be fired with the hammer pre-cocked. In this case, after cocking the trigger, you need to take aim and press the tail of the trigger.
85. To perform shooting techniques that ensure the greatest accuracy and convenience of the shooter’s actions, each soldier must: depending on his individual characteristics, develop the most advantageous and stable position for shooting, while achieving a uniform position of the handle in the hand and the most comfortable position of the body, arms and legs
WHEN SHOOTING A PISTOL:
At the command “Equip magazine,” the employee loads the magazine (magazines) with cartridges and holds it (them) in his hand.
When an employee equips several magazines, one of them is inserted into the pocket of the holster for a spare magazine, the others are held in the hand or put away in the pocket of the uniform. At the command “Prepare to shoot,” the employee puts the loaded magazine into the pocket of the holster for a spare magazine (if there are several magazines, into the pocket of the uniform), removes the pistol from the holster, checks that there is no cartridge in the chamber (for which he turns off the safety, moves the bolt to the extreme rear position and puts it on the slide stop, inspects the chamber, removes the bolt from the slide stop), tests the trigger mechanism of the weapon, firing several shots “dry” in the direction of the target, turns on the safety and puts the weapon in the holster. During test firing, the “Prepare to fire” command is not given.
At the “Load” , the employee removes the pistol from the holster, inserts the loaded magazine into the base of the handle and, depending on the conditions of the exercise, fires a cartridge into the chamber, or puts the pistol into the holster and fastens it, or holds it in his hand in the direction of the target and reports readiness to shooting.
At the “Fire” , the employee removes the pistol from the holster (if the pistol is in the holster), turns off the safety and, in accordance with the conditions and procedure for performing the exercise, places a cartridge in the chamber and conducts aimed fire. At the end of the shooting, the employee takes the starting position, holding the weapon in his hand in the direction of the target, removes the bolt from the slide stop (if the bolt is in the rearmost position on the slide stop), turns on the safety and reports the end of shooting. Shooting can be carried out either with one hand or with two hands.
At the command “Forward”, the employee moves to the firing line and, in accordance with the conditions and order of the exercise, takes a shooting position, removes the pistol from the holster, turns off the safety, chambers a cartridge, and conducts aimed fire. At the end of the shooting, the employee takes the starting position, holding the weapon in his hand in the direction of the target, removes the bolt from the slide stop (if the bolt is in the rearmost position on the slide stop), turns on the safety and reports the end of shooting.
At the “Unload” , the employee removes the magazine from the base of the pistol handle, turns off the safety, removes the cartridge from the chamber (if any), for which he pulls the bolt back, turns on the safety, puts the weapon in the holster, removes cartridges from the magazine (magazines (if any) ), takes the pistol out of the holster, inserts the magazine into the base of the grip, puts the weapon in the holster and fastens it.
At the command “Weapon for inspection,” the employee, holding the weapon in the direction of the target, turns off the safety, moves the bolt to the rearmost half and places it on the slide stop, removes the magazine from the base of the pistol handle, places the magazine under the thumb of the hand holding the weapon, in front of the safety so that the magazine feeder is 2 - 3 cm above the bolt. If several magazines were used during shooting, then all magazines are submitted for inspection.
At the “Inspected” command, the employee takes the magazine in his free hand, removes the bolt from the slide stop, pulls the trigger in the direction of the target, turns on the safety, inserts the magazine into the base of the handle, puts the pistol in the holster, and if there are several magazines, puts one in the holster pocket and fastens it her, and the rest - into the pocket of the uniform.
Getting ready to fire
86. When preparing to fire on the command “Load”
the shooter must:
- remove the pistol from the holster; remove the magazine from the base of the handle; put the gun in the holster;
Rice. 53. Loading the magazine with cartridges
- equip the magazine with cartridges, for which, holding the magazine in your left hand (Fig. 53), with your right hand put cartridges into the magazine one by one, with the other, pressing with your thumb until the cartridge goes beyond the upper curved edges of the side walls of the case magazine, move it with the capsule close to the rear wall of the magazine body;
— remove the pistol from the holster and insert the magazine into the base of the handle;
- insert the cartridge into the chamber of the barrel, to do this, turn off the safety (move the flag down), move the bolt to the rearmost position with your left hand and release it;
- turn on the safety (move the safety flag with the thumb of your right hand so that it covers the red circle) and put the pistol in the holster.
Note. In a combat situation, the pistol must be loaded in advance.
87. To assume a standing shooting position
(Fig. 54) it is necessary:
- turn half a turn to the left and, without placing your right leg, put it forward towards the target at shoulder width (whichever is more convenient for your height), distributing the weight of the body evenly on both legs;
— unfasten the cover and remove the pistol from the holster;
- hold the pistol vertically with the muzzle up against the right eye, while maintaining the position of the hand at chin height; the left hand should be freely lowered along the body or laid behind the back;
— holding the pistol with the muzzle up, place the thumb of your right hand on the safety catch and lower it down (turn off the safety); insert your index finger into the trigger guard without touching the trigger.
Rice. 54. Standing shooting position
Notes: 1. When shooting from the left hand, the body position is reversed; With your right hand, remove the pistol from the holster and transfer it to your left hand.
2. If shooting will be carried out with preliminary cocking of the hammer, and not self-cocking, then after turning off the safety, it is necessary to press the trigger head with the thumb of the right hand to cock the hammer.
88. To assume a kneeling shooting position
(Fig. 55) you need to put your left leg back so that the toe of your foot is opposite the heel of your right foot;
Rice. 55. Kneeling position
quickly lower yourself to your left knee and sit on your heel; keep your right leg as straight as possible from the knee to the foot, with the toe pointing towards the target; remove the pistol from the holster, turn off the safety (move the flag down); cock the hammer if shooting will be carried out with the hammer pre-cocked; hold the pistol as specified in Art. 87.
89. To assume a prone shooting position
(Fig. 56) you should take a full step with your right foot forward and slightly to the right;
Rice. 56. Prone shooting position
leaning forward, go down on your left knee and place your left hand on the ground in front of you, fingers to the right; then, leaning successively on the thigh of the left leg and the forearm of the left hand, lie on your left side and quickly turn onto your stomach, spreading your legs slightly to the sides with your toes out. Remove the pistol from the holster, turn off the safety and cock the hammer, as indicated in Art. 87; if shooting will be carried out by self-cocking, then after turning off the safety, place the index finger of your right hand into the trigger guard without touching the trigger.
III. Actions with weapons according to given commands
49.When shooting a pistol:
49.1.On the command “Equip magazine,” the employee equips the magazine (magazines) with cartridges and holds it (them) in his hand. When an employee equips several magazines, one of them is inserted into the pocket of the holster for a spare magazine, the others are held in the hand or put away in the pocket of the uniform.
49.2. At the command “Prepare to shoot,” the employee puts the loaded magazine into the pocket of the holster for a spare magazine (if there are several magazines, into the pocket of the uniform), removes the pistol from the holster, checks for the absence of a cartridge in the chamber (for which he turns off the safety, pulls the bolt back extreme rear position and puts it on the slide stop, inspects the chamber, removes the bolt from the slide stop), tests the trigger mechanism of the weapon, firing several shots “dry” in the direction of the target, turns on the safety and puts the weapon in the holster. During test firing, the “Prepare to fire” command is not given.
49.3. At the command “Load” , the employee removes the pistol from the holster, inserts the loaded magazine into the base of the handle and, depending on the conditions of the exercise, fires a cartridge into the chamber, or puts the pistol into the holster and fastens it, or holds it in his hand in the direction of the target and reports about readiness to shoot.
“Fire” command , the employee removes the pistol from the holster (if the pistol is in the holster), turns off the safety and, in accordance with the conditions and procedure for performing the exercise, places a cartridge in the chamber and conducts aimed fire. At the end of the shooting, the employee takes the starting position, holding the weapon in his hand in the direction of the target, removes the bolt from the slide stop (if the bolt is in the rearmost position on the slide stop), turns on the safety and reports the end of shooting. Shooting can be carried out either with one hand or with two hands.
49.5. At the command “Forward”, the employee moves to the firing line and, in accordance with the conditions and procedure for performing the exercise, takes a shooting position, removes the pistol from the holster, turns off the safety, chambers a cartridge, and conducts aimed fire. At the end of the shooting, the employee takes the starting position, holding the weapon in his hand in the direction of the target, removes the bolt from the slide stop (if the bolt is in the rearmost position on the slide stop), turns on the safety and reports the end of shooting.
“Unload” command , the employee removes the magazine from the base of the pistol handle, turns off the safety, removes the cartridge from the chamber (if any), for which he pulls the bolt back, turns on the safety, puts the weapon in the holster, removes cartridges from the magazine (magazines (if availability), removes the pistol from the holster, inserts the magazine into the base of the handle, puts the weapon in the holster and fastens it.
49.7. At the command “Weapon for inspection,” the employee, holding the weapon in the direction of the target, turns off the safety, moves the bolt to the rearmost half and puts it on the slide stop, removes the magazine from the base of the pistol handle, places the magazine under the thumb of the hand holding the weapon, in front of the fuse so that the magazine feeder is 2 - 3 cm above the bolt. If several magazines were used during shooting, then all magazines are submitted for inspection.
“Inspected” command , the employee takes the magazine in his free hand, removes the bolt from the slide stop, releases the hammer in the direction of the target, turns on the safety, inserts the magazine into the base of the handle, puts the pistol in the holster, and if there are several magazines, puts one in the holster pocket and fastens it, and the rest into the pocket of his uniform.
50. When firing from a machine gun (machine gun) and submachine gun:
50.1. At the command “Equip magazine,” the employee loads the magazine (magazines) with cartridges and puts it (them) in the magazine bag with the feeder facing down.
50.2. At the command “Prepare to fire,” the employee checks the machine gun for the absence of a cartridge in the chamber (for which he lowers the translator down, moves the bolt handle to the rearmost position, inspects the chamber, releases the bolt handle), tests the trigger mechanism, firing . several empty shots in the direction of the target, puts the machine on safety. During test firing, the “Prepare to fire” command is not given.
50.3.
At the
“Load” , the employee attaches a loaded magazine to the machine gun and reports that it is ready to fire.
50.4.On the command “ Fire” (“Single bursts - fire”, “Short bursts - fire”), the employee sets the required type of fire with the translator, sends the cartridge into the chamber and, according to the conditions and procedure for performing the exercise, conducts aimed fire. At the end of the shooting, he puts the machine gun on safety, takes the starting position, holding the weapon in the direction of the target, and reports the end of the shooting.
50.5. At the command “Forward” , the employee moves to the firing line and, in accordance with the conditions and procedure for performing the exercise, takes a position for shooting, sets the required type of fire with the translator, sends a cartridge into the chamber, and conducts aimed fire. At the end of the shooting, the officer puts the machine on the safety, takes the starting position, holding the weapon in the direction of the target, and reports the end of the shooting.
50.6. At the command “Unload” , the employee disconnects the magazine, lowers the translator down, removes the cartridge from the chamber (if any), for which he moves the bolt handle back, releases the hammer towards the target, puts the machine on the safety, and places the weapon on the parapet ( stand) or takes the machine gun to the “belt” position, removes cartridges from the magazine (magazines (if any) and attaches the magazine to the weapon.
50.7. At the command “Weapon for inspection,” the employee, holding the weapon in the direction of the target, disconnects the magazine, takes the weapon and magazine with his left hand. He pulls the bolt frame back with his right hand and presents the machine gun and the magazine for inspection, while the magazine feeder should be 2 - 3 cm above the upper cut of the receiver cover. The weapon is held in the direction of the target. If several magazines were used during shooting, then all magazines are submitted for inspection.
50.8. At the command “Inspected,” the employee releases the bolt frame, releases the hammer towards the target, puts the safety on the machine gun, and puts the magazines in the magazine bag with the feeder facing down.
51. When shooting from a sniper rifle:
51.1.On the command “Equip magazine,” the employee loads the magazine (magazines) with cartridges and puts it (them) into the bag with the feeder down.
51.2.On the command “Prepare to shoot,” the employee checks the rifle for the absence of a cartridge in the chamber (removes the rifle from the safety, moves the charging handle back, inspects the chamber, releases the charging handle), tests the trigger mechanism by firing several shots “dry” in the direction targets, puts the rifle on safety. During test firing, the “Prepare to fire” command is not given.
51.3.On the command “Load”, the employee attaches a loaded magazine to the rifle and reports that it is ready to fire.
51.4.On the command “Fire” , the employee removes the rifle from the safety, puts a cartridge into the chamber and, in accordance with the conditions and procedure for performing the exercise, conducts aimed fire. At the end of shooting, moves the bolt carrier to the forward position (if the bolt carrier is in the rearmost position), puts the rifle on safety, takes the starting position, holding the weapon in the direction of the target, and reports the end of shooting;
51.5.On the command “Forward”, the employee moves to the firing line (position) and independently performs the given exercise. At the end of shooting, he moves the bolt carrier to the forward position, puts the safety on, takes the starting position (if the bolt carrier is in the rearmost position), holding the weapon in the direction of the target, and reports the end of shooting.
51.6. At the command “Unload”, the employee disconnects the magazine, removes the rifle from the safety, removes the cartridge from the chamber (if any), for which he moves the charging handle back, releases the hammer towards the target, puts the rifle on the safety, and places the weapon on the parapet ( stand), removes cartridges from the magazine(s) (if any) and attaches the magazine to the weapon.
51.7. At the command “Weapon for inspection,” the employee, holding the weapon in the direction of the target, disconnects the magazine, takes the weapon and the left magazine for inspection, while the magazine feeder must be 2 - 3 cm above the upper cut of the receiver cover. If several magazines were used during shooting, then all magazines are submitted for inspection.
51.8. At the command “Inspected,” the employee releases the bolt frame, releases the hammer towards the target, puts the rifle on safety, and puts the magazines in the magazine bag with the feeder down.
52. When firing from an underbarrel grenade launcher:
52.1. At the command “Load”, the employee puts the grenade launcher on safety, takes the weapon by the handle with his right hand, holding it in the direction of the target, and with his left removes a shot from the bag; inspects it, inserts the tail part into the barrel of the grenade launcher, aligning the protrusions on the shot with the rifling of the barrel bore, pushes it all the way into the breech (when the latch sinks into the locking groove on the shot, a characteristic click is heard); assumes a shooting position and reports readiness.
52.2.On the command “Fire”, the employee removes the grenade launcher from the safety lock and conducts aimed shooting in accordance with the conditions and procedure for performing the exercise.
52.3. At the end of the shooting, the employee puts the grenade launcher on safety and reports the end of the shooting.
52.4. If the command “Stop, cease fire” was received when the grenade launcher was loaded, then after putting the grenade launcher on the safety catch, the employee reports to the director (assistant director) of the shooting: “The grenade launcher is loaded.” In this case, the shooting director gives the command “Unload”.
52.5. At the command “Unload”, the employee checks the safety of the grenade launcher, takes the weapon with his right hand by the handle and gives the barrel an elevation angle of 45 degrees, with his left hand takes the grenade launcher from below by the body of the trigger mechanism, pushes the extractor forward with the thumb of his left hand, wraps his left hand around the far part of the grenade launcher barrel, lowers the barrel down with his right hand, then with his left hand removes the shot from the barrel and puts it in the bag.
53.When firing from a hand-held anti-tank grenade launcher:
53.1.On the command “Prepare shot”, the employee takes the fan out of the bag and inspects it, removes the pencil case with the charge from the bag, opens it, turning the case body in one direction and the lid in the other, removes the charge from the case and removes the paper wrapper, screws it by hand a safety cap from the bottom of the grenade, screws the charge onto the grenade (without applying excessive force), inspects the connection of the grenade with the charge (the charge must be completely screwed onto the grenade until it stops).
53.2. At the command “Load”, the employee checks whether the hammer is cocked, puts the grenade launcher on safety, takes the shot in the left hand by the jet engine, inserts the powder charge and the jet engine into the muzzle of the barrel and fires the shot so that the fan lock fits into the cutout on the muzzle of the barrel until it stops.
53.3.On the “Fire” command, the employee cocks the trigger, removes the grenade launcher from the safety catch and fires a shot in accordance with the conditions and order of the exercise.
53.4. At the end of the shooting, the employee puts the fan launcher on safety and reports the end of the shooting.
53.5. If the command “Stop, cease fire” was received when the grenade launcher was loaded, then after setting the safety lock on the fan launcher, the employee reports to the director (assistant director) of the shooting: “The grenade launcher is loaded.” In this case, the shooting director gives the command “Unload”.
53.6. At the command “Unload”, the employee checks the safety of the grenade launcher, removes the shot from the barrel of the fan launcher and places it on the bag, removes the fan launcher from the safety, if the trigger was cocked, releases it, puts covers on the muzzle and breech of the fan launcher barrel and puts it down to the ground, takes the shot, puts the safety cap on the head of the fuse and secures it with a pin, unscrews the powder charge from the bottom of the jet engine and puts it in the pencil case, screws the fuse onto the bottom of the jet engine, puts the powder charge and the fan in the bag.
54.When throwing hand fragmentation grenades:
54.1. At the command “Prepare the fan,” the employee moves to the firing line, unscrews the cap from the tube (glass) of the grenade body and
her place screws the fuse all the way in and reports readiness for grenade launching.
54.2. At the command “Grenade - fire”, the employee takes the grenade in his hand, presses the trigger lever firmly against the body of the fan with his fingers, squeezes (straightens) the ends of the safety pin with his free hand and pulls it out of the fuse by the ring, throws the grenade at the target and hides in cover . At the end of the grenade throwing, at the command of the firing director (assistant director), the employee takes the starting position and reports on the completion of the grenade throwing.
54.3. At the command “Forward, grenade - fire,” the employee moves to the firing line, takes the fan in the hand, presses the trigger lever firmly against the body of the grenade with his fingers, squeezes (straightens) the ends of the safety pin with his free hand and pulls it out of the fuse by the ring, throwing it grenades at the target and hides in cover. At the end of the grenade throwing, at the command of the firing director (assistant director), the employee takes the starting position and reports on the completion of the grenade throwing.
54.4. If at the time of grenade throwing the command “Stop, cease fire” was received, but the grenade was not thrown and the safety pin was not pulled out of the fuse, the command “Unload the grenade” is given. At this command, the employee opens (spreads in different directions) the ends of the safety pin, unscrews the fuse, wraps it in rags (paper) and puts it in a grenade bag, screws the stopper into the tube (glass) of the grenade body and puts it in the bag.
54.5. If at the time of grenade throwing the command “Stop, cease fire” was received, and the grenade was not thrown, but the safety pin was pulled out of the fuse, after order is restored, the command “Grenade - fire” must be given, according to which the grenade throwing is carried out.
Firing a shot
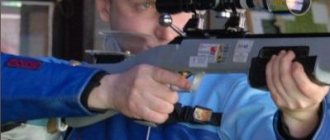
90. To fire a shot from all shooting positions you must: select an aiming point; without ceasing to observe the target, extend your right hand with the pistol forward, holding the pistol by the handle with your right hand; place the index finger of this hand with the first joint on the tail of the trigger; extend the thumb of your right hand along the left side of the handle parallel to the direction of the barrel (Fig. 57);
Rice. 57. How to hold a pistol when shooting
hold the outstretched right arm freely, without tension, keep the hand of this arm in a plane passing through the axis of the barrel bore and the elbow of the arm (Fig. 58); Do not squeeze the pistol handle and hold it as uniformly as possible.
91. For aiming
hold your breath as you naturally exhale, close your left eye, and with your right eye look through the rear sight slot at the front sight so that the front sight is in the middle of the slot, and its top is level with the upper edges of the rear sight; in this position, bring the pistol under the aiming point (without dropping it) and at the same time begin pressing the tail of the trigger.
Rice. 58. Standing shooting position
Note. If it is difficult for the shooter to close his left eye separately, he is allowed to aim with both eyes open.
92. To release the trigger
it is necessary, while holding your breath, to smoothly press the first joint of the index finger on the tail of the trigger until the trigger, unnoticed by the shooter, as if by itself, falls off the cocking mechanism, i.e. until the shot fires.
When the hammer is pre-cocked, it should be borne in mind that the trigger has some free play, during which the shot will not fire.
When pressing the tail of the trigger, apply finger pressure straight back. The shooter must gradually increase the pressure on the tail of the trigger during the time when the top of the level front sight aligns with the aiming point, and when the front sight deviates from the aiming point, the shooter must, without increasing or weakening the pressure, straighten the aiming and, as soon as the level the front sight will again align with the aiming point, again gradually increase the pressure on the tail of the trigger. When releasing the trigger, you should not be embarrassed by slight vibrations of the front sight at the aiming point; the desire to make the trigger necessarily at the moment of the best coincidence of the front sight with the aiming point can entail tugging on the trigger, and hence an inaccurate shot. If the shooter, pressing the tail of the trigger, feels that he can no longer breathe, he must, without weakening or increasing the pressure of the finger, take a breath and, holding it again, continue to smoothly squeeze the tail of the trigger.
The procedure for loading and unloading a Makarov pistol (PM)
When loading a PM pistol, you must:
1. remove the pistol from the holster;
2. holding the pistol in your right hand with your left hand, remove the magazine from the base of the pistol handle, while the barrel should be directed at a right angle towards the bullet catcher;
3. put the gun in the holster;
4. equip the main and spare magazines with live ammunition;
5. put a spare magazine in the holster pocket;
6. remove the pistol from the holster;
7. check if there is a cartridge in the cartridge (the barrel of the pistol should be directed towards the bullet catcher), to do this, turn off the safety (move the flag down), move the bolt to the rear position with your left hand, put it on the bolt stop and inspect the chamber, then with your thumb press the shutter stop with your right hand, release the shutter;
8. holding the pistol in your right hand, place the pistol in the bullet catcher socket, then turn on the safety (lift the flag up), the trigger should be released from the cocking action and locked;
9. holding the pistol in your right hand (the barrel should be pointed towards the bullet catcher), insert the magazine into the base of the handle, through the lower window of the base of the pistol handle;
10. fasten the pistol to the pistol strap with a carabiner;
11. place the pistol in the holster and fasten the holster lid.
PROCEDURE FOR UNLOADING THE MAKAROV PISTOL “PM”
To unload the pistol you must:
2. holding the pistol in your right hand, remove the magazine from the base of the pistol handle with your left hand, while the barrel should be directed at a right angle towards the bullet catcher;
3. check to see if there is a cartridge in the chamber (the barrel of the pistol should be pointed towards the bullet catcher), to do this, turn off the safety (move the flag down), move the bolt to the rear position with your left hand, put it on the bolt stop and inspect the chamber, then with your thumb press the shutter stop with your right hand and release the shutter;
4. holding the pistol in your right hand, place the pistol in the bullet catcher socket, then turn on the safety (lift the flag up), the trigger should be released from the cocking action and locked;
5. put the gun in the holster;
6. alternately unload the main and spare magazines, for which you take the magazine in your left hand, with the thumb of your right hand, slide the cartridges one by one forward along the magazine feeder and pick them up with the palm of the same hand, then inspect the cartridges and check their number (from 2 magazines there should be 16 of them);
7. remove the pistol from the holster, pointing the barrel of the pistol towards the bullet catcher, insert the main magazine (without ammunition) into the base of the pistol grip;
8. hand over the pistol, spare magazine and ammunition to the duty officer at the military unit.
Chapter V INSPECTION, PREPARATION FOR SHOOTING A PISTOL AND CARTRIDGES, CARE FOR THEM AND THEIR SAVING
Chapter V
INSPECTION, PREPARATION FOR SHOOTING OF A PISTOL AND CARTRIDGES, CARE FOR THEM AND THEIR SAVING
General provisions
46. To determine the condition of the weapon, its serviceability and combat readiness, periodic inspections of pistols are carried out within the time limits established by the Internal Service Charter.
The pistol is inspected either assembled or disassembled. The degree of disassembly is determined before each inspection.
Simultaneously with the inspection of the pistol, the holster, spare magazine, wiper and pistol strap are inspected.
47. Every soldier armed with a pistol must inspect the pistol daily, before leaving for training, before firing, and during cleaning.
Before going to class and immediately before shooting, inspect the pistol in assembled form, and during cleaning - in disassembled and assembled form.
48. When inspecting the pistol daily, you must check:
— are there any rust, dirt, scratches, nicks or cracks on the metal parts; what condition is the lubricant in?
— whether the bolt, magazine, trigger mechanism, safety and bolt stop function properly;
— are the front and rear sights in good working order?
— whether the magazine is held at the base of the handle;
- Is the bore clean?
Malfunctions of the pistol must be corrected immediately; If they cannot be corrected in the unit, the pistol must be sent to a repair shop.
Typical malfunctions that cause abnormal pistol firing are as follows:
- the front sight is broken or bent - the bullets will deviate in the direction opposite to the movement of the top of the front sight;
- rear sight is offset - bullets will deviate in the direction the rear sight is offset;
— the nicks on the muzzle of the bullet barrel will deviate in the direction opposite to the nicks;
- fraying of the barrel bore (especially in the muzzle), wear (rounding) of the rifling fields, scratches and nicks in the barrel bore, wobbling of the rear sight - all this increases the dispersion of bullets.
Inspection of the assembled pistol
49. When inspecting the assembled pistol, check:
1) Are there any rust deposits, scratches, nicks or cracks on the parts of the gun; Do the numbers on the bolt, safety and magazines match the numbers on the frame?
2) Are there any nicks on the front sight and in the rear sight slot that interfere with aiming; Is the rear sight firmly held in the bolt groove and does the mark on the rear sight coincide with the mark on the bolt.
3) Is the fuse easy to switch from one position to another and is it securely fixed in its extreme positions?
4) Does the trigger have a “release”: when the trigger is released and the trigger is pulled all the way back, the trigger head, when pressed with a finger, should move forward, and after the pressure stops, it should vigorously return to its original position; when the trigger is released and the pressure on the trigger head stops, the hammer should be in the safety cocking position and in this position, under sufficiently strong hand pressure, should not break off the safety cocking and move forward.
5) Is the trigger guard securely held in the frame and is it set in an angled position to separate the bolt?
6) Is the handle screw tightened?
7) Is there any dirt, rust or other defects in the bore? To do this, you need to place the shutter on the slide stop and look into the barrel from the muzzle, inserting white paper into the shutter window.
 Are the walls and upper edges of the magazine body bent and does the feeder move freely in the magazine?
9) Does the magazine (spare magazine) slide in and out of the grip base freely and is held securely by the magazine latch?
10) Are the parts and mechanisms of the gun working correctly? To check, you need to do the following work.
Place the safety catch in the “fire” position (lower down), pull the bolt back by hand until it stops and release it; The bolt, having moved slightly forward, should remain in the rear position under the action of the bolt stop. Press the shutter stop button; the bolt, under the action of the return spring, must vigorously return to the forward position, and the trigger must be cocked. Press the tail of the trigger; the trigger must be released from the cocking position and hit the firing pin.
Remove the magazine from the base of the pistol grip and equip it with training cartridges; insert the magazine into the base of the pistol grip, pull the bolt back and release it; in this case, the bolt, under the action of the return spring, must reach the extreme forward position and send the cartridge into the chamber; When the bolt is pulled back again, the cartridge must be vigorously reflected outward through the window in the bolt.
Turn the safety flag up to the “safety” position; in this case, the trigger should be released from the cocking position, strike the fuse protrusion and remain in a position slightly retracted; after this, the bolt must be locked, the trigger should not be cocked either by direct action of the thumb on it, or by pressing the tail of the trigger (self-cocking).
Place the safety switch in the “fire” position and press the tail of the trigger; in this case, the hammer must be cocked and, without being cocked, strike the firing pin.
Put the hammer on cock and press the trigger head from behind; at the same time, he should not break from the combat platoon. Then press the tail of the trigger; in this case, the trigger must be released from the cocking position and deliver an energetic blow to the firing pin.
If there are spring scales, check the hammer release force. The hammer must be released from a trigger force of at least 1.5 kg and no more than 3.5 kg.
11) Is the trigger blocked by the fuse protrusion when the fuse is turned before the sear begins to rise? Perform the check as follows.
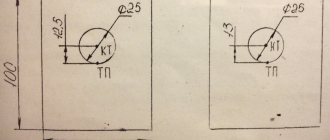
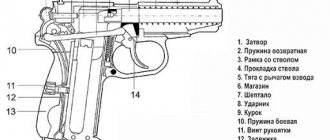
Move the safety switch to the “fire” position. Put the trigger on cock. Holding the pistol in your right hand with the barrel down and observing the sear through the groove in the bolt, slowly move the safety lever up with the thumb of your right hand until the sear begins to rise. Having thus determined the position of the fuse at the moment the sear begins to rise (i.e., at the moment the shelf of the ledge of the fuse touches the tooth of the sear), holding the trigger with the thumb of your right hand, press the trigger with your index finger and, without releasing it, slowly bring the trigger to the forward position . In this case, the trigger must rest against the protrusion of the fuse, i.e., be blocked by the fuse (Fig. 48), as a result of which the shot does not occur.
Rice. 48.
Scheme for blocking the trigger with the fuse protrusion:
1
- the tooth whispered;
2
— fuse ledge shelf;
3
- fuse protrusion
Inspection of the pistol in disassembled form
50. When the pistol is disassembled, each part and mechanism is examined in detail separately in order to check whether there is any chipped metal, torn threads, scratches and nicks, bents, rashes, rust and contamination, and whether all parts have the same numbers.
51. When inspecting the frame with the barrel and trigger guard, pay special attention to the condition of the barrel bore.
Inspect the bore from the muzzle and breech. At the same time, check the cleanliness of the bore, chamber and serviceability of the breech section of the barrel.
Barrels can be with chrome-plated or non-chrome-plated bore and chamber.
When examining a non-chromed bore, the following disadvantages may be observed.
The rash is the primary damage to metal by rust. The rash looks like dots and specks, located locally or over the entire surface of the bore.
Rust is a dark coating on metal. Rust, invisible to the eye, can be detected by wiping the bore with a clean rag, on which rust leaves yellowish stains.
Rust marks are dark, shallow stains that remain after rust has been removed.
Sinks are significant depressions in the metal caused by prolonged exposure to rust. It is prohibited to delete them in the department.
Copper plating - appears when shooting clad bullets coated with tombac. Copper plating is observed in the form of a light copper coating on the walls of the bore. Can only be removed by a repair shop.
Scratches are dashes, sometimes with a noticeable rise of metal along the edges.
Removing scratches in the bore is not allowed.
Nicks are more or less significant depressions, sometimes with metal rising.
Barrel swelling - noticeable in the barrel bore in the form of a transverse dark solid ring (semi-ring) or detected by a metal convexity on the outer surface of the barrel. Inflating the trunk is not allowed.
When determining the quality condition of chrome-plated barrels, follow the Instructions for the Categorization of Artillery Weapons.
52. When inspecting the bolt with ejector, firing pin and fuse, pay special attention to the condition of the internal grooves, sockets and protrusions, which should not be dirty and should not have nicks. Check whether the firing pin moves freely in the bolt channel, whether the ejector is vigorously rising towards the bolt cup, and whether the ejector hook and the firing pin are not crushed.
When inspecting the fuse, check whether the latch is recessed, whether there are large bruises on the hook for locking the trigger, whether the trunnion is worn, and whether the rib of the fuse is worn.
53. When inspecting the return spring, check whether there are burrs, rust, bends, dirt or breaks on it, and whether it is firmly held on the barrel.
54. When inspecting parts of the trigger mechanism, pay special attention to the serviceability of the hammer, sear, and trigger rod with the cocking lever. When inspecting the trigger rod, check to see if there is significant wear on the release lug of the cocking lever; the cocking lever should rotate smoothly on the trigger rod pin. Check to see if there is any crumbling or wear of the combat and safety cocking of the hammer, stretching of the sear spring and wear of its nose. The mainspring feathers must not be broken.
55. When inspecting the handle with the screw, check for cracks and chips, for stripped threads on the screw, for dirty grooves and recesses, and for dirt in the metal bushing for the screw.
56. When inspecting the bolt stop, make sure it is in good condition. The bolt stop must not be bent or broken. Check if there is any chipped metal on the reflector.
57. When inspecting the magazine, pay special attention to the serviceability of the feed tooth and the protrusion for the magazine latch; check that the top edges of the magazine body are not bent.
Inspection of the wipe, holster and pistol strap
58. When inspecting, check whether the rubbing is not bent, whether there are nicks or scratches on it. There should be no chipped metal on the blade. The rubbing protrusion must not be bent.
When inspecting the holster, check for tears or broken seams, the presence of loops, a clasp and an auxiliary strap.
Check the condition of the pistol strap.
Inspection of live ammunition
59. Inspection of live ammunition is carried out in order to detect malfunctions that could lead to delays in firing the pistol.
Cartridges are inspected before shooting, when joining a squad, and by special order.
60. When inspecting cartridges, you need to check:
— are there any rust and green deposits on the cartridges, especially on the primer, bruises, scratches that prevent the cartridge from entering the chamber; whether the bullet is pulled out of the case by hand and whether the primer protrudes above the surface of the bottom of the case; cartridges with the indicated defects must be selected and returned;
- Are there any training cartridges among the combat cartridges?
If the cartridges become dusty or dirty, covered with a slight green coating or rust, they must be wiped with a dry, clean rag.
Preparing the pistol for shooting
61. Preparing a pistol for shooting is carried out in order to ensure trouble-free operation of the pistol during shooting and maintain its normal firing. To do this you need:
- inspect the pistol disassembled in accordance with Art. 50–57;
- inspect the assembled pistol in accordance with Art. 49;
- inspect the cartridges as specified in Art. 59 and 60;
- equip the magazine with cartridges, as specified in Art. 86;
— immediately before shooting, clean and wipe the barrel bore dry.
Storing a pistol and ammunition
62. The pistol must always be in good condition. Storage of the pistol and accessories is entrusted to the soldier armed with the pistol, who is obliged to handle the pistol carefully and inspect it daily.
63. In barracks and camp settings, pistols are stored unloaded and removed from holsters in cabinets or boxes with nests in accordance with the Internal Service Charter. Spare magazines are stored in slots next to the pistols.
64. When staying in a populated area for a short time in apartments, keep the pistol with you.
65. During field training, on a hike, when traveling by rail and by car, carry the pistol in a holster on a belt, which must be firmly fastened and properly adjusted so that the holster does not hit hard objects.
66. To prevent swelling or rupture of the barrel when shooting, it is prohibited to plug or cover the barrel bore with anything.
67. In all cases not related to shooting, the safety box must be in the “safety” position. When setting the fuse to the “fire” or “safety” position, the fuse box must be set to the lowest or highest position.
68. If, if necessary, the pistol will be placed in a damp holster, then at the first opportunity, remove the pistol from the holster, wipe, clean, lubricate it and dry the holster.
69. In hot areas with dust in the air, as well as in coastal areas with high air humidity, store the gun according to special instructions.
70. Cartridges should be stored in a dry place and, if possible, protected from sunlight; when handling them, avoid damage, protect them from shock, moisture, dirt, etc.
Checking weapons, delays when firing and how to eliminate them
Disassembly and reassembly of the pistol may be incomplete or complete.
Partial disassembly is carried out for cleaning, lubricating and inspecting the gun, complete - for cleaning when the gun is heavily soiled, after it has been exposed to rain or snow, when switching to a new lubricant, as well as during repairs. Frequent complete disassembly of the pistol is not allowed, as it accelerates the wear of parts and mechanisms.
When disassembling and assembling the pistol, the following rules must be observed:
disassembly and assembly should be carried out on a table or bench, and in the field - on a clean mat;
Place parts and mechanisms in the order of disassembly, handle them carefully, avoid unnecessary force and sharp impacts;
When assembling, pay attention to the numbering of parts so as not to confuse them with parts of other pistols.
Partial disassembly of the pistol must be done in the following order.
1. Remove the magazine from the base of the handle. Holding the pistol by the handle with your right hand, with the thumb of your left hand, pull the magazine latch back as far as it will go, while simultaneously pulling back the protruding part of the magazine cover with the index finger of your left hand, remove the magazine from the base of the handle. Check to see if there is a cartridge in the chamber, to do this, turn off the safety (move the flag down), move the bolt to the rear position with your left hand, place it on the bolt stop and inspect the chamber. Press the shutter stop with your right thumb to release the shutter.
2. Separate the shutter from the frame. Taking the pistol in your right hand by the handle, with your left hand pull the trigger guard down and, tilting it to the left, rest it against the frame so that it is held in this position. During further disassembly, hold it in this position with the index finger of your right hand. With your left hand, move the bolt to its rearmost position and, lifting its rear end, allow it to move forward under the action of the return spring. Separate the bolt from the frame and put the trigger guard in its place.
3) Remove the return spring from the barrel. Holding the frame with your right hand by the handle and rotating the return spring towards you with your left hand, remove it from the barrel.
Reassemble the pistol after partial disassembly in the reverse order:
1) Place the return spring on the barrel. Taking the frame by the handle in your right hand, with your left hand you must put the return spring onto the barrel with the end in which the outermost coil has a smaller diameter compared to other coils;
2) Attach the shutter to the frame. Holding the frame by the handle in your right hand and the bolt in your left, insert the free end of the return spring into the bolt channel and move the bolt to the rearmost position so that the muzzle of the barrel passes through the bolt channel and protrudes out. Lower the rear end of the shutter onto the frame so that the longitudinal protrusions of the shutter fit into the grooves of the frame, and, pressing the shutter against the frame, release it. The bolt, under the action of the return spring, vigorously returns to the forward position. Turn on the fuse (raise the flag up).
Note. To attach the shutter to the frame, it is not necessary to pull down and twist the trigger guard. When moving the bolt to the rearmost position, it is necessary to lift its rear end up as far as possible so that the lower front wall of the bolt does not stick into the ridge of the trigger guard, which limits the movement of the bolt back;
3) Insert the magazine into the base of the handle. Holding the pistol in your right hand, use the thumb and index finger of your left hand to insert the magazine into the base of the grip through the lower window of the base of the grip. Press the magazine cover with your thumb so that the latch (the lower end of the mainspring) slides over the protrusion on the wall of the magazine. There should be a click. It should be noted that hitting the magazine with the palm of your hand is not allowed.
The procedure for checking the correct assembly of the pistol after partial disassembly:
turn off the fuse (move the flag down). Move the shutter to the rear position and release it;
the shutter, having moved slightly forward, comes to the shutter stop and remains in the rear position. Press the shutter stop with your right thumb to release the shutter. The bolt, under the action of the return spring, must vigorously return to the forward position, and the trigger must be cocked. Turn on the fuse (raise the flag up). The trigger must be released from cocking and locked.
The procedure for loading and unloading a pistol.
To load the pistol you need:
remove the magazine from the pistol grip;
remove the pistol from the safety;
move the bolt to the rearmost position and check if there is a cartridge in the chamber;
perform a control release of the trigger, with the barrel directed towards the bullet catcher;
put the gun on safety;
insert the loaded magazine into the pistol grip;
place the pistol and loaded spare magazine in the holster.
To unload the pistol you must:
remove the pistol from the holster;
holding it with the muzzle up at an angle of 45 degrees, remove the loaded magazine from the pistol handle;
remove the pistol from the safety;
move the bolt to the rearmost position and check if there is a cartridge in the chamber;
perform a control release of the trigger;
put the gun on safety.
It should be said that a person using any weapon must comply with certain requirements for caring for it.
An employee of an LLC must strictly adhere to the following rules.
Any weapon requires constant inspection, since all kinds of defects are possible during operation.
The weapon should be stored in a dry place, preventing moisture from getting on the parts of the trigger mechanism.
Due to the fragility of the external parts of gas weapons, care is required when transporting and storing weapons.
It is recommended to store the weapon with the firing pin uncocked, since the firing pin spring may become deformed and misfire when firing.
Weapons are fired only with standard cartridges.
After shooting, the weapon must be cleaned and lubricated with a thin layer of gun lubricant. To remove shot products from the bore, you must first wipe it with a gauze swab or a special brush soaked in gun oil, and then wipe it with a dry swab.
Cleaning and lubrication of the IZH-71 pistol
The pistol must be kept clean and in good working order at all times. This is achieved by timely and proper cleaning and lubrication, careful handling of the gun and proper storage of the gun.
Pistols are cleaned:
in the field - every day in between classes;
after exercises, orders and training in the field without firing - immediately after the end of the exercises, orders or classes;
after shooting - immediately after shooting, it is necessary to clean and lubricate the barrel bore and chamber; Perform final cleaning of the pistol upon returning from shooting; in the next 3-4 days, clean the gun daily;
if the gun is not in use - at least once every 7 days.
Apply lubricant only to a well-cleaned and dry metal surface immediately after cleaning to prevent moisture from affecting the metal.
Cleaning and lubrication of pistols is carried out under the guidance of a senior officer. He determines the degree of disassembly of the gun, the correctness and quality of cleaning, gives permission for lubrication and assembly, and checks the correctness of lubrication and assembly.
To clean and lubricate the gun, use:
liquid gun lubricant - for cleaning the gun and lubricating its parts and mechanisms at air temperatures from +5 to -50 ° C;
gun lubricant - for lubricating the bore, parts and mechanisms of the gun after cleaning them; this lubricant is used at air temperatures from +5° C and above;
RFC solution (barrel cleaning solution) - for cleaning barrel bores and other parts of the pistol exposed to powder gases;
rags or paper KV-22 - for wiping, cleaning and lubricating the gun;
tow (short flax fiber), cleared of kernels, - only for cleaning the bore.
To make it easier to clean grooves, cutouts and holes, you can use wooden sticks. Cleaning a pistol with an RFS solution is carried out only after shooting at a shooting range or shooting range. If after shooting the pistol was cleaned with liquid gun lubricant, then upon returning the pistol to the weapon room, clean it with an RFC solution.
In field conditions, the pistol can be cleaned only with liquid gun lubricant.
The solution is prepared in the following quantity; what is necessary to clean a weapon within one day. A small amount of RFS solution can be stored for no more than 7 days in bottles, sealed with a stopper, in a dark place and away from heating devices. It is prohibited to pour RFC solution into oil cans.
Clean the gun in the following order:
1. Prepare wiping and lubricants.
2. Inspect the accessory and prepare it for use during cleaning.
3. Disassemble the pistol.
4. Clean the bore. Pass tow or rags through the wiping slot; The thickness of the tow layer should be such that the wipe with tow is introduced into the barrel bore with a slight hand effort. Soak the tow with liquid gun lubricant. Introduce the rub into the bore from the muzzle. Place the pistol frame on the table and, holding it with your left hand, smoothly move the wipe along the entire length of the barrel several times with your right hand. Change the tow and repeat the cleaning again. Rub thoroughly. Wipe the bore dry first with tow and then with a clean, dry rag. Inspect the rags; If traces of soot or rust are noticeable on the rags, wipe the barrel bore again with tow soaked in liquid gun lubricant, and then with dry tow or rags. Repeat cleaning the bore until the rag removed from the bore is clean. Clean the chamber in the same way. The chamber must be cleaned only from the breech by rotating the wiper with tow (rags) pressed against the ledge of the chamber.
Cleaning with the RChS solution is carried out in the same order as with liquid gun lubricant, and continues until carbon deposits are completely removed and tombakization, i.e. until a brush or tow moistened with a solution comes out of the barrel bore without signs of soot or greenery. After this, wipe the bore with dry tow or a rag. The next day, check the quality of the cleaning performed and, if carbon deposits are found on it when wiping the barrel bore with a clean rag, clean again in the same order. After cleaning the rifled part of the bore, clean the chamber in the same manner.
Carefully inspect the bore and chamber against the light. When inspecting, pay special attention to the chamber and the corners of the rifling, in which no dirt or carbon deposits should remain.
5. Clean the pistol frame with barrel and trigger guard. Wipe the parts dry with a rag until dirt and moisture are completely removed. Remove rust with tow or rags soaked in liquid gun lubricant.
6. Clean the bolt, return spring, bolt stop and parts of the firing mechanism. If the pistol is cleaned after shooting, then clean the bolt cup with tow or rags soaked in liquid gun lubricant or RFC solution until the carbon deposits are completely removed. After cleaning, wipe it dry. If the pistol has not been fired and there is no carbon deposits or rust on the bolt cup, then wipe it with a dry cloth.
Wipe the remaining metal parts and mechanisms dry with a rag until dirt and moisture are completely removed, using wooden sticks for this.
Clean the bolt, bolt stop and parts of the trigger mechanism in assembled form after training and training without shooting, and in disassembled form after shooting, leaving the pistol in the rain and heavily soiled.
7. Wipe the handle with a dry rag or tow.
8. Clean out the store. The magazine is cleaned after training and training in assembled form, and after shooting, the pistol is exposed to the rain and is heavily soiled - in disassembled form. After outfits and activities, wipe the store dry with a rag until dirt and moisture are completely removed. After firing, remove carbon deposits from the feeder with tow or rags soaked in liquid gun lubricant or RSF solution. After cleaning, wipe the feeder dry.
9. Wipe the holster with a dry cloth both from the inside and outside until dirt and moisture are completely removed.
10. Wipe the wipe dry.
Lubricate the gun in the following order:
a) lubricate the bore. Pass a rag through the wiping slot. Soak a rag with lubricant. Introduce the rub into the barrel bore from the muzzle and smoothly move it two or three times along the entire length of the barrel bore to evenly cover the rifling and bore margins with a thin layer of lubricant. Lubricate the chamber from the breech by rotating the wiper with a rag;
b) lubricate the remaining metal parts and mechanisms of the gun. Lubricate external surfaces using an oiled rag. To lubricate channels, sockets and holes, use an oiled rag wound on a wooden stick. Apply the lubricant in a thin, even layer. Excessive lubrication on gun parts will cause contamination and may cause gun malfunction.
Do not lubricate the holster, but only wipe it dry with a rag and dry it;
c) lubricate the wipe;
d) upon completion of lubrication, assemble the gun, inspect it, check the correct assembly and operation of the parts and mechanisms of the gun.
A gun brought from a frost into a warm room cannot be lubricated until it “sweats”; when drops of water appear, without waiting for the moisture to dry, wipe the parts and mechanisms of the gun dry and lubricate them.
A pistol handed over for long-term storage must be thoroughly cleaned (the bore and trigger mechanism are lubricated with liquid gun lubricant), wrapped in one sheet (layer) of inhibited paper and two sheets (layers) of waxed paper and sealed in a cardboard box.
Lubricate the parts and mechanisms of the gun at an outside temperature of + 5°C and below only with liquid gun lubricant.
Delays when firing a pistol and how to eliminate them
A pistol, when handled correctly, carefully maintained and preserved, is a reliable and trouble-free weapon. However, during prolonged operation, due to wear and tear of parts and mechanisms, and more often due to careless handling and inattentive maintenance, delays in firing may occur.
To prevent delays when firing a pistol and ensure its safe operation, you must:
properly prepare a pistol for shooting;
inspect, clean and lubricate the gun in a timely manner and in compliance with all rules; Take special care to clean and lubricate the rubbing parts of the gun;
carry out repairs in a timely manner;
inspect cartridges before shooting;
Do not use faulty, rusty or dirty cartridges for shooting;
during shooting and when moving, protect the pistol from contamination and impacts;
If the pistol is in severe frost for a long time before firing, then before loading it it is necessary to release the bolt several times by hand and release it, and after each retraction and release of the bolt it is necessary to release the trigger by pressing the tail of the trigger.
If there is still a delay during shooting, it must be eliminated by reloading the pistol. If the delay cannot be eliminated by recharging, then it is necessary to find out the cause of the delay and eliminate it as indicated below.
| Reasons for delays | Ways to eliminate them | |
| 1. Misfire. The bolt is in the forward position, the trigger is pulled, but the shot does not fire. | 1. The cartridge primer is faulty. 2. Thickening of the lubricant or contamination of the channel under the firing pin. 3. The output of the striker or nick on the striker is small. | 1. Reload the pistol and continue shooting. 2. Inspect and clean the gun. 3. Poison the gun to the workshop. |
| 2. Failure to cover the cartridge with the bolt. The shutter stopped before reaching the extreme forward position; the trigger cannot be pulled. | 1. Contamination of the chamber, frame grooves, bolt cup. 2. Difficult movement of the ejector due to contamination of the ejector spring or pressure. | 1. Push the bolt forward with a push of your hand and continue shooting. 2. Inspect and clean the gun. |
| 3. Failure to feed or not advance the cartridge from the magazine into the chamber. The bolt is in the forward position, but there is no cartridge in the chamber; the bolt stopped in the middle position along with the cartridge, without sending it into the chamber. | 1. Contamination of the magazine and moving parts of the gun. 2. Bent upper edges of the magazine body. | 1. Reload the pistol and continue shooting. 2. Clean the gun and magazine. 3. Replace the faulty magazine. |
| 4. Seizing (pinching) of the cartridge case by the bolt. The cartridge case was not thrown out through the window in the bolt and became wedged between the bolt and the breech end of the barrel. | 1. Contamination of the moving parts of the gun. | 1. Throw away the stuck cartridge case and continue shooting. 2. Send the gun to the workshop. |
| 5. Automatic shooting. | 1. Thickening of the lubricant or contamination of parts of the trigger mechanism. 2. Wear of the hammer cocking or sear nose. 3. The sear spring is weakened or broken. 4. Touching the shelf of the fuse ledge of the sear tooth. | 1. Inspect and clean the gun. 2. Send the gun to the workshop. |
Author: Sergey Razumov