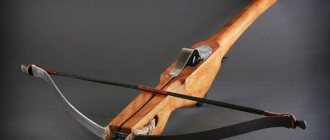
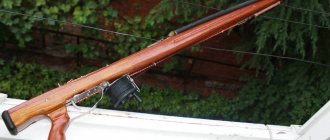
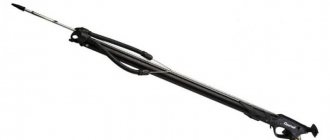
Parachute Arbalet-2 is a parachute system for reconnaissance and special forces. When the main parachute is released, the reserve parachute automatically opens. A 10 km flight across the Sky is not the limit.
Parachute systems of the "Crossbow" type have four modifications with different purposes. The controllability of the parachute and the ability to land on limited areas allowed its use in the Ministry of Emergency Situations; this system was used when jumping to the North Pole and Elbrus; the Tandem Crossbow successfully carries passengers to Heaven.
And now in the Airborne Forces, reconnaissance has received wings.
Wings of Intelligence
A year ago, airborne reconnaissance received wings - the Arbalet-2 parachute. Testing of the parachute system and training of instructors for special forces of the Airborne Forces took place at the Center for Special Physical Training and Survival in Ryazan. In the past, this was the Central Sports Parachute Club of the Airborne Forces (TSSPK Airborne Forces), which has a half-century history of sports parachuting. Head of the Center, Colonel Lukyanov Sergei Ivanovich. Who else but experienced skydivers, world-class masters, will be able to determine when jumping with a certain type of parachute:
- correct and reliable opening of the dome,
- stability of the canopy when operating in the air,
- the ability of the canopy to respond to commands from the control lines,
- how the canopy behaves in turns,
- how does it maintain speed along the horizon,
- how it behaves in strong winds - at altitude the wind can be 20 m/sec
- the capabilities of the canopy on landing with the full flight weight of a parachutist with combat equipment,
- how the reserve parachute comes into operation in case of an emergency in the air,
- behavior of a reserve parachute in the air and on landing at the full flight weight of a parachutist with combat equipment.
Viewing all the nuances in the air, and not just identifying the shortcomings of the parachute system, but showing ways to improve it - only experienced parachuting masters can do this.
Athletes-paratroopers of the Center for Special Physical Training and Survival conducted tests of the Arbalet-2 parachute system, and airborne reconnaissance received wings.
The Chinese Armed Forces immediately became interested in the Arbalet-2 parachute system; their representatives were present during the training period for instructors of special airborne forces. They were even offered to jump, parachutes were laid out for them, but they refused to jump - perhaps they were prohibited from jumping.
Watch the video
Crossbow assembly diagram
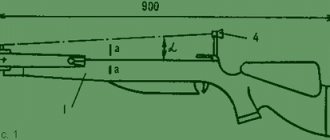
The crossbow that we propose to assemble consists of the following main parts, see Diagram 1 (all dimensions are given in mm).
Scheme 1
The stock can be made from solid or laminated hardwood. Its approximate dimensions are shown in the figure. The shape is chosen at the discretion of the shooter. The most important thing is that it is convenient for further use. Depending on whether you are left-handed or right-handed, a special recess is made on the corresponding side for more intimate contact of the shooter’s head with the stock. In our example, it is made for right-handers.
Scheme 2
In our crossbow diagram, the stock and guide form a single whole
Therefore, it is necessary to pay special attention to surface finishing. The accuracy of shooting will largely depend on its quality.
They must be strictly straight, free from roughness, burrs, etc. It is best to process them on a milling machine, followed by fine sanding and polishing.
Dimensions of the guide groove for an 8 mm diameter boom. shown in Figure 3.
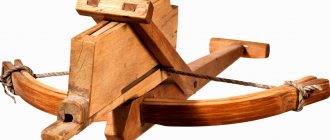
A crosspiece with shoulders screwed to it is attached to the end of the stock. The crosspiece is cast from a light aluminum alloy or milled from an aluminum blank. It can also be made from wood.
The position of the crosspiece with elastic elements on the bed should be such that the window for the arrow to fly out is located opposite the guide groove. (Figure 4), and the bowstring was pressed against the surface of the stock when fired.
Each arm is attached to the crosspiece with two screws.
Scheme 3
Scheme 4
The principle of operation of the trigger mechanism is borrowed from the description of the design of a medieval crossbow. Its manufacture requires precision and scrupulousness (Figure 5).
Scheme 5
The operation and structure of the mechanism are clear from diagram 5. In the cocked position, the bowstring (1) is hooked onto the protrusion (a) of the lever (2). The trigger (3) keeps the lever from turning. When you press the hook, the lever is released, and the bowstring, rushing forward, sends an arrow. The movement of the lever is limited by the stop (4). To soften the impact, you need to put a rubber tube on the stop. The position of the stop is selected in such a way that the protrusion (a) of the lever in the extreme position is located below the guide surface of the stock, thereby not preventing the bowstring from sliding. After the shot, the lever is held in its extreme position by a spring (5).
When cocking the crossbow, the bowstring rests against the protrusion (b) and turns the lever (2) to its original position. In this case, the trigger rotates under the action of the spring (6) and fixes the lever and the bowstring.
To prevent the bowstring from accidentally jumping off the protrusion (a), the trigger mechanism is closed with a lid (7). A gap is left between the cover and the stock for the passage of the bowstring. A flat spring (8) is attached to the cover, holding the arrow on the guides when aiming.
The bearing (9), mounted on the end of the trigger, significantly reduces the trigger force. The required amount of trigger force can be selected by sawing through the surface of the lever (2), which rests on the bearing.
To reduce the weight of the lever, we recommend making it from light alloy D16T. Safety pins can be used as springs (5) and (6).
Unique parachute system
The unique parachute system Arbalet-2 , which has no analogues in the world, is now available to intelligence officers; it is in service with reconnaissance and special units of the Airborne Forces.
What makes it unique? After all, wing-type parachutes have long been used in parachuting, and the Arbalet parachute system has been in operation in units of the Russian Ministry of Emergency Situations since 1994.
Athletes parachutists and firefighters are not paratroopers! It’s one thing to jump lightly, but it’s another thing when, having a small number of jumps, you need to take with you into the sky all the ammunition, a cargo container, be able to open a sports parachute, cope with the controls, bring the canopy to a given limited landing area, ensure a safe landing by parachute - wing and begin completing tasks.
I know for sure that when a paratrooper, after parachutes D-5, D-6, D-10, D-12, makes a jump with the Arbalet-2 parachute system , he will have the feeling that he has been in the air as if in a modern high-speed car ... :))
The main and reserve parachutes are located in the same backpack behind the back, both have 9-section canopies (sport parachutes have 7 sections), and both have the same area - 27 square meters. A cargo container weighing up to 50 kg is attached to the suspension system in front.
The suspension system is well adjustable for heights from 160 cm to 200 cm, allowing you to jump both in summer and winter in full winter uniform, plus special equipment and body armor.
The total weight of the paratrooper including the cargo container is up to 150 kg.
The temperature range for using Crossbow parachutes is from +35 to -35 degrees Celsius.
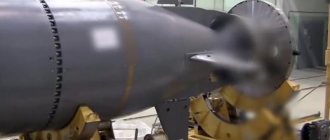
The parachute system has stabilization - a parachute with an area of 1.5 square meters, which is put into operation immediately after separation from an airplane or helicopter, and the speed at release is permissible up to 400 km/h.
With the Arbalet-2 parachute system, paratroopers of reconnaissance and special forces units can jump individually and in groups from An-2, An-12, An-26, Il-76 aircraft and from Mi-8 helicopters.
The maximum altitude for leaving the aircraft is determined by the concept “we’ll go with whatever we need”; the minimum altitude for opening a parachute is 700 meters.
Under the dome, you can walk 50 km along the horizon to the landing point. Jump higher... :)) and into the wind with all sails... :)) This is not a joke, it is really possible...! At 10 km the parachute leaves easily.
The opening of the parachute is insured by the PPK-Uad or KAP-3 device, which opens the parachute either after a specified time (up to 5 seconds), or at a given height - the height is set on the device, at this height the aneroid device is triggered and the device is put into operation - the parachute opens.
And now the important moment...!!!
If the main parachute fails, at the moment the main parachute is released, the reserve parachute opens automatically.
This means that in case of malfunction of the main canopy, when the main canopy is uncoupled and the reserve parachute is put into operation, the moment of free fall is eliminated. This is very important for skydivers with little jumping experience.
This is your safety in the event of a canopy failure when the reserve parachute is deployed!
The system is designed in such a way that, at the moment the release cushion is pulled out, the main canopy is unhooked, and the reserve parachute immediately goes into the clear Sky.
I deliberately described this moment in such detail with repetition of information. Knowing the parachute system you are jumping on is confidence in the Sky!
I indicated the minimum opening altitude of the parachute as 700 meters - this is a sports altitude, but taking into account the fact that if the canopy fails, the main canopy is uncoupled immediately with the opening of the reserve, the minimum opening altitude of the parachute may be lower.
Let's look at this moment with you:
- after exiting the plane, stabilization takes 3 seconds and the parachute opens - this is 100 m of altitude.
- in case of canopy failure with the deployment of a reserve parachute, a height of 200 m is needed, taking into account the fact that you first need to assess the situation.
- To ensure a safe landing, a height of 100 m is sufficient.
Now let's count. It turns out that with the Arbalet-2 parachute you can really jump from a height of 400 m. For me this is low... :)) Our paratroopers are courageous...!
And now for the speeds.
Vertical rate of descent on the Arbalet-2 parachute system is no more than 5 m/s
On landing, you can reduce the rate of descent to zero... and gently get to your feet... :)) in the video you watched, this moment is well indicated:
- a smooth transition to the lower mode by the control lines calmly stops the canopy, reduces the rate of descent, and the landing is soft;
- a sharp (quick) transition to the lower mode by the control lines gives a cushion with the take-off of the canopy - and then a vertical dip. Do not do that!
Horizontal speed. The maximum horizontal speed of the Arbalet-2 parachute is within 10-12 m/sec with the control lines fully released. In average mode - approximately 5-6 m/sec.
In medium mode, the rate of descent is reduced to 3 m/sec
In conclusion, I would like to say that the skydiver athletes of the Center for Special Physical Training and Survival and the head of the Center, Colonel Sergei Ivanovich Lukyanov, having made test jumps and tested the Arbalet-2 parachute system in different conditions, highly appreciated this parachute system.
Successful and safe parachute jumps to you Arbalet-2...!
I suggest reading the article “Serve in Special Forces” about intelligence.
The article “Serve in the Airborne Forces” additionally describes all formations of the Airborne Forces
Please leave a review... and share with your friends.
Drawing of the guide and trigger mechanism of the crossbow:
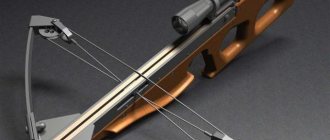
A crossbow sight must consist of a rear sight and a front sight. You can also install an optical sight on the crossbow, providing a mount for the aiming bar. Vertical adjustments are made entirely, mounted on the cover of the trigger mechanism, and horizontal ones - with a front sight mounted on the bracket of the elastic element.
There can be many design options for sights and sighting devices for a crossbow, depending on the possibility of manufacturing, the availability of ready-made sights from conventional weapons (air rifles), etc.
It should be borne in mind that the flight path of a crossbow arrow (crossbow bolt) is quite high, so the rear sight must be installed significantly higher than the front sight. The angle of elevation of the aiming line depends on the weight of the arrow, the tension of the string, the shooting distance, etc. In our crossbow at a distance of 50 m it is approximately 6°.
Convenient are the designs of the rear sight, which allow it to be removed or folded during transportation. It will also be convenient if the rear sight can be adjusted manually by raising or lowering the bar. Thus, you will be able to target the crossbow under different conditions (distance to target, weight of the arrow).
The crossbow, the manufacture of which is described above, is designed for shooting bolts with a diameter of 8 mm and a length of 450-470 mm. You can easily make them yourself from a duralumin tube with a wall thickness of 0.5 mm. The tip and liner are attached to the bolt in front, and the feathering is attached to the back, just as they do for archery. It should be borne in mind that the shank of a bolt for a crossbow, unlike an arrow for a bow, should not have a cutout for the bowstring; it should be flat. It can be carved from wood in the form of a cork and inserted into the end of the tube, having previously been lubricated with glue.
Making the trigger mechanism
One of the complex processes is working with the trigger mechanism. The fact is that it is a set of several steel parts:
- Trigger;
- Sear for holding the bowstring;
- Two springs for fixing the hook and sear;
- Two plates for the supporting body;
- Bolts and nuts.
Usually crossbow drawings show only the closed trigger mechanism without a detailed description of it.
A 6mm steel sheet is used to make the hook, sear and plates. But before sawing it, it is recommended to draw each detail on a piece of paper and then cut it out.
By placing paper pieces on a sheet of metal, it will be easier to cut the latter with a grinder or hand saw. Moreover, the workpieces must be sawed so that they have a 2-mm margin at the edges, which can be ground off with a file.
After the workpieces are ready, holes for fasteners must be drilled in the plates. Next, a hook with a sear is placed on top of one body plate.
How to make a crossbow at home
Making a crossbow with your own hands is quite simple. To do this, you must first leave a drawing with a detailed description of each detail. The weapon consists of a bowstring with shoulders, a stock and a trigger mechanism. Steps on how to make a crossbow with your own hands at home:
- The stock is made of wood: for this you need to find a suitable board, draw a sketch of the stock, then cut it out with a jigsaw and a hacksaw.
- A homemade crossbow must have a hole for a finger - it is made using a suitable drill.
- A needle file is used to make a groove for the arrow, the location of which is previously marked with a marker or pencil.
You can use ordinary wooden clothespins to secure the arrow. To do this, a hole with a diameter equal to the thickness of the arrow is drilled in one of them, after which two clothespins are glued to the top and bottom of the crossbow stock, and the one in which the hole is made is placed on top of the back part. It is this that will hold the arrow and be attached to the top ones.
Crossbow arms can be made from car springs or elastic plastic. They are secured with a block or welded metal fastener. To tension the bowstring, block elements are used for fastening at the ends of the crossbow arcs. The bowstring is made of steel cable or nylon thread, for example, lavsan.
When making a crossbow, an important part is the trigger mechanism. For this you will need:
- Stainless steel sheet 2-3 mm thick, size 10x15 cm.
- Two small springs
- Three 10mm bolts with six nuts and two 8mm bolts with two nuts.
On paper you need to draw a diagram of the trigger mechanism, or more precisely, the trigger and hook for the bowstring. The drawing is transferred from paper to a sheet of metal, cut out with a hacksaw, and processed with a file. After this, a drawing of the parts of the crossbow trigger housing is made from wood, transferred to a metal plate, and cut out with a hacksaw. The holes for the trigger mechanism must first be made on a piece of plywood; if it works properly, then transfer the holes to a metal plate. Bolts with a diameter of 08 mm secure the trigger and hook for the bowstring, and the springs are also attached. The side parts of the plates are fastened with bolts with a diameter of 10 mm, and after that the homemade trigger mechanism for the crossbow is ready.
For a good quality bow, you need a good quality bowstring, which we will now manufacture
But people interested in making a real bow will definitely pay attention to these recommendations, unless of course they are planning to buy a bowstring in an online store
To wind the bowstring we will need nylon, silk or nylon thread. All this can be purchased at fishing, hunting, and hardware stores.
But a bowstring that is too thin will cut your fingers when firing. These are the contradictions that await you when choosing a material for a bowstring.
At the ends of the block we drill holes along the diameter of the sticks at a distance from the length of the future bowstring. If it is thin, then ten, twenty or thirty turns, depending on the thickness, see for yourself, but the bowstring must be at least two millimeters in diameter.
In order for the arrow to immediately fall on the middle of the bowstring when shooting, we put on thick rubber rings opposite the bow shelf between which the arrow will be inserted. Our almost professional bowstring is all ready.
With the help of a bowstring, the tension of the arms and the acceleration of the arrow take place, so the quality of the bowstring affects many of the characteristics of the crossbow. An important requirement for a bowstring is that it does not stretch during use, and the durability of the bowstring will depend on what material it is made of.
It’s not difficult to make a crossbow bowstring yourself; suitable materials include threads such as lavsan, dacron, kevlar, deinema, SVM, fastflight and others made of synthetic fiber. After the machine is made, you can begin making the bowstring.
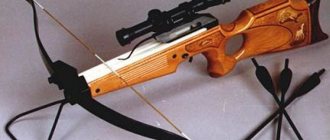
Drawings for making at home
The photo above schematically shows a crossbow with all the necessary dimensions. Its main value is to understand what size its parts should be in relation to each other.
Expert opinion Smirnov Alexander Stanislavovich Wilderness survival instructor. More than 15 years of teaching experience
Its entire length is 732 mm, with a height at the sight mounting point of 223 mm. The drawing shows a “pistol” handle (shaped like a pistol), for a reliable and comfortable grip.
The second hole is made to facilitate the construction, since the total thickness of the plywood handle (can be made of wood) is 30 mm. The arms are 302 mm long and are a universal option; their total length is 532 mm. For the first time, it is enough to make exactly according to the dimensions indicated in the diagram, and after testing, make adjustments.
This article describes how to make a powerful and reliable crossbow with your own hands. I assume that you are familiar with the general design of a crossbow, the purpose of its individual components and the terms used.
I would like to share my experience in designing this type of weapon and offer my developments and achievements. I think that you will be interested in learning how, in a moderately equipped workshop, using only available materials, you can make a crossbow whose characteristics are close to factory models.
Making a crossbow
This paragraph will provide information on how to make a crossbow at home. The analysis will be based on the example of a wooden crossbow. To make a wooden crossbow, you need to choose hard and durable wood, such as larch, oak, cedar, and mahogany.
Bed
Initially, to make a stock, a rectangular wooden block is taken, in which a groove for the arrow is machined. After this, a hole for the trigger mechanism is drilled at the opposite end of the chute. A hole for the bow is machined in the front of the block. Then all the holes are carefully ground and the outline of the stock is cut out.
The bow is the main part of the crossbow, so when making a stock it is necessary to focus on the parameters of the bow. When grooving a gutter, it is advisable to leave a few millimeters of margin when grooving.
If you are making a compound crossbow, then you need to be extremely careful when cutting the groove for the intersecting section; incorrect cutting will ruin the design.
Bow and guides
Bows can be made from any wood. It is installed in an already drilled hole. Next to the hole for the trigger mechanism, you also need to drill a groove for the bolt that will secure the bowstring.
Particular attention should be paid to the crossbow guides, as they set the initial path of the arrow (bolt). They should not have a high coefficient of friction
It is advisable to manufacture them as a separate part. This will simplify the use of the crossbow; if you want to shoot with other bolts, you can easily change it to the desired size.
The guides should be made as similar to each other as possible. After manufacturing, they are installed in the groove so that the axis of the inserted arrow coincides with the axis of the tensioned bowstring. The bolt must lie freely in the groove. To protect the wooden surface, you can install metal protection on it.
Lesson #2
In this tutorial we will talk about how to make a mini crossbow from items that can be found in every home.
You will need:
- 4 rectangular chopsticks;
- 2 wooden toothpicks;
- clothespin;
- scotch;
- string;
- small saw or knife;
- hot glue gun.
1. Boil water in a saucepan, then reduce the heat and place two wooden toothpicks into the hot water. Leave for 45 minutes.
2
After 45 minutes, carefully remove the toothpicks from the water, place them together and gently bend them so that they form a crescent shape. If you have clamps, secure the toothpicks in a bent shape and leave to dry
If you don’t have clamps on hand, you can simply glue the bent toothpicks to the cardboard using tape. Next, using tape, glue the toothpicks together - one above the other.
3. Fold 4 chopsticks as shown in the picture and wrap them with tape.
4. Cut a groove several centimeters deep and one toothpick wide.
5. Place toothpicks in the groove.
6. At a distance of about 7 mm from each end of the toothpicks, attach a string by wrapping it around the toothpicks and gluing it using a hot glue gun.
7. Measure a piece of fishing line equal to the distance between both ends of the toothpicks, and make a loop at each end. Apply hot glue to the ends of the toothpicks and place the loops on them.
8. Tape a clothespin to the chopsticks with the pinch end towards the stretched fishing line, and wrap this end with tape so that you can hardly press the opposite end of the clothespin.
9. Make arrows from toothpicks using paper fletching.
An ideal target for shooting from such a crossbow would be fruits and vegetables.
Do not point the crossbow at people or animals - you may cause serious injury to them.