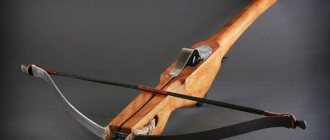
Many fans of crossbow shooting are stopped from purchasing by the relatively high price of high-quality products or the low consumer properties of the simplest entertainment models. However, if you have the skills and tools, you can independently make a crossbow mechanism of a simple design.
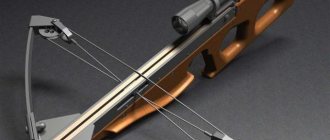
Crossbow with trigger mechanism.
DIY crossbow trigger mechanism
How this mechanism is designed and works becomes clear from Figure 4 - a diagram of a crossbow with your own hands.
When the bowstring 1 is cocked, it is engaged with the protrusion a of the lever 2. When the lever rotates, it holds the trigger 3. When the hook is pressed, at the same time the lever is released, at this moment the bowstring, straightening, sends an arrow. The stop 4 is limited during the movement of the lever. In order to soften the impact force on the stop, it is necessary to put a rubber tube on it. The stop must be in a position in which the extreme position of the protrusion a of the lever is lower than the guide surface of the stock. This prevents the string from sliding. After the shot is fired, spring 5 holds the lever in its extreme position.
In the process of pulling the crossbow, the bowstring is focused on protrusion 6, lever 2 takes its original position. Spring 6 acts on the trigger so that it rotates, the lever and the bowstring are fixed. To prevent the string from accidentally jumping off protrusion a, the release mechanism is closed with a cover 7. A flat-type spring 8 is attached to this cover, which holds the arrow on the guides while aiming the sight. Bearing 9, which is attached to the tip of the trigger, sufficiently weakens the force of the trigger. The level of trigger force is selected by sawing the surface resting on the lever bearing 2. In order to reduce the weight of the lever, it is better to make it from light alloy D16T. Safety pins can serve as a replacement for springs 5 and 6. The trigger mechanism can be mounted in a metal housing, after which it is inserted into the stock socket and secured with two screws. In this way, reliability and ease of adjustment can be significantly increased. But this method makes the design more complex, and metal-cutting machines will also be needed to implement it.
The sighting device of a crossbow consists of a rear sight and a front sight. Vertical adjustments are made entirely, mounted on the cover of the trigger mechanism, and horizontal ones - with a front sight mounted on the bracket of the elastic element.
There can be many design options for these devices, depending on the possibility of manufacturing, the availability of ready-made sights for sports bullet weapons, etc.
It should be borne in mind that the flight path of a crossbow arrow is quite high, so the rear sight must be installed significantly higher than the front sight. The angle of elevation of the aiming line (see Figure 1 - crossbow drawings) depends on the weight of the arrow, the tension of the string, the shooting distance, etc. In our crossbow at a distance of 50 m it is approximately 6°.
The design of the crossbow rear sight is convenient, allowing it to be removed or folded during transportation.
Our homemade crossbow, the manufacture of which is described above, is designed to shoot crossbow arrows with a diameter of 8 mm and a length of 350 mm. Arrows for a crossbow can be easily made from a duralumin (D16T alloy) tube with a wall thickness of 0.5 mm. The arrow is equipped with a tip and fletching in the same way as is done for archery. It should be borne in mind that the shank of an arrow for a crossbow, unlike an arrow for a bow, should not have a cutout for the bowstring. It is convenient to carve it out of wood in the form of a cork and insert it into the end of the tube using glue.
In conclusion, I would like to express the hope that you understand how to make a crossbow; making it yourself will give you a lot of pleasure, and shooting from it will give you the opportunity to have a good time in the fresh air. Just do not forget that a crossbow, like any weapon, requires a responsible attitude and compliance with all safety measures when shooting. And the amount of pleasure directly depends on how the crossbow is made.
Convenience
The medieval crossbow is a weapon convenient for a warrior also because the shooter was better protected than when using a bow. During shooting, he had the opportunity to be almost completely in cover, sticking out only his head and the tip of the device, while he could choose any convenient direction to hit the desired target.
Although the effort that had to be expended to operate such a mechanism was very significant, the shooter’s energy was saved due to the absence of the need to maintain a certain balance between speed and accuracy of movements, and it was also not necessary to commensurate them with the expended force, as archers did.
Drawing of the guide and trigger mechanism of the crossbow:
A crossbow sight must consist of a rear sight and a front sight. You can also install an optical sight on the crossbow, providing a mount for the aiming bar. Vertical adjustments are made entirely, mounted on the cover of the trigger mechanism, and horizontal ones - with a front sight mounted on the bracket of the elastic element.
There can be many design options for sights and sighting devices for a crossbow, depending on the possibility of manufacturing, the availability of ready-made sights from conventional weapons (air rifles), etc.
It should be borne in mind that the flight path of a crossbow arrow (crossbow bolt) is quite high, so the rear sight must be installed significantly higher than the front sight. The angle of elevation of the aiming line depends on the weight of the arrow, the tension of the string, the shooting distance, etc. In our crossbow at a distance of 50 m it is approximately 6°.
Convenient are the designs of the rear sight, which allow it to be removed or folded during transportation. It will also be convenient if the rear sight can be adjusted manually by raising or lowering the bar. Thus, you will be able to target the crossbow under different conditions (distance to target, weight of the arrow).
The crossbow, the manufacture of which is described above, is designed for shooting bolts with a diameter of 8 mm and a length of 450-470 mm. You can easily make them yourself from a duralumin tube with a wall thickness of 0.5 mm. The tip and liner are attached to the bolt in front, and the feathering is attached to the back, just as they do for archery. It should be borne in mind that the shank of a bolt for a crossbow, unlike an arrow for a bow, should not have a cutout for the bowstring; it should be flat. It can be carved from wood in the form of a cork and inserted into the end of the tube, having previously been lubricated with glue.
Top 5 best models
Ratings and categories are a subjective matter, but you can identify models that are outstanding among analogues from any list.
Aspid
Created in the form of a small pistol.
- Dimensions – 29x13 cm, weight – 0.9 kg. Asp.
- Intended for entertainment and training purposes.
- Ammunition: small arrows and harpoons.
- With a reel and line, it becomes possible to catch fish.
- Tension – up to 18 kg.
- Application range – up to 20 m.
- Cost – from 5000 rub.
Big Rhino
Rifle shape and 4 shoulders in khaki color.
- Dimensions – up to 40 cm, weight – 3.7 kg.
Big Rhino. - Designed for hunting large game, including bear.
- Tension – up to 100 kg.
- Application range – up to 55 m.
- Cost – from 70,000 rubles.
CARBON EXPRESS COVERT CX2
Classic shape, with butt and 4 shoulders, scope included.
- Dimensions – up to 45 cm, weight – approx. 2 kg.
- Designed for hunting any game.
- Tension – 84 kg.
- Application range – up to 50 m.
- Cost – from 37,000 rubles.
CARBON EXPRESS COVERT CX2.
Parker StingRay
Parker StingRay.
Classic body and 2 shoulders.
- Dimensions – up to 50 cm, weight – approx. 3 kg.
- Designed for hunting in any conditions and in any weather.
- Tension – up to 56 kg.
- Application range – up to 70 m.
- Cost – from 50,000 rubles.
Barnett Ghost 420 PKG
Modern form.
- Dimensions – up to 50 cm, weight – approx. 3.4 kg.
- Designed for outdoor recreation and entertainment.
- Tension – 84 kg.
- Application range – up to 100 m.
- Cost – from 108,000 rubles.
Barnett Ghost 420 PKG.
What to shoot with a crossbow, do-it-yourself arrow catcher
Everyone knows for what purposes a crossbow is used. Hunters use these weapons to pursue animals, many amateurs specially visit a crossbow shooting range to practice shooting with a crossbow or bow, athletes use small arms for competitions. Apart from hunters who know what they are shooting an arrow at, ordinary shooters or athletes will need a special device with a target in the center.
An arrow catcher is a shield with dimensions close to the diameter of the target. It is into such a shield that an archer or crossbowman directs his arrow. If you do not want to spend money on purchasing such a shield, since its cost is not always acceptable, you can make a homemade arrow catcher. For these purposes, you will need to prepare plates of perforated cardboard, 25-30 cm wide, on their sides you will need to lay wooden boards, which need to be fastened with metal fasteners. This shield is very convenient and practical; it retains its functions for quite a long time, since the plates can always be replaced with new ones.
A more expensive option is a homemade arrow catcher made from a straw bundle that has previously undergone a pressing process. In addition, you can make a homemade shield from a jute bag stuffed with cotton; on the finished version you will need to draw a target and you can shoot. Some even manage to make shields from a material that is somewhat similar to rubber, although, unlike it, it is lighter. Such catchers are called etaphoum catchers, they are very practical, they reliably hold an arrow fired at a target, and after it is removed from the shield, the trace of the shot is almost invisible. A homemade arrow catcher is practically no different from a purchased one, the only difference being that the shooter will save a lot.
photo. Target for training shooting
There are differences between crossbow and bow shooting
Nowadays, you can find different types of crossbows, which differ significantly from the bow. The first thing that strikes you about modern small arms is the power of the crossbow and its destructive power. More popular models have a tension force of about 43 kg and a weight of no more than 10 kg. Such models are practical and easy to use; the range and speed of the arrow of such crossbows is quite high. After all, holding a weapon that weighs more than 10 kg is very difficult, and not always convenient, especially if the shooter’s weight category does not meet the parameters of the crossbow.
Moreover, unlike a bow, which almost always has the same design, a shooter can choose a crossbow of any type, which, by the way, will perfectly suit his body parameters. Therefore, manufacturers offer the following types of crossbows:
- classic models equipped with recursive arms;
- block models with a system of eccentric blocks, which, thanks to the tension of the bowstring, ensure the flight range of the arrow. Their destructive power and acceptable weight category, which is determined in kg, are suitable for both professional shooters and beginners;
- pistol crossbows.
The presented types of crossbows differ in bowstring tension, weight, size, design, power and, of course, design. If a shooter wants to use a crossbow for hunting, but does not yet have sufficient skills, a small weapon with a bowstring tension of up to 43 kg, weighing about 10 kg, will suit him. Before buying a crossbow, it is advisable to ask the seller about the parameters of the model you are purchasing and find out the firing range of the weapon. Because, unlike a bow, all crossbow models have different indicators. If you do not want to buy ready-made small arms, you can try to make a homemade crossbow, so all its parameters will depend on the wishes and capabilities of the master.
photo. Crossbow shooting range
Crossbow for hunting
This is a complicated version designed for hunting.
Bed
The production of the stock does not differ in anything significant from the crossbow described above; the only nuance is the rectangular hole for the trigger mechanism.
Bow and guides
The bow is made from strong, dry wood; the thickness of the wood should be maximum in the middle. The shoulders need to be made narrower. If there is excess wood left, it must be removed and leveled until the deflection of the shoulders is the same.
Trigger
In this case, the mechanism must be much more powerful, so wood will not work. The trigger mechanism must be assembled exactly according to the drawing using steel parts.
Block
The block is used to secure the bow and its limbs to the stock. This part experiences high loads, so it can only be made of metal. The block is attached to the stock or limbs of the bow using bolts or rivets. It is advisable not to attach it to the shoulders, since the slightest mistake can disrupt the entire shooting process. You can make the block removable to reduce the weight of the crossbow when carrying.
Bowstring
There are four types of bowstring:
- Metal - woven from small cables or strings.
- Silk - woven from silk.
- The third is made from fishing line.
- Synthetic - the main element is kevral.
It is best to weave the bowstring yourself or purchase a braided one, since in this case a small part of the load will be spent on friction between the threads. This will reduce the load on it and extend its service life.
Bolt(boom)
Crossbow arrows are made from materials that have high strength and elasticity. If this material is wood, you need to make sure that it lies longitudinally during processing, this will give the bolt even greater ductility.
Basically, the center of gravity of the arrow lies between 1 and 2 or 2 and 3 elements. This position may vary depending on what material the arrow, tip, shaft or tip is made of.
To protect against moisture, the arrows are impregnated with special protective solutions. For greater durability, the arrows are stored horizontally.
Shooting from a crossbow must be carried out on bolts of similar weight, otherwise the range and accuracy of shooting will begin to be impaired.
Making a crossbow at home is not that difficult. However, it is worth remembering safety precautions when using, so as not to harm yourself and others. The bulk of people who make crossbows in a handicraft way are young people. If a person has the opportunity, then it is best to purchase a professionally made crossbow.
Shoulders
The material for manufacturing the structural element can be a car spring. In such metal arms, semicircular recesses are made for bolts, with the help of which the part will be screwed to the body.
There is a widespread opinion that the use of metal springs as the basis for making shoulders is a rather dangerous decision. And in fact, when using a homemade crossbow in conditions of low ambient temperature, the likelihood of the part breaking increases, especially at the fastening points. Such cases are accompanied by the release of small fragments. Therefore, you should apply the idea at your own peril and risk.
Crossbow assembly diagram
The crossbow that we propose to assemble consists of the following main parts, see Diagram 1 (all dimensions are given in mm).
Scheme 1
The stock can be made from solid or laminated hardwood. Its approximate dimensions are shown in the figure. The shape is chosen at the discretion of the shooter. The most important thing is that it is convenient for further use. Depending on whether you are left-handed or right-handed, a special recess is made on the corresponding side for more intimate contact of the shooter’s head with the stock. In our example, it is made for right-handers.
Scheme 2
In our crossbow diagram, the stock and guide form a single whole
Therefore, it is necessary to pay special attention to surface finishing. The accuracy of shooting will largely depend on its quality.
They must be strictly straight, free from roughness, burrs, etc. It is best to process them on a milling machine, followed by fine sanding and polishing.
Dimensions of the guide groove for an 8 mm diameter boom. shown in Figure 3.
A crosspiece with shoulders screwed to it is attached to the end of the stock. The crosspiece is cast from a light aluminum alloy or milled from an aluminum blank. It can also be made from wood.
The position of the crosspiece with elastic elements on the bed should be such that the window for the arrow to fly out is located opposite the guide groove. (Figure 4), and the bowstring was pressed against the surface of the stock when fired.
Each arm is attached to the crosspiece with two screws.
Scheme 3
Scheme 4
The principle of operation of the trigger mechanism is borrowed from the description of the design of a medieval crossbow. Its manufacture requires precision and scrupulousness (Figure 5).
Scheme 5
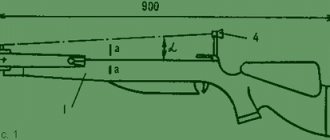
The operation and structure of the mechanism are clear from diagram 5. In the cocked position, the bowstring (1) is hooked onto the protrusion (a) of the lever (2). The trigger (3) keeps the lever from turning. When you press the hook, the lever is released, and the bowstring, rushing forward, sends an arrow. The movement of the lever is limited by the stop (4). To soften the impact, you need to put a rubber tube on the stop. The position of the stop is selected in such a way that the protrusion (a) of the lever in the extreme position is located below the guide surface of the stock, thereby not preventing the bowstring from sliding. After the shot, the lever is held in its extreme position by a spring (5).
When cocking the crossbow, the bowstring rests against the protrusion (b) and turns the lever (2) to its original position. In this case, the trigger rotates under the action of the spring (6) and fixes the lever and the bowstring.
To prevent the bowstring from accidentally jumping off the protrusion (a), the trigger mechanism is closed with a lid (7). A gap is left between the cover and the stock for the passage of the bowstring. A flat spring (8) is attached to the cover, holding the arrow on the guides when aiming.
The bearing (9), mounted on the end of the trigger, significantly reduces the trigger force. The required amount of trigger force can be selected by sawing through the surface of the lever (2), which rests on the bearing.
To reduce the weight of the lever, we recommend making it from light alloy D16T. Safety pins can be used as springs (5) and (6).
Drawing of block assembly parts:
Pay special attention to the processing of the arrow guides and bowstring. The clarity of their finish greatly influences shooting accuracy. The guide lines must be perfectly straight and smooth. The best choice would be grinding on a milling machine and subsequent processing with fine-grain sandpaper. Next comes polishing the guides. You can see the dimensions of the boom guide groove in the drawings. The crosspiece, with the shoulders attached to it, is installed at the end of the stock. It is usually made from an aluminum billet. Wood can also serve as a suitable material.
What kind of crossbow should a beginner shooter buy for recreation?
To choose a crossbow, you need to know that there are two fundamentally different types - recurve and compound crossbow.
Compound crossbows are more compact, they are 20-25% smaller than recurve crossbows, their trigger is very soft, and the take-off speed is higher. This is achieved by the presence of special blocks in the crossbow's shoulders. But they are heavier than recurve ones; replacing the cable (string) is quite difficult, and often impossible in the field.
A recurve crossbow has arms curved towards the direction of the shot, at the end of which there are special fasteners onto which the bowstring is pulled. Their accuracy is high, they are unpretentious in maintenance and repair. You can replace the bowstring yourself without using special tools.
Crossbow pin mechanism
The pin mechanism is easy to manufacture. It's easy to do it yourself. How to make a pin mechanism? For the pin mechanism, you need to make a groove on the stock. The bowstring will be wound through this groove. A hole is drilled directly under the bowstring, into which either a wood or metal pin is inserted. A bar is attached to the bottom of the stock so that when you press on it, it presses on the pin. The pin, having thus received the command, pushes the bowstring out of the groove. The device is simple, easy to manufacture, but has many disadvantages: there is no safety lock in the mechanism, the trigger is heavy, and it also wears out quickly.
Bowstring
As a bowstring, you can use a metal cable with a diameter of about 2-3 mm.
A thicker string will be more difficult to attach to a weapon, and a thin one will begin to stretch as the product is used. To fix the bowstring at the ends of the arms, it is enough to make a regular loop. It is better to place pieces of leather or any other dense material under the cable fastenings. This solution allows you to avoid chafing of the bowstring when in contact with metal shoulders.
Making the trigger mechanism
One of the complex processes is working with the trigger mechanism. The fact is that it is a set of several steel parts:
- Trigger;
- Sear for holding the bowstring;
- Two springs for fixing the hook and sear;
- Two plates for the supporting body;
- Bolts and nuts.
Usually crossbow drawings show only the closed trigger mechanism without a detailed description of it.
A 6mm steel sheet is used to make the hook, sear and plates. But before sawing it, it is recommended to draw each detail on a piece of paper and then cut it out.
By placing paper pieces on a sheet of metal, it will be easier to cut the latter with a grinder or hand saw. Moreover, the workpieces must be sawed so that they have a 2-mm margin at the edges, which can be ground off with a file.
After the workpieces are ready, holes for fasteners must be drilled in the plates. Next, a hook with a sear is placed on top of one body plate.
Drawings for making at home
The photo above schematically shows a crossbow with all the necessary dimensions. Its main value is to understand what size its parts should be in relation to each other.
Expert opinion Smirnov Alexander Stanislavovich Wilderness survival instructor. More than 15 years of teaching experience
Its entire length is 732 mm, with a height at the sight mounting point of 223 mm. The drawing shows a “pistol” handle (shaped like a pistol), for a reliable and comfortable grip.
The second hole is made to facilitate the construction, since the total thickness of the plywood handle (can be made of wood) is 30 mm. The arms are 302 mm long and are a universal option; their total length is 532 mm. For the first time, it is enough to make exactly according to the dimensions indicated in the diagram, and after testing, make adjustments.
This article describes how to make a powerful and reliable crossbow with your own hands. I assume that you are familiar with the general design of a crossbow, the purpose of its individual components and the terms used.
I would like to share my experience in designing this type of weapon and offer my developments and achievements. I think that you will be interested in learning how, in a moderately equipped workshop, using only available materials, you can make a crossbow whose characteristics are close to factory models.
Crossbows in Rus'
Ancient chronicles about the use of the type of weapon that our ancestors called crossbows provide very contradictory evidence. According to some written sources, the crossbow in the Middle Ages in Rus' was known and used in battles already in the middle of the 13th century. This is confirmed by historical finds dating back to fairly early periods of Russian history. For example, in the ruins of the city of Izyaslavl, which arose in the 12th century and was destroyed by the Mongol-Tatars about a century later, the remains of a warrior were discovered. On his belt there was a special hook for a crossbow bowstring. True, the weapon itself was not found. Therefore, this historical evidence has not been assessed unambiguously.
There are also facts that crossbows appeared in Rus' only in the 14th century. This type of weapon was adopted from the Bulgars during historical military campaigns in those lands of the Russian army.
However, among our ancestors the crossbow cannot be considered one of the particularly popular types of weapons. The explanation for this should be sought in the inconvenience of the design compared to a mobile bow, difficulties in charging, as well as large mass and high cost.
How to make a crossbow at home
Making a crossbow with your own hands is quite simple. To do this, you must first leave a drawing with a detailed description of each detail. The weapon consists of a bowstring with shoulders, a stock and a trigger mechanism. Steps on how to make a crossbow with your own hands at home:
- The stock is made of wood: for this you need to find a suitable board, draw a sketch of the stock, then cut it out with a jigsaw and a hacksaw.
- A homemade crossbow must have a hole for a finger - it is made using a suitable drill.
- A needle file is used to make a groove for the arrow, the location of which is previously marked with a marker or pencil.
You can use ordinary wooden clothespins to secure the arrow. To do this, a hole with a diameter equal to the thickness of the arrow is drilled in one of them, after which two clothespins are glued to the top and bottom of the crossbow stock, and the one in which the hole is made is placed on top of the back part. It is this that will hold the arrow and be attached to the top ones.
Crossbow arms can be made from car springs or elastic plastic. They are secured with a block or welded metal fastener. To tension the bowstring, block elements are used for fastening at the ends of the crossbow arcs. The bowstring is made of steel cable or nylon thread, for example, lavsan.
When making a crossbow, an important part is the trigger mechanism. For this you will need:
- Stainless steel sheet 2-3 mm thick, size 10x15 cm.
- Two small springs
- Three 10mm bolts with six nuts and two 8mm bolts with two nuts.
On paper you need to draw a diagram of the trigger mechanism, or more precisely, the trigger and hook for the bowstring. The drawing is transferred from paper to a sheet of metal, cut out with a hacksaw, and processed with a file. After this, a drawing of the parts of the crossbow trigger housing is made from wood, transferred to a metal plate, and cut out with a hacksaw. The holes for the trigger mechanism must first be made on a piece of plywood; if it works properly, then transfer the holes to a metal plate. Bolts with a diameter of 08 mm secure the trigger and hook for the bowstring, and the springs are also attached. The side parts of the plates are fastened with bolts with a diameter of 10 mm, and after that the homemade trigger mechanism for the crossbow is ready.
For a good quality bow, you need a good quality bowstring, which we will now manufacture
But people interested in making a real bow will definitely pay attention to these recommendations, unless of course they are planning to buy a bowstring in an online store
To wind the bowstring we will need nylon, silk or nylon thread. All this can be purchased at fishing, hunting, and hardware stores.
But a bowstring that is too thin will cut your fingers when firing. These are the contradictions that await you when choosing a material for a bowstring.
At the ends of the block we drill holes along the diameter of the sticks at a distance from the length of the future bowstring. If it is thin, then ten, twenty or thirty turns, depending on the thickness, see for yourself, but the bowstring must be at least two millimeters in diameter.
In order for the arrow to immediately fall on the middle of the bowstring when shooting, we put on thick rubber rings opposite the bow shelf between which the arrow will be inserted. Our almost professional bowstring is all ready.
With the help of a bowstring, the tension of the arms and the acceleration of the arrow take place, so the quality of the bowstring affects many of the characteristics of the crossbow. An important requirement for a bowstring is that it does not stretch during use, and the durability of the bowstring will depend on what material it is made of.
It’s not difficult to make a crossbow bowstring yourself; suitable materials include threads such as lavsan, dacron, kevlar, deinema, SVM, fastflight and others made of synthetic fiber. After the machine is made, you can begin making the bowstring.
Device features and main details
What does this shooting apparatus consist of? The classic version has three main components, then there are solutions with increasing complexity (kicks, handles, components, Picatinny rails, and so on). Our bow-making instructions do not include the installation of optical sights or other technical bells and whistles (Figure 2).
The main part that concentrates energy for shooting is the arch. By pulling the rope, he can transfer kinetic energy to the projectile. The whole structure revolves around this “capricious lady”. The main materials for its manufacture are metal and wood, but there are also more exotic solutions, for example, glass fittings or butter knife blades. The requirements for the arch are flexibility, rigidity and ductility. So, for example, a strong steel frame will not work like a bow, while a car spring or saw will do.
To create a frame from a wooden frame, pay attention to species such as hazel, birch bark, acacia, ash, yew or bean. Before cutting the frame, you should keep the log in a dry, dusty place for about a month or two. Fresh logs do not have the qualities necessary to undergo the processing procedure.
How to make a bow shot? Choose hardwood such as yew, beech, ash or oak. Hazelnuts and conifers are suitable. The further process depends only on the flight of fancy and your skill.
Figure 2. Main structural elements
The main controller of the mechanism is the trigger. It is he who holds the bowstring until the lever is pressed. The bow cocking mechanism consists of a solid block of metal, less often it is a groove inside the butt with a cylindrical pusher rod.
The methods listed are not the final solution. Even though the bow is a single-shot design, there are workarounds. The most common way is to make a multi-shot bow by making a special magazine for storing and delivering bullets.
Lesson #2
In this tutorial we will talk about how to make a mini crossbow from items that can be found in every home.
You will need:
- 4 rectangular chopsticks;
- 2 wooden toothpicks;
- clothespin;
- scotch;
- string;
- small saw or knife;
- hot glue gun.
1. Boil water in a saucepan, then reduce the heat and place two wooden toothpicks into the hot water. Leave for 45 minutes.
2
After 45 minutes, carefully remove the toothpicks from the water, place them together and gently bend them so that they form a crescent shape. If you have clamps, secure the toothpicks in a bent shape and leave to dry
If you don’t have clamps on hand, you can simply glue the bent toothpicks to the cardboard using tape. Next, using tape, glue the toothpicks together - one above the other.
3. Fold 4 chopsticks as shown in the picture and wrap them with tape.
4. Cut a groove several centimeters deep and one toothpick wide.
5. Place toothpicks in the groove.
6. At a distance of about 7 mm from each end of the toothpicks, attach a string by wrapping it around the toothpicks and gluing it using a hot glue gun.
7. Measure a piece of fishing line equal to the distance between both ends of the toothpicks, and make a loop at each end. Apply hot glue to the ends of the toothpicks and place the loops on them.
8. Tape a clothespin to the chopsticks with the pinch end towards the stretched fishing line, and wrap this end with tape so that you can hardly press the opposite end of the clothespin.
9. Make arrows from toothpicks using paper fletching.
An ideal target for shooting from such a crossbow would be fruits and vegetables.
Do not point the crossbow at people or animals - you may cause serious injury to them.
Sights
The main feature of crossbow shooting is a significant shift in the aiming line. In other words, after firing the shot, the fired projectile begins to gravitate towards the ground quite quickly. Therefore, it is advisable to install optics with a special crossbow reticle on such weapons. To effectively target a target, it is enough to equip crossbows with optical sights with 4x zoom.
Some hunters prefer collimator systems, which also prove to be quite effective. Moreover, this option makes it possible to hunt both during the day and in the evening. Collimator sights are extremely convenient to use when aiming at moving targets.
Making a crossbow
This paragraph will provide information on how to make a crossbow at home. The analysis will be based on the example of a wooden crossbow. To make a wooden crossbow, you need to choose hard and durable wood, such as larch, oak, cedar, and mahogany.
Bed
Initially, to make a stock, a rectangular wooden block is taken, in which a groove for the arrow is machined. After this, a hole for the trigger mechanism is drilled at the opposite end of the chute. A hole for the bow is machined in the front of the block. Then all the holes are carefully ground and the outline of the stock is cut out.
The bow is the main part of the crossbow, so when making a stock it is necessary to focus on the parameters of the bow. When grooving a gutter, it is advisable to leave a few millimeters of margin when grooving.
If you are making a compound crossbow, then you need to be extremely careful when cutting the groove for the intersecting section; incorrect cutting will ruin the design.
Bow and guides
Bows can be made from any wood. It is installed in an already drilled hole. Next to the hole for the trigger mechanism, you also need to drill a groove for the bolt that will secure the bowstring.
Particular attention should be paid to the crossbow guides, as they set the initial path of the arrow (bolt). They should not have a high coefficient of friction
It is advisable to manufacture them as a separate part. This will simplify the use of the crossbow; if you want to shoot with other bolts, you can easily change it to the desired size.
The guides should be made as similar to each other as possible. After manufacturing, they are installed in the groove so that the axis of the inserted arrow coincides with the axis of the tensioned bowstring. The bolt must lie freely in the groove. To protect the wooden surface, you can install metal protection on it.
How the medieval crossbow was used
It was possible to tighten such a structure in several ways, for example, holding it with your left hand or using your free right hand. Or, leaning their feet on the semicircle of the bow, the warriors pulled the string with all possible force with one jerk with both hands. And before taking aim, the arrows were placed in a special chute. It looked like a cylinder cut in half and was located in the middle part of the device.
For this weapon, the arrows used were not very long, but their ends were extremely heavy and thick. They had a special name - bolts. The tension force of a medieval crossbow made it possible to pierce strong iron breastplates and the most reliable shields. And when the arrow hit the enemy’s body, it not only pierced him through, but also continued its flight, almost without slowing down, as if it had just passed through the void.