Possible problems when making and assembling a compound bow
When making compound bows at home, you can encounter many problems. One of them is what to make the shoulders from? Should I use multi-layer plywood? Not a bad idea, but no. You need to look for fiberglass. And then use it to make a multi-layer design of the shoulders. But here difficulties may arise with internal deformations due to excess stress. Or you can go the other way and make the shoulders out of carbon. In addition, we need composite glue, fiberglass and polyethylene film. We spread the polyethylene and pour glue on it, in a 1:1 weight ratio with carbon. We lay carbon fiber on top. Without letting the glue harden, turn it over with the film up and smooth it out well. We also mark the mode of the strip of the required width. We remove the carbon from the film and place it on the prepared fiberglass. Thus, we make a sandwich, the thickness of which depends on your physical strength. The thicker it is, the more difficult it will be to bend. To give the shoulders a curve, they need to be placed under a curved press. The arms are fixed in pre-made grooves on the handle, and with self-tapping screws, for greater strength.
Further more. Block system. It’s almost impossible to make them yourself, except on a lathe. Or you'll have to buy it. The best option, of course, would be a wheel on the upper arm and an eccentric on the lower arm. Having installed the block system, the cable and string are attached to the bow. Please note that after each bow disassembly, the blocks must be adjusted again.
The stabilizer serves to reduce bow vibration and recoil during a shot. The stabilizer also dampens the volume of the shot. The stabilizer is a rod on which moving weights are placed, fixed with a screw. The stabilizer can be long and light, or short but heavy. To secure the stabilizer to the handle, a screw is attached in a blind hole.
The rod for retracting the bowstring and the bracket for the arrows are made of aluminum or steel. Its diameter is approximately 10 mm. The runner can be made from vinyl plastic. All fastenings are made with screws. The outlet shelf can be made from strong wire. The shelf must have a power reserve to adjust the length. The bowstring can be made from Kevlar thread or braid. Having installed the bowstring, it needs to be balanced using different weights. It is recommended to weight the lower part so that the arrow flies in the desired direction. A flask with water can serve as a balancer.
Tools and materials
To make such a bow you will need a minimum set of tools:
- airplane;
- knife.
- hacksaw;
In order for the bow to acquire the desired bend, it is best to use a special slipway.
You can also make it yourself from a board and several bars. To make a simple non-removable arch with your own hands, you will need:
- strong rope, leather tape, metal wire, thick thread for making a bowstring;
- thick rope or other suitable material for gripping.
- wooden or PVC pipe for making an arch;
When shooting from a bow, his shoulders should bend, while the bowstring practically does not stretch. The arrow hits the target precisely with the force of the weapon's bow, which straightens at the moment of the shot.
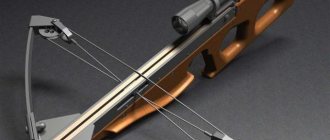
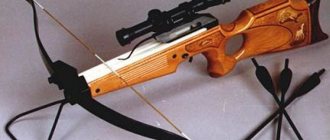
What is a compound bow
The essence of the design is the presence of a pair or several pairs of asymmetrical blocks with eccentric axes. This device works as follows:
The high pulling force of the bowstring, which seems directly proportional to the tension force, is created largely thanks to the blocks: contrary to the first impression, the archer's muscular force expenditure becomes lower, and the bow's tension becomes greater.
Compound bow.
The downside to the operation of the blocks is that when collecting the cables and tightening the bowstring, a certain moment of their peculiar bending occurs: the block is rotated, after which the reverse opening requires a little effort.
This leads to the fact that holding a compound bow in a tensioned state is much less energy intensive than for other designs. As a result, aiming and waiting are performed for an increased amount of time.
The evolution of the bow to a block design brought its production into the enterprise: while a conventional bow was made by hand, with the development of technology and increasing demands, such a design became quite complex. However, it is possible to create a compound bow on your own, even at home.
Advantages of PVC products
This device is easy to transport. And the large dimensions do not interfere at all, because it has a prefabricated device and is very easy to disassemble.
Together with arrows, it easily fits into a quiver. The weight of such a bow is light, but the accuracy is high. A good homemade tool is in no way inferior to its factory-made counterparts in terms of combat capabilities.
This ancient weapon, made with your own hands from PVC pipes, differs from the factory version in its lighter weight. And it differs from its wooden counterpart in higher strength.
A video will help you make a bow from a PVC pipe, where the production is presented in great detail.
The low cost of synthetic materials makes it possible to produce this device at a cost that will be an order of magnitude less than purchasing a finished product.
PVC pipe is considered the simplest and most affordable material option. You can use leftovers after repairs, or buy a small size of the workpiece (3 meters).
An additional advantage of a bow made from PVC is its long service life. After all, such a product is not subject to rotting, unlike wood.
Selection of components for onion harvesting
For the manufacture of a bow as a structure subject to repeated bending and high stress, it is important to select the highest quality materials.
Excessive humidity and mold are also unfavorable.
Making the handle
Creating the handle requires care - the remaining parts will be mounted on it.
Material to create
Among wood species, yew is optimal - flexible and durable. Also suitable:
When harvesting with your own hands, cutting is carried out in cold weather. The bark is removed only after drying. It is recommended to use a variety of impregnations and protective compounds.
Gluing the handle
The most effective is a solid piece. If there is a need to increase its size or obtain significant arrow reach power, there is a way to create a multi-layer handle.
Hole for fastening
Holes and grooves are made in the arms (short bars) for installing wheels.
How to make and stretch a bowstring
In addition to synthetic rope, which has a limited service life due to abrasion, other materials are used:
Natural fiber works best.
What do you need for arrows?
A stand is required for the arrow - it will save the bowstring itself and your fingers. A piece of sheet metal or hard plastic is suitable.
Arrows for a bow.
What do you need to know before you start?
Even if you're making a bow and arrow for fun or as a gift for a child, there are a few things to consider:
| Swing by hand | Arm length | Arc length |
| 137-142 | 55-58 | 137 |
| 145–150 | 57-60 | 145 |
| 152-157 | 60–64 | 152 |
| 160–165 | 64-66 | 160 |
| 167–172 | 66-68 | 167 |
| 175–180 | 70 | 178 |
The classic version of the arch consists of:
- Shoulders
- Bow string
- The main part, namely the handle
After making the bow, it is necessary to ensure proper care. Don’t be alarmed, leaving is easy and won’t take much time:
- The bowstring is only put on when shooting, so it is immediately removed. Before shooting, you need to “click” the bow and pull the string.
- Store only in a dry place, preferably in a case.
- Onions should be stored in an upright position.
- You can't pull the bow.
Bow Handle Design
A collapsible bow includes two arms in its design, which are attached to both sides of the handle using nuts.
The handle should have two flat surfaces for attaching the shoulders, a place for a hand grip, and a shelf-cutout for the passage of the arrow. The handle should not bend (at all!) while using the bow! As long as the bow satisfies these three conditions, it doesn't matter what it looks like. Now is a good opportunity to show your creativity. Start developing your bow design with a couple of sketches on a piece of paper. I did a few scaled-down sketches so I could have some ideas before drawing the full size handle.
The two handles I created were approximately 51cm and 46cm in length. The handle pictured on the left was designed using only one bolt to secure the bow's limb, while the one on the right was designed using two bolts to each limb. Don't pay too much attention to this. Even after the bow is fully built, there are ways to change the angle to increase the tension on the string. We'll come back to this later.
Next, I made a model of the handle from 5 cm thick foam. This step is not necessary, but it may be useful when later cutting the handle out of wood.
Make a copy of your drawing so that you have the original drawing to transfer to the wood. Cut and glue the design to the foam board and cut it out using a knife or rasp.
On a foam handle, you can choose a comfortable shape for the part that your hand will hold on to, and adjust the curves before making the handle out of wood. The foam model helped me a lot. I'm not very good at transferring a three-dimensional picture from my imagination to a plane. Having a 3D model allowed me to tweak the design before making the wood handle.
Making a bow handle
Use a table saw to shape the selected pieces of wood into uniform widths (along the grain). The width of the blanks should be approximately 5 mm larger than the widest part of the ski. In my case it was approximately 5 cm for both pairs of skis. The 5mm allowance will be removed later with sandpaper. Now cut the planks to the same size along the length (across the grain).
To do this I used a hand-held circular saw. Please note that the planks turned out a little uneven. For high-quality gluing, it is important that the boards fit together as tightly as possible. If you have a plane or surface planer, make the boards even or sand them using sandpaper placed on a rectangular piece of wood.
Useful tips for storing onions
Now you have all the instructions on how to make a good bow. But it is very important not only to make it correctly, but also to maintain your creation in the right conditions so that it retains its original shape and excellent characteristics for a long time.
Here are some valuable tips for storing onions at home:
- Keep the bow upright
- Remove the string after each use. Don't keep it tight.
- Each time before use, make several smooth bends of the structure. This procedure will help “warm up” and help avoid breaks.
- Do not keep onions in the sun for a long time. It should be stored in a dry, dark place.
That's all! You can get down to business.
Material for making a bow
We recommend harvesting the material when there is the least amount of sap in the wood. Therefore, winter or autumn is considered the most optimal time of year.
Good wood for making a bow is:
If a bow is being made for an adult, the diameter of the bow barrel should be approximately 3 centimeters. And if you are making a bow for a child, then an ordinary straight branch will do.
It is advisable to leave the material in a cool, dry place for 1 year of drying, but if you want to quickly make onions, the period can be reduced to a month.
Instructions for creating an arrow
For a good bow you need to make at least 4 arrows. To make them, we take slats or boards with a thickness of 2 to 3 cm.
The length of the arrow is about 85 cm, but it is better to determine it using the special table located above.
- We make markings. Using a plane, change the thickness of the board to 1.5 centimeters;
- We mark the board into squares (from the end) and saw it into arrows;
- We turn the squares into hexagons using a file or knife;
- Using a grinding machine or sandpaper, give the shaft a round shape with a diameter of up to 8 mm;
- If necessary, attach feathers (3 pieces per arrow). It is better to take crow feathers, which we cut lengthwise. We even out the pile with scissors, leaving 0.5 cm. We wrap them with threads. Instead of feathers, you can make grooves for fingers;
- The tip should be triangular in shape. You can make it yourself;
- In the shaft we make a recess for the tail of the tip and fasten it with the same thread.
Mongolian bow design
Now let's move on to the details of the Mongolian bow. As mentioned, it was the best bow in the world and probably still is today. Although modern high-tech compound bows are in some ways more user-friendly and can be just as powerful, the simplicity of the Mongolian composite bow and complete absence of foreign hardware and complex parts that the archer cannot easily repair or replace makes the Mongolian bow a superior solution .
The famous Mongolian bow, which was used by the warriors of Genghis Khan, can easily be created today.
The Mongolian bow is not as large or long as the English one, but it is much more powerful. The strength (the force with which the string must be drawn) of an English bow averages about 70-80 pounds, while the strength of the old Mongolian bow, according to George Vernadsky, was about 166 pounds. This apparent discrepancy certainly reflects the fact that the tension required to draw the bow varied depending on the strength of the archer and the purpose for which the bow was used. As would be expected, there was a significant difference in shooting.
Selecting the length of the bow and string
The first thing you need to do when deciding to make a bow is to choose the right length of the string and the bow itself. Please note that depending on the length of the arms, the dimensions of the product will change. For example:
- arm span 155-165cm, bow 153-160cm and arrows 66cm;
- sleeve width is from 167 cm and above, so choose a length of 160 cm, arrows from 60 cm.
- the opening of a person’s arms is from 136 to 150 cm, the length of the bow should be 137-151 cm, arrows should not be longer than 60 cm;
Making a bow handle
Rough sawing of the handle
Once these cuts have been made, begin sawing along curved lines. As soon as you reach the cuts, pieces of wood will fall off. This will create natural places to stop the cut.
Now you need to cut out the shelf for the boom to pass through. Turn the bow handle blank on its side and draw the outline of the shelf. If you have a band saw, the cutting process is simple - follow the same steps as when rough cutting the handle. If you only have a jigsaw (like me), then you may need a chisel. Most jigsaws can cut into boards up to 5cm thick. The handle I designed is about 7.5 - 9 cm thick when placed on its side.
To chisel a shelf, hold the piece against the bench with a clamp and make a vertical cut with a handsaw. Next, turn the handle blank on its side and secure it again with a clamp on the bench. Using a hammer and chisel, carefully holding the chisel as perpendicular to the workpiece as possible, gradually cut out the shelf. Now it's time to grind, use a rasp and sandpaper to give the handle a smooth shape. I did most of the work using a belt and disc sander.
Ski trimming
Make sure the ski is cut exactly at the right angle. If not, use sandpaper and a rasp to smooth out the corner.
Drilling holes for fasteners.
Mark the center of the future hole (with an awl or nail) in the middle of the ski and approximately 3 cm from the edge of the ski. This will help you drill the hole accurately if you are not using a drill press. Place the bow limb and grip together and drill a hole together. You can also drill the holes individually. To prevent the bolt head from protruding from behind and being scratched, it must be “recessed”. Use a drill bit that is a hair larger than the diameter of the widest part of the bolt head. Determine how deep to drill the hole by holding the bolt next to the folded ski and handle, as shown below. It is necessary that approximately 1-2 cm of thread protrudes from the front in order to put on the washer and tighten the wing nut. Make a mark on the handle and return to the drill press (or drill).
If you're wrong
It's time to remove all marks and scratches. I used M40 sandpaper. M63 paper will also work. After sanding, remove the wood dust and apply the finishing touch. I used two pieces of finishing gloss polyurethane sandpaper with an intermediate sanding of M40.
Making a bowstring
Before making a thickened bowstring, determine how long the slightly untwisted bowstring should be. Tie two bow knots at the ends of the string and draw it across the bow. If the string is too long or too short, it will greatly interfere with its use. The distance between the string and the handle is called the "base". Although it may vary slightly between bows, it is approximately 18 cm.
To make a twisted string that will fit a bow, cut a piece of string equal to three times the length of the single string drawn as the bowstring. The video below shows how to twist the thread. If you can't see it clearly enough, here's what happens: Fold the thread in half. Using the thumb and index finger of your left hand, hold the thread by the loop (with a pinch). Place the upper end of the thread coming out of the pinch on the end of your index finger, press it with your thumb and roll the pad of your thumb along the index finger to the joint, unwinding the weave of the thread. Having rolled the thread to the joint, press it with your thumb, and without releasing it, grab the second end of the thread with your index and middle fingers and turn the hand towards you. Move the pinch holding the loop forward a little. Repeat.
Detailed description of the operation on video (in English)
Now you have a large piece of twisted nylon thread, tie a double knot at the end to prevent unraveling, trim and melt the ends.
The string is almost ready. The part of the bowstring where it comes into contact with the fingers and the nock of the arrow is subject to increased wear when shooting. An additional thin thread layer can be added to strengthen the bowstring. This process is called bowstring maintenance. Maintain a section of the bowstring a few centimeters below and above the arrow shelf.
To prevent this area from fraying and sliding up and down, it is necessary to thread a hemp thread through the bowstring. Also, a small nail can be inserted into the twisted bowstring to thread the hemp thread. The tape in the top photo is used to hold the hemp thread in place during the twisting process. This process is similar to basic overcasting. However, the hemp thread is not strong and pulls the end of the loop back and twists it. Therefore, thread the working end of the hemp thread in small increments through the twisted bowstring. Tie the end in a knot and add a drop of superglue to the end to prevent fraying. Last steps.
What does it consist of?
A bow has only two components:
- Shoulders;
- Handle
.
The bow's limbs are located above and below the handle. Sometimes a special shelf is made on the handle on which the arrow rests. A bowstring is stretched between the shoulders.
A hole is made in the bow to guide the arrow. The size of the bow and arrow depends on your height. They are easily identified by their arm span.
There are fixed sizes:
How to properly make a shallow strip foundation:
How to make a compound bow with your own hands
We will need:
Base
First you need to give the handle the necessary shape that is comfortable for the hand. You can also make a small recess to guide the arrow. After this, glue the shoulders from several layers of plywood or textolite. The main thing is that they bend evenly, providing sufficient tension, and not crack. When everything is ready, you need to make connections between the handle and the shoulders. It is best to fasten them together with pairs of bolts.
Blocks should be attached to the ends of the arms, the eccentric to the bottom, and the roller to the top. An eccentric is necessary to fix the bowstring in a tense position. The block consists of two chambers - the bowstring is wound onto one, and the cable is wound onto the second. The whole point is that the first, stretching, rotates the eccentric, which, in turn, wraps the latter around itself. This allows you to release the bowstring with great force and almost instantly develop high arrow speed.
Bowstring
After installing the blocks, a bowstring and a cable are attached to them. The disadvantage of such bows in this case is that after each disassembly you will have to readjust the blocks. But if you made a compound bow with your own hands, it may require some effort. The tension of the bowstring is adjusted depending on the strength of the shoulders and the strength of the shooter.
Arrows Making your own arrows is not difficult. At least it's easier than assembling a compound bow with your own hands. The blanks must be polished, and a plastic or paper feathering must be attached to them, leaving room for gripping with your fingers. But the choice of tip is completely arbitrary. However, it is worth considering that all hunting bows are designed to inflict wounds, and compound bows are no exception. If the tips are sharp, the arrows can seriously injure.
Balancing and finishing
After installing the string, you need to balance the bow using various weights. The priority goal is to make the lower part heavier so that when firing the gun does not throw, and the arrow is released in the desired direction. The balancer can be made hydraulic, that is, in the form of a cone with liquid.
Conclusion
Your personal homemade hunting bow is ready! After manufacturing, it is necessary to adjust the weights and adjust the bowstring, and this is done experimentally. It’s not easy to make a compound bow with your own hands, but if your skills allow it, you’ll get a rather serious and interesting product.
What parts does an onion consist of?
This product consists of:
- Shoulder;
- Handles;
- Bowstrings;
- Strel;
- Final design.
To make a durable arm, a pipe blank one and a half meters long is used. The handle is also made from it, or supplemented with a wooden blank.
The length of the handle depends on the hand of the person who will use the bow. A strong fishing line is used for the bowstring.
Adjusting Bow Power
Here are some ways to increase the power of your bow.
Angle between the handle and the bow shoulder:
Changing the length of the shoulders
If the bow limbs are too long, the bow can end up being quite weak. Long arms bend less when the bowstring is drawn. Less bending means less strength. The string can be drawn back further and the limbs can be bent more without likely breaking, increasing the strength of the bow. Shoulders that are too small can be broken by normal bowstring tension. My advice: if you want to replace the shoulders, measure approximately 10 centimeters from the edge of each shoulder. Drill new holes and make a new string.
Removing material from the ends of the arms
Not all the force developed by the tension of the bowstring is transferred to the arrow. Significant energy is spent returning the shoulders to their original position. If the arms are lighter, less energy is required to move them, resulting in more energy transferred to the arrow. This does not change the draw weight of the bow, but it does make the bow more efficient and powerful. Because the ends of the bow must move as far as possible to reach the starting position, they are often the part of the bow from which material is removed. To remove material, use a rasp, file, sandpaper, and use them to “sharpen” the ends. If you remove too much material, you will compromise the structure of the bow. I warned you. This can be done as long as you don't go too far. Do not remove more than 20% of the material in the top third of the onion.
How to make arrows
Young animals are usually taken to make arrows. To make the reed even, you need to hang it on a heavy weight and let it dry in the sun. If the summer is very hot, a week will be enough for complete drying.
You can also take a dry oak log and cut a lot of arrows on it to make arrows. But this method takes a lot of time, since it will take a lot of time to process the arrows.
What to make the tip from
The arrowheads must be made of heavy material; in this case, after releasing the bowstring, the arrow will acquire great acceleration.
Tips can be nail clippings, steel wire or glass pieces.
Using a knife, a recess is made in the wooden base of the arrow and the tip is securely fixed. Typically, homemade arrowheads are tied with thread and then soaked in superglue.
If you want to make very strong tips that will fly big, coat them with epoxy resin.
How to make an arrow stabilizer
Thin plastic sheets or large bird feathers can be used as stabilizers. There are 2 ways to attach: cut the arrow and attach the stabilizer from the inside or wrap it on top.
If you are using large bird feathers, the second method is best. Because splitting an arrow can negatively affect its flight characteristics.