List of required tools
Knowing how to make a bow and arrow at home, you need to acquire the following tools:
- large file;
- chisel;
- vice;
- plane;
- with a very sharp knife.
Here is the recommended set of tools needed for the process. You also need to select other tools that will correspond to the design chosen by you personally and will help to carry out high-quality processing of the base. This will make the manufacturing process much easier.
Choosing material for manufacturing
Just knowing how to make a bow with your own hands is not enough, because you need to know what you can make a bow from. If you plan to obtain a high-quality design after design, it is recommended not to experiment with materials. Wood or PVC pipes are considered to be the best among other bases.
There are enough tree species that are ideal for making. But cutting down a certain type of tree is not enough; you need to be able to process it correctly.
Note that the bow can be made from the following materials:
- Tree. This is mainly oak, acacia or ash.
Wooden bow - Metal. To construct a metal-based bow, hollow tubes are used that are welded together.
- Fiberglass. This material is very popular for making modern bows. Fiberglass skis, which do not have an additional plastic coating, are often used as a basis.
- Combined materials. This bow has several inserts.
Features of classic products
Traditional bows are made from wood. They are considered classics; modern materials are used in tandem with wood. The devices have a handle made of aluminum alloy, and the shoulders are made of carbon inserts. Quality classic bows include special threads to secure accessories for accuracy. These include stabilizers, sights, plungers.
Since many traditional bows are designed for sport shooting, many people know them as Olympic bows. Now similar devices are sold for hunting. Classic bows are ideal for beginners and advanced archers.
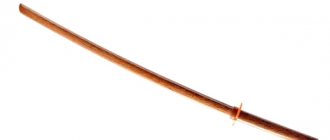
Wooden bow
Knowing how to make a bow and arrow at home, before making it you need to understand their differences.
Bows differ in arrow placement, design, and area of use.
Finding an arrow happens:
- Central. The arrow before the shot is in the middle, on the longitudinal axis of the product.
- Peripheral. Here the arrow is placed on the left side closer to the top.
Designs can be:
- solid;
- collapsible;
- block, consists of many elements.
The scope of use is also different:
- This is a bow intended for hunting;
- bows are often used for fishing;
- game bow, that is, a child’s bow;
- Can be used for target shooting, indoors or in fields;
- for long-distance shooting.
Since it’s easier to make a bow with your own hands from wood, let’s start looking at wooden products.
Preparation of material
While studying materials on how to make a bow and arrow from wooden material, you came across the structures of trees.
Let us remind you:
- Inner rings. They are dried elements of wood and are quite hard.
- Then come the lighter rings. They are called sapwood. Along the perimeter the wood is not hard, but elastic.
A wooden bow consists of several parts. This is the so-called belly and back. The back compresses when the bowstring is pulled, it is important during manufacturing to find a middle ground between the sapwood and dried rings. Such parameters extend the life of the product.
Let's start preparing the material. In a planting or forest, you need to find a 2-meter even tree, the diameter of which is approximately 10 cm. Having cut down or cut down the found tree, you need to quickly treat it using glue, you can apply a special varnish to the surface, designed for wood processing.
Preparing onions
This is done in order to close those fibers that have opened, and so that during further processing and under conditions of use the material does not crack. After manipulation, the material must be placed in a place where there is no humidity. In such an environment, the material must be stored for several months. If there is no urgent need to use onions, then it is better to extend the drying process.
If the tree is dry, the bark is removed, but it is worth considering that 10 centimeters should be left on each side. So, the bark has been removed, now we send the workpiece to dry for another week in the same place. If such preparation is not carried out, the product will turn out to be of poor quality and unreliable. Ideally, the tree will take a year to dry.
While the preparation process is underway, we will tell you how to make a high-quality bow and arrows at home.
First stage
After the prepared material has dried, you can begin the manufacturing process. If you theoretically know how to make a bow and arrows, then you know that the first thing you should do is inspect the prepared material and select for the bow the part where the annual rings predominate. In this part of the tree the wood is denser and the structure will snap.
The tree is divided by splitting or sawing into several parts, but if there are a large number of knots on the material, it is better not to do this. It is not recommended to chop the workpiece, unless of course you have done this before. When the workpiece is divided, it needs to be hung and a 25 kg load attached to it. This is done in order to remove the threat of deformation of even parts that may occur during drying. It is better if the wood hangs for about a week.
Bow making diagram
Note that if the tree has been drying for a year, manipulation is not necessary. You can test products made from one-year-old stock and those that have been drying for a month. You will see that a structure made from wood that has been dry for a year is much stronger and more reliable.
Formation
The wood has dried, now we begin to form the future weapon. While studying the material on how to properly make a bow and arrow at home, you could not ignore the formation section, but it is still advisable to repeat this. The middle is marked on the workpiece, that is, the place where the arrow will be located. It is necessary to determine the dimensions of the handle that are necessary and will make shooting more comfortable.
And so the marks are made, now we proceed to making the main part of the bow. Using a sharp knife or plane, remove excess wood from the belly. From the handle we gradually go deeper to a suitable shoulder thickness. It is advisable to perform the work evenly; the uniformity of the bend of the shoulders depends on this.
Bend test
The bend test is needed to make sure that the shoulders are bending evenly and to check the bend points. A person who makes such a design for the first time will not be able to visually determine the uniformity of the folds. It is impossible for those people who know how to make a bow with their own hands to check this. And this is very important, because during use the structure may bend in the wrong place, and thus you will not be able to shoot accurately.
To check the bend and determine where to cut the excess wood, you need to bend the workpiece with both hands, and mark where it bends less with a pencil. It is better to cut off excess parts with a diamond-shaped file, since such a tool does not leave burrs or chips after processing.
Treatment
During drying, it is not recommended to cut knots on the wood; they may crack during processing, but for convenience they can be reduced. It is advisable to carry out such work at the end of drying when constructing the onion as carefully as possible. Using a knife to cut the knots can cause them to crack. It is recommended not to completely cut off the knots, but during construction, process them with fine-grained sandpaper.
Creating a Handle
In the previous steps we made a preliminary handle, and now we will start creating it. It is necessary to mark the upper and lower arms of the bow and mark the handle on the lower side. To mark, you need to clasp the body of the bow with your hand and mark the boundaries of the placement of your hand. After making the marks, you need to tighten the experimental bowstring and check the arms of the product for bending.
Lever
All manipulation at this stage should take place clearly and gradually. It is recommended to check the shoulder curve frequently. After turning the handle, a place is made for the location of the arrow, but you need to figure out where to make it. For this purpose, you need to shoot with a bow and then it will become clear to you where it is more convenient to do it.
And so, we learned how to make bows and arrows at home, there are a few nuances left.
Decoration
After making a bow, and being convinced of its quality and reliability, most people want to decorate it. Varnish is often used. You need to remember that this may be your first independent product, and you are not able to determine its degree of dryness. It is recommended not to coat the product and allow it to dry completely. The period takes about six months, but this does not mean that it cannot be used for its intended purpose, because it is a ready-made, full-fledged weapon. Once you are confident that it is completely dry, you can decorate and show off your piece.
Let's get started
The first step is to remove the inner part of the wood from the bow; this is done so that cracks do not appear along the trunk during use. If the wood is without branches, then this work can be done with a plane.
Then tie any rope as a temporary bowstring. Then you need to check how well the bow arms bend.
If the bending is not carried out evenly, then make marks with a pencil in places where the wood is poorly bent. In these places you still need to work with the plane until the bend of the shoulders occurs equally.
After this, sand the entire surface of the bow to remove small burrs; now you can put this part aside.
PVC pipe bow
If you need a substitute for wood products, you can use polyvinyl chloride pipes. Of course, the finished structure will differ from a wooden structure, but this will not affect the quality. If you are interested in how to make a bow and arrow from PVC pipe, then the first thing you need to know is that they are constructed in a certain sequence.
Namely:
- From the total length of the material, we make a cut one and a half meters long and use a tape measure to mark the middle. From the middle we mark 5 cm on each side. This section will act as a handle.
- We heat the pipe with a gas burner. To warm up, you need the area from one end to the handle, approximately 160 degrees. It is advisable not to touch the handle itself. The duration of heating depends on the hardness of the product, and the material must be heated to a soft state. Many have understood why it needs to be heated, and for those who haven’t figured it out, we’ll explain. Warming up is necessary to give the pipe the desired bow shape.
- The pipe has become soft, it now needs to be transferred to the workbench. A board is placed on the top of the soft pipe and the edges are clamped with it. The board is simply secured near the handle, so the handle will remain round, and the transition along the rest of the perimeter will be flattened. When carrying out such work, it is important to focus on rounded clamps; they must be symmetrical.
- The handle itself is made. It heats up in the same way. Press across the shoulders of the bow.
- Finally, protrusions are made at the ends of the workpiece, and the bowstring is stretched.
Many people will think that a bow made from PVC pipes is a child's toy, but in fact they are powerful and quite suitable for hunting.
Concept
A recurve bow, compared to a regular bow, is distinguished by the presence of arms curved in the direction from the shooter. The product has a deep cutout in the center with a shelf for storing the boom. The designs were invented by Asian masters. In ancient times, small arms were used by cavalrymen, as they were convenient for shooting above the horse's head. The recurve bow was made from bone, wood, and tendons.
Instructions for creating an arrow
To use a crafted bow, you need arrows. They are made of wood. Pine and birch are ideal. Although birch is more difficult to process, arrows from it are of higher quality. To make arrows, you can use a board, branches and wooden slats. When making it, it is important to ensure that the tip is sharp, since it must cut through the air and could stick into the object.
Arrows and tips
Often a nail is attached to the arrows. It is fixed with copper wire. But experts recommend cutting a square out of thin steel as a tip and bending it onto the arrow. If the bow is of high quality, then one arrow will not be enough; it is better to make about 5. Arrows are often made from boards or slats.
Manufacturing process:
- Marking. Using a tape measure, 1.5 cm squares are marked on the board. After marking, they are cut into arrows.
- Using a file or a sharp knife, the square pieces are ground to hexagonal. Next, they are processed with a file or a grinding machine until they are rounded, with a diameter of approximately 0.8 cm.
- Upon completion of processing, feathers are often attached to the arrow.
Feathering on a bow arrow
The crow ones are better suited, in the amount of 3 pieces per unit. The feather pile is trimmed using scissors. They are attached with threads. - Then it is made mainly from tin, a triangular tip. Fasten it with threads. It is necessary to make a cut on the arrow for the bowstring.
Arrow for a bow with a metal tip
If you follow all the recommendations and follow the order of work, you will use a homemade bow for a long time.