Visual video:
Today we will talk about how to make or forge your own traditional Japanese knife or samurai tanto dagger with a wooden sheath.
We will also consider a detailed description and step-by-step photos of making a tanto with your own hands using Japanese technology. First of all, you need to know that a tanto (translated from Japanese as “short sword”) is a samurai dagger. The tanto blade is characterized by a one-sided blade, less often sharpened on both sides, 25-40 cm long. The tanto is made of sponge iron (tamahagane) and must have a hamon hardening line, a removable handle, which is secured with a menuka bamboo pin, and a round guard, which can be remove - tsuba. Calling the tanto a knife is incorrect, since it is a dagger and has never been used as a knife. Tantos are usually made using the hira-zukuri method, in other words, they do not have a stiffening rib, but sometimes you can see blades with a stiffening rib (Moroha-zukuri, sharpened on both sides). Tantos, which had a thick triangular blade, were called yoroidoshi and were used in close combat to pierce armor. The tanto was used only as an additional blade for finishing off the wounded, decapitation, seppuku, etc., and never as a knife, which was a small kogatana knife carried along with the wakizashi or tanto in special compartments of their sheaths.
Tanto was used, as a rule, by samurai, but it could also be used by doctors and merchants for protection. Noble women also sometimes wore small tantos called kaiken in the belt of their kimono (obi) for defense or hara-kiri.
To make a tanto in a regular workshop, take a metal rod, bolt or piece of reinforcement 30-40 cm long. Heat it over coals and begin to shape the blade on an anvil.
Ideally, you should end up with a triangular blade with a shank approximately the same shape as in the photo above. The thickness in the butt area should be 2-4 mm
Japanese craftsmen traditionally process and polish the blade by hand. The workpiece is clamped with wedges on a workbench and each side is processed in turn. To speed up the process in modern conditions, you can use various grinding and polishing machines and tools that you have available.
When the processing of the blade is completed, you can begin to harden it. In Japanese blacksmithing technology, the entire blade is rarely hardened. Usually the working part of the blade is hardened.
For these purposes, a special fire-resistant paste or clay is taken, with which the entire blade is coated. Only a 3-5 mm thick area in the blade area is left unsmeared, as shown in the photo. After this, the blade is heated in a forge and hardened by immersing it in water, oil, or hanging it in a cold wind. For more information about blade hardening methods, see other sections of the site.
After this, you can begin to manufacture various attachments for the blade and sheaths, which are made from various metals - copper, brass, steel, silver or their alloys. Every detail is carefully adjusted to the blade
In places where the working part of the blade will come into contact with metal attachments when removed from the sheath, it is necessary to use softer metals such as copper or partially solder them, as shown in the illustration. This is done so that the blade does not become dull when rubbing against these parts.
A good design combination with copper attachments is provided by parts made from silver or cupronickel spoons. In addition, these metals hold solder well
Silver and cupronickel alloys are quite soft and ductile metals that lend themselves well to any mechanical and thermal treatment.
The more time you devote to processing and adjusting each individual part, the better your future tanto will turn out.
Do not strive to achieve the obligatory polishing of every detail to a mirror shine. On the contrary, it is better to show that each nozzle was made by hand.
To fasten individual parts, you can use ordinary tin or lead solder. As a result, you should have the following number of attachments and fastenings for the blade and tanto sheath
After this, you can begin making the wooden handle and sheath of the tanto. In Japan, the wood used is local mountain pine, larch, cherry or maple.
We recommend using hardwood - oak or beech. The handle and sheath are made of two dies, which are then glued together. The grooves for the blade and shank are cut with ordinary carpenter's chisels
Leather is glued onto the finished handle. Also, do not forget to first mark and drill a hole in the handle for the fastening pin, which securely fixes the shank of the tanto dagger and the handle itself. In the process of cutting grooves in the sheath, constantly try on the blade, which should fit there perfectly.
The blade should enter the sheath gently, but should not dangle there freely and fall out of it. When the grooves for the tanto blade are ready, glue both halves of the sheath. Any high-quality wood glue, PVA glue or epoxy will be suitable as glue.
The sheath should remain under pressure until the glue has completely dried. After this, you can grind and polish the sheath, which should have an oval shape in cross-section. Also take care of fitting the attachments. The attachments should also fit perfectly into their grooves.
Before final installation of the nozzle, coat the contact points of all parts with quick-drying “Moment” type glue.
On the sheath itself, glue a copper attachment with a fastening ring for a lace, as shown in the photo
Cover the well-polished scabbard with several layers of paint. You can even use metallic paint and apply some kind of Japanese-style ornament
As a result, you should get such a samurai tanto dagger
Source: https://remontavto-moto-velo.blogspot.com/2017/11/blog-post_20.html
What are Tanto combat knives?
The original tanto (短刀= tan "short" + to "sword") is a traditional Japanese short knife available to civilians (as opposed to the long katana). National treasure of Japan. Tanto combat knives are considered edged weapons in all countries. In a safe form (made of plastic, wood, rubber, etc.) it is used in oriental martial arts.
Traditional samurai set - tanto, wakizashi and katana
In the European tanto classification:
- in size - a dagger;
- for sharpening - a knife.
Tanto knife in Japanese is hamono (刃 “blade, blade” + 物 “product, thing”). Despite the fact that both “hamono” and “tanto” have two hieroglyphs, the first is perceived as one word “knife”, the second - as a phrase with the keyword “sword”.
The second meaning of tanto is a special blade shape for modern knives:
- combat;
- tactical;
- folding, etc.
The thick tip of the tanto is the key to the strength of the knife even with inappropriate use
This form has little in common with the classic tanto, but is popular and widely used due to its strength.
Etiquette rules for weapons training
Etiquette is the rules adopted in society to regulate relationships and prevent conflict situations. One of the main consequences of maintaining etiquette in martial arts is the development of discipline and self-control. Control over emotions undoubtedly helps to find a compromise in a conflict situation, and discipline creates favorable conditions for self-development and helps to avoid injuries during training.
The main rule of Aikido is to show consideration and respect to others without expectations.
In Aikido clubs, traditional rules of behavior are prescribed and strictly observed. When all club members follow these rules, safe exercise for body, spirit and mind is guaranteed. A separate paragraph outlines the rules of conduct for armed students:
- you must respect weapons, both yours and others. It is prohibited to touch someone else's weapon, or to injure someone (or their weapon) with your weapon.
- The weapon must not be thrown, placed (even in a corner), slapped or hit on the mat, or rested in a standing or sitting position.
- Weapons must always be placed behind the tatami.
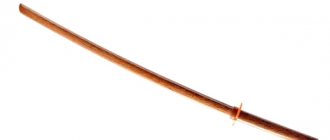
- At the beginning and end of training, the weapon is placed directly in front of you. The bokken is placed on the jo, the “blade” facing towards the jo, the handle to the left.
- When training during seiza, the weapon is always positioned to the left and left of the jo, the "blade" facing outward, the grip is forward, the tips of the weapon are level with the left knee (not protruding).
- When standing with Joe, they hold him upright in the center of their right hand. In this case, the lower end of the jo is directed forward.
- While standing with the bokken, they hold it in an upright position by the handle in their left hand. The direction of the sword is down, back. In this case, the sword is held in such a way that the “blade” of the bokken is facing upward.
- The partner does not change throughout the training with the weapon.
- If you break your partner's weapon, then you need to buy him a similar new weapon.
Description of the Japanese Tanto sword
The classic tanto should be done like this:
| Parameter | Meaning | Japanese designation |
| Blade shape | slightly curved tip | hira-zukuri |
The correct shape of a tanto blade is flat with a slight curve
A standard school 30 cm ruler is exactly 1 exemplary Japanese shaku
Tanto is made from “diamond steel” - tamahagane
If you make a mekugi from metal or horn, the sword will be decorative, not combat
You can recognize the owner of the blade by the tsuba. The samurai code prohibited them from decorating, so they decorated tsuba. Simple “guards” are the lot of commoners
*Tsuba was never used by the Japanese to block weapons - only to rest the hand during a piercing blow.
Parameters of a short Tanto knife
Modern tanto knives differ from the canon in almost all respects:
| flat | ||
| Sharpening | one-sided | |
| Blade length | no more than 30.3 cm, otherwise it will turn out to be wakizashi | 1 shaku |
| total length | 35-50 cm | |
| Material | Japanese steel from sponge iron ingots | Tamahagane |
| Handle | Removable | |
| Attaching the handle to the shank | Bamboo pin | Mekugi |
| Garda* | Round | Tsuba |
| Parameter | Traditional tanto sword |
The sketch is so detailed that you can even make a real Tanto sword yourself
This type of American tanto resembles a kitchen knife, but costs 10 times more.
The American tanto adopted the sharpening from the katana and added chopped shapes
In pursuit of a spectacular appearance, modern knives have acquired serious disadvantages:
Read also: How to determine the thermal conductivity of a material
| Modern tanto knife | ||
| Blade shape | slightly curved tip | Straight bevel at 45° |
| flat | With stiffening rib | |
| Type of sharpening | one-sided | Single or double sided |
| blade length | 17-30.3 cm | 10-30 cm |
| total length | 35-50 cm | 22-50 cm |
| thickness | 5-7 mm | 2,5-7 |
| material | sponge iron steel | A variety of steels, including Damascus |
| Handle | Removable | non-removable |
| Attaching the handle to the shank | Bamboo pin | There are no bamboo pins in sight |
| Garda* | Round | Flat, round or none |
| Performance degradation | Reason (compared to classic tanto) |
| Lower penetration ability | straight bevel of the butt 45 o |
| Worse cutting properties | straight blade shape |
However, the tip strength of modern tantoids is very high, so sticking them into something hard is much safer - and it will turn out much better than with other knives.
Step-by-step manufacturing instructions
After looking at the blade shape in our article or anywhere else, the image needs to be printed. The product model is the first thing done when making a knife. Then follow the instructions:
- Cut out a template for a white knife from paper and glue it to a file from a cutter for quick cutting. This is a reliable option for cutting out the outline of the future blade. Having secured the workpiece in a vice, using an angle grinder and a cutting wheel, we cut out the shape of the product according to the sketch. Cut with a margin of 1-1.5 mm; when sanding, the excess will go away. We also monitor the color of the part; overheating must not be allowed. Notice the slightest change in color - stop. Allow the parts to cool.
- The workpiece must be cleaned of chips on a grinding machine and the contour must be brought to an exact match with the sketch. We work slowly, monitoring the temperature of the product. Again, overheating is contraindicated.
- Once you have a perfect match, wet the design with water and remove. It's time to make the bevels, a critical feature of the blade's future cutting capabilities. They must be marked with a strictly symmetrical marker. There is an article on our resource - “how to make a descent with a knife at home”, it will be useful to read. After cutting the knife, carefully lower the blade on the belt sander and slowly lower it.
- It is better to sand the product by hand using sandpaper, starting with large grains and ending with the finest grains - 1500-2000 units. The blade will acquire a pleasant shine.
- It's time to drill holes in the shank for the pins. 3, for secure fastening of the handle. We cut the brass rod into pieces 3 cm long, no longer needed. And we try them on in the drilled holes, these are future rivets.
- After descending, it is necessary to remove the cutting edge and pre-sharpen the blade. Preparation for hardening is complete. Preheat the oven to 900-1000 ° C, the optimal temperature for the saw blade. It is advisable to check with a magnet whether the part will no longer be attracted. Remove the product with pliers and immerse it in a container of oil for 3 seconds. Hardening is complete, let the part cool in the air.
- After the procedure is completed, the blade is discharged. It is produced in a conventional gas oven, at a temperature of about 200 ° C for a couple of hours. After tempering, the steel will become more malleable and acquire all the qualities of a worthy blade. It should be sanded again with fine sandpaper and water.
- The handle will be produced from the invoice. To do this, the wooden block must be divided in half, and the part adjacent to the blade must be sanded with sandpaper for a perfect match. Then mark the blanks for the holes along the shank. Drill them.
- Mix up some epoxy glue, coat the blanks and rod, attach everything together and insert the brass pins. Counteract them. Then clamp the entire structure with clamps and leave for a day until the glue dries completely.
- The final step will be sanding the handle. Try making a pen based on the original model. If you want to do this for a specific hand, no one will interfere. Work the way you like. More information about the handle can be found in the material - “Methods of attaching a knife handle.”
Tanto blades in Japanese culture
Historically, Tanto blades are not a knife, but a sword, so they were most often worn in a sheath:
- for warriors - behind the belt, on the right;
- for women - in the sleeve, fan or behind the obi belt.
Samurai until the 14th century. armed with a pair of swords - daisho (“big-small”):
- Daito (“big tanto sword”) - the main one, more than 66 cm.
- Shoto (“small sword”) - additional, 33-66 cm.
Sometimes the Japanese tanto sword was used instead of the shoto.
A couple of things that distinguished a samurai from ordinary people were a large and a small sword. Guess which tanto came from
In the 14th century The samurai's weapons have changed:
- instead of daito - tachi, then - katana;
- instead of shoto - wakizashi, sometimes - tanto.
The difference between a tati and a katana is that the first was worn tied to the belt, and the second was tucked into the belt
Over time, the tanto became part of the military set on a permanent basis, as the third item. It was regarded precisely as a military weapon, and therefore was used accordingly:
- to finish off the enemy;
- for battle in close quarters;
- for cutting off heads;
- for suicide (warriors-men, women, children);
- for self-defense (traders, artisans, monks and other travelers).
The only permitted uses are:
- wedding ceremonies of the imperial family;
- oriental martial arts.
Types of tanto
In addition to the tanto itself, the short sword had dozens of varieties at different times:
| Title and photo | Difference and purpose |
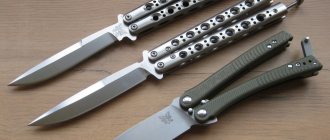
| Tanto fan |
The tanto fan has a well-camouflaged scabbard
- spies,
- women,
- retired military,
- monks
The tanto most despised by samurai is the firearm
Outside the sheath is a single-shot pistol.
In the 17-18 centuries - as a weapon of self-defense;
- status weapon
Looks like a spear - but no, yari-tanto
- sometimes with a hollow handle;
- sometimes with rich inlay.
For piercing armor.
It could be put on a shaft like a spear.
As a second hand weapon
Perhaps hashiwari is a prototype of the Japanese weapon sai
The tanto saw not only cuts, but also saws
Supposedly the ninjas made holes in the walls to get into the house
Tanto yoroi doshi looked approximately like this
Aikuti (“fitted mouth”) was not considered a sword
“Civilian version”, for finishing off an enemy (you cannot finish off someone lying down with a sword, but aikutti, unlike tanto, was not considered a sword)
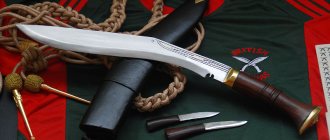
Kubikiri literally means “head cutter”
- To collect trophies - cutting off the enemy's heads (usually servants did this).
- For chopping wood or gardening - household based on combat
Tanto-kens were forged specifically for monasteries
two parallel cutting edges.
- Ritual, for Buddhist ceremonies
Seppuku or hara-kiri
Too cramped for a wakizashi? Use kaiken!
A type of tanto with additional sharpening on the concave part
Unokubi is a refined Japanese tanto in the truest sense, as it becomes thinner along the entire length of the striking part and retains only the tip and base thick
Read also: Stove in the garage from disks
Difference in tip:
- Unokubi - sharpened tip,
- Kanmuri-otoshi - no.
Perhaps the stronger tip was used for stabbing.
Plus, such a weapon is lighter than a conventional one, monolithically thick along its entire length
A short Japanese tanto knife with a stiffening rib looks more like an American tanto
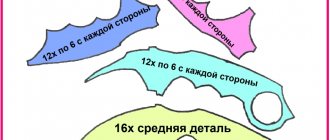
Rarer executions of tanto (as well as wakizashi, katanas and naginata) are presented in the figure below.
Photo of tanto. Different geometries of Japanese blades
Training weapons for children
The teacher will determine the child’s readiness to work with weapons. As a rule, this is school age. At the initial stage, the child will need a baby bokken or wakizashi (for children 4-6 years old). After 12-14 years of age, it is recommended to purchase an adult training sword, fishing rod (ze, jo), tanto and a portable bag for equipment.
How to choose
- The choice of weapon will depend on the needs of the teacher and the financial situation of the parents.
- The student must like the weapon. When purchasing, you need to hold the sword in your hands, touch it, and find harmony with it.
- High-quality training weapons do not have cracks or chips.
History of the tanto sword
In Japan, tanto has a long history - to this day:
| Sheath for tanto in the form of a folded fan. | ||
| Tanto pistols | ||
| In the sheath it looks like a regular tanto. | ||
| yari tanto | ||
| The blade is exactly like a yari spear: | ||
| Hashiwari | ||
| ||
| Tanto saw | ||
| On the concave part there are saw teeth. | ||
| tanto yoroi-doshi | ||
| ||
| Aykutti, Aigutti (or yaykutti). | ||
| Without a guard, without a braided handle, various tanto sizes, most often short. | ||
| Kubikiri | ||
| More curved, sometimes without a point (or with a weakly defined one), the cutting edge is on the inside or on both sides. | ||
| Tanto-ken | ||
| Double-edged blade like a dagger | ||
| Kusungobu (9 sun, 5 bu), also known as metezashi Kusungobu - a shortened version of the tanto for hara-kiri | Ritual, the size of the tanto knife is 29.7 cm. | |
| Kaiken | ||
| ||
| Moroha-zukuri | ||
| Double-edged, curved tanto blade for close combat | ||
| Unokubi and Kanmuri-otoshi | ||
| The back of the blade becomes thinner in the middle, but thickens again towards the tip. | ||
| Shinogi | ||
| Stiffening rib (approximately in the middle) | ||
| Eras of production | Period | Event |
| Koto, "old swords" |
Before 1596
(War of Minamoto and Tairo)
1180-1185
- Naginata,
- Onion,
- long sword,
- tanto.
(1185-1333)
The most famous tanto master is Yoshimitsu.
(1333-1573)
1597 — 1780
Then production increased, but quality fell.
Gradually they began to fall out of use, becoming a tribute to tradition.
(1781-1876)
Weapons are produced industrially
Carrying weapons is prohibited. Tanto goes out of use
After the 1950s, nothing interesting happened regarding tanto in Japan. But thirty years later, the tanto was reincarnated - in America, in the form of a combat knife.