how to draw a tank with a pencil
More than a hundred years ago, during the First World War, a new weapon first appeared on the battlefields of Northern France, and it was a tank! In this article you will learn how to draw a tank - a truly historical example of modern warfare. The predecessors of the tank date back to ancient times, when armies used armored vehicles such as chariots, siege towers or battering rams. The first modern tank was built in 1900 using a steam engine. Tanks played a large role in the positional First World War and were decisive in the Great Patriotic War.
The article presents dozens of master classes on how to draw a tank step by step for younger and older children. In 1916 these fighting vehicles were very clumsy, but in the next century tanks made static wars a thing of the past and truly defined their place in history! Here you will find lessons on how to draw tanks from different historical periods with a pencil. Mainly, of course, combat vehicles of the Soviet army and other countries of the Second World War. There are also instructions on how to draw an armored personnel carrier , infantry fighting vehicle, BRDM and some types of small arms. There are coloring pages of tanks for children and examples of applications for the little ones.
How to draw an armored personnel carrier
Armored personnel carriers are armored fighting vehicles for maneuvering infantry. With firing ports, soldiers can fire at the enemy from the middle of the vehicle. The armored personnel carrier is mainly used to coordinate tank operations. Here is a step by step tutorial that will teach you how to draw this cool technique, very simply.
If kids like it, have them try the steps shown in the step-by-step photos.
Draw three large circles and then a small circle inside each one. These are wheels.
Draw the body of the combat vehicle with an acute angle on the left, then the turret of the heavy machine gun.
There are four rectangles of different sizes on the body. Finally, just paint and the armored personnel carrier is ready.
Photo source: www.cuteeasydrawings.com/pictures/How-to-Draw-an-Infantry-Fighting-Vehicle-Easy-Step-by-Step-for-Kids-1743.html
Or here's another way to draw an armored personnel carrier with a pencil .
This 3D drawing is a little more complex.
Photo source: winx-fan.ru/poetapno/risunok-poetapno-tank-kak-narisovat-tank-t-34-kak-risovat-voennuyu-texniku-karandashom-poetapno.html
Tank with a tank driver for the little ones
Let's start with a simple drawing, which will include a tanker. We use markers and felt-tip pens for coloring. Let's get started:
- At the bottom of the sheet we draw a large oval. Inside it we add the same figure, but smaller.
Here we will begin to depict the caterpillar. - Inside the small oval we draw small circles on the sides and put dots inside. In the center we add circles of larger diameter and also place a point in the center.
- We add a semicircle above the caterpillar; this is the tower in which the tanker will be located. Add a thin rectangle at its top. A narrow oval, which is located vertically, denotes the open hatch cover.
- The combat vehicle lacks a muzzle. In front of the tower we draw a small semicircle. We draw two parallel lines and slightly lift them up. We shape the end of the barrel in the form of an oval.
- At this stage, you can indicate the shot that comes out of the muzzle. We draw two arcs near the barrel. On the left we will depict clouds of smoke in waves.
- Now, using a thin marker, draw a tanker near the hatch. It will be located sideways to us. Draw the nose and outlines of the mouth. Cover the top of the head with a semicircular helmet. We denote the eye with a dot. You can draw a star on the tank turret.
- The picture is ready, all that remains is to color it. The main part of the car will be dark green. For the caterpillar you will need a brown and gray felt-tip pen. Gray will be needed for the manhole cover and smoke.
Drawing is complete.
Tiger
Next, we’ll look step by step at how easy it is to draw a tiger tank with a pencil. This is a German tank from the Second World War.
1. Draw the main contours of a tiger tank with a strongly protruding gun.
Stage 1: outline the contours of the Tiger tank
2. We designate the main parts of the tiger tank, the rollers and the barrel, as well as smaller parts.
Stage 2: designate the main parts of the tank
3. Add parts for attachments. We outline the chassis.
Stage 3: finishing the attachments and wheels
4. Shade the tank, tint individual parts, add volume to the tiger tank.
Stage 4: shade the tank
Video instruction
Mouse
Tank Mouse is also easy to draw with a pencil. Here's how to do it step by step.
1. Draw a rectangle with rounded edges. On top we draw a trapezoid – the body of a Mouse tank.
Stage 1: depicting the basics of the tank
2. On top of the hull we draw the turret of the Mouse tank: we draw a trapezoid, rounded on the left side. Nearby we draw another semicircle, and from it - a cannon.
Stage 2: draw the tower, cannon and wheels
3. At the next stage we depict the hatch, tracks and spare tank.
Stage 3: finishing drawing the hatch and tracks
4. At the end, we decorate the Mouse tank with symbols in the form of a cross.
Stage 4: painting the Mouse tank
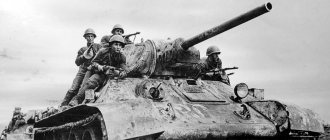
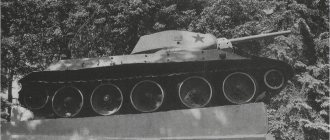
Drawing the T34 tank
We have already made a tank from paper and plasticine, now let's try to draw it. Let's depict the well-known T-34 tank. A preschool child, even one who has not tried to draw, can easily handle such a drawing. The main task of the parents is to help the baby and the child will get a wonderful drawing.
For creativity we need a sheet of paper, a felt-tip pen or a pencil. By the way, it’s better to draw with a pencil, because if you make a mistake, you can always correct it with an eraser. This is important for beginning artists who, if they get a bad result, stop drawing.
How to draw a T-34 tank for beginners:
- We begin our creativity by drawing five identical circles on a sheet of paper.
In these circles, approximately in the center, we draw the same number of circles, but very small ones. - To the drawn figures, rising a little higher, we will add another smaller circle. These figures are located on both sides of our chassis.
- Next, we need to circle our drawing. The contours are rounded on the sides, and we get tracks.
- In the middle of the tracks, on the side of the wheels, we place spikes inside along the perimeter, with which they cling to the wheels when driving. You have learned how to draw a tank, or more precisely, its chassis, now let’s start drawing the body.
- We draw the contours of the wings in front and behind. Stepping back a little, draw a slash from the edge of the segment. At the end of the line we draw a horizontal stripe again.
- Stepping back a little from the edge of the line, we draw a rectangle, it acts as a barrel located at the back. The barrel needs to be drawn with dashes. From the middle of the barrel, draw a small line, draw a circle and lower the line to the caterpillars.
- Approximately in the middle of our drawing, draw a thin strip. It will be the base of the tower. At the beginning of the strip we draw an arc, draw a horizontal segment, make the end of the segment with an oblique line, and connect it with a small line. We divide the top in half with a vertical strip, draw a thin arc in front, and proceed to the image of the cannon.
- The T-34's gun comes in different calibers, which means that you choose the length and thickness of the rectangle in any order. To complete our drawing, we draw a hatch on top.
- On the body we draw an antenna, in front of the body we draw a machine gun. If you wish, you can also depict a star. To highlight certain parts of a combat vehicle, you can outline the outline of one or another part.
- Let's color our drawing. For these purposes, it is better to use oil pastels. We paint the hull, turret and wheels light green. Paint with dark green in the second layer. If the star is drawn, paint it red. We use brown to complete the camouflage coloring. At the end we depict earth or grass.
The drawing is ready. We figured out how to draw a Soviet T-34 tank.
There are several more interesting options that are no less famous.
Model selection
You can choose good tank models in computer games. Screenshots are used for this. For greater artistic expressiveness, you can draw a turret hatch and a tank driver.
Cartoon tank
And now we propose to draw a combat vehicle from a cartoon about tanks based on the game World of Tanks. Prepare a simple pencil or marker for drawing outlines and the brightest felt-tip pens for coloring. Let's move on to step-by-step drawing:
- First we draw the round eye. We draw a wide arc and add a large semicircle to it at the top.
We place a small round pupil inside and immediately paint over it, leaving a highlight. - Draw a large eyebrow above the eye. It looks like a rectangle, but we make the right side a little narrower. Under the eye we draw a mouth, these are two lines that we connect to the right in the corner. Inside we will draw teeth with stripes. It turned out to be an angry grin.
- Starting from the eyebrow, draw the right side of the tower; it is curved at the top and slightly rounded at the side. On the left we will finish the rest of the part. It is an elongated semi-oval at the top and an arc at the bottom.
- Add small details to the top of the tower. We depict them using horizontal and vertical rectangles.
- Let's move on to the barrel. On the right side of the tower, we add the base of a military weapon using arcs of different sizes. We draw two long horizontal lines and draw the end of the barrel.
- Now it's time to depict the caterpillar. Below we draw two horizontal lines. We place them parallel and at a short distance.
- The main part of the track will be level at the top and bottom. We make the sides at a slight angle. Inside, closer to the bottom, we denote round wheels. We add elongated semi-ovals to them.
- Let's add a few more large circles on the sides and small ones at the top. Let's fill them out. We will make additional strokes inside and divide them into cells with small strips.
- The finishing touches. Where our character’s nose is, we’ll draw additional details decorating it. We draw the outlines with a thick marker and move on to coloring.
Painting this tank is easy. Here you will need a dark green color for its upper part, light green for the eyes. We use gray and brown for the track and barrel. Please note that we leave the bottom part of the picture white. Ready.
Tank KV-2 in pencil
An equally famous Soviet tank, which also went through the war and performed well there, is the KV-2. This is exactly what megamaster.info suggests drawing. Let's do the work with a simple pencil. This tank model is a little more difficult to draw, but the result will exceed your expectations. If you have ever drawn a car, then in this lesson you will not find anything complicated. The main task of a novice artist is to adhere to the requirements and strictly follow the instructions.
How to draw a tank with a pencil:
- Place the sheet in a horizontal position.
We step back a couple of centimeters from the middle and draw a vertical line. We continue the line with a horizontal segment, drawing a line upward, wrapping the pencil and directing the line to the center. Having reached the middle of the sheet, we lower the line to the lower level of the first segment and connect them. - From the edge of the resulting tower, draw a strip down, turn it to the right side and draw a segment approximately the same size as the tower. We depict a viewing window at the front. We complete the platform for the cannon, as shown in the picture.
- Starting from the middle of the drawn part, draw two long lines. At their end, we draw two circles. They are located inside each other. We figured out how to draw a tank turret step by step, now let's start drawing the hull and tracks.
- From the image of the platform, at the corners we draw one short slash and another long one. We connect slashes, horizontal ones, and near the long line we depict something like a machine gun. We finish drawing the wing of the caterpillars on the same side. Next we make two arcs on the right side of the body and two on the left side.
- Draw horizontal lines near the arcs, as shown in the picture. We bring out the ring with the cable on the right side. On the left side we draw a line to the arcs. At the back we round the line upward and draw a wavy edge around the tracks.
- We complete the spare fuel tank on the same side and complete the rear part, as shown in the picture. We draw a viewing window in front, and finish drawing the tensioned cable on the left side. Let's draw a headlight. We depict inspection hatches.
- Next, let's start depicting the caterpillars. First we draw the wheel near our arcs in front. We depict wheels along the entire length of the caterpillar from below. It is imperative that they be voluminous, as shown in the picture. In the rear corner of the chassis we designate a roller, add several small rollers on top, and make hooks with which the equipment can move. Finishing the small details.
- Let's start shading. We start shading from the top. Next, we shade the body. We complete our drawing by shading the caterpillars.
Ready! Of course, for some it is difficult to draw such a technique, but with patience and perseverance, even a novice artist who studies in elementary school can cope with the drawing.
In addition, you can also draw a military helicopter
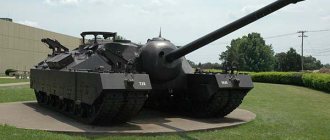
Principles of depicting the hull and turret
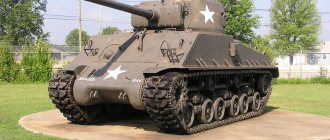
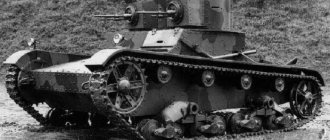
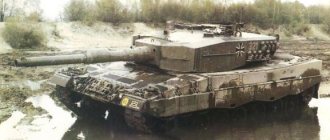
When depicting a tank hull, you should remember which school of tank building it belongs to. The Soviet one leans towards a low silhouette, sharp lines of armor. Western for the most part advocates a free layout with large vehicle sizes.
If your child is just starting to become interested in technology. It is not necessary to strictly follow this principle. The kid can show his imagination and draw his own car. The drawing method will be useful, it will make the process fast and fun, and will help avoid mistakes.
- You can take the already drawn chassis as a basis.
- Parallel to the line of the tracks, stepping back a little higher, the side, front and rear wings of the tank, armor plates with rivets along the edges are depicted.
- At the rear there is a slightly raised engine compartment with an exhaust pipe and a cooling mesh.
- On some tank models, the upper part of the tracks is covered with side armor, up to half the height of the chassis. After drawing the armor, the covered part is erased with an eraser.
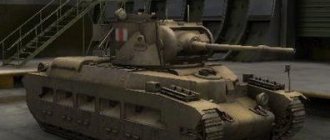
- The turret can be located at the front, rear or center of the tank. Its dimensions vary from small (up to ¼ of the length of the body) to half and even more.
- The height of the turret depends on the armored vehicle model. There are options with low, slightly protruding ones, like Soviet technology, and vice versa, with outstanding and high ones, like Western ones.
- You can draw additional elements on the turret - a commander's hatch, a machine gun mount, a searchlight, an antenna.
- In the front part there is a gun mantlet - a compacted layer of armor, followed by the gun itself. To draw it, you need to be guided by real images so that the picture turns out natural.
- For the cannon you need to draw two straight parallel lines. Often, a round or rectangular thickening is depicted at the end - a muzzle brake. The thickening in the middle of the barrel length is the ejector, which serves to discharge powder gases.
- The length of the barrel is proportional to the length of the turret, which should be taken into account when working.
After completing the basic elements, you can detail the surface by applying camouflage, damage and abrasions, and painting with the addition of distinctive features of the state.
An interesting method would be a graphic dictation, where a starting point is given on a sheet of paper in a box, from which, following the assignment, the silhouette of an armored vehicle is drawn. This tank does not pretend to be detailed, but for children this activity will be exciting and educational.
Drawing small elements
First the track is tracked. Then the final drawing of the details of each wheel of the tank is completed, for which a stroke is added to the previous contours.
The outer wheels should have teeth, thanks to the engagement of which the movement of the equipment is carried out. It is necessary to further clarify all the hatch details and carefully review everything that can still be completed on the hull part.
For many tankers, there was often a need to install additional fuel barrels.
Using anchor points
Drawing steps:
- The tower's base point is located above the center of the first road wheel.
- The other point is located above the center of the middle road wheel. Both points are located a few millimeters above the tank hull.
- By connecting the dots, you can get the base of the tower.
- A circle (the forehead of the tower) is drawn above the center of the left skating rink, touching the base.
- The rear part of the tank turret is drawn in the same way. In this case, the diameter of the circle should be one and a half times larger.
- The roof of the tower is obtained by connecting the upper points of the circles.