Techniques and rules of small arms shooting
Weapons
Techniques for shooting small arms include: positioning, aiming, releasing the trigger and organizing breathing when shooting.
Manufacturing. Proper preparation for shooting ensures the stability of the weapon, which affects shooting accuracy. The preparation includes taking the shooting position, loading the weapon, and loading the weapon.
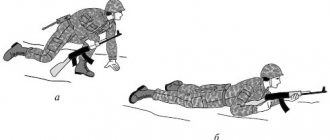
To assume a prone shooting position with a small-caliber rifle, you must, holding the rifle in your right hand with the muzzle forward, take a full step forward and slightly to the right with your right foot. Lean forward and get down on your left knee. Then, leaning your left hand on the ground, consistently lower yourself onto the thigh of your left leg and the forearm of your left hand. Lie on your left side and quickly turn onto your stomach, spreading your legs slightly to the sides with your toes facing out. In this case, the body is located at an angle of 25–30° to the firing plane. The rifle is placed with the fore-end on the palm of the left hand (Fig. 53). To load a small-caliber rifle, you need to open and pull back the bolt with your right hand, take the cartridge by the cap with the thumb and forefinger of your right hand and insert the bullet into the chamber; push the cartridge forward with your thumb until the rim of the cartridge case hits the end of the barrel stump; close the shutter with your right hand.
To attach a small-caliber rifle, the left hand, bent at the elbow, must be moved forward so that the rifle with the lower plane of the fore-end rests on the palm of the hand closer to the flesh of the thumb. The fingers of the left hand only lightly, without the slightest tension, touch the forend of the rifle. The right hand should slightly clasp the neck of the stock, and the index finger rests with the first joint on the trigger. The middle of the butt plate should rest against the notch of the shoulder.
To give the weapon greater stability when shooting from a prone position, you can use a rest. Bags of sand or sawdust 20–25 cm high are used as a stop.
The shooter finds the correct position of the body relative to the stop by slightly moving the body forward or backward until it reaches a position that is comfortable for itself. If this cannot be achieved, you need to adjust the height of the stop and repeat the preparation technique.
All standards for sports shooting prone without support are performed using a rifle belt.
The correct position depends on the position of the body, legs, arms and head of the shooter. And the stability of the weapon, in turn, depends on the correct attachment.
When shooting prone, there must be a certain angle between the shooter’s body and the shooting plane. The amount of body displacement to the left from the direction of fire depends on the physique of the shooter. If the arms are short, then it is advisable to position the body at a greater angle to the direction of fire, if long, at a smaller angle. Typically, the angle between the body and the direction of fire ranges from 25° to 30°.
The head should be tilted slightly forward and, without straining the neck, the right cheek should be lightly pressed to the butt. In this case, the right eye should be at the level of the sight and 25–30 cm from it, or at such a distance that would allow the shooter to see the sight slot and the front sight most clearly and always uniformly. The butt plate of the butt should fit snugly in the middle of the shoulder.
Aiming is a set of actions by the shooter designed to give the bore of a weapon a position in space that ensures that the bullet flies in the desired direction and at the required distance. These actions are performed using a sight and front sight.
In order to maintain uniformity of positioning and positioning throughout the shooting, the initial aiming of the weapon at the target should be done not with the hands, but by moving the body, without changing the position of the left hand. If the weapon is aimed low, then the body must be moved back. If the weapon is pointed high, the body moves forward. When the body and legs move to the right, the barrel of the weapon moves to the left, and when the body moves to the left, the barrel moves to the right.
It is useful to close your eyes and relax your muscles after you have finished roughly aiming the weapon in the direction of the target. Then, opening your eyes, look where the weapon is pointed, and, if necessary, correct the rough aiming.
To aim (Fig. 54), you need to close your left eye and look through the slot of the sight at the front sight with your right eye so that the front sight is strictly in the middle of the slot, and its top is level with the upper edges of the mane of the sighting bar. This is called taking an even front sight
; she must be held. Then, holding your breath as you exhale, bring the front sight straight to the aiming point, while simultaneously pressing the trigger.
If the front sight is shifted away from the middle of the slot, as well as above or below its edges, accurate shooting will not work (Fig. 55). In this case, the greater the error in the position of the front sight relative to the sight slot, the greater will be the deviation of the bullets from the aiming point. In all cases, the bullets are deflected in the direction of the front sight displacement.
Pulling the trigger is one of the most important and critical elements of shooting technique. Place the index finger of your right hand on the trigger with the first knuckle and press smoothly and straight back. If you apply the finger with the second joint, then the pressure will occur to the left and back, as a result of which the weapon will shift to the left. To release the trigger, you must, holding your breath, smoothly press the trigger until the trigger, unnoticed by the shooter, is released from the cocking position, i.e. until the shot is fired.
While aiming and releasing the trigger, you must hold your breath . The most appropriate moment to hold your breath is at the end of your exhalation. You should first make a rough aim, take a deep breath, and then, slowly exhaling, perform a fine aim while simultaneously smoothly pressing the trigger to eliminate its backlash. Refining the aim and holding his breath at the end of the exhalation, the shooter, continuing to smoothly press the trigger, fires a shot.
Techniques and rules for shooting from a machine gun . Firing from a machine gun consists of preparing to fire, firing (shot) and stopping shooting.
Firing preparation includes taking the shooting position and loading the machine gun. When firing from a standing position, the machine gunner assumes a shooting position while standing, kneeling, or lying down, depending on the terrain conditions and enemy fire. While on the move, the machine gunner can fire without stopping or with a short stop. Preparation for firing is carried out at the command of the commander or independently. Guided by the general rules for performing shooting techniques and taking into account their individual characteristics, each machine gunner develops and applies the most advantageous and stable positions for shooting, achieving a uniform position of the head, body, arms and legs.
Firing includes installing the sight, setting the translator to the required type of fire, placing the gun, aiming, releasing the trigger and holding the machine gun while firing. Depending on the task and the situation, fire is carried out at the command of the commander or independently. The command to open fire usually specifies who to shoot, the target, the sight and the aiming point. When shooting at targets at ranges up to 300 m, the sight and aiming point may not be indicated.
When firing in bursts, you must firmly hold the butt of the machine gun in your shoulder, without changing the position of your elbows, keeping the front sight leveled under the selected aiming point. When shooting from a prone position, it is allowed to rest the machine gun with its magazine on the ground.
Depending on the situation, the cessation of shooting can be temporary or complete. To temporarily stop firing, the command “Stop” or “Cease fire” is given. Following these commands, the machine gunner stops pressing the trigger, puts the machine on safety and, if necessary, changes the magazine. To completely stop firing, after the command “Stop” or “Cease fire,” the command “Unload” is given. At this command, the machine gunner puts the safety on the machine gun, sets the “P” sight and unloads the machine gun.
The sight and aiming point are selected by the machine gunner in such a way that when firing, the average trajectory passes through the middle of the target. When shooting at a distance of up to 300 m, fire should be carried out, as a rule, with a 3 or “P” sight, aiming at the lower edge of the target or the middle if the target is high.
When shooting at ranges exceeding 300 m, the sight is set according to the distance to the target, rounded to the nearest hundred meters. The aiming point is usually taken to be the middle of the target. If the conditions of the situation do not allow changing the sight setting depending on the distance to the target, then within the range of a direct shot, fire should be carried out with a “P” sight, aiming at the lower edge of the target.
1. Tell and show how to properly prepare for shooting prone from a small-caliber rifle. 2. Talk about aiming. What mistakes happen when aiming, what do they lead to? 3. Why is there a permanent installation of the “P” sight on the sighting bar of the Kalashnikov assault rifle?
Throwing hand grenades
During classes and exercises, grenades are thrown at the command of the commander (training leader), and in battle - depending on the situation, either on command or independently. Throwing a grenade consists of the following techniques: preparing for throwing (loading and taking the appropriate position) and throwing the grenade.
Loading a grenade . Loading a grenade is carried out by the command “Prepare grenades”, and in battle, in addition, independently.
To load a hand-held fragmentation grenade, it is necessary (Fig. 56) to remove the grenade from the bag with your left hand, and unscrew the cap from the body tube with your right hand. Then, holding the grenade in your left hand, remove the fuse from the bag’s socket with your right hand. Insert the fuse into the central tube and screw it in until it stops. The grenade is ready to be thrown.
Throwing a hand fragmentation grenade . Throwing a grenade is carried out from various positions: standing, kneeling, lying down, as well as in motion from an infantry fighting vehicle (armored personnel carrier) and on foot (offensive only). To throw a grenade, a place is selected and a position is taken so that the throw can be made without interference, i.e. so that there are no tree branches, tall grass, wires or other obstacles in the grenade’s flight path.
Throwing a grenade is carried out by the command “Grenade - fire”, and in battle, in addition, independently.
To throw a grenade, you need to take the grenade in your hand and press the trigger lever firmly against the grenade body with your fingers (Fig. 57). Continuing to press the trigger lever tightly, with the other hand squeeze (straighten) the ends of the safety pin; holding the trigger lever in a pressed position, pull out the safety pin by the ring; swing and throw a grenade at the target (when throwing a defensive grenade, take cover immediately after the throw).
When throwing a grenade while walking or running (Fig. 58), it is necessary, holding the grenade in the right half-bent hand, and the weapon in the left, to pull out the safety pin. With a step with your left foot, bring your hand with the grenade forward and down. In the second step (with the right foot), the arm continues to move in an arc downwards and backwards while simultaneously turning the body to the right. On the third step, placing your left leg towards the target on your toe and bending your right leg at the knee, finish turning your body and swinging your arm. Using the speed of movement, consistently put the strength of your legs, body and arms into the throw, throw a grenade, carrying it over your shoulder.
To throw a grenade from a trench or trench (Fig. 59), you must place the weapon on the parapet, take the grenade in your right hand and pull out the safety pin; move your right leg back (as far as possible); bending at the waist and slightly bending both legs, move your right hand with a grenade back to failure; leaning on your left hand, straighten up sharply and throw a grenade at the target, and then take cover in a trench (trench).
To defeat enemy personnel located in a trench (trench), you need to throw a grenade at an angle to the horizon of approximately 35 - 45° so that the grenade falls into the trench along an overhead trajectory and rolls less over the trench.
Throwing a hand-held anti-tank (cumulative) grenade . Throwing a grenade consists of performing the following techniques: preparing for throwing (loading a grenade and taking the appropriate position) and throwing a grenade. Loading a grenade is carried out by the command “Prepare cumulative grenades”, and in battle, in addition, independently.
Throwing an anti-tank grenade is carried out from a standing position and from a kneeling position (from a lying position, rising to the knee) only from behind a vertical cover or from a trench, crater, etc.
Considering the weight of the anti-tank grenade, the swing should be made more calmly, and the throw should be performed at a gradually increasing speed. The throw is made with great force along a flat trajectory. Having thrown a grenade, you must immediately take cover, without waiting for it to hit the target or fall to the ground.
1. In what sequence is a hand fragmentation grenade prepared for throwing? 2. Show the sequence of performing grenade throwing techniques in motion and from a trench (trench). 3. What are the features of throwing an anti-tank hand grenade?
Chapter VII. DRILL
Drill training is organized and conducted on the basis of the Drill Regulations of the Armed Forces of the Republic of Belarus. During drill classes, students are instilled with accuracy, discipline and attentiveness, and the ability to perform single drill techniques and act as part of a unit is developed. Drill training is improved in physical, tactical training and other classes, during formations, movements and in everyday life.
Construction and management
To successfully perform techniques and actions in formation, the student must have an understanding of the formation, know its elements, the order of commands, responsibilities before the formation and in the formation.
Build. Elements of building . Formation is the placement of military personnel, subunits and military units established by the Charter for their joint actions on foot and in vehicles.
A line is a formation in which military personnel are placed one next to the other on the same line.
Flank - the right (left) end of the formation. When the formation rotates, the names of the flanks do not change.
Front - the side of the formation in which the military personnel face (vehicles - with the frontal part).
The back side of the formation is the side opposite to the front.
Interval – the distance along the front between military personnel (vehicles), units and military units.
Distance – the distance in depth between military personnel (vehicles), units and military units.
The width of the formation is the distance between the flanks.
The depth of the formation is the distance from the first line (the soldier in front) to the last line (the soldier behind), and when operating on vehicles, the distance from the first line of vehicles (the vehicle in front) to the last line of vehicles (the vehicle behind).
A two-rank formation is a formation in which servicemen of one rank are positioned behind the heads of servicemen of another rank at a distance of one step (an outstretched arm placed with the palm of the hand on the shoulder of the soldier in front). The ranks are called first and second. When the formation is rotated, the names of the ranks do not change. Four people or less are always lined up in one line.
Row – two military personnel standing in a two-rank formation behind each other’s heads. If the soldier in the first rank is not standing behind the head of the soldier in the second rank, such a row is called incomplete; the last row should always be complete. When turning a two-rank formation in a circle, a soldier in an incomplete row moves into the line in front.
Single-rank and double-rank systems can be closed or open. In a closed formation, military personnel in ranks are located along the front from one another at intervals equal to the width of the palm between the elbows. In open formation, military personnel in ranks are located along the front from one another at intervals of one step or at intervals specified by the commander.
Column - a formation in which military personnel are located behind each other's heads, and units (vehicles) are located one after another at distances established by the Charter or the commander. Columns can be one, two, three, four or more. Four people or less line up in a column one at a time. Columns are used to build subunits and military units in marching or deployed formation.
Deployed formation - a formation in which units are built on the same line along the front in a single-rank or double-rank formation (in a line of vehicles) or in a line of columns at intervals established by the Charter or the commander. The deployed formation is used for verification, calculations, inspections, parades, as well as in other necessary cases.
Marching formation - a formation in which a unit is built in a column or units in columns are built one after another at distances established by the Charter or the commander.
The guide is a soldier (unit, vehicle) who moves as the head in the indicated direction. The rest of the military personnel (units, vehicles) coordinate their movement according to the guide.
The trailing one is the soldier (unit, vehicle) who moves last in the column.
Formation control . The formation is controlled by commands and orders, which are given by the commander by voice and signals, and also transmitted using technical and mobile means. Commands and orders can be transmitted along the column through unit commanders (senior vehicles) and designated observers.
The team is divided into preliminary and executive; teams can only be executive ones.
The preliminary command is given clearly, loudly and drawlingly, so that those in the ranks understand what actions the commander requires of them. At any preliminary command, servicemen who are in and out of formation on the spot take the position “at attention”, and when moving, they place their feet more firmly.
The executive command is given after a pause loudly, abruptly and clearly. When an executive command is given, it is carried out immediately and accurately.
In order to attract the attention of a unit or individual serviceman, the name of the unit or the rank and surname of the serviceman is called out in the preliminary command, if necessary. The voice when giving commands should be commensurate with the length of the formation, and the report should be given clearly, without a sharp rise in voice.
To cancel or stop the reception, the "RESERVE" command is issued. This command returns to the position that was before the technique was performed.
During training, it is allowed to perform the techniques specified in the Charter, as well as turns and movement along divisions. For example: “To the right, by division: do – ONCE, do – TWO.”
To participate in parades, as well as in other cases, a unit, by order of the commander, can be built in a common column of three, four or more. In this case, the construction is carried out according to height (ranking).
Responsibilities before formation and in formation. The serviceman is obliged:
· check the serviceability of your weapon, the combat and other equipment assigned to it, ammunition, personal protective equipment, entrenching tools, uniforms and equipment;
· have neat hair and a neat appearance;
· tuck in the uniform, put on and fit the equipment correctly, help a friend eliminate any noticed deficiencies;
· know your place in the ranks, be able to quickly take it without fuss; while moving, maintain alignment, the established interval and distance; do not disable (the machine) without permission;
· in the ranks, do not talk without permission, be attentive to the orders (instructions) and commands (signals) of your commander, quickly and accurately carry them out, without interfering with others;
· transmit orders, commands (signals) without distortion, loudly and clearly.
1. Tell us about the elements of the system. 2. What types of systems do you know? 3. How are commands given by the commander, what should a soldier do according to a preliminary and executive command? 4. Name the responsibilities of a soldier before formation and in formation.
Main menu
Share the news with your friends
General provisions
To successfully complete tasks in battle you must:
- continuously monitor the battlefield;
- quickly and correctly prepare data for shooting;
- skillfully fire at all kinds of targets in various combat conditions, both day and night; to hit group and most important single targets, use concentrated fire;
- observe the results of the fire and skillfully adjust it;
- monitor the consumption of ammunition in battle and take measures to replenish them in a timely manner.
Battlefield surveillance and target designation
Observation is carried out in order to timely detect the location and actions of the enemy.
In addition, in battle it is necessary to observe the signals and signs of the commander and the results of his fire.
Unless there are special instructions from the commander, the soldiers conduct surveillance in the sector of fire indicated by them.
When the target moves at an acute angle to the direction of fire, the lead is taken to be half that indicated in the table.
When the target moves at a speed greater (smaller) than indicated in the table, the lead increases (decreases) in proportion to the change in the speed of the target.
Fire at a target moving at an angle to the direction of fire is carried out by tracking the target or by waiting for the target (fire attack).
When firing by tracking a target , the machine gunner (machine gunner), taking the required lead and moving the machine gun (machine gun) in the direction of the target's movement, at the moment of the most correct aiming, fires in short or long bursts, depending on the firing range and the speed of the target.
When firing by waiting for the target (fire attack), the machine gunner (machine gunner) takes aim at a point chosen in front of the target, and as the target approaches this point by one and a half to two table leads, firmly holding the machine gun (machine gun), fires a long burst; then, if the target is not hit, selects a new aiming point in front of it, takes aim, and when the target approaches it by the amount of the required lead, fires a long burst again, etc. If, when firing from a machine gun, the lead is taken using the rear sight, fire opens when combined equal front sight with the middle of the target.
Targets spotted on the battlefield must be immediately reported to the commander and their location correctly indicated. The target is indicated by verbal report or tracer bullets.
The report should be short, clear and precise, for example: “There is a wide bush straight ahead, a machine gun to the left”; “The second landmark, two fingers to the right, under the bush there is an observer.”
When designating targets with tracer bullets, fire one or two short bursts in the direction of the target.
Target selection
For machine guns (machine guns), the most typical are living targets - crews of machine guns and guns, groups of shooters or individual figures firing from various positions, as well as manpower on cars, motorcycles, etc. In addition, fire from machine guns (machine guns) It is also carried out against air targets. Targets on the battlefield can be stationary, appear briefly, or move.
. A machine gunner (machine gunner) fires in combat, usually as part of a squad or platoon, destroying targets assigned to him by the commander. Therefore, he must listen carefully and accurately carry out all the commands of the commander.
. If a machine gunner (machine gunner) in battle is not given a target to hit, he chooses it himself. First of all, it is necessary to hit the most dangerous and important targets, for example: the crews of machine guns and guns, enemy commanders and observers. Of two targets of equal importance, choose the closest and most vulnerable one for shelling. If a new, more important target appears during shooting, immediately transfer fire to it.
Selecting a sight, aiming point and rear sight
To select a sight, aiming point and rear sight, it is necessary to determine the range to the target and take into account external conditions that may affect the range and direction of the bullet. The sight, rear sight and aiming point are selected in such a way that when shooting, the average trajectory passes through the middle of the target.
When shooting at a distance of up to 400 m, fire should be carried out, as a rule, with a sight of 4 or “P” and entirely 0, aiming at the lower edge of the target or in the middle if the target is high (running figures, etc.).
When shooting at ranges exceeding 400 m, the sight is set according to the distance to the target, rounded to whole hundreds of meters, and the rear sight is 0. As a rule, the middle of the target is taken as the aiming point. If the conditions of the situation do not allow changing the sight setting depending on the distance to the target, then within the direct shot range, fire should be carried out with a sight corresponding to the direct shot range, aiming at the lower edge of the target.
The range to targets is determined by the eye. In this case, the range to targets and local objects is determined by sections of the terrain that are well imprinted in visual memory, by the degree of visibility and apparent size of targets (objects), as well as by a combination of both methods.
When determining ranges by segments of terrain, it is necessary to mentally set aside some familiar range, which is firmly entrenched in visual memory (for example, a segment of 100, 200 or 300 m), from yourself to the object (target).
When determining the range by the degree of visibility and apparent size of objects (targets), it is necessary to compare the visible size of the target with the visible sizes of this target imprinted in memory at certain distances.
If a target is detected near a landmark or local object, the range to which is known, then when determining the range to the target, it is necessary to take into account its distance from the landmark by eye.
At night, the range to illuminated targets is determined in the same way as during the day.
When determining the range with an eye, the following must be taken into account:
- the apparent size of the same section of terrain gradually decreases as it moves away from the machine gunner or machine gunner (in the future);
- ravines, hollows, rivers that cross the direction of a local object or target conceal (reduce) the range;
- small objects (bushes, stones, individual figures) seem further away than large objects located at the same distance (forest, mountain, column of troops);
- a single-color, monotonous background of the area (meadow, snow, arable land) highlights and, as it were, brings closer the objects located on it if they are colored differently, and a motley, varied background of the area, on the contrary, masks and, as it were, removes the objects located on it;
- on a cloudy day, in rain, at twilight, in fog, the distances seem increased, and on a bright, sunny day, on the contrary, they appear decreased;
- in mountainous areas, visible objects seem to come closer.
A significant deviation of external conditions from the table (normal) changes the flight range of the bullet or deflects it away from the direction (plane) of fire. The following shooting conditions are taken as the following: air temperature +15° C, absence of wind and terrain elevation above sea level, target elevation angle no more than 15°.
A deviation of the air temperature from the table (+15° C) causes a change in the flight range of the bullet, increasing it when shooting in summer conditions and decreasing it in winter. The flight range of a bullet when shooting in summer conditions increases slightly, so you should not make adjustments to the sight or to the position of the aiming point. The flight range of a bullet when shooting in winter (at low temperatures) at a distance of over 400 m decreases by a significant amount (50-100 m), therefore, it is necessary to select the aiming point at the upper edge of the target at air temperatures above -25ºС, and at air temperatures below - 25°C increase the scope by one division.
Corrections to the sight installation for the elevation of the terrain above sea level and the elevation angle of the target are taken into account only when shooting in the mountains, if the distance to the target is more than 400 m.
Side wind has a significant effect on the flight of a bullet, deflecting it to the side. The amount of bullet deflection depends on the speed and direction of the crosswind and the distance to the target. The stronger the side wind, the closer to 90° the angle at which it blows, and the further away the target, the greater the amount the bullet will deflect away from the direction of fire. In this regard, it is necessary to correct for side winds. It is taken into account when shooting from a machine gun by setting the aiming point in target figures or meters, when shooting from a machine gun - by setting the rear sight in thousandths. If the situation in battle does not allow for adjustments to the rear sight, then correction for side winds when firing a machine gun is taken into account by moving the aiming point out. The correction for side wind is taken in the direction from which the wind is blowing. So, when there is wind from the left, the aiming point is moved (the rear sight is set) to the left, when there is wind from the right - to the right.
The correction values for moderate side wind (speed 4 m/sec) in meters, human figures and rear sight divisions are given in the following table.
The table corrections for strong winds (speed 8 m/sec) must be doubled, and for weak winds (speed 2 m/sec) they must be halved. When the wind blows at an acute angle to the shooting plane, take half the correction as when the wind blows at an angle of 90°.
Choosing the moment to open fire
The moment to open fire is determined by the commander’s “Fire” command, and when firing independently, depending on the situation and the position of the target.
The most advantageous moments for opening fire: when the target can be hit suddenly at close range; when the target is clearly visible; when the target crowds, exposes the flank or rises to its full height; when the target approaches a local object (landmark), for which the sight setting is specified by shooting; when driving, when the vibration of the car is minimal.
A sudden fire attack on the enemy (especially from the flank) has a stunning effect on him and causes him the greatest defeat.
Conducting fire, monitoring its results and adjusting
When firing, the machine gunner (machine gunner) must carefully monitor the results of his fire and adjust it.
The results of your fire are monitored by ricochets, bullet paths and the enemy’s behavior.
Fire adjustment is made by changing the position of the aiming point in height and lateral direction or by changing the installation of the sight and rear sight. The aiming point is set to the amount of deviation of ricochets or tracks in the direction opposite to their deviation from the target (Fig. 94). If the deviation of bullets from the target in range exceeds 100 m, then it is necessary to change the sight setting by one division. To adjust the fire along the routes, it is necessary that the shooting be carried out with cartridges with ordinary and tracer bullets in the ratio: for three cartridges with ordinary bullets, one cartridge with a tracer bullet, the first should be a cartridge with a tracer bullet. It is not recommended to use cartridges with a tracer bullet in clear weather (bullet traces are poorly visible). Firing only cartridges with a tracer bullet leads to increased wear on the bore.
Removing the aiming point when adjusting fire
Signs indicating the reality of friendly fire can be: enemy losses, his transition from dashes to crawls, dismemberment and deployment of columns, weakening or cessation of enemy fire, his withdrawal or retreat to cover.
Shooting at stationary and emerging targets
Fire at a single clearly visible target in short or long bursts, depending on the importance of the target, its size and distance to it. The more dangerous or the further away the target, the longer the queue should be. The fire continues until the target is destroyed or disappears.
To hit an emerging target, you must, having noticed the place of its appearance, quickly prepare to shoot and open fire. Quickly opening fire is critical to hitting a target. If the target disappeared during preparation for shooting, when it reappears, clarify the aiming and open fire.
When shooting at a repeatedly appearing target, you should keep in mind that it may appear in a new place, so defeating it will depend on attentiveness during observation, the speed of preparing to fire and opening fire.
Hit the emerging target with bursts, quickly following one after another.
A group target, consisting of individual, clearly visible figures, should be fired in bursts, sequentially transferring fire from one figure to another.
A wide target, consisting of unclearly visible figures or a camouflaged one, and a single camouflaged target, should be fired at with bullets scattered along the front of the target (mask) or with a sequential transfer of the aiming point from one flank of the target (mask) to the other.
Shoot at attacking enemy personnel at a distance of 200 m and closer in long bursts with bullets scattered along the front of the target.
The dispersion of bullets along the front when firing is achieved by angular movement of the machine gun (machine gun) along the horizon. The speed of angular movement of an assault rifle (machine gun) when firing with bullets scattered along the front of the target depends on the firing range and the required fire density. In this case, the fire density in all cases should be at least two bullets for every meter of the target front.
Shooting at moving targets
When the target moves towards or away from the shooter at a distance not exceeding the range of a direct shot, fire with the sight set to the range corresponding to the direct shot. At a distance exceeding the range of a direct shot, fire with the sight set corresponding to the range at which the target may be at the moment of opening fire.
When shooting at a target moving at an angle to the direction of fire, the aiming point must be chosen in front of the target and at such a distance from it that during the flight of the bullet the target will move this distance. The distance that the target moves during the bullet's flight to it is called lead. The lead for target movement is taken in target figures or in meters.
When firing from a machine gun, lead can be taken before the start of shooting using the rear sight, while the rear sight moves in the direction of the target's movement and aiming is done at the middle of the target. If shooting conditions do not allow the rear sight to be installed, then the lead is taken in target figures or in meters.
To determine the lead when firing from an assault rifle (machine gun) at a target moving at an angle of 90° to the direction of fire, use the following table.
When the target moves at an acute angle to the direction of fire, the lead is taken to be half that indicated in the table.
When the target moves at a speed greater (smaller) than indicated in the table, the lead increases (decreases) in proportion to the change in the speed of the target.
Fire at a target moving at an angle to the direction of fire is carried out by tracking the target or by waiting for the target (fire attack).
When firing by tracking a target , the machine gunner (machine gunner), taking the required lead and moving the machine gun (machine gun) in the direction of the target's movement, at the moment of the most correct aiming, fires in short or long bursts, depending on the firing range and the speed of the target.
When firing by waiting for the target (fire attack), the machine gunner (machine gunner) takes aim at a point chosen in front of the target, and as the target approaches this point by one and a half to two table leads, firmly holding the machine gun (machine gun), fires a long burst; then, if the target is not hit, selects a new aiming point in front of it, takes aim, and when the target approaches it by the amount of the required lead, fires a long burst again, etc. If, when firing from a machine gun, the lead is taken using the rear sight, fire opens when combined equal front sight with the middle of the target.
The use of tracer bullets when shooting at moving targets provides better observation of the shooting results and the ability to refine the lead.
Related publications:
Equipment for indoor surgery
LIST OF MEDICINES IN A TRAVELING FIRST KIT
Sniper tactics
Preparing to fire. Target selection. Aiming
The difficult conditions and tense environment of modern combat require military personnel to have excellent combat training and high psychological preparation. The fire weapons of modern motorized rifle units are machine guns; sniper rifles; light, single and heavy machine guns; under-barrel, hand-held anti-tank and automatic grenade launchers - allow you to solve a wide range of fire missions: from suppressing enemy manpower and fire weapons to destroying his tanks and low-flying aircraft and helicopters. Accurate, skillfully organized fire of all types of weapons of a motorized rifle unit in combination with fire from assigned and supporting fire assets is the basis for achieving success in battle.
Methods and types of fire must be selected with the expectation of inflicting the greatest destruction on the enemy in the shortest possible time and with the least expenditure of ammunition. The organization of such fire requires from all military personnel a conscious understanding and firm knowledge of the rules of shooting from all types of weapons. Solving this problem is made easier by the fact that, despite some differences in the methods and rules of shooting from certain types of fire weapons, the execution of a fire task from all types of firearms follows a fundamentally identical pattern.
Thus, shooting from any weapon usually consists of three elements: preparing to fire, zeroing in and shooting to kill. For small arms, in most cases, zeroing and shooting to kill proceed as a single stage, while the content and meaning of the rules for shooting from small arms fully reflect the general provisions of the rules for zeroing and shooting to kill from any firearm.
Firing preparation in general has the task of ensuring that fire weapons are ready to open fire in the shortest possible time. This includes the entire range of issues related to the preparation of fire weapons to carry out a combat mission. These issues are usually divided into preliminary preparation of shooting and preparation of initial data for firing at a specific target.
Preliminary preparation includes: study of the area and reconnaissance of targets; selection of location and occupation of firing positions and command and observation posts; preparation of weapons, ammunition, instruments, determination of initial data for firing in areas and boundaries of the probable appearance of the enemy, i.e., all activities carried out before receiving a fire mission from the senior commander or until the discovery of a target to be hit. In the preliminary preparation of firing, the task of timely detection of the enemy, identifying the most important and dangerous targets in his combat formations is of particular importance.
In order to study the terrain and timely detect the enemy, an observation system is being created in all motorized rifle units, which consists of command observation posts, observation posts and observers. The battalion usually organizes one or two observation posts consisting of two to three observers; one or two observers are appointed in the company; in the platoon, squad, crew and crew - one observer each.
The entire strip of terrain in front of the front and on the flanks of the units is distributed between observers and observation posts. They are assigned surveillance bands so that they overlap each other.
The task of the observers is assigned personally by the unit commander from a place from which the entire observation line is visible. In the task, the commander usually indicates landmarks, information about the enemy (what he is doing, where he is or when he is expected to appear), a place for observation, an observation line, what to pay special attention to, and the order of reporting on the results of observation.
Observation is carried out with the naked eye, using binoculars or other optical instruments, and at night - using night vision devices. Observation begins with a detailed study of the terrain in a given zone from right to left, first in the near zone (up to 400 m), then in the middle zone (400–800 m) and finally in the far zone (from 800 m and beyond).
Observers, as a rule, are appointed well-trained and quick-witted soldiers who are able to show restraint and self-control in tense moments of battle. Observers must be familiar with the appearance of typical targets and the signs that can help identify them; notice such “little things” in the observation zone as the swaying of branches and bushes in calm weather, the appearance of new small local objects, changes in the shape, position and color of local objects, etc. At night, the enemy can be detected by sounds, flashes of light - even by the burning of cigarettes, by silhouettes against the background of a bright sky, by the characteristic shadows of military equipment and people when the area is briefly illuminated by lighting means.
Observers must be trained in targeting techniques; their reports of the detected target must be concise, clear and accurate. For example: “There’s a wide bush straight ahead, there’s a machine gun on the right”; “Landmark two, forty to the left, then two hundred - a gun”; “Landmark three, two fingers to the right, closer to fifty - a tank in a trench.”
The second stage of fire preparation begins from the moment the target to be hit is detected, or from the moment the fire mission is received from the senior commander. This stage is the preparation of initial data for firing at a target. This includes choosing a weapon to solve a given fire task, choosing a shooting method and determining the initial settings for opening fire - the sight, the rear sight, the aiming point (the aiming mark - when shooting with optical sights). It is clear that this stage often occurs within a sharply limited time frame, measured in minutes and sometimes seconds.
Motorized rifle units on the offensive fire mainly on the move and from short stops in a constantly changing situation, when decisions and calculations for opening fire must be made in the shortest possible time. On the march, when meeting the enemy, the speed of opening fire is often decisive for the outcome of the battle. Even in defense, when it is possible to prepare in advance the initial data for firing at the lines of the probable appearance of the enemy, it may often be necessary to immediately open fire on suddenly appearing targets.
The speed of making a decision to open fire must be combined with the possible accuracy of determining the initial settings. If, when repelling an enemy attack, small arms fire from close distances can be carried out simply with directed fire without the use of sighting devices, i.e., without any preparation of initial data, then fire at the same target from the depths of the defense of our units must be well calculated, otherwise it will may not only be of little effect, but also dangerous for his units located in front.
In different conditions of shooting at different targets, training can be carried out with varying degrees of accuracy. On this basis, data preparation is divided into complete, abbreviated and visual.
Full preparation and reduced data preparation are basic for artillery shooting. They make it possible to calculate the initial settings for firing with high accuracy, taking into account ballistic and meteorological deviations of firing conditions from the table ones. For firing from small arms, the main method of preparation is eye-based, when the range to the target is determined by eye and corrections for changes in shooting conditions are not taken into account or taken into account approximately.
Since measurement by any method is inevitably accompanied by errors, it is almost impossible to prepare initial data for shooting without errors. If these errors are significant and the target is not hit when shooting at the original settings, then amendments are made to them, i.e., zeroing is carried out. For small arms, this stage of shooting is called fire adjustment.
The easiest way for small arms to adjust fire is by changing the aiming point in height. This method, the most widely used, is based on the fact that a change in the aiming point in height causes a corresponding change in the range of the bullets. Therefore, having received, for example, a flight burst, to reduce the firing range it is enough to lower the aiming point. In all cases, it is advisable to use this method at a distance of less than 500 m against vertical targets.
Correction of fire in the direction for small arms is carried out by moving the aiming point in the lateral direction by the amount of the resulting deviation. For weapons with a rear sight, adjustment of fire direction can be done by changing the rear sight setting. In the first case, the amount of offset of the aiming point is measured in visible figures of the target, in the second case, the rear sight is changed to the angle of deviation of the center of bullet dispersion from the target in thousandths.
Depending on the conditions of shooting and observation during zeroing, you can move from one method of adjusting fire to another in order to determine the most advantageous settings for hitting the target as quickly as possible.
Suppressive fire is conducted with the goal of depriving the enemy of combat capability for a certain period of time. Fire to destroy manpower, fire weapons and military equipment is conducted in order to deprive the enemy of combat capability not only during the shelling, but also after the ceasefire, which is achieved by causing material damage to the enemy.
Suppressive or destructive fire can be used by all types of firearms. Ammunition consumption when firing for destruction is usually two to three times greater than when firing for suppression. Destructive fire is carried out with the aim of rendering defensive structures and barriers unusable and is used by artillery and tank guns.
One type of lethal fire may be barrage fire, used to prevent the enemy from overcoming or occupying a certain line, restricting his maneuver, etc. Barrage fire is widely used by artillery; Barrage fire against air targets is carried out from anti-aircraft weapons and small arms.
Any type of lethal fire is usually controlled by monitoring the gaps and, if possible, adjusted, i.e., in fact, during the lethal fire, the shooting continues.
In the same way, during shooting, they strive to apply such an order and rules of fire that would achieve the greatest probability of hitting the target. Thus, in fact, zeroing and lethal fire may not be separated.
Sergey Monetchikov Photo by Vladimir Nikolaychuk and from the author’s archive
Plan - outline. Topic: Shooting Basics.
INTRODUCTIONFire training is carried out with the aim of training personnel to skillfully use their weapons in various combat conditions.
Firearms training for youth undergoing basic military training includes the following sections: shooting basics; material part of the weapon; shooting techniques and rules; throwing hand grenades; observation in battle and determination of distances.
The basics of shooting
The phenomenon of a shot is studied, as well as the patterns of bullet flight in the air. This is necessary to know in order to master the rules of shooting and competent use of weapons to defeat the enemy in battle.
Material part of the weapon
includes the study of the combat properties, purpose and design of weapons. This is necessary to know in order to properly handle the weapon, preserve it and ensure trouble-free operation when shooting in various conditions.
Learning shooting techniques and rules
necessary in order to learn how to accurately hit with fire stationary, appearing and moving single and group targets at different distances from different positions, in any terrain, weather conditions, at any time of the year and day.
Hand grenade throwing training
aims to teach how to throw hand grenades from different positions at different targets in any conditions of the current combat situation, especially in close encounters with the enemy.
Training in combat observation and determining distances
is carried out to develop skills in observing the enemy, detecting targets, accurately determining the distance to them, correctly choosing a sight and aiming point, as well as adjusting shooting and performing a fire task in the shortest possible time.
The phenomenon of a shot.
A shot is the ejection of a bullet (shell, grenade) from the bore of a weapon by the pressure of gases formed during the combustion of a powder charge.
The shot occurs in a very short period of time (0.001-0.06 s). The impact on the percussion compound of the cartridge primer produces a flame that ignites the powder charge. When a powder charge burns, a large amount of highly heated gases are formed, which create high pressure in the barrel bore, acting in all directions with equal force. Under gas pressure, the bullet moves from its place, crashes into the rifling, moves along the barrel bore with a continuously increasing speed and is thrown outward along the axis of the barrel bore. Hot gases flowing out of the barrel following a bullet, when meeting air, form a flame and a shock wave, which is the source of sound when fired.
Since the rifling in the walls of the barrel is helical, the bullet, moving along the barrel bore, receives a rotational movement.
There are four consecutive periods in a shot (in Fig. 28 these periods are shown graphically).
The preliminary period
lasts from the start of combustion of the powder charge until the bullet casing is completely inserted into the rifling of the barrel.
During this period, a pressure of 2,500-5,000 N/cm2 (250-500 kgf/cm2) is created in the barrel bore, which is necessary in order to move the bullet from its place and overcome the resistance of its shell to cut into the rifling of the barrel.
FIGURE, 28.
Shot periods O boost pressure Рм — highest (maximum) pressure; Pk and Vk are pressure and the speed of the bullet at the moment of complete combustion of the gunpowder; P d and V d - gas pressure and the speed of the bullet at the moment it leaves the barrel; V m - the highest (maximum) speed of the bullet; P atm - pressure equal to atmospheric.
The first,
or main, period lasts from the beginning of the bullet's movement until the complete combustion of the powder charge.
At the beginning of this period, when a bullet travels 4-6 cm, the amount of gases grows faster than the volume of the bullet space (between the bottom of the bullet and the bottom of the cartridge case), the gas pressure quickly increases and reaches its highest value (maximum pressure), for example, in small arms chambered for the 1943 model - 27450 N/cm2 (2800 kgf/cm2). Then, due to the high speed of the bullet, the volume of the behind-the-bullet space increases faster than the influx of new gases and the pressure begins to fall.
The second period
lasts from the moment the powder charge is completely burned until the bullet leaves the barrel.
Although the flow of gases stops, the highly compressed and heated gases expand, put pressure on the bullet and increase its speed. The pressure drops quickly, and at the muzzle of various types of weapons it is 3000 - 9000 N/cm2 (300 - 900 kg/cm2).
The third period , or the period of aftereffect of gases, lasts from the moment the bullet leaves the barrel
until the moment the bullet stops increasing in speed.
Powder gases flowing from the bore, several tens of centimeters from the muzzle of the barrel, continue to influence the bullet and increase its speed until the pressure of the powder gases on the bottom of the bullet is balanced by air resistance. Further, the flight of the bullet in the air continues by inertia and largely depends on its initial speed.
The initial speed of a bullet is the speed at which the bullet
leaves the barrel - the speed of the bullet at the point of departure.
It is usually denoted uo and measured in meters per second (m/s).
The initial speed of a bullet is one of the most important characteristics of the combat properties of a weapon. An increase in the initial speed of movement increases the range of the bullet, the lethal and penetrating effect of the bullet, and reduces the influence of external conditions on its flight.
The magnitude of the initial velocity of a bullet depends on the length
of the barrel, the mass of the bullet, the mass of the powder charge and other factors. The longer the barrel (up to certain limits), the longer the powder gases act on the bullet and the greater its initial speed.
With a constant barrel length and a constant mass of the powder charge, the smaller the mass of the bullet, the greater the initial speed of movement.