Zeroing a weapon with an open sight "front and rear sight"
We talked about aiming with open sights in one of the previous articles. Now let's talk about zeroing a weapon with a front sight and rear sight (a rectangular front sight and a semicircular slot).
How to zero a weapon with open sights?
Most models of weapons with a similar sight are equipped with a front sight that is adjustable vertically and horizontally and a rear sight with height presets. You should not rely on the factory adjustment to normal combat or the shooting of the weapon by the previous owner. Your weapon must be aimed at you. Why? Yes, because the same weapon in the hands of different shooters will shoot differently. In addition, the zeroing “exercise” is extremely useful for understanding how the sights are designed and how their “tuning” affects the location of the holes on the target.
First, you need to decide on the zeroing method (more on this below) and the target that you will use to zero your weapon. This can be a special sighting target (for example, the “Sighting 1” target from the “Precise Shot” team - see more about it below) or any target of sufficient size that allows you to aim uniformly and determine the location of holes.
You choose the shooting distance yourself. For certain purposes, you can zero the weapon at 20-25 meters, 50 meters and further. The classic recommended shooting distance for a weapon with a rifled barrel is 100 meters.
Shooting weapons "on the spot" and "to the edge"
Now a few words about the methods of zeroing weapons. At a distance of 100 meters, the weapon can be shot “on the spot” or “bleeded”. By location means that you are trying to align the midpoint of impact (MIP, that is, the location of most of the holes) with the aiming point. In this case, it is better to select the “1” setting on the rear sight, corresponding to our shooting distance. Accordingly, the numbers “2”, “3”, etc. will “equal” shooting distances of 200, 300 meters, etc.
In my opinion, another method of zeroing a weapon - “under the bleed” - with the rear sight set to “P” (“fixed” sight) is more convenient and versatile. The recommendation in army shooting manuals to use this particular method is explained to the greatest extent by such a concept as a “direct shot.” A direct shot is a shooting distance at which the height of the bullet’s flight path does not exceed (does not exceed the size) the dimensions of the target. In other words, aiming “under the heels” of the advancing adversary, the shooter, depending on the caliber, at distances up to 300-400 meters may not make adjustments to the sight: the bullet will still hit the enemy in the leg, stomach, chest or head.
With an enemy offensive, everything is more or less clear, but what about in real life? In shooting training and competitions, targets can be at different distances and often it is not fixed in equal intervals: 50, 100, 200 meters, etc. Having an understanding of the external ballistics of the ammunition you use, you can use the “straight shot” principle in your shooting. By shooting a weapon with the “P” setting at 100 meters “bleeded”, you will “collect” the STP of your holes, depending on the caliber of the cartridge, at a distance from 13 to 25 centimeters above the aiming point.
DIRECT SHOT Source: A. Potapov, “The Art of the Sniper.”
Thus, a bullet along a flat trajectory will arrive below the aiming point at a distance of, for example, 5 meters; “locally” - say, at 10-15 meters; a little higher - at distances of 20-25 meters, etc., reaching a given height of 13-25 cm above the aiming point at distances of 70-100 meters.
An important point: at distances over 100 meters, the holes will be located lower, smoothly arriving at the “second zero” (the coincidence of the hit and the aiming point) at distances of 300-400 meters, depending on the caliber.
Source: photo by the author
Another advantage of the “bleed-off” shooting method is that the target (target) at almost any effective fire distance will be located on the top of the front sight, and in the case of zeroing in place on the “edge” you, for example, will not be able to make adjustments to the sight, you will shoot with the extension upward, gradually covering the target with the front sight and not seeing it at distances of 200-300 meters.
Which shooting method to choose is up to everyone to decide for themselves. It's helpful to understand what to do if the holes on your sighting target are not where you want them to be.
We are making amendments
It's simple: move or twist the front sight. There is only one rule: the front sight, unlike the rear sight, “follows the bullet,” that is, if the holes are above the control point, the front sight must be unscrewed; below - screw in; left or right - move the front sight, respectively, left or right. If the reader is too lazy to delve into and figure out why this is so, take this rule for granted. Happy owners of weapons with a rear sight adjustable horizontally should know that their magnificent rear sight “comes from the bullet” when bringing the weapon into normal combat, that is, in order to move the STP to the right, the rear sight must be shifted to the left.
That's it, enough puzzles. Let's shoot already! Tra-ta-ta-ta-ta! Has it arrived? Look into the pipe. To make adjustments to the sight, you need to assemble at least some group on the target, preferably from 5-7 shots. There is no need to talk about a group in which the holes overlap each other, as in high-precision shooting, when shooting a carbine with open sights. Did everything come within 8-15 centimeters? So that's great. Don't worry, move STP.
Preparatory activities
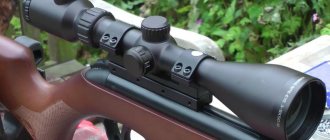
Regardless of whether you decide to set up an optical or standard sight, it is important to carry out some preparatory procedures so that the weapon can reach its full potential. If you neglect these measures, the zeroing process may become more complicated, and the weapon will still not hit accurately enough.
Depreservation
Before you start zeroing your pneumatic, it is strongly recommended to get rid of the factory preservative lubricant, which is intended for long-term storage of weapons, and certainly not for accurate shooting. Follow the algorithm described below:
- We completely disassemble the weapon (the trigger is easy enough to remove).
- Remove the preservative grease using a cleaning rod and a rag soaked in kerosene.
- We wash the barrel and other treated parts with a soapy solution under running water.
- Dry the rifle well in a disassembled state in a warm room.
- We use universal gun oil to lubricate the barrel and compression system.
- We assemble the weapon in reverse order.
Before shooting, it is necessary to re-preserve the rifle.
If you want to treat the trigger mechanism, you can use a special silicone lubricant for this purpose, which is available in almost every gun store.
Targets
Before zeroing, you need to decide on the choice of targets, as well as prepare a place for their attachment. The best option for this purpose would be a paper printout with classic sports markings, like in biathlon.
Fastening sheets of paper is best done using push pins on a wooden surface. The target must be positioned at the same distance from the ground at which you plan to shoot.
Ammunition
The choice of bullets for zeroing depends entirely on how much power the rifle boasts. For weak pneumatics (less than 7.5 J of muzzle energy), you should not choose ammunition that is too heavy, since it will not be able to develop sufficient speed. At the same time, bullets that are too light are not the best choice for shooting at long distances (over 25 meters). The best option for shooting at short distances is bullets with a mass of 0.5 grams.
It is important to pay attention to the charge tip, which can be pointed, rounded, flat, or even expansive (explosive). Here you should look at what distance you plan to shoot from. Flat sporting bullets are suitable for shooting at distances from 10 to 25 meters. But for zeroing using pneumatics, rounded ammunition is suitable. Pointed and hollow point bullets are used for hunting only.
Position
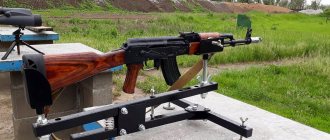
Also, a big role in the correct zeroing of a weapon is played by the appropriate position the shooter has chosen. Of course, it is preferable to go to a shooting range, where the ballistic projectile will not be affected by weather conditions, and the rifle can be secured with a special machine. If this is not possible, choose an outdoor position based on the following principles:
- Open space and flat landscape. The view should not be obstructed by vegetation or hummocks, and the terrain should be large enough to increase the shooting distance at any time.
- A deserted place located outside a populated area. Although the aerial shot is quite quiet, even it can attract curious onlookers. So it’s best to shoot somewhere outside the city, for example, in an open field or in a clearing in the forest.
- Quiet and sunny day. Zeroing will be useless if carried out in conditions of strong wind or rain. So, if you can’t go to the shooting range, you should at least wait for suitable weather.
You will have to place a table for rest shooting or sandbags on site. Therefore, it is important to first find the optimal place for the position, and only then choose where to attach the targets.
Distance
Factory zeroing (the rear sight and front sight are located strictly in the middle) is carried out mainly at a distance of 10 meters. Therefore, it is recommended to fire the first shots from a distance of 10 meters. Gradually the distance should be increased by 5-10 meters. In the case of an optical sight, you can “jump” 20 meters at once. If the deviation turns out to be too large and the bullet does not hit the target, then it is worth reducing the distance.
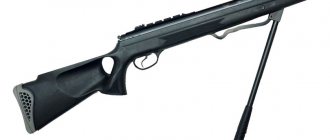
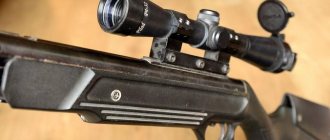
Zeroing a carbine without an optical sight
Features of long-range shooting without optics
There are many nuances here. The first key to success is that the more you shoot, the better. Breathing plays a big role, you need to feel it. You need to learn how to aim the front sight correctly, but no matter how hard the shooter tries, it will still move. We must learn to reduce the movement of the front sight and choose the moment of the shot between heartbeats, so that the breath holding is minimal, and so that just at this moment the front sight looks exactly at the target and manages not to pull the trigger, but to smoothly press it (the trigger should already be pressed so much that the slightest pressure will result in a shot).
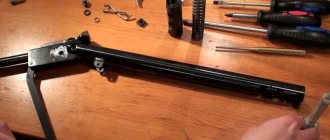
Front sight adjustment
To adjust the front sight horizontally, that is, left or right, as well as in height, we need a front sight guide. With it you can easily adjust the sight. Some people use a vice, but this greatly increases the adjustment time. It’s better to watch the video on how to use the fly remover.
Rear sight adjustment
Everything is simple here. But adjusting the rear sight can also take a lot of time. It should be adjusted depending on the distance and hits.
Let's say you were aiming at the middle, but the hits went higher, then you should release the rear sight a little. Or, conversely, if the hits are lower, then the rear sight should be raised, and it can also be adjusted in different directions. If hits go to the right, the rear sight needs to be turned to the left and vice versa, if hits go to the left, then the rear sight needs to be turned to the right.
Is cold zeroing effective without optics?
It would seem that this is a high-tech, convenient device, but, unfortunately, it will only be effective if you are going to shoot at paper. Let's say you're going hunting, but at the same time you did a cold sighting, then hitting the animal will be 50/50. This thing is suitable for beginners, but for the most part it will be a waste of money. It is mainly necessary at the initial stage to make it easier to set the rear sight and front sight for further “hot” zeroing.
Using an open sight, the shooter achieves the location of three objects on one line, called the sighting line: the target, the front sight and the rear sight. Since, according to the laws of optics, it is impossible to simultaneously keep three objects in focus, it accommodates the eye to a point located on the front-rear sight segment and dividing this segment in a ratio of approximately 2:1. By this he achieves approximately equal clarity of observation of both the front and rear sights. The target is visible blurry.
Express[edit]
A type of open sight for hunting life-threatening animals, provides faster aiming. A V-shaped rear sight slot and a large front sight with a bright-colored dot are used, which is “placed” into the slot at the moment of aiming. Due to the large front sight, it is difficult to aim at a target beyond 200 meters and therefore is not used in military weapons.
Sighting in the field
Since pneumatics are noticeably different in power from firearms (and hardball pneumatics are even more noticeable), the shooting methods here are slightly different. A hardball player usually doesn’t bother with zeroing with special devices (machines, vices); regular zeroing from a rest, or worse, from the hand, is suitable for the game. The shooting distances are small (usually 10-20m).
The most common bullets for sighting are used, without any problems. Targets for zeroing can also be purchased from us (standard ones are suitable).
We will not differentiate between zeroing an air rifle and zeroing an air pistol.
And in general, we will assume that we are shooting in harsh combat conditions and we simply do not have time to perform a bunch of correct actions.
So, let's start the actual shooting.
Exercises to develop correct aiming skills
Exercises must be performed opposite a wall or target, at a distance of 1.5 m or more.
Exercise No. 1. “Concentration”
For a Makarov pistol or similar pistol with a distance of less than 15 cm between the front sight and rear sight.
Take the pistol, assume a shooting position, raise the weapon to eye level and sequentially perform the following steps:
- Focus your gaze on the target/wall. Please note that in this case, not only the upper edges of the rear sight “blur”, but also the front sight. And they “blur” so much that it is impossible to align their upper edges with each other.
- Turn your gaze to the front sight. Please note that in this case the upper edges of the rear sight have “blurred” a little, and a halo has appeared above them.
- Focus your gaze on the rear sight. And remember this aiming picture. Sights must be sharp.
Pay attention to the location of the sights relative to the shoulders of the “chest figure” target (the sight is located in the center of the target) and relative to the black circle of the sports target. The sights are located under the black circle (approximately in the area of dimensions 4, 3).
Options for focusing on various objects when shooting from a Makarov pistol
Aiming at the chest target (focus on target / focus on front sight / focus on rear sight)
Aiming at a sports target (focus on target / focus on front sight / focus on rear sight)
Options for focusing on various objects when shooting from a Yarygin pistol
Aiming at the chest target (focus on target / focus on rear sight / focus on front sight)
Aiming at a sports target (focus on target / focus on rear sight / focus on front sight)
Exercise No. 2. “Even front sight”
When performing this exercise, the focus of your gaze should always be on the sighting devices (PM and analogues - in the rear sight / FP and analogues - on the front sight). The sights must be sharp when performing the exercise.
Take the pistol, assume a shooting position, raise the weapon to eye level and sequentially perform the following steps:
- Focus your gaze on the sights.
- Raise the front sight above the upper edges of the rear sight by 0.5-1 mm.
- Align the front sight with the rear sight.
- Lower the front sight below the upper edges of the rear sight by 0.5-1 mm.
- Align the front sight with the rear sight.
- Move the front sight to the left by 0.5-1 mm (the gap on the left will almost disappear).
- Align the front sight with the rear sight.
- Move the front sight to the right by 0.5-1 mm (the gap on the right will almost disappear).
- Align the front sight with the rear sight. And remember this aiming picture. Sights must be sharp, and the upper edges of the rear sight and front sight must be at the same level. It is this picture that they say that the sights are level.
Sequence of performing exercises for the Makarov pistol
Vertical displacement of the front sight in the rear sight (front sight up / front sight down / level front sight)
Horizontal displacement of the front sight in the rear sight (front sight on the left / front sight on the right / level front sight)
Sequence of performing exercises for the Yarygin pistol
Vertical displacement of the front sight in the rear sight (front sight up / front sight down / level front sight)
Horizontal displacement of the front sight in the rear sight (front sight on the left / front sight on the right / level front sight)
The duration of each exercise is 10 - 15 seconds.
The number of repetitions per workout is at least 5.
The number of training sessions with exercises is at least 7.
It is recommended to repeat the exercises at least 2 - 3 times a month.
Visually, the eye perceives a deviation of the front sight to the right or left by 1 mm as the disappearance of the gap between it and the vertical wall of the rear sight slot on one side and an increase in the width of the gap by 2 times on the other.
A deflection of the front sight by 1 mm in the rear sight slot when shooting from a Makarov pistol at a distance of 25 m leads to a deflection of the bullet in the same direction by 19 cm from the center of the target.
When shooting from a Yarygin pistol, deflecting the front sight in the rear sight slot by 1 mm will cause the bullet to deflect in the same direction from the center of the target at a distance of approximately 15 cm.
By completing these exercises, you have learned to align the front sight with the rear sight and see the sights sharply.
You can often hear the question of how to aim with one eye or two? The answer is as follows - preferably two, since in this case visual acuity is higher.
However, when aiming with both eyes, the effect of a “second front sight” may occur. Typically, this effect manifests itself if the shooter is right-handed, and his dominant eye is left, with a left-hander, respectively, vice versa.
This raises two questions:
- How to determine which eye is dominant?
- If the leading eye and the strong hand are not the same, then what to do about it?
To determine the dominant eye, perform the following steps:
- At a distance of several meters from you, 3 m and beyond, find a stationary object.
- Stretch your arms forward and connect your thumbs and index fingers so that they form a closed contour.
- Place your hands between your face and the selected object. Look through the outline with both eyes.
- Keep your eyes on the selected object and alternately close one eye and then the other.
- The leading eye will be the eye during which the object does not change its position in space relative to the contour of the fingers (while the second eye is closed).
Determination of the dominant eye
If the strong hand is right (the shooter is right-handed), and the dominant eye is left, then there are several options for solving the problem:
- When shooting, place the weapon in front of your left eye.
- Use a shooting monocle and lower the curtain that will cover your left eye; if you are using glasses, then cover the left glass with an opaque material.
- Learn to shoot with your weak (left) hand.
For a left-handed person, the same actions are required, performed in a mirror image.
Another question that concerns most people who decide to learn how to shoot at a sports target on their own is “Where to aim?”
The position of the sights relative to the target's aiming dome (left is correct / right is not)
Please note that the sights are located below the black circle by approximately the size of its radius. This ensures almost identical aiming with a significant difference in target illumination, be it bright sun or dense clouds, as well as for a target printed on paper of different quality (from matte cardboard color to glossy white).
Experienced athletes may object and say that the clearance between the scope and the black circle should be kept to a minimum. But we should not forget that sporting weapons are distinguished by the ability to make adjustments using micrometric screws on the rear sight; this is not possible on military weapons and their analogues. It follows from this that you will most likely have to “remove” the aiming area. In sunny weather, you will approach the black circle, and if you initially “shot in” with a small clearance, you will have to “crawl” into the field of the black circle.
Shooting process
Once all preparatory procedures are completed, the zeroing process begins. And although a 4.5 mm bullet fired from an air rifle does not have much penetrating power, safety precautions should not be neglected during this process (especially if the rifle has a power exceeding 7.5 J).
Cold shooting
The cold zeroing method is usually carried out when using a firearm so that the shooter does not waste precious ammunition. However, if desired, you can carry out the technique for pneumatics. True, for this you will have to purchase a special muzzle attachment with a laser designator.
The whole point of the technique is that the shooter turns on the pointer, and then inserts it into the muzzle channel (thanks to the cartridge, it lies flat). The rifle is fixed, and the vertical and horizontal position of the rear sight bar begins to adjust to the red dot. After this, the weapon is considered shot, although its owner did not fire a single shot.
Test shot
Regardless of whether you used the cold sighting method or not, taking a test shot at an improvised target from a distance of 5-10 meters is a mandatory procedure. This is done not so much to see the difference between the aiming point and the impact point, but to check the serviceability of the weapon, and also to determine how comfortable the position is (excessive muscle tension is one of the main reasons for the deflection of bullets when shooting). This also applies to those cases when the optics are adjusted, because it often happens that the optical device is not firmly fixed.
Zeroing in at 10 meters
Have you made sure that the weapon is working properly and that the position is comfortable? Then it's time to start zeroing at a 10-meter distance. It is best to choose the lower part of the black circle of the target as the aiming point, because it will not merge with the metal front sight.
We fire three shots at the same point. After this, we remove the barrel from the line of fire and approach the target to determine the average point of impact (we connect the points with straight lines and find their intersection).
As soon as the STP is found, we return to the position and use the drums to adjust the rear sight, located on the side (horizontal) and on top (vertical). We repeat the procedure until the difference between the average point of impact and the aiming point is minimal.
Sighting at 20 meters or more
To accurately hit a target located at a long distance (20 meters or more), you will have to have some knowledge that is taught to professional athletes. You can make an accurate shot only if you follow the following recommendations:
- the trigger should be pulled smoothly, without sudden movements or excessive force;
- the shot must be made while exhaling, catching the moment between heartbeats;
- After inspecting the target, it is important to take the same position as during shooting.
An equally important point is whether the shooter knows how to adjust the position of the rear sight depending on the difference between the aiming point (AP) and the midpoint of impact (MIP). Here are three example situations:
- The STP is located above the TP - we lower the rear sight down using the upper screw.
- The STP is located below the TP - we lift the rear sight up, moving the screw counterclockwise.
- The STP is located to the left of the TP - we move the rear sight to the right using the side screw.
- The STP is located to the right of the TP - we shift the rear sight to the left using the side drum.
The maximum recommended distance for zeroing pneumatics with a power of 7.5 J and an optical sight is 200 meters. For models with a PCP mechanism (pre-pumping), this figure can be doubled or even tripled.
Peculiarities
When zeroing rifled weapons, it is recommended to use factory ammunition. When checking the combat of weapons with them, one should take into account some features of dispersion during the shooting process. For example, it is recommended to start the zeroing procedure for a 5.6 mm rimfire cartridge at a distance of 50 m, for cartridges of other calibers at a distance of 100 meters.
As an example, let's look at the permissible dispersion rate of bullets chambered for different calibers:
- 5.6 mm rimfire cartridge at a distance of 50 m, no more than 30 mm. (cartridge of category 1), and no more than 40 mm (cartridge of category 2);
- Cartridge 5.6X39 mm at a distance of 100 m. no more than 55 mm;
- Cartridge 8.2Х66М mm at a distance of 100 m no more than 140 mm.
Jet DTKP "RDT-T" for Tiger/SVD/TG3 with short or long flame arrester
Quick-detachable jet DTKP "Tiger" for installation on Tiger/SVD/TG3 with short*
or
a long flame arrester.
This DTKP was specially designed for use on Tiger/SVD carbines of caliber 7.62x54R, .308Win with the possibility of use on barrels equipped with both a long “slotted” flash hider and a short one (of the “dudka” type), often found on these weapons in depending on the version and years of manufacture.
Attention! When ordering a DTKP with the number of chambers you need, we ask you to pay attention to the correlation of the DTKP by type of flash suppressor - “long PG” and “short PG”, as well as a separate modification of the product - for TG3 weapons chambered for 9.6x53 Lancaster.
Please be careful when placing your order.
These are the models for which our DTKP is suitable:
TG3 (9.6x53 Lancaster):
____________________________________________________________________________________________________________________________________________
Tiger 7.62x54R version 02 (long PG):
____________________________________________________________________________________________________________________________________________
Tiger 7.62x54R version 01 (short PG):
On this model of the carbine with this PG, depending on the batch and year of manufacture, we observe a “range” in the dimensions of the flash suppressor along the outer diameter: 21.7…21.8…21.9 mm. We ask customers of DTKP for the Tiger of this version to inform us the exact size (diameter) of their PG when placing an order in the “cart” - in the “Additional order information” window. The measurement must be done with a caliper or micrometer. ______________________________________________________________________________________________________________________________________________
ATTENTION. For this model of weapon - Tiger 308Win. 02 with this type of short* flame arrester - our DTKP will not work (!):
___________________________________________________________________________________________________________________________________________
INFORMATION ON SOUND SILENCER DESIGN:
The collet mount allows you to mount the DTKP on a weapon in a few seconds without any tools or accessories.
The DTKP is manufactured using a reactive multi-chamber design and, depending on the length of the “can” body (220 or 250 mm), can have 11 or 13 internal chambers, determined by the number of so-called K-baffle coils. The more “coils”, the more expansion/bypass chambers, the higher the efficiency of the product in reducing the sound of a shot with a given silencer.
It should be said that since the DTKP was designed and manufactured for domestic weapons with a fairly long flame arrester, in 5% of cases we are faced with some misalignment of the flame arrester and the barrel itself, which is due to both production problems and instability of the quality of the weapon itself, and external incorrect mechanical influences during operation of weapons - impacts when carrying weapons while hunting, when riding snowmobiles and ATVs, etc.
All critical parts of this DTKP are made of 40X steel, and the body and internal elements are made of titanium alloys D16T and V95T1, which ensures exceptional reliability and survivability of the entire structure. This will eliminate possible contact of the bullet with the internal elements of the DTKP and will ensure the most accurate shooting from your carbine.
The diameter of the DTKP body for this model (regardless of length) is 50 mm. Weight - 740, 780 grams, depending on the model. Effective sound reduction - 28...32 dB.
These products are covered by a lifetime manufacturer’s warranty in any format (repair/replacement/return).
Aperture sight.
It differs entirely in the form of a disk with a slot - an aperture. And quite close to the shooter.
There are three types of aperture sights. The first two are common on rifled weapons, while the latter is installed on a smoothbore:
Ring - the sighting disk is located directly at the shooter's eye, as a result of which automatic alignment of the front sight with the center of the ring is achieved. Pros: high aiming speed and shooting accuracy due to the larger length of the aiming line, easier work in poor lighting. Cons: long period of time when changing targets, the disk obscures the view and requires regular cleaning.
Diopter sight - the rear sight completely blocks the view, leaving only a small diameter aperture, thus creating something like a pinhole camera. The image is projected directly onto the pupil. Positive aspects: very high accuracy. Negative: difficulties arising in the dark due to low brightness, low aiming speed and the least visibility of all options.
Ghost Ring is one of the types of ring sights, due to the thin rim of the rear sight and large aperture, it provides the greatest speed when aiming. There are minor losses in accuracy.
Catalog