- April 2, 2020
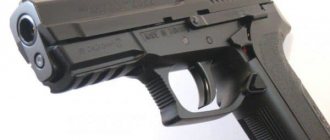
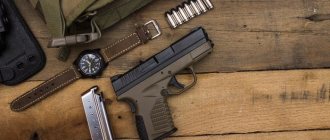
- Weapons and ammunition
- Alevtina Tarasova
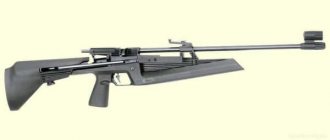
Zeroing pneumatic weapons is a mandatory procedure. Firearms are checked in the same way. Thanks to this procedure, it is possible to achieve not only accuracy, accuracy and even combat range, but also maximum safety, reliability and efficiency. This can be especially true for weapons with installed optics.
Reactivation process
Novice shooters usually ask questions about how to properly aim at an optical sight and what is needed for this? First of all, you need to properly de-preserve the weapon, and then proceed directly to shooting the optics on the pneumatic. This rule applies to both air rifles and firearms.
The algorithm for this process looks like this:
- First of all, you should completely disassemble the rifle.
- Secondly, you need to remove the spring-impact mechanism.
- Then you should completely get rid of the factory preservative grease.
- Next, you need to clean the elements of the compressor system.
To do this, you can use special solvents and compounds. The entire process of cleaning and lubricating the barrel during the work on re-opening the weapon is a mandatory requirement.
Elimination of reticle displacement
Modern optics use a luminous aiming mark with brightness adjustment. The brand illumination should turn off automatically after a certain time. This saves battery power, as many shooters forget to turn off the battery. In general, aiming marks are of the following types:
- stump;
- Mildot;
- PSO-1;
- Crosshair;
- SVD.
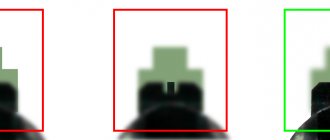
The aiming mark tends to shift due to recoil - this should not be allowed. Paradox: the mobility of the aiming mark is welcomed when zeroing a rifle. The brand is adjusted by turning the drum (you need to focus on the number of clicks). The offset scale varies depending on the scope model and manufacturer.
Having discovered a mark shift, it is worth examining the scope mount - did you do everything correctly? Proper installation guarantees long service life for your aiming system. You should not save money by purchasing cheap mounts - this is self-deception, leading to a loss of accuracy.
Preparatory process
Novice hunters, due to the lack of sufficient experience behind them, ask professional hunters to teach them how to aim correctly through an optical sight. What should you do for this? It is necessary to zero the weapon. This process is the most responsible. It includes carrying out certain procedures and using the following methods:
- Adjusting weapons using a front sight. It's no secret: to adjust the sight, you must first place the front sight correctly. It must be positioned as evenly as possible, and not have any distortions, much less even minimal shifts to the side. To adjust the scope and use it with the front sight quickly and correctly, it is best to use the center axis of the barrel as a reference.
- Adjusting weapons using the rear sight. Of course, all shooters want to use their riflescope correctly. To do this, it must be configured correctly. For example, you can adjust the optics of a weapon thanks to the rear sight. To do this, it is necessary to take into account the fact that when the bullet goes down, it is recommended to slightly raise the rear sight. Accordingly, for the bullet to go down, it is enough to raise the rear sight. In addition, you need to take into account that if the front sight has moved to the side, then it is recommended to move the rear sight in the same direction.
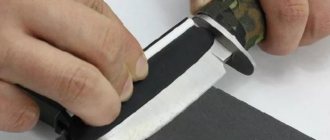
Disassembly
Before disassembling the scope, make sure you have the necessary tools and “accessories.” You will need:
- repair kit (set of flat screwdrivers);
- inexpensive transparent sealant (solvent-free);
- cotton buds;
- a clean cotton cloth;
- jars (for storing small bolts);
- flashlight.
As an example, consider disassembling the VOMZ-P model. You will encounter the following configuration:
- lens;
- eyepiece;
- lever;
- screw;
- lid;
- net;
- angular scale of lateral corrections;
- lens wrapping system;
- installation ring;
- aiming angle scale.
First you have to unscrew the lenses (back/front). The adjusting drums are screwed in until they stop (clockwise), then unscrewed together with the pressure washers. Then the pressure and locking bolts are unscrewed one by one. Half of the pipe is unscrewed. The cassette containing the adjustment lens is carefully squeezed out.
The lens is removed from the cassette (while trying not to touch the glass with your fingers).
The lens-turning system is localized in the remaining segment of the pipe. If desired, it is not difficult to unscrew it - the system is secured with one microbolt.
The structure is assembled in reverse order. Pay attention to the stained lenses - they should not be touched with your fingers. The lenses are wiped with one-sided movements (zero pressure).
Choosing the right position
An optical sight for pneumatics should be used in a certain position. As for choosing the right position for shooting, you need to understand that this choice must meet the following requirements:
- First of all, it is very important to try to ensure comfort while shooting. Correct zeroing of an optical sight on a rifle or carbine must be carried out in a position in which the weapon is located only on a horizontal surface. In this case, you need to lean on the forend, but in no case on the barrel.
- It is necessary to follow safety rules so as not to harm yourself, but also those around you. But most often this point is observed, since zeroing an optical sight for pneumatic weapons is carried out exclusively either at shooting stands or in deserted places.
- Under no circumstances should you rush to change your position, much less fire in machine-gun fire mode. This is due to the fact that at this moment both the optics are zeroed and the weapon barrel is put into operation. Because of this, the weapon begins to heat up quite quickly.
To zero a weapon, it is best to use a special machine. But if this is not possible, you can use a convenient horizontal stand, bipod or ordinary sandbags. In addition, it is imperative to remember that the choice of position largely depends on the need to gradually change the distance to the target.
Techniques and rules of shooting from a machine gun
When performing training shooting from a machine gun, a very important condition is to take a comfortable position for shooting. It must comply with the following rules:
- When performing training, machine gunners must take a position from which they can see the entire area where the enemy is or may appear;
- The shooting position should not only give the shooter the opportunity to have a complete overview of the terrain, but also, if possible, hide the machine gunner from enemy fire as much as possible. It is recommended to use various trenches for shooting, which come in several types. This is a trench for shooting from a machine gun while lying down, and a trench for shooting while standing. In a real combat situation, trenches for shooting are made independently, and making a deep trench under enemy fire is not only not easy, but often simply impossible;
- If digging trenches is impossible, then, as a rule, various shelters that exist in a particular area are used;
- Places that are unsuitable for shooting from a machine gun are conspicuous local objects.
Before taking a place for shooting, the machine gunner receives the command to take a convenient position for shooting in a certain place. Obeying this command, the shooter must quickly take a comfortable position in a trench, building or other place most suitable for shooting.
If teams do not adjust the machine gunner's movement speed, he must move in the most optimal way for a specific tactical situation. This can be moved in the following ways:
- Running;
- With a quick step;
- Short dashes (as a rule, this method is used in battle);
- Movement while lying down, which implies crawling.
When using any method of movement, the machine gun is put on safety in order to avoid an accidental shot, which can not only give away the machine gunner’s location to the enemy, but also injure the owner.
Shooting from machine guns consists of several stages, which include:
- Getting ready to fire;
- Firing a shot or firing;
- Stop shooting.
Choosing a distance sufficient for the shot
It is very important for novice shooters to learn how to use the mildot reticle on a riflescope. To use it, it must be adjusted correctly. And before you adjust the optical sight that is mounted on an air rifle, you need to select the correct distance. It is best to shoot from short distances; 25 meters will be enough. Once a few shots have been fired, the distance can be increased. Thanks to this, you can quickly adjust the optical sight. It is necessary to increase the shooting distance gradually. The final zeroing of the gun must be done from a distance of up to 300 meters. In this case, at each distance, the gun must be zeroed with three shots.
Standards that every machine gunner must pass
In order for a fighter to handle a machine gun easily and naturally, he must pass certain standards within the allotted time. Here are 5 basic standards that every machine gunner must pass:
- Standards for preparing for shooting in various positions. Performed from standing, lying and kneeling positions. Passing the standard is to complete the shooting position while standing in 6 seconds, from the knee in 7, and lying down in 9 seconds;
- Standards for incomplete disassembly of a Kalashnikov assault rifle. Must be completed in no more than 18 seconds;
- The standard for assembling an AK after partial disassembly must be completed in 28 seconds;
- The standard for loading a magazine with cartridges is met in 40 seconds maximum;
- The standard for discharging a machine gun is no more than 12 seconds.
Choosing the right ammunition
Beginning shooters simply must learn how to use the reticle of an optical sight. To carry out competent zeroing of an air gun with an optical sight, it is necessary to take into account the following requirements:
- Bullets should only be selected that will be used in the future.
- You should only choose ammunition that is recommended by the manufacturer.
- There must be complete correspondence between weapon ammunition in terms of weight and technical characteristics.
It is also necessary to know and understand that bullets that are too light have a very short flight range. Heavy ammunition, on the contrary, has high dispersion rates, and at the same time they have relatively low accuracy.
How often is shooting carried out?
Repeated combat testing of weapons is carried out when necessary, or at intervals recommended by the manufacturer. In general, it all depends on the frequency of use of the “air”.
And for an optical guidance system, it is important to carry out the procedure constantly. Shot accuracy is important to the shooter. Repeated adjustment of the sighting device cannot be avoided when replacing bullets and when the center of gravity of the rifle is shifted.
Selecting a Suitable Target
The initial zeroing of the optics on a rifle or carbine is allowed to be carried out on targets of absolutely any type. It is best to use ordinary paper targets with sports or tiger-type markings applied to them for these purposes. You can also use small jars. They can be aluminum, glass, etc.
The tactical and technical characteristics of the weapon are also a very important factor. These include indicators such as:
- Optical sight magnification.
- Initial rate of fire.
- Sight range.
Some of the above significantly increase weapon zeroing rates.
Preparatory activities for shooting
At this stage the following is done:
- re-preservation of pneumatics;
- correct installation of optics;
- determining the shooting position;
- adjustment of the optical sight for pneumatics;
- selection of distance;
- selection of bullets;
- installation of targets.
Zeroing will be effective and fast if the re-preservation is carried out correctly, the bullets are selected, the location is selected and the position for the shooter is prepared.
Reactivation of pneumatics
Instructions for de-preservation are provided by gun sellers without fail. Sometimes they offer customers to perform this procedure for a fee.
The process of independent re-preservation takes place in 6 steps:
- The rifle is being disassembled - in order, according to the instructions.
- The trigger mechanism (trigger mechanism) is removed.
- The preservative grease is removed with a cleaning rod, then a rag soaked in kerosene is used.
- The bore is washed under running water. Left to dry unassembled.
- The dried weapon and all its parts (attention is paid to the compressor system) are lubricated with weapon oil.
- Complete assembly of air guns.
Now you need to install the sight.
Correct installation of the optical sight
Installation of optics is possible if the following rules have been observed:
- The weapon has been re-opened and completely cleaned.
- The rifle has no shortcomings (plays, weak fixation of the stock with the butt, etc.).
- There is a case or cover for transportation (if the user does not plan to remove the sight).
- The individual characteristics of the shooter are taken into account.
- Additional accessories are pre-installed.
Owners of the first optical sights will benefit from training with aiming through the eyepiece and studying literature on handling aiming. Your eyes need to get used to it.
The installation procedure for a standard pneumatic bar is simple:
- Unpack the optics and remove the grease.
- Unscrew the lower clamp screws of the standard mounting of the sight to the weapon.
- Using careful movements and without unnecessary effort, insert the sight clamps into the grooves of the body.
- Lightly tighten the screws 1-3 turns to achieve a suitable position for the optics.
- Fully tighten the bolts.
Using the notches made on the brackets and body of the weapon, the shooter can easily determine the position of the optics, and if necessary, remove the device from the pneumatic gun.
Position Definition
An open space, such as a field, is suitable. In bad weather conditions, it is better to go to the shooting range. Strong wind or rain will negatively affect the results obtained, and the shooter will feel discomfort.
The location is found – the position is selected. It is constantly changing. Zeroing pneumatics with an optical sight is carried out in a lying position. As a support, you can use a table, a bag with filling (for example, sand) or a large cobblestone. The main thing is that the emphasis is not soft. The fixation of the air gun is correct if the open sight is clearly aimed at the point. The position of the crosshair is changed using adjustment screws with test shots.
The target is placed at the distance from which the shooting will be carried out. First, the first target is set at 25 meters, then the last two - 100 and 200 meters. If the step seems large to the shooter, a slight reduction in the distance is allowed (for example, 25, 50, 100, 150, 200 m).
Methods for adjusting optics and a possible problem
The optics are zeroed under the shooter:
- Aim and fire.
- Now, without changing the position of the weapon, hold it at the same aiming point. Shift the position of the eyepiece crosshair to the point of breakdown from the last shot.
- The final step is to zero the optical aiming adjustment drums, according to the instructions. Now the shooter can shoot from a different distance.
How to set up an optical sight on a pneumatic rifle?
Using a front sight
It is important to conduct a visual inspection of the position of the front sight: whether its optical axis is on the same line in relation to the barrel of the weapon. Everything is in order - you can start shooting.
You need to aim at the target so that the upper edge of the front sight is as if equal to the upper edge of the rear sight. 3 shots are fired in a series, and then the “horizontal” and “vertical” are adjusted.
Using the rear sight
To zero in pneumatic optics using this method, you will need to hone your skills. However, each time the process will become intuitive and fast.
Adjustment of aiming and impact points is carried out by the upper and side drums of the optics. For example, if the point of impact is located below the sighting, then the upper adjustment drum rotates counterclockwise. In the reverse situation, the top screw is used to lower the rear sight. The principle is similar to the side adjustment screws, when the point of impact moves to the left or right of the aiming point.
What to do if the optical sight goes astray
How to fix a broken optical sight on a pneumatic rifle while shooting? First you need to identify the cause. Immediately check the fastening screws, and if they are loose, tighten them. The problem with a knocked down sight occurs among owners of powerful spring-piston weapon models. The reason is double returns.
The following recommendations will help:
- Use only reliable fastenings.
- Do not install too cheap optics and do not strive for magnification.
An expensive model will add extra weight and dimensions to the “aircraft”. Plus, complex mechanisms are more sensitive to strong vibrations. For lower power air rifles, problems with optics malfunctioning are rare or non-existent. But a reliable mount is important for weapons of all types.
Selecting a distance
In order to comprehensively adjust the optical sight, pneumatic rifles need to be shot at short distances - from 15 to 25 meters. After a series of shots, the distance gradually increases. This manipulation will help the user adjust the sight and alignment. Increasing the distance by 25-50 meters, then the final zeroing is completed at the far limits - 200 meters. At each sighting stage, the shooter fires 3 shots.
Selection of bullets
Recommendations from the manufacturer of a specific pneumatic model will help you make the right choice when choosing ammunition. It is worth shooting those bullets that the shooter plans to use constantly.
Projectiles are selected according to shape and weight:
- light (0.25-0.56 g) suitable for training and entertainment;
- medium (0.68-1.0 g) are used by hunters and athletes for shooting from a distance of 50 meters or more;
- heavy (over 1.2 g) are used on pneumatics of 4.5 and 5.5 mm caliber “magnum” class for long-distance shooting.
To shoot an optical sight, it is important to use bullets “from the same box”. It is recommended to weigh 5 pieces. Deviation in weight of more than 0.3 grams is unacceptable.
Setting up targets
Paper targets with sports markings are suitable for zeroing an air rifle. They can be printed on A4 paper, on a printer with regular black and white ink, in the amount of 3 pieces. Then, fix it on a wooden surface in a horizontal position.
How to aim
Many novice shooters strive to immediately learn how to use the reticle of an optical sight. In order to properly target the optics, it is necessary to install it correctly. All reputable manufacturers provide their products with detailed instructions. It literally explains step by step how to correctly install an optical sight on a weapon.
Currently, there are several common types of fastening:
- Fastening systems for Weaver rails.
- Dovetail brackets for mounting optics.
- Hardware on the side rail, which are used to secure the sight.
- Double brackets.
Most often, in order to install an optical sight correctly, you do not need to have any special knowledge or skills in using special equipment or tools. For this, a special key, which is included in the delivery kit, or a regular screwdriver is quite sufficient.
Required materials and tools
First, you should take a look around to see what materials you have at home. To recreate a high-quality shooting range, you will need the following materials:
- carbon steel sheets, thickness from 5 mm;
- grinder with attachments;
- welding machine with electrodes;
- rods;
- universal door hinges;
- canvas (for example, foam);
- a can of primer.
A box measuring 100x80x50 (cm) will be assembled from metal sheets. You can use wooden planks, self-tapping screws, a screwdriver, a jigsaw (hacksaw), but then the design will not be reliable. Even if this is not available, you can ask for a regular box at the grocery store.
The shooting process
You can use an optical sight only after the weapon has been checked for its functionality: how well the weapon’s shooting position is equipped, as well as its optics.
Shooting stages:
- Carrying out a test shot. At the very first stage, a test shot must be fired at the closest possible distance, no more than 25 meters. At this stage, it will be possible to identify existing malfunctions in the operation of the weapon, as well as determine the degree of correction for bullet spread and correctly determine the vector of its displacement. Also, thanks to a test shot, it will be possible to quickly determine the average point of impact.
- Sighting from a distance of 25 meters. Next, you need to fire a series of shots from a weapon at a distance of 25 meters. Most often it is enough to fire three shots. Each of these shots will be a specific signal of the properties of the weapon. A lot depends on the results of the hit. However, the radial spread of hits in some situations does not depend on the quality of the weapon or sight. A lot depends on the qualifications of the shooter himself. An inexperienced owner will also be able to identify certain defects and the need to center the sight at a distance of 25 meters. The sight of any optics pursues precisely this goal.
- Sighting at a distance of 100 meters. In order to finally select the optimal sighting of the gun, you need to move away to a distance of 100 meters. And the results of such an exercise will provide more complete information about the characteristics, quality of the weapon, as well as its behavior in real conditions. If the optics were installed on a carbine or rifle correctly, that is, in full compliance with the requirements and rules of the manufacturer, then the results of such zeroing will be quite acceptable. And this despite the fact that the distance for wind weapons is quite large.
Production and cessation of shooting
Fire from a machine gun can be fired either independently or on command. It depends on how the fighter performs the assigned task, as part of a group or independently. If the work is carried out in a group, then on the command “Open fire on the infantry!” The machine gunner can choose the target himself if the commander does not specify one.
When shooting, you need to hold the machine gun with a standard grip, that is, your left hand holds the weapon by the fore-end or magazine, and the right hand holds the pistol grip.
The cessation of shooting can be either complete or temporary. If the machine gunner is required to temporarily stop firing, then the command “Stop” or “Cease fire” is given if the shooting is in motion. After this command has been sounded, the machine gunner must stop pressing the trigger, put the weapon on safety, and if necessary, then replace the magazine.
If a complete cessation of firing is required, then the machine gunner, after the command “Cease fire,” is given the command “Unload.” After the machine gunner hears this command, he must perform the following actions:
- Put your weapon on safety;
- Install the sight by pulling the clamp back to the “P” position;
- Unload the machine gun;
- If the machine you are using has a folding stock, then you need to fold it.
If the shooting was carried out from a trench, then after unloading the machine gun, it must be laid on the trench parapet with the bolt handle down.
In order to carry out the procedure for discharging the machine, you need to follow the following algorithm of actions:
- Disconnect the magazine;
- Remove the machine from the fuse;
- Pull the bolt frame back and remove the cartridge from the chamber. After this, the bolt frame must be released;
- Pull the trigger;
- Put the fuse on the machine;
- Remove cartridges from the magazine;
- Attach the empty magazine back to the machine.
A machine gun discharged in this way will not pose any threat, however, you should not point its barrel at people.
Shooting from long distances
All shooters are required to know how to use a scope at long ranges. More experienced hunters and even athletes are excellent at aiming an optical sight at long distances, more than 500 meters. But for this it is necessary to use very powerful types of weapons and, on top of that, very expensive optical instruments. In fact, this shooting is considered to be sniper shooting. This is due to the fact that it requires deeper theoretical knowledge, practical experience, as well as skills and abilities. It is very important to understand that before you zero the optics on a powerful rifle, you should clearly define the tasks of the weapon: what it should do.
Basically, spring-piston long-range weapons are designed for catching large animals. This weapon is characterized by the presence of a large double recoil impulse, in addition, it requires professional skills from its owner. Even in cases where the hunter knows perfectly well how to install an optical sight on an air gun, rifle, and even a carbine, if he is not sufficiently qualified, the result may not justify itself, critical errors may occur, and because of this, the entire effectiveness of this device is reduced. weapons.
As for the sighting brands of optical sights, they are individual for different manufacturers, that is, they have some individual features. In general, the general principles of zeroing are typical for the vast majority of models.
Adjustment
The process of bringing together the mechanical and optical axes
“Zeroing” the sight (adjustment) is the process of bringing together the mechanical and optical axes. The need for adjustment arises after purchasing a new sight - the shooter is not yet sure of the correct range set by the adjustment drums. The sequence of actions for adjustment is as follows:
- The vertical correction drum is turned all the way down, and the horizontal drum is turned all the way to the left.
- The vertical and horizontal drums are clicked (“up” and “right”, respectively).
In this case, it is necessary to count the number of clicks over the entire range. It’s best to do this in splendid isolation—household members can throw off your mental calculations. In addition, a rifle occupying the kitchen table (on a special machine) is not the most positive sight for a wife. - Let's assume that you are 300 clicks away from the extreme positions of the drum. Count halfway (in this example, 150 clicks). This is the middle of both ranges. The sight is “zeroed” - its optical and mechanical axes are combined.
To reduce the risk of repair work, protect your scope from bad weather - heat, humidity and direct sunlight. Cover the lenses with caps, avoid mechanical damage and contact of harmful substances (lubricants, alcohol solutions) on the lenses. Periodically (after 1000-1500 shots) check the internal fastenings. Have a good hunting!
Evaluation of shooting results
The main parameter that is used to evaluate the zeroing of an optical sight on an air weapon is the average point of impact. Its value is calculated very simply. To do this, you should take into account such indicators and characteristics as:
- After three shots have been fired into the nearest holes, the targets must be connected to each other by one straight line.
- The resulting segment should be divided exactly in half.
- Then, from the central point, it is necessary to draw a beam to the third, that is, the farthest bullet hole (entrance).
- The single beam must also be divided into two equal parts.
- Next you should draw the last line. It must be made between the two central points of the resulting segments. This is approximately 1/3 of the distance from one central to another. This will serve as the STP value.
By determining the average point of impact and the resulting dial, existing alignment deviations can be easily and simply identified. In addition, thanks to this, you can make all the necessary adjustments to the settings. For example, in this way you can shoot both a collimator sight and sensitive optics with absolutely any settings, even capricious ones.
Rules for shooting from a machine gun
In order to effectively carry out combat missions, the machine gunner must continuously monitor the situation on the battlefield. Before starting a fire, you need to carefully analyze the situation and direct the fire where it is really needed. A properly trained and trained shooter is able to fight regardless of the time of day or weather conditions. If the situation on the battlefield requires dense, concentrated fire, the machine gunner should not hesitate to fire in long bursts. After the magazine with cartridges is empty, the machine gunner must replace it with a new one within a few seconds and continue the fight.
Security measures
There is an opinion that air guns in themselves are harmless. Actually this is not true. Such weapons are a source of mortal danger. Even when using the lightest air rifle with a telescopic sight, tragedy can occur if safety precautions are not followed. And not only in relation to animals or birds, but even for the shooter himself, as well as for random passers-by.
That is, it turns out that even if a hunter has certain knowledge and experience in shooting and knows the design of an optical sight perfectly, he in any case needs to know and follow the following basic safety rules:
- Any weapon must always be kept in impeccable order. Each weapon requires special care; it needs to be cleaned and lubricated. This also applies to sighting devices. Optics for rifled weapons have much greater capabilities compared to the optics of other rifles. In this regard, it is the safest. But air guns are the opposite. It works over short distances, and due to the fact that the time for making decisions is significantly reduced at this moment, the risks of getting into the wrong place and causing harm to someone increase many times over.
- When shooting you need to be very attentive and extremely careful. Under no circumstances should you shoot spontaneously if you hear rustling in the bushes. Very often accidents occur due to negligence.
- It is recommended to use only standard ammunition and accessories. Unfortunately, very often, wanting to save money on weapons, hunters improve the performance of their weapons by using non-standard charges. As a result of this, the hunter endangers not only his own life, but also those of bystanders. Therefore, to avoid such tragedies, it is necessary to follow the special markings of optical sights.
Safety precautions when handling automatic weapons
When handling weapons, strict adherence to safety rules is required. It doesn’t matter where the shooting takes place, on a firing range or in a real battle, safety rules cannot be neglected. They are as follows:
- All actions with weapons are carried out only at the command of the leader;
- After finishing shooting, it is necessary to check the weapon for the presence of a cartridge in the chamber, if there is one, and unload the weapon;
- The weapon must be held with the barrel up;
- After receiving the command “Cease fire”, stop firing immediately;
- The weapon must be stored and transported only with the trigger pulled and the bolt closed.
Shooting from a machine gun is very popular among the military and special forces, since the Kalashnikov assault rifle is the main weapon of the Russian army. Civilians who want to learn how to shoot a machine gun can purchase a Saiga carbine, which in some modifications almost completely copies a combat AK. You won't be able to fire a burst from a carbine, but the necessary skills for shooting from a machine gun can be acquired.
How to load 12 gauge cartridges
The process itself does not take much time, but requires attention and accuracy from its participant. Self-equipping 12-gauge bullet cartridges has a lot of advantages; it’s not for nothing that experienced hunters equip entire workshops at home (Figure 1).
The method is universal for shot, buckshot and bullet units - it is easy to learn, and hand-rolled cartridges last much longer than those packed with a star.
In addition, when fired, the ammunition creates less internal pressure, which makes it less harsh and extends the life of older barrels, which can be damaged by excessive muzzle impact.
To complete the task, you will need special equipment for loading 12-gauge cartridges, which includes certain devices and materials:
- The first include scales with a set of weights, dispensers and measures for gunpowder and pellets, stands for shells, and a guard for delivering wads.
- The second includes charging units, wads, gaskets, gunpowder and primers.
- It is worth highlighting some devices separately - UPS, a tool for rolling sleeves.
In the process of work, it is necessary to adhere to certain rules; the peculiarities of equipping 12-gauge cartridges are that the activity itself is difficult and dangerous, so it must be carried out in a prepared place so that there are no unnecessary objects on the work table. A similar condition is the absence of strangers; for beginners, it is worth doing business in the company of an experienced person.
Figure 1. Loading ammunition requires care and concentration.
Concentration and attentiveness are the main criteria for your safety and success; you should never smoke during the exercise.
How to load 12 gauge bullets and buckshot
Following the general rules and principles of loading ammunition, loading 12-gauge buckshot cartridges implies: using felt or wood-felt wads and hanging a clear amount of flammable substance - 1.8 g of Sunar, 7 g of Bear or 2.1 g of Falcon. It is worth considering that, for example, smokeless powder is very sensitive to compression, you should not overdo it (Figure 5).
A careful inspection of the liner for ruptures and cracks is also required; if they are present, it is discarded.
Do-it-yourself loading of 12-gauge cartridges with a bullet is carried out in accordance with the above recommendations; two felt wads are used for it - the main one and the additional one. They are installed so that 5 mm is left free for rolling and special devices are used - a machine or a press.
Figure 5. Cartridges, if desired, can also be filled with buckshot
Loading 12-gauge cartridges with buckshot is a little more complicated. First, take buckshot with a diameter of 8 mm and pour sawdust to the edges onto wads or cardboard pads. Next, they lay the buckshot in 4 pieces and tamp it with a navoynik, and then repeat the operations again, the last time placing 3 particles, then put a gasket and tighten the ammunition.
General principles for loading hunting cartridges
The skill of independently loading ammunition will be useful to every hunter. But you won’t be able to master it without special tools; the main components of 12-gauge cartridges are: spacers and wads, cartridge cases and primers, charge, gunpowder and dispensers, and measurements for its canopy.
You will also need a machine for loading 12-gauge cartridges, which allows you to insert igniters of any kind into paper and metal, plastic cartridges, remove primers of all types from already fired clips, seal the sleeve using a machine-type “star” method and press in wads.
Loading 12 gauge cartridges for hunting can be done in several ways:
- 2 1.5 mm seals are added to the clip with the Zhevelo igniter and the Sokolov flammable substance, after which a felt wad is placed above them, if necessary, placing an additional one on it, then the shot is poured in and covered with a cardboard spacer, after which the equipped product is rolled.
- They do the same thing, using instead of seals one polyethylene seal with a small hole in the center, another way is to put another bedding between it and the wad in the center, which saves a lot of gunpowder.
- Further options for the equipment are various combinations of different types of wads and the number of sealing gaskets with or without a seal.
What does the correct equipment for 12-gauge cartridges look like using a real example, if you use Sokol gunpowder:
- Following the recommendation on the jar, take 2.3 g of powder per 35 g of shot.
- For a cartridge case with a height of 63 mm, the height and mass of the flammable substance are 14 mm and 2.1 g.
- Shot column No. 7 with a weight of 32 g is 18 mm, the twist height is 11 mm.
- Based on the data obtained, the wad size is calculated - 63-14-18-11=20 mm.
- It corresponds to BRG 19, which is installed using a machine.
The equipment of 12-gauge cartridges for long-range shooting has its own specifics. In the case of using buckshot, it is stacked in the amount of 9 units of 3 pieces. With a polyethylene seal without a hole, the weight of the powder charge is reduced by 0.2 g for one cardboard gasket 1.5 mm thick and by 0.15 g for two seals. A concentrator with a hole is used together with one 1.5 mm bedding.
Prohibition on use
The taboo on the use of shackles applies to pregnant women, citizens with obvious signs of disability and minor citizens, but unless they resist, and then the “Irish handcuffs” will turn out to be real for them.
Irish handcuffs are a joke used to refer to hands occupied by bottles of alcohol. Devices are not used during peaceful rallies and demonstrations unless the operation of vehicles, communications, and organizations is disrupted.
The use of handcuffs, as it may initially seem, is not a simple matter in reality.
It requires skill and dexterity, otherwise you can get injured and even break your own or the offender’s arm.
Over the centuries, hand bracelets have not lost their relevance. Since the beginning of their release, the shackles have changed, but not dramatically. They are an integral attribute of law enforcement and security agencies. We must assume that the shackles will be used for many centuries to come and their history is not over yet.
What types are there
There are several types of these special equipment. The classic type of handcuffs consists of two metal bracelets, which are connected by two welded chain links. To latch the lock, a key is not used, the shackles are locked automatically, you just need to make sure that your wrists are not pinched. There are a variety of sizes of handcuffs, it's just that people are different and it is difficult to secure the large type of handcuffs on small hands.
There are Russian types of handcuffs, but there are also foreign ones.
American:
- Peerless in translation sounds like “incomparable”. Patented in 1912, the patent became invalid in the 70s, which made it possible for other companies to copy them. These devices have anti-squeeze pins and grooves on the arc; the existing lock blocks their further advancement, which prevents excessive tightening. The latch is activated by pressing the pin with a special pin on the key.
- Model No.-100. Widely used for games. This type of bracelets does not cause any injury. Easily opened with folded paper, even when your hands are behind you.
- No.-3000 with loops. This type has a more rigid fixation of the wrists. The lock on them can be located on the front, which makes opening it easy, but if you try to open them from the back, then skill will be required.
- Iron-Masters (Iron Lords). There is a complex lock built in that you just can’t open. They are massive; the long chain provides greater freedom of action.
- Darby – translated as “hand shackles.” It is known that the appearance of these ancient handcuffs served as an example for all manufacturers for about 300 years. In some states of America, they are still used in police work. They close without a key, but they open by screwing it in; they cannot be opened quickly, even if the offender has the key. At first they were produced without fitting to the wrists, in various sizes, for men, women and children. However, not all men were suitable for men's types of handcuffs. Nowadays they use mainly universal ones.
- Game handcuffs. Most often used for sexual games. They are sold in adult stores and, of course, permission is not required.
Russian species:
- Tenderness – 1. Produced by a Russian company of the same name, used by the police. The prototype for their production was the American “incomparable” type of 1912. But there were still some differences: the chains were longer, the bracelets were matte. They can be opened not only with a key, but even with a paper clip.
- Tenderness – 2. Metal handcuffs. The lock prevents excessive tightening and can be activated by pressing in the pin.
- Samples from the Soviet era. They started making them in the 30s of the last century and received the name “BR” - hand bracelets. They have been slightly modified, but are still used by law enforcement agencies. They are characterized by heavy weight, bulkiness, lack of aesthetics, and have a strong spring. The chain links are welded, with anti-spin and locking mechanism.
- Model "BR-2M". This is a simplified and cheaper option; there is no anti-spin or locking mechanism. The latch mechanism is the same as that of “Tenderness - 1”, with a weak spring, the slightest force and they will latch tightly.
- The crab is a Russian-made device with large arches, similar to the Western model OVERSIZED, which means “enlarged”. Heavy and crudely made. The closing bow has several large teeth, but the latch mechanism only has one tooth. Thanks to the protruding outward latch, the bracelets can be fixed without using a key; the fixation is removed by turning the key, as when opening. An anti-squeeze groove was placed on one side of the arc, but it does not perform its function well. The key is made from a flat metal plate. Because of their large size, they are too big even for adult men. This model is easy to open with any hairpin.
- Operational handcuffs BRS-2V, a widespread Russian model. This is a two-link device connected by a chain, made of blued steel. The device differs in that if the bracelets are slammed and locked, they do not squeeze the hands too much.
- Finger cuffs. These are modern handcuffs made in Russia. They are worn on the thumbs. They are opened using a key that has a pin that activates the lock.
- Fixing metal handcuffs without chain.
- Screw model. It was not possible to establish their origin for certain. There are differences from other types - this is a lock, blind holes instead of teeth, pins in place of the latch with teeth, which prevents them from simply being pressed out. Although the spring is not elastic, they snap into place easily. You can open them with a key using a screwing motion, but due to the inconvenient location of the lock at the end, this will be difficult to do, especially when the bracelets are worn on both hands.
Operation of special equipment is possible at temperatures from -30 to + 40 degrees; they are stored in a special place for this purpose.
During a break from the main activity, handcuffs are cleaned and lubricated. Timely maintenance contributes to the long operation of these devices.
Charging using the UPS5 press
This universal device is essentially a cunning press that allows you to crimp cartridges with a “star”, it can also remove primers and insert new ones in their place, and press wads (Figure 3).
In addition to this, the equipment set for 12 gauge cartridges includes:
- Support cone, cone, also known as pestle and funnel.
- Sleeve and die for star-shaped packaging.
- Needles for removing spent igniters.
- Cup for inserting new capsules.
The kit also includes attachments for 12-gauge cartridges: a standard star-type crimp, a crimp ring for the bottom of the clip, for final pressing of the ammunition.
Homemade paper targets
Sports markings made of paper are a simple option. All you need to do is find the desired drawing on the Internet, download it to your hard drive and print it out. Paper format – A4 (standard). It will be a classic sports marking, or an image of an animal - it all depends on the shooter’s imagination.
If you don’t have a printer at home, it’s time to remember drawing.
Materials and accessories
You will need the following materials and tools:
Manufacturing process
- A sheet of A4 paper is folded in half; to determine the central point, mark it with a pencil.
- Use a ruler to measure 10 cm from the center (or apply a compass to the measuring accessory).
- A compass with a given pitch is installed with a needle on a point. A clear circle is drawn.
- The step of the compass is reduced by 1 cm, then the next oval is drawn.
- The process is repeated until the target is completely ready.
The finishing touches are to draw the numbers with a marker and paint over the “bull’s-eye”. Different colors are used. Paper targets are fixed with pushpins, tape, and universal glue.
Loading a cartridge with a container
The specificity of using such projectiles is that they are initially designed to increase shot accuracy. Modern manufacturers have made it much easier for hunters to equip 12-gauge cartridges with a container (Figure 4).
Figure 4. Stages of loading a cartridge with a container
They make special container wads, which also contain a shock absorber with a seal. The latter copes well with breakthroughs of powder gases; due to shock absorption, the pressure surge in the chamber is smoothed out, which allows you to maintain the shape of the shot cloud.
The polyethylene cup itself prevents contact of pellets with the walls of the barrel, preventing them from deforming, and reduces its lead content. Its operating principle is no different from the usual one, except for greater speed and convenience.
The correct choice of container affects the equipment of 12 gauge hunting cartridges at home. Its dimensions must correspond to the weight of the shot - all of it must fit into it. The height of the part should suit your projectile and the way it is packaged.
The main elements must be strong so that the product does not warp or deform during assembly or firing.
How to load 12 gauge cartridges at home with loaded containers:
- The gunpowder is added after checking the cartridge case and replacing the primer, after which a wad is installed, which has been stored properly and has a complete seal.
- To maintain the integrity of the structure, it is also worth pressing a gasket and another small wad over the flammable substance if there is free space.
- The pellets are filled in such a way that they do not go beyond the limits of their container; if its height is greater than the amount that can fit in the projectile, the auxiliary parts of the structure are removed.
Purpose
According to Russian legislation, handcuffs are special equipment, and they do not belong to edged weapons, but they are considered prohibited means for mass sale. Purchasing and wearing them is possible only with a special permit; without it, handcuffs can be confiscated from civilians, so why run into trouble with law enforcement agencies.
Handcuffs are needed only for special purposes. Previously, even under the USSR, police patrols controlled the streets without the use of batons and the same bracelets, even a pistol was not always present in a holster and the streets were much calmer.
Now the police are in full uniform, the equipment includes a bulletproof vest, a baton, shackles, a machine gun, and a pistol.
Employees of the Ministry of Internal Affairs of the Russian Federation and departmental security can use all these devices against offenders in order to:
- limit the physical force of those arrested;
- prevent the possibility of resistance by the intruder;
- suspend the commission of illegal actions;
- deliver the violent offender to the police station.
Not only police officers use handcuffs; these devices can be used by bodyguards or security guards, but in compliance with strict rules.
The order of correct actions for private security company employees when using bracelets:
- The employee should warn the person or group of people about the possibility of their use, and give them time to comply with the requirements. The exception is the situation when the slowness of the security guard threatens his health and life or another person, or more severe consequences may occur.
- Employees should try to minimize harm to the health of the offender due to the use of such devices. If necessary, first aid is provided to the victim. In emergency situations, it is advisable to immediately call an ambulance and the police.
- Law enforcement agencies are notified of bodily harm caused by the use of special equipment.
These special means are carefully secured on the hands of the offender so as not to cause harm to the offender. The grounds for using handcuffs must be lawful, otherwise criminal liability is provided.
This category of employees undergoes special retraining over a certain period of time. There they perform standard exercises for private security guards and other persons with special statutory tasks.