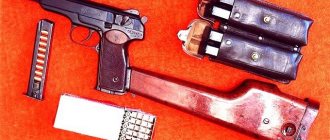
To disassemble a product such as the Makarov Borner PM 49 air pistol, you will need:
1. Phillips screwdriver.
2. Flat head screwdriver.
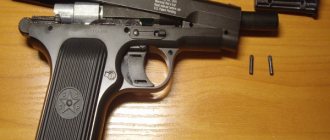
Determine the working space, prepare the box so as not to lose important parts of the pneumatics. So that nothing interferes with the further procedure, remove the PM49 magazine, and then remove the plastic cheeks of the Makarov pistol. Do not break the fixing tendrils, after removing them there should be four left - 2 on top, 2 on bottom.
Air gun device
Weapon contains parts:
- frame consisting of two parts, they are symmetrical;
- a barrel that connects to the gas mechanism. The bullet flies out of the barrel using the energy of a compressed gas cartridge located in the magazine;
- feed unit;
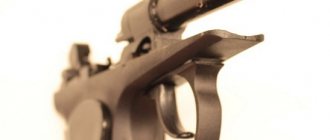
- gate. There is a fuse on the left side of the bolt. When switching to the safety mode, the trigger is safely released without firing, ensuring that the hammer does not hit the firing pin;
- trigger mechanism. It makes it possible to shoot using self-cocking or pre-cocking. The gas for the shot is cut off using a working trigger;
- handle cheek;
- shop. The process of feeding a bullet onto the barrel line occurs due to the magazine spring;
- You can use two types of cans in weapons - 7 grams (if the included adapter is used) and 12 grams.
The parts are made of metal alloy. The slots are made of plastic. All materials from which the gun is made are not very hard. Therefore, you need to handle it carefully to avoid falls on hard surfaces or impacts. It is necessary to ensure that dirt and sand do not get into the mechanism.
In order to properly use personal weapons and provide them with proper care, you need to know how partial and complete disassembly and reassembly of weapons is done.
Operational and technical characteristics
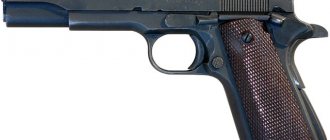
Umarex Makarov became the first-born of this company to produce a replica of the PM. Unlike MP-654k, it is made of a metal alloy, which is fragile, which can be attributed to its disadvantages. The Baikal model is made of weapons-grade steel, which makes it indestructible. The design of the PM 49 air pistol is based on a combat pistol.
Umarex PM is painted black, and often unsuccessfully. Some models are marked 654. Advantages include:
- the ability to jerk the shutter;
- fuse installation;
- double-action trigger mechanism, that is, shoot both self-cocking and from a pre-cocked hammer;
- magazine for 18 balls, a CO2 cylinder is installed separately in the handle.
To charge, move the cheeks of the handle back, which will open access to the installation of a CO2 cylinder. The puncture is made by a hidden clamping screw, however, this option is implemented better than in the MP654k.
To remove the magazine, move the lock located on the handle forward. Loading is carried out one ball at a time, which is fed into the combat unit using a spring.
The power does not exceed 3J, which complies with the law, the steel ball flies out at a speed of 120-130 m/s, which allows you to confidently pierce beer cans or break glass bottles. One fresh CO2 cylinder can fire 130 full shots, after which it needs to be replaced.
In cold weather, the power of the weapon decreases, which is due to the properties of the gas; in addition, with frequent shooting, the mechanism freezes.
The tactical and technical characteristics of the Umarex Makarov are summarized in a table.
| Characteristics | Makarov |
| Caliber, mm: | 4.5 mm (.177) |
| Shot speed, m/s: | 120 m/s |
| Magazine capacity: | 18 bullets |
| Weight, kg): | 0.685 kg |
| Size: | Length 167 mm |
| Energy Source: | CO2 canister 12 g. |
| Bullet type: | BB balls |
| Material: | metal |
| Power: | < 3 J |
| Blowback: | No |
| Shop | pencil |
Incomplete disassembly
You can disassemble both a combat and non-combat pistol. Partial disassembly is carried out in order to “practice” in handling the weapon. The time for incomplete disassembly in the field can be reduced, since there is no need to check the loaded cartridge.
In practice, to service and care for the weapon, it is sufficient to carry out partial disassembly. Complete “dismemberment” must be done every 5 thousand shots to eliminate accumulated dirt.
Be sure to check the instructions for disassembling the weapon.
What should be done:
- Press the latch at the bottom of the handle and pull out the magazine.
- Remove the safety from the weapon.
- Lower the trigger guard down.
- Lift the back of the bolt up and pull it back.
- Remove the shutter from the frame.
- Remove the return spring.
Partial disassembly completed.
Cleaning and Lubrication - General Recommendations
Weapons need to be given time, even air guns. If it is not cleaned and lubricated, the shooting quality will decline over time. After each shooting, the weapon must be visually inspected. If it gets wet, wipe it with a dry cloth, disassembling it if necessary. Check for rust, cracks, and chips.
We start cleaning from the barrel. There is always lead left in the rifling. The barrel must be freed from it with a cleaning rod and rags. Apply a little lubricant. The barrel has been cleaned.
If a weapon is used, it must be given due attention. https://www.youtube.com/embed/LPK7vs-0_FM
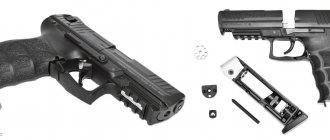
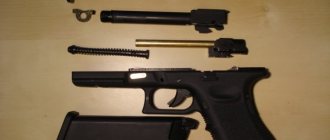
Complete disassembly
If a Makarov air pistol is seriously dirty, dropped into water, broken, or subject to tuning, it must be completely disassembled. You can do complete disassembly of the MP-654K yourself if you have physically strong fingers. Otherwise, you simply won’t be able to collect weapons later.
Disassembly should be carried out on a clean white cloth, so you will notice the dropped components of the weapon and prevent their loss.
Procedure:
- Perform partial disassembly of the pistol.
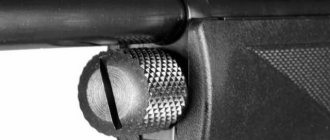
- Then slide the cheeks back to remove the CO2 cylinder; pull it out of the handle.
- Remove the covers and set aside.
- Using a Phillips screwdriver, remove the screws that hold the two halves of the case together.
- Open the case, making sure that the components of the firing mechanism do not get lost.
- Remove the rod, remove the spring-loaded trigger, and move the guard to the side.
- Remove the barrel connecting to the gas valve. The green gasket is pressed with a special nut. Used to seal the gas valve assembly. In addition, it does not allow the gas to evaporate. If the cylinder is punctured and gas escapes, this means that the gasket is faulty and needs to be replaced. In this situation, you will have to change the o-rings. The repair kit includes all the necessary parts for the gun. When ordering replacement parts, please specify which model requires them.
- Carefully and carefully unscrew the impact mechanism, you will see the first ring that needs to be replaced.
- Unscrew the nut that presses the gasket in the gas block. Use tweezers or an awl to remove it.
- Replace the gasket and tighten the nut again.
Remember - the O-rings that you installed must be lubricated with silicone paint. This must be done with extreme care.
Pros and cons of TT pneumatics
Summarizing all of the above, I would like to figure out whether an air pistol is worth the money. To understand this, it is necessary to study what positive and negative aspects a weapon has. Here is the basic information on this matter, left on the forums by experienced users:
| Advantages | Flaws |
| Appearance (the weapon is an almost exact copy of the legendary TT, known in many countries around the world | Narrow specialization (without modifications, weapons cannot be used for hunting) |
| Maintainability (as already mentioned, if you have good spare parts, replacing parts will not be difficult) | The quality of the gas cylinder (over time, the air begins to bleed) |
| Tactical and technical characteristics (the pistol is perfect for training or recreational shooting, as well as for airsoft) | The presence of double recoil (an eternal problem with 90% of air pistols with the Blowback system) |
| Availability (pneumatic TT can be found in almost any gun store, as well as spare parts for it) | Cost (for 6,000 rubles you can find many analogues with more powerful performance characteristics) |
Of course, for some people the listed pros and cons may seem insignificant, but we still recommend that you read them carefully before going to the store to make a purchase. Also, do not forget about the possibility of eliminating certain shortcomings yourself by upgrading (although this will require some knowledge about the design of air guns). For example, to prevent air from bleeding out, it is enough to install several rubber gaskets inside the receiver.
However, if you are looking for a model that can be used for hunting or self-defense, then it is better to focus on something more powerful. Although we should not forget about the possibility of modernization
If desired, you can replace the gas cylinder with a more powerful one and get a weapon that differs not only in quality, but also in destructive power.
How to assemble an air pistol
To reassemble the weapon you need to do the following:
- Insert the trigger guard into the groove and secure it with a pin.
- Insert the spring from the bracket into the frame.
- Using the barrel bushing, recess the bracket spring. To do this, you need to rest the sleeve with its upper side against the edge of the table. The spring is quite elastic, so you have to try.
- Hold the spring with the barrel bushing and screw the barrel into place.
- Pull down the bracket and place the trigger in the groove.
- Return the trigger guard to its place.
- Place the trigger rod in the trigger eye.
- Return the trigger to its previous position.
- Install the mainspring, pressing it against the frame with your finger, and put on the lock.
- Place the handle shell on the frame and tighten the fixing screw. Tighten it all the way, then turn it half a turn counterclockwise. The pin of the screw must be vertical or horizontal, then it will be fixed using a spring-loaded tooth.
- Install the slide stop, aligning the hole with it and the hole on the left side of the frame.
- With the nose towards the trigger, insert the sear into these holes. Align the face at the other end of the sear axis with the groove on the frame and push the end inside the frame.
- Put the tail of the spring sear with the rubbing spout on top of the bolt stop.
- Place the firing pin in the bolt.
- Install the safety catch into the bolt, turn it counterclockwise and lock it in the “Fire” position.
- Place the return spring on the barrel (the narrow end to the “chamber”).
- Put the shutter in place. On some models, this requires pulling the trigger guard down.
- Check the operation of the trigger and fuse.
Loading the Makarov PM pistol
To load the pistol you must: remove the magazine from the pistol handle by moving the magazine latch back; equip the magazine with eight rounds; insert the loaded magazine into the pistol grip; move the shutter to the rearmost position and release it sharply. When inserting a loaded magazine, the magazine latch slides over the protrusion on the wall of the magazine. The upper cartridge rests on the ridge of the bolt and lowers all the cartridges down slightly, additionally compressing the feeder spring. When the bolt casing moves back, it turns the trigger, compresses the return spring and stops when it meets the ridge of the trigger guard. The trigger, turning, with the front part of the annular recess moves the trigger rod with the cocking lever forward upward, bringing it to the protrusion of the sear. The sear, under the action of a spring, jumps its nose behind the cocking cock. After the bolt passes through the magazine, the upper cartridge, under the action of the feeder spring, rises up until it stops at the bends of the magazine walls and becomes in the path of movement of the bolt. When moving forward, the bolt casing, under the action of the return spring, removes the cartridge from the magazine, sends it into the chamber and locks the barrel. The ejector with its hook jumps into the annular groove of the cartridge. The gun is ready to fire.
Self-cocking shot from a Makarov "PM" pistol
If shooting is carried out without first cocking the hammer, then when you press the trigger, the hammer is cocked automatically. In this case, the cocking lever, having engaged its self-cocking protrusion with the self-cocking tooth of the hammer, cocks the hammer, but the latter, without standing on the sear, breaks away from the self-cocking protrusion of the lever and strikes the firing pin - a shot occurs. At the moment the trigger is released, the sear turns out to be raised to the upper position by the protrusion of the cocking lever.
The position of the parts of the Makarov "PM" pistol when fired by self-cocking.
Setting the Makarov "PM" pistol to the slide stop
When all the cartridges are used up, the magazine feeder, with its hook, presses the front end of the bolt stop, which stops the bolt in the rear position. The bolt remains in the rear position even after removing the magazine from the pistol handle, holding on to the bolt stop. You can return the bolt to its original position as follows: either insert the loaded magazine into the pistol grip. In this case, the oblique protrusion on the left wall of the magazine rotates the bolt stop, which releases the bolt. The bolt, under the action of the return spring, will move forward and send the cartridge into the chamber; or press the shutter stop button.