General provisions
91. Firing from a machine gun can be carried out from various positions and from any place from which the target or area of terrain where the enemy is expected to appear is visible.
When firing from a standing position, the machine gunner assumes a shooting position while standing, kneeling, or lying down, depending on the terrain conditions and enemy fire.
While on the move, the machine gunner can fire on the move without stopping and from a short stop.
When traveling on an armored personnel carrier, car, tank, landing craft and skis, the machine gunner takes a position that is convenient for him to fire, observing safety measures.
92. In combat conditions, the machine gunner occupies and equips the shooting area at the commands of the squad leader or independently. In the command to occupy a firing position, the commander can also determine the time for equipment, the firing position, the firing sector, or the direction of firing.
To fire from a machine gun, you must choose a place that provides the best visibility and fire, protects the machine gunner from observation and enemy fire, and allows you to conveniently perform shooting techniques.
Depending on the situation, the place for shooting is chosen in a trench, trench, shell crater, ditch, behind a stone, stump, etc. In a populated area, the place for shooting can be chosen in a window of a building, in an attic, in the foundation of a building, etc. P.
You should not choose a place for shooting near prominent individual local objects, as well as on the ridges of hills,
93. When preparing a place for shooting in advance, it is necessary to check the possibility of firing in a given sector or direction, for which the machine gun is sequentially aimed at various local objects. For ease of firing, it is necessary to prepare a stop for the forend of the machine gun.
Rice. 48. Holding the machine gun while crawling on your belly
94. To occupy a place for shooting, a command is given, approximately; " So and so
(or to such and such a machine gunner),
the place for shooting is there - for battle
.” At this command, the machine gunner, applying himself to the terrain, quickly takes a place for shooting, prepares to fire and opens fire.
95. To change the place for shooting, a command is given, approximately: “ To such and such
(or a machine gunner like that), run over
there - forward
.” Following this command, the machine gunner outlines the route to advance to a new location, hidden places for stopping, and a method of movement, if it was not specified in the command.
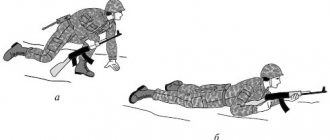
Depending on the situation and the nature of the terrain, the machine gunner moves in battle by running, at an accelerated pace, and by dashing or crawling. Before moving, the machine is put on safety.
96. When running, at an accelerated pace and when dashing, the machine gun is held with one or two hands, as is more convenient.
When crawling, the machine gun is held with the right hand by the belt at the top swivel or by the forend (Fig. 48).
97. To successfully perform fire missions, a machine gunner must be fluent in the techniques of firing a machine gun.
Each machine gunner, guided by the general rules for performing shooting techniques and taking into account his individual characteristics, must develop and apply the most advantageous and stable position for shooting, achieving a uniform position of the head, body, arms and legs.
Depending on the physical characteristics of the machine gunner, it is allowed to fire from the left shoulder, aim with both eyes open, etc.
98. Firing from a machine gun consists of preparing to fire, firing (shot) and stopping shooting.
Fire: single or automatic
In the article “Choosing the type of fire” S. Monetchikov writes that shooting in short bursts is the main type of fire for automatic weapons. This idea is also reflected in official documents defining the methodology for mass training of shooters since the post-war period of the USSR. At the same time, practice and sound calculation show the fallacy of such a concept. Let's just try to understand the advantages and disadvantages of shooting, both single shots and bursts. Moreover, we won’t generalize, but let’s start with its most widespread type – the automatic rifle.
The main advantages of single fire: 1. Economical consumption of ammunition. How much ammunition will a soldier take into battle? As practice shows, 8–10 stores. The rest of the ammunition, if any, will be stored in paper packets in the backpack. It is not always possible to replenish spent ammunition. So there are never too many of them, and Suvorov’s commandment “take care of the cartridge” should not be forgotten. In combat conditions, a unit may well encounter superior enemy forces if it is impossible to replenish its ammunition. 2. Less overheating of the weapon. After a certain number of shots, the barrel of the weapon becomes hot and begins to “spit” bullets. This is the worst option, which appears after intensive shooting of 3-4 magazines. But simply heating the weapon increases the dispersion of bullets and also impairs reliability. 3. Firing in bursts indoors increases the risk of ricochet injury to both the soldier himself and his comrades in the unit. This is especially true for panel houses; a bullet readily ricochets off concrete walls and ceilings. 4. When firing from weapons with PBS, single fire is also preferable, since in the intervals between shots the remaining powder gases have time to evaporate from the muffler, and the device itself has time to cool down at least a little. In any case, the sound of single shots is damped much better than even a short burst.
The very essence of short burst shooting is to cover the target with several bullets, increasing the likelihood of hitting it. To do this, all the bullets in the burst must hit the outline of the target or at a short distance from it, but the machine gun (AK, at least) throws the recoil upwards and to the right. There are two options to keep the weapon on the aiming line during the burst so that the affected area covers the target. The first is to aim at the “knee of the left leg” of the target, the second is to keep the sight on the target using correct posture and hand pressure. Both of these methods are good for a calm environment, as long as the fighter has the ability to aim and control his actions while shooting. In addition, in order to learn how to hold the same machine gun, you need to train for a long time, and practically shoot; even blank training will not help much here.
And most importantly, all this works well on the range, when shooting at a paper target. But if a fighter in heavy armor and a helmet, after an exhausting jerk, begins to fire back from behind cover, his results will be much lower than in the shooting range. There are several negative factors here, but the main one is stress, which does not allow a person to fully realize fine motor skills. That is, not only to keep the machine gun on the target during the burst, but even to control the length of the last one. The result is a stupid waste of ammunition.
Single shooting in such a situation is more effective. It’s just that for most, the term “single shooting” is strongly associated with the obligation to re-aim after each shot. But there is rapid single fire, when aiming is partially restored, the main thing is that the front sight is in the target area. The 74th AK in this regard is slightly more advantageous than the AKM, the recoil impulse is smaller, the weapon returns to the aiming line faster, although with proper training the difference disappears. If you train the trigger correctly so that your finger can work at a good pace, the rate of fire will be high. And the accuracy of hits will increase significantly.
Burst shooting is a particular thing. For example, in case of insufficient visibility - at night, in fog or in greenery, when the target cannot be found except with a burst. True, there is the old principle “if I don’t see, I don’t shoot,” in practice it is used only by police and anti-terrorism units. So, in the event of a sudden collision with the enemy, the forward patrol of a group can fire with high density automatic fire in short bursts. Then switch to single-aisle, otherwise it will simply shoot out cartridges in vain and unmask itself. In the same way, aimless bursts are fired into the dark corners of rooms after throwing a grenade.
Another example when automatic fire is acceptable is an ambush. There is shooting here, like in a shooting gallery. You can choose a comfortable position, prepare yourself correctly, and control the burst when shooting, sending bullets where needed. Here you can increase the burst length to 6–8 shots.
The last example where burst fire takes place is hitting a crowded group target. Such situations are usually typical for computer games, but the events in the village. Pervomaisky showed that even a modern enemy is quite capable of breaking through in a crowd that can only be stopped by automatic fire.
As already mentioned, in the USSR automatic fire was recognized as the main type of fire, so machine guns never satisfied military customers in terms of accuracy of fire in bursts. As a result of theoretical research, requirements for the Abakan competition were developed. The fact is that for shooting from unstable positions (standing and kneeling, from the hand), the most successful was firing in bursts of 3 shots with a high rate of fire, when the barrel did not have time to rise up and all the bullets ended up in the target area. For firing from stable positions (lying and sitting, with emphasis), the most optimal was automatic fire at an average rate, 600–800 rounds per minute. The Abakan competition has brought to life many interesting designs of assault rifles, but none of them have yet been presented en masse in the weapon system. So for now, most fighters will have to use an AK that only has single fire or continuous fire at a medium tempo, replacing burst fire with frequent single fire.
Now a few words about light machine guns, especially since in S. Monetchikov’s article the firing efficiency was determined specifically for the RPK. For light machine guns, there is no doubt that automatic fire is the main one. Only the tasks assigned to them are completely different from those of automatic machines. In addition, my opinion is that the RPK is not a light machine gun, but simply an assault rifle with a longer barrel. A truly cool light machine gun is the RPD-44, but it is out of production and out of service. Compared even to the RPK-74, this weapon pushes into the shoulder much more softly and does not jerk so much when firing. Many people criticize the “tar” for its heavy weight, comparable to a PC. But you also need to take into account the weight of the ammunition; with a 100-round belt, the difference is not so small. But with a PC on a bipod, it’s impossible to accurately “lead” a line like with a RPD. It’s not for nothing that “Minimi” is popular all over the world. I think something like an RPD on a Kalashinka base, with a replaceable barrel, a massive receiver and belt feed, will be a good help for the troops, because today most units take additional PCs. Such a “light support weapon” will not replace a single machine gun, but will allow the weapon system to be supplemented with automatic weapons capable of covering a target at 400–600 meters with automatic fire.
And finally. Everyone can have their own opinion, but how a soldier is trained in peacetime is how he acts in battle. Therefore, when determining shooting exercises, one must proceed from the conditions in which he will have to act, and take a flexible approach to resolving the issue, and not bend the “party line”, which was written in another time and for other conditions.
Yuri Bondar Photo from the editorial archive
Getting ready to fire
99. The machine gunner is prepared to fire on command or independently. During training sessions, the command to prepare to fire can be given separately, for example: “To the firing line, march at a pace,” and then “Load.” If necessary, the firing position is indicated before the “Load” command.
100. Preparing for shooting includes taking the position for shooting and loading the machine gun.
101. To assume a prone shooting position, you must:
1) If the machine gun is in the “on the belt” position, move your right hand along the belt slightly up and, removing the machine gun from the shoulder, grab it with your left hand by the trigger guard and receiver, then take the machine gun with your right hand by the receiver lining and the fore-end with the muzzle part forward. At the same time, take a full step with your right foot forward and slightly to the right. Leaning forward, lower yourself to your left knee and place your left hand on the ground in front of you, fingers pointing to the right (Fig. 49, a); then, leaning successively on the thigh of the left leg and the forearm of the left hand, lie on your left side and quickly turn onto your stomach, spreading your legs slightly to the sides with your toes outward; At the same time, place the machine gun with the fore-end on the palm of your left hand (Fig. 49, b).
2) If the machine gun is in the “chest” position. With your left hand, take the machine gun from below by the fore-end and the barrel guard and, lifting it slightly forward and up, remove your right hand from under the belt, and then throw the belt over your head and take the machine gun with your right hand by the barrel handguard and the hand-guard with the muzzle part forward. In the future, the prone shooting position is assumed in the same way as from the “on the belt” position with the machine gun.
102. To assume a kneeling shooting position, you must: take the machine gun in your right hand (Article 101) by the barrel lining and fore-end with the muzzle forward and at the same time, putting the right yoga back, lower yourself onto your right knee and sit on your heel; the shin of the left leg should remain in a vertical position, and the hips should form an angle close to a right angle. Place the machine gun with the fore-end in your left hand, pointing it towards the target (Fig. 50).
Rice. 49. The procedure for taking the position for prone shooting:
a - the driver rests on his left knee and left hand;
b - the machine gunner is held by the forearm with his left hand
103. To assume a standing shooting position
necessary:
1) If the machine is in the “belt” position
. Turn half a turn to the right in relation to the direction towards the target and, without applying the left yoga, move it to the left approximately shoulder-width apart, as is more convenient for the machine gunner, while distributing the weight of the body evenly on both legs. At the same time, moving your right hand slightly upward along the belt, remove the machine gun from your shoulder and, picking it up with your left hand from below by the fore-end and receiver lining, vigorously push the muzzle forward towards the target (Fig. 51).
2) If the machine gun is in the “chest” position
. With your left hand, take the machine gun from below by the fore-end and the receiver lining and, lifting it slightly forward and up, remove your right hand from under the belt, and then throw the belt over your head.
| Rice. 50. Kneeling position | Rice. 51. Standing shooting position |
At the same time, turn half a turn to the right and, without placing your left foot, move it to the left approximately shoulder-width apart, as is more convenient for the machine gunner, and vigorously move the machine gun with the muzzle forward, towards the target side (see Fig. 51).
104. When taking a shooting position with a machine gun “on the chest,” it is allowed not to remove the belt from the neck, but to use it to more firmly hold the machine gun when shooting (Fig. 52).
105. To load the machine gun
necessary:
— holding the machine gun by the fore-end with your left hand, attach the loaded magazine to the machine gun with your right hand (see Article 7, paragraph 9 and Fig. 11), if it was not previously attached to it;
— put the translator on automatic fire (AB), if the machine gun is on safety;
- with your right hand, pull the bolt frame back as far as it will go by the handle and release it;
- put the machine gun on safety (Fig. 53), if there is no immediate opening of fire or the command “Fire” is not followed, and move your right hand to the pistol grip (see Fig. 49, b).
Rice. 52. Shooting position using a sling:
a - from the knee; b - standing
106. If before loading the machine gun the magazine was not equipped with cartridges or the cartridges were used up during shooting, then it is necessary to equip the magazine.
Rice. 53. The machine is put on safety
To equip the magazine, you need to take the magazine in your left hand with the neck up and the convex side to the left, and in your right hand - the cartridges with bullets to the little finger so that the bottom of the cartridge case rises slightly above the thumb and forefinger. Holding the magazine with a slight tilt to the left, press the thumb (Fig. 54) to insert cartridges one at a time under the bends of the side walls with the bottom of the cartridge case towards the rear wall of the magazine.
Rice. 54. Loading the magazine with cartridges
107. When preparing to fire an assault rifle with a folding stock, you must fold the stock down before loading the assault rifle. To do this, holding the machine gun with your left hand by the shoulder rest and fore-end, and with your right hand by the pistol grip, push down the locking cap with the thumb of your right hand, and tilt the rods slightly downwards with your left hand (Fig. 55). After this, take the machine gun by the fore-end and the receiver lining with your left hand, fold the rods back with your right hand until they are secured in the folded position with the butt clamps and place the shoulder rest perpendicular to the rods.
| Rice. 55. Folding out the folding stock | Rice. 56. Firing position with stock folded |
If there is no time to fold back the butt (in the event of a sudden attack by the enemy), the machine gunner prepares to fire (and fires) from the machine gun with the butt folded, pressing the machine gun with the back of the receiver and the pistol grip to the body (Fig. 56).
The machine gunner must and can hit the head piece (Part 1)
Abstract: The AK-74 manual recommends a direct shot at the chest, but there are no chest targets on the battlefield. A fire duel must be fought with the main target. Therefore, it is necessary to fire up to a range of 300 m with a direct shot with a “3” sight, which will allow the machine gunner to conduct a fire duel even with the help of a standard mechanical sight.
The scientific version of this article was published in the publication of the Academy of Military Sciences “Vestnik AVN” No. 2 a 2013.
Part 1 The machine gunner must hit the head figure
In the last two decades, in combat operations where our small arms were used against US-made small arms, the loss ratio was not in favor of our weapons.
But it is generally accepted and confirmed by tactical and technical data that there is no superiority, for example, of the M-16 or M-4 itself over Kalashnikov assault rifles. On the contrary, the legendary reliability of the AK gives it a head start over any opponent. Therefore, our unsatisfactory loss ratio is usually explained by the poor training of the troops who fought with our weapons.
However, along with weapons, we also supply manuals for their use, our military schools and academies, and our advisers teach the recipients of our weapons how to shoot. Therefore, it is unacceptable to brush aside such results from the combat use of our weapons and our shooting methods.
Let’s analyze what methods of shooting from an assault rifle are taught in our “Guide to the 5.45 mm Kalashnikov assault rifle (AK74, AKS74, AK74N, AKS74N) and the 5.45 mm Kalashnikov light machine gun (RPK74, RPKS74, RPK74N, RPKS74N)” [1] :
Figure 1. Excerpt from Article 155 of the AK-74 Manual [1].
As we see, in the first paragraph of Art. 155 declared an indisputable position necessary for the maximum probability of hitting the target. After all, as succinctly stated in the monograph “Efficiency of shooting from automatic weapons” [2]: “3.5. The degree to which the midpoint of the hits coincides with the center of the target determines the shooting accuracy.”
But the second paragraph of Article 155 recommends a direct shot at the chest figure as the main method, because “P” corresponds to the range of a direct shot at the chest figure. On the standard sector (mechanical) sight of a Kalashnikov assault rifle there is a special position “P” - the range of a direct shot at the chest figure. That is, the machine gun’s sight is optimized for a direct shot specifically at the chest figure.
Therefore, the question of how many chest targets there are in combat is the main question for assessing the effectiveness of our main method of firing from a machine gun.
The chest figure, whose height is 0.5 m, is equal in height to the shooter in the shooting position lying “with his elbows shoulder-width apart” on an absolutely flat surface, for example, in the middle of a paved area. And how many targets are there in battle that take up a firing position on a completely flat area?
What firing positions are soldiers taught to take in foreign armies? Let's analyze this according to the document “Manual for planning and executing training on the 5.56-mm M16A1 and M16A2 rifles” [3], which can be translated as “Guide to planning and executing training on the 5.56-mm M16A1 and M16A2 rifles” (hereinafter translated author). This manual was developed at the US Army Infantry School at Fort Benning for US Army commanders and instructors [3, PREFACE]. This manual is used to teach soldiers in the US Army and other countries armed with M-16 rifles. Here is the main requirement of this Guide to choosing a firing position:
" IMPORTANT : ... Although the shooter must be positioned high enough to see all targets, he must remain as low as possible to provide additional protection from enemy fire" [3, FIRING POSITIONS].
The requirement to "stay as low as possible" is repeated in different variations for each type of firing position and determines the choice of firing position by a US Army soldier.
“When taking a position, the soldier adds or removes dirt, sandbags, or other forms of parapet to adjust its height” and only then assumes a firing position behind that parapet. And it is specifically stated to “place your elbows on the ground behind the parapet” (and not on it) [3, Supported fighting position]:
Figure 2. Supported fighting position [3, Supported fighting position].
Figure 3. Modified Firing Positions [3, Modified Firing Positions].
That is, if an American soldier has a few minutes, he is obliged, out of the blue, to build a parapet and take cover behind it. Moreover, he will definitely hide behind a stone or other natural parapet:
Figure 4. Alternate prone position [3, Alternate prone position].
“Figure 3-15 shows a soldier firing over the roof ridge and leaning out just enough to hit the target” [3, MOUT Firing Positions]:
Figure 5. Firing over rooftops [3, MOUT Firing Positions].
"Figure 3-17 emphasizes the need to remain in the shadows when firing from a window, and supports the requirement to take cover" [3, MOUT Firing Positions]:
Figure 6. Firing from windows [3, MOUT Firing Positions].
As we can see, when shooting from a window, a US Army soldier does not place his elbows on the windowsill, but is behind the window sill and uses it as cover. If you trace the direction of fire in Figure 6 (downwards, along the approaches to the house), it becomes clear that the enemy above the windowsill can only see the shooter’s head and shoulders, but not his chest.
There is also a position in the Manual [3] for shooting from a flat area. In this position, the shooter’s height is reduced in the following way: - first, they force the “non-shooting” hand to hold the rifle only by the fore-end, but not by the magazine. As a result, this arm is extended and the “non-shooting” shoulder is lowered;
- and if now the “shooting” elbow is placed shoulder-width apart, then the “shooting” shoulder will be significantly higher than the “non-shooting” one. But “the soldier adjusts the position of the shooting elbow until his shoulders are aligned...” [3, Prone unsupported position]. That is, the “shooting” elbow is set aside, as a result the soldier is pressed to the ground, which is facilitated by the short magazine of the M-16:
Figure 7. Prone unsupported position [3, Prone unsupported position].
Here a comparison with our lying position is necessary:
Figure 8. Excerpt from Article 118 of the AK-74 Manual [1].
From Figures 7 and 8 you can see that our shooter with the AK-74 is taller than the shooter with the M-16. This occurs due to the installation of the elbows at shoulder width, which leads to the raising of the shoulders and head to the level of the chest figure. And it is precisely this figure (measured according to our Manual) that we teach our machine gunners to shoot.
But in the US Army, the only position in which they do not care about lowering the silhouette is the standing position. But it is not intended for a fire duel, but for “observation of the firing sector, since it can be taken quickly while moving” [3, Standing position].
And even when shooting from the knee, which is used only when it is necessary to rise “on top of short grass or other obstacles” [3, Kneeling supported position], the “non-shooting” elbow is never placed on the knee, but is always “moved forward of the knee” [3, Kneeling supported position], as a result of which the shooter’s head and shoulders are lowered and the figure visible to the enemy above the obstacle is lowered:
Figure 9. Kneeling supported position [3, Kneeling supported position].
Thus, in the US Army there is not a single firing position in which an American soldier would be a chest target for the enemy; only the head target in a fire duel or a height target when moving.
And in our army, people who have been under fire are also taught to reduce their silhouette as much as possible.
The author of this article, in grades 9-10 at school (1975-1977), had initial military training conducted by a veteran of the Great Patriotic War, reserve colonel Dmitriev. He taught this: “In battle, before getting up to run, mark out a shelter where you will run: at least a hillock to hide behind, at least a hole into which you will fall. If you lie down in front of the enemy, you’ll be killed.”
And recently on the website “Military Review” in the article “Bringing the head to normal combat” there was a generally wonderful position for shooting at distances up to 1/10 of actual fire:
Figure 10 “Prone shooting” - the lowest visible silhouette of the shooter. If aiming is possible, shooting is very accurate” - [6].
The “Tumbler” exercise proposed by the author of this article is indicative. Out of 30 shots with a change of position for each shot, with a backpack weighing 30 kg, in 1 minute 50 seconds, from 80 meters, it is proposed to hit an A4 sheet thirty times (let me remind you, 210x297mm), that is, an almost exact copy of the head figure No. 5a . Surely, “Tumbler” is a practice for practicing actions in the event of an ambush. And quite rightly, the author of this exercise believes that since the organizers of the ambush had at least a few seconds to take positions, then those caught in the ambush will not see any other targets except the lead ones.
So, armies around the world train their soldiers to take a firing position “high enough to see all targets, but stay as low as possible.” Therefore, in fire duels, a machine gunner with a Kalashnikov almost never sees breast targets. Only head figures No. 5 or No. 5a from our “Shooting Course” [4]:
Figure 11. Targets No. 5 and No. 5a [4, Appendix 8].
And it is precisely at such – the main – targets that our machine gunner rehearsedly fires a direct shot for the chest figure. We’ll look at what this leads to in the second part of the article.
References [1] “Guide to the 5.45 mm Kalashnikov assault rifle (AK74, AKS74, AK74N, AKS74N) and the 5.45 mm Kalashnikov light machine gun (RPK74, RPKS74, RPK74N, RPKS74N)”, Main Directorate of Combat Training of the Ground Forces , Uch.-ed., 1982. [2] “Efficiency of shooting from automatic weapons”, Shereshevsky M.S., Gontarev A.N., Minaev Yu.V., Moscow, Central Research Institute of Information, 1979 [3] “Manual for planning and executing training on the 5.56-mm M16A1 and M16A2 rifles,” FM 23-9, 3 JULY 1989, By Order of the Secretary of the Army, Distribution: Active Army, USAR, and ARNG. [4] “Small arms shooting course (KS SO-85)” by the USSR Ministry of Defense, put into effect by order of the Commander-in-Chief of the Ground Forces dated May 22, 1985 No. 30, Military Publishing House, Moscow, 1987. [5] “Shooting tables for ground targets from small arms of 5.45 and 7.62 mm calibers" USSR Ministry of Defense, TS / GRAU No. 61, Military Publishing House of the USSR Ministry of Defense, Moscow, 1977 [6] "Bringing the head to normal combat", September 20, 2013, www .topwar.ru
The author of the article is Viktor Alekseevich Svateev, reserve officer. Email
Shooting production
108. Fire from a machine gun is carried out by command or independently, depending on the task and the situation.
The command to open fire specifies: who to shoot, the target, the sight and the aiming point. For example: “ So and so
(or such and such a machine gunner),
according to the observer, four to the target - fire
", "
Squad, along the column, five, to the waist - fire
."
When shooting at targets at ranges up to 300 m, the sight and aiming range may not be indicated. For example: “ To the machine gunners, fire on the attacking infantry.”
" At this command, the machine gunner fires with a 3 or “P” sight, and chooses the aiming point independently.
109. Firing (shot)
includes installing a sight, a translator for the required type of fire, placing the gun, aiming, releasing the trigger and holding the machine gun while firing.
110. To install the sight you need
, bringing the machine closer to you, with the thumb and forefinger of your right hand, squeeze the clamp latch (Fig. 57) and move the clamp until its front cut aligns with the mark (division) under the corresponding number on the sighting bar.
Rice. 57. Sight installation
111. To install the translator
to the required type of fire (Fig. 58), pressing the thumb of the right hand on the protrusion of the translator, turn the translator down: until the first click - for automatic fire (AB), until the second click - for single fire (OD).
112. For attaching a machine gun
It is necessary, holding the machine gun with your left hand by the fore-end or by the magazine, and with your right hand by the pistol grip and without losing sight of the target, rest the butt against your shoulder so as to feel the entire butt plate (shoulder rest) tightly fitting to your shoulder, the index finger of your right hand (first knuckle) place on the trigger.
Rice. 58. Setting the translator to the required type of fire:
a - for automatic fire; b - for conducting single fire
Tilt your head slightly forward and without straining your neck, place your right cheek on the butt. The elbows should be:
- placed on the ground in the most comfortable position, approximately shoulder width apart when shooting from a prone position
(Fig. 59),
standing and kneeling from the trench
;
- the elbow of the left hand is placed on the flesh of the left leg near the knee or slightly lowered from it, and the elbow of the right hand is raised to approximately shoulder height (Fig. 60, a) when shooting from a kneeling position outside the trench
;
- the elbow of the left hand is pressed to the side near the grenade bag if the machine gun is held by the magazine, and the elbow of the right hand is raised approximately to shoulder height (Fig. 60, b) when shooting from a standing position outside the trench.
If a belt is used with the stock to hold the machine more firmly when shooting, then the belt must be placed under the left hand so that it presses it against the fore-end (Fig. 61).
| Rice. 59. Holding a machine gun when shooting prone: a - with your left hand by the forearm; b - left hand behind the store | Rice. 60. Holding the machine gun when firing from the position: a - from the knee; b - standing |
113. For aiming
you need to close your left eye and look through the slot of the sight at the front sight with your right eye so that the front sight is in the middle of the slot, and its top is level with the upper edges of the mane of the sighting bar, i.e. take an even front sight (Fig. 62).
Rice. 61. Holding a machine gun using a belt when shooting from the position:
a - from the knee; b - standing
Holding your breath as you exhale, move your elbows and, if necessary, your body and yoga, bring the front sight straight to the aiming point, while simultaneously pressing the trigger with the first joint of the index finger of your right hand. When aiming, you need to ensure that the mane of the aiming bar is in a horizontal position.
114. To release the trigger
It is necessary, firmly holding the machine gun with your left hand by the fore-end or magazine, and with your right hand pressing the pistol grip to your shoulder, holding your breath, continue to smoothly press the trigger until the trigger, unnoticed by the machine gunner, is released from the cocking position, i.e., until there will be no shot.
Rice. 62. Even front sight
If, when aiming, the straight front sight deviates significantly from the aiming point, it is necessary, without increasing or decreasing the pressure on the trigger, to clarify the aiming and again increase the pressure on the trigger until the shot occurs.
Rice. 63. Prone shooting position with the magazine resting on the ground
When releasing the trigger, you should not attach importance to slight vibrations of the level front sight at the aiming point. The desire to pull the trigger at the moment of best alignment of the straight front sight with the aiming point, as a rule, leads to pulling the trigger and an inaccurate shot. If the machine gunner, pressing the trigger, feels that he can no longer breathe, it is necessary, without increasing or weakening the finger pressure on the trigger, to resume breathing and, holding it again as you exhale, clarify the aim and continue pressing the trigger.
115. When firing in bursts
you need to firmly hold the butt in your shoulder without changing the position of your elbows, keeping the front sight straight in the sight slot under the selected aiming point. After each burst, quickly restore correct aiming. When shooting from a prone position, it is allowed to rest the machine gun with its magazine on the ground (Fig. 63).
Techniques and rules for shooting with a PM pistol, AK74 assault rifle and RPK74 machine gun
PM pistol shooting techniques
Rice. 13. Standing shooting position; Rice. 14. Kneeling position Fig. 15. Prone shooting position
To assume a standing shooting position (Fig. 13), you must: turn half a turn to the left and, without placing your right leg, put it forward towards the target at shoulder width (as is more convenient for height), distributing the weight of the body evenly on both legs; unfasten the cover and remove the pistol from the holster; hold the pistol vertically with the muzzle up against the right eye, while maintaining the position of the hand at chin height; the left hand should be freely lowered along the body or laid behind the back; holding the pistol with the muzzle up, place the thumb of your right hand on the safety catch and lower it down (turn off the safety); insert your index finger into the trigger guard without touching the trigger.
Notes:
1. When shooting from the left hand, the body position is reversed; With your right hand, remove the pistol from the holster and transfer it to your left hand.
2. If shooting will be carried out with preliminary cocking of the hammer, and not self-cocking, then after turning off the safety, it is necessary to press the trigger head with the thumb of the right hand to cock the hammer.
To assume a kneeling shooting position (Fig. 14), you need to put your left leg back so that the toe of your foot is opposite the heel of your right foot; quickly lower yourself to your left knee and sit on your heel; keep your right leg as straight as possible from the knee to the foot, with the toe of the foot in the direction of the target; remove the pistol from the holster, remove the safety (move the flag down); cock the hammer if shooting will be carried out with the hammer pre-cocked; hold the gun as above.
To assume a prone shooting position (Fig. 15), you should take a full step with your right foot forward and slightly to the right; leaning forward, lower yourself to your left knee and place your left hand on the ground in front of you, fingers pointing to the right; then, leaning successively on the thigh of the left leg and the forearm of the left hand, lie on your left side and quickly turn onto your stomach, spreading your legs slightly to the sides with your toes out. Remove the pistol from the holster, turn off the safety and cock the hammer; if shooting will be carried out by self-cocking, then after turning off the safety, place the index finger of your right hand into the trigger guard without touching the trigger.
Firing a shot
To fire a shot from all shooting positions you must: select an aiming point; without ceasing to observe the target, extend your right hand with the pistol forward, holding the pistol by the handle with your right hand; place the index finger of this hand with the first joint on the tail of the trigger; extend the thumb of your right hand along the left side of the handle parallel to the direction of the barrel (Fig. 16); hold the outstretched right arm freely, without tension, keep the hand of this arm in a plane passing through the axis of the barrel bore and the elbow of the arm (Fig. 17); Do not squeeze the pistol handle and hold it as uniformly as possible.
Rice. 16. How to hold a pistol when shooting
Rice. 17. Standing shooting position
To aim, hold your breath as you naturally exhale, close your left eye, and look through the rear sight slot at the front sight with your right eye so that the front sight is in the middle of the slot, and its top is level with the upper edges of the rear sight; in this position, bring the pistol under the aiming point (without dropping it) and at the same time begin pressing the tail of the trigger.
Note. If it is difficult for the shooter to close his left eye separately, he is allowed to aim with both eyes open.
To release the trigger, it is necessary, while holding your breath, to smoothly press the first joint of the index finger on the tail of the trigger until the trigger, unnoticed by the shooter, as if by itself, falls off the combat cock, i.e. until the shot fires.
When the hammer is pre-cocked, it should be borne in mind that the trigger has some free play, during which the shot will not fire.
When pressing the tail of the trigger, apply finger pressure straight back. The shooter must gradually increase the pressure on the tail of the trigger during the time when the top of the level front sight fits with the aiming point; when the front sight deviates from the aiming point, the shooter must, without increasing or weakening the pressure, straighten the aiming and, as soon as the straight front sight is again aligned with the aiming point, again smoothly increase the pressure on the tail of the trigger.
When releasing the trigger, you should not be embarrassed by slight vibrations of the front sight at the aiming point; the desire to make the trigger necessarily at the moment of the best coincidence of the front sight with the aiming point can entail tugging on the trigger, and hence an inaccurate shot. If the shooter, pressing the tail of the trigger, feels that he can no longer breathe, he must, without weakening or increasing the pressure of the finger, take a breath and, holding it again, continue to smoothly squeeze the tail of the trigger.
Rice. 18. Standing shooting position from behind cover
Rice. 19. Kneeling position from behind cover
Shooting from point-blank range and from behind cover
The emphasis is used to increase the reality of the fire. Depending on the height of the rest, the shooter must take the appropriate shooting position.
When shooting from a rest, place your right hand with a pistol on the rest so that the hand is suspended and the pistol handle does not touch the rest.
Covers are used to make it difficult for the enemy to observe and to protect from his fire.
When shooting from the hand from behind cover, you should take the appropriate position for shooting (standing, kneeling, lying down) and place your right hand on the stop so that the hand with the pistol is free (Fig. 18 and 19).
Firing techniques from the AK74 assault rifle and the RPK74 machine gun Fig. 20. The procedure for taking a position for shooting while lying down from a machine gun: a - the machine gunner leans on his left knee and left hand; b - the machine gun is held by the forearm with the left hand
Rice. 21. Assuming a prone position for firing a machine gun: a - installation of the machine gun; b - support with hands on the ground; c — prone shooting position
To assume a prone shooting position, you must:
If the machine gun is in the “on the belt” position, move your right hand slightly up along the belt and, removing the machine gun from your shoulder, grab it with your left hand by the trigger guard and receiver, then take the machine gun with your right hand by the receiver lining and the fore-end with the muzzle part forward. At the same time, take a full step with your right foot forward and slightly to the right. Leaning forward, lower yourself to your left knee and place your left hand on the ground in front of you, fingers pointing to the right (Fig. 20, a) then, leaning successively on the thigh of your left leg and the forearm of your left hand, lie on your left side and quickly turn onto your stomach, legs spread slightly to the sides with toes out; At the same time, place the machine gun with the fore-end on the palm of your left hand (Fig. 20.6).
If the machine gun is in the “on the chest” position, take the machine gun from below by the fore-end and the receiver lining with your left hand and, lifting it slightly forward and up, remove your right hand from under the belt, and then throw the belt over your head and take the machine gun with your right hand by the barrel pad and forend with the muzzle forward. In the future, the prone shooting position is assumed in the same way as from the “on the belt” position with the machine gun.
If the machine gun is in the “on the belt” position, move your right hand slightly up along the belt and, removing the machine gun from your shoulder, grab it with your left hand by the trigger guard and receiver; then take the machine gun with your right hand by the barrel lining and fore-end, and spread the legs of the bipod with your left hand.
At the same time, take a full step forward with your right (left) foot and, leaning forward, place the machine gun on the bipod in the direction of fire; without straightening, lean with both hands on the ground, throw your legs back and lie on your stomach, spreading your legs with your toes outward (Fig. 21).
If the machine gunner crawls over without getting up, spread his bipod legs, place the machine gun on the bipod, lie on his stomach, spreading his legs to the sides with his toes out.
To assume a position for shooting from the knee, you need to: take the machine gun (machine gun) in your right hand by the barrel pad and fore-end with the muzzle forward and at the same time, putting your right leg back, lower yourself onto your right knee and sit on your heel; the shin of the left leg should remain in a vertical position, and the hips should form an angle close to a right angle; transfer the machine gun (machine gun) with the fore-end to your left hand, pointing it towards the target (Fig. 22).
To assume a standing shooting position, you must:
If the machine gun (machine gun) is in the “on the belt” position, turn half a turn to the right in relation to the direction towards the target and, without placing your left leg, set it to the left approximately shoulder-width apart, as is more convenient for the machine gunner (machine gunner), while distributing the weight of the body evenly across both legs. At the same time, moving your right hand slightly upward along the belt, remove the machine gun (machine gun) from your shoulder and, grabbing it from below with your left hand by the fore-end and the barrel guard, vigorously push the muzzle forward towards the target (Fig. 23). Rice. 22. Kneeling position Fig. 23. Standing shooting position Fig. 24. Position for firing from a machine gun using a belt: a - from the knee; b – standing
If the machine gun is in the “on the chest” position, take the machine gun from below by the fore-end and the receiver lining with your left hand and, lifting it slightly forward and up, remove your right hand from under the belt, and then throw the belt over your head. At the same time, turn half a turn to the right and, without placing your left leg, move it to the left approximately shoulder-width apart, as is more convenient for the machine gunner, and vigorously move the muzzle of the machine gun forward, towards the target (Fig. 23).
If the machine gun is at your foot, then simultaneously with the turn it is necessary to vigorously move the machine gun with its muzzle forward, towards the target, grabbing it by the fore-end with your left hand. The legs of the bipod do not need to be spread apart.
When taking a shooting position with a machine gun in the “chest” position, it is allowed not to remove the belt from the neck, but to use it to more firmly hold the machine gun when shooting (Fig. 24).
When preparing to fire a machine gun with a folding stock, the stock must be folded down before loading the machine gun. If there is no time to fold back the butt (in the event of a sudden attack by the enemy), the machine gunner prepares to fire (and fires) from the machine gun with the butt folded, pressing the machine gun with the back of the receiver and the pistol grip to the body (Fig. 25). Rice. 25. Shooting position with stock folded
Shooting production
Fire from a machine gun (machine gun) is carried out by command or independently, depending on the task and the situation. Rice. 26. Installation of the sight; Rice. 27. Installing the rear sight
Rice. 28. Setting the translator to the required type of fire: a - for automatic fire; b - for conducting single fire Fig. 29. Holding a machine gun when shooting prone: a - with your left hand by the fore-end; b - left hand behind the store
Firing (a shot) includes installing a sight and rear sight, a translator for the required type of fire, placing the gun, aiming, pulling the trigger and holding the machine gun (machine gun) while firing.
To install the sight, you need to bring the machine gun (machine gun) closer to you, with the thumb and forefinger of your right hand, squeeze the latch of the clamp (Fig. 26) and move the clamp until its front cut aligns with the mark (division) under the corresponding number on the sighting bar. The sight of a machine gun can also be installed using a scale marked on the reverse (bottom) side of the sighting bar.
To install the rear sight, you need to pull the handwheel of the rear sight screw slightly to the right and by rotating it align the mark under the slot of the mane with the desired division (Fig. 27).
To set the translator to the required type of fire (Fig. 28), by pressing the thumb of your right hand on the protrusion of the translator, turn the translator down: to the first click - for automatic fire (AB), to the second click - for single fire (OD) .
To attach an assault rifle (machine gun), you need to: without losing sight of the target, rest the butt against your shoulder so that you feel the entire butt plate fit tightly to your shoulder; Place the index finger of the right hand (first joint) on the trigger; tilt your head slightly forward and, without straining your neck, place your right cheek on the butt.
Hold the machine gun with your left hand by the fore-end or magazine, and with your right hand by the pistol grip (Fig. 29).
Hold the machine gun: when shooting from a prone position and from a trench while standing or kneeling - with your left hand by the neck of the butt or by the butt from below, and with your right hand by the pistol grip (Fig. 30); when shooting from a kneeling position and standing outside the trench - with your left hand on the fore-end or magazine, and with your right hand on the pistol grip (like a machine gun). When holding the machine gun by the neck of the butt, press your hands firmly against each other.
When applying the elbows, they should be: placed on the ground in the most comfortable position (approximately shoulder width from a lying position and from a trench while standing or kneeling); the elbow of the left hand is placed on the flesh of the left leg near the knee or slightly lowered from it, and the elbow of the right hand is raised to approximately shoulder height (Fig. 31, a) when shooting from a kneeling position outside the trench; the elbow of the left hand is pressed to the side near the grenade bag if the machine gun (machine gun) is held by the magazine, and the elbow of the right hand is raised approximately to shoulder height (Fig. 31.6) when shooting from a standing position outside the trench.
If a belt is used with the buttstock to more firmly hold the machine gun (machine gun) when shooting, then the belt must be placed under the left hand so that it presses it against the fore-end (Fig. 32). Rice. 30. Holding a machine gun when firing while lying down and from a trench while standing or kneeling: a - by the neck of the butt; b - from below by the butt Fig. 31. Holding a machine gun when shooting from the position: a - from the knee; b – standing
Rice. 32. Holding a machine gun using a belt when shooting from the position: a - from the knee; b – standing
To aim, you need to close your left eye, and look through the slot of the sight at the front sight with your right eye so that the front sight is in the middle of the slot, and its top is level with the upper edges of the mane of the sighting bar, i.e. take an even front sight (Fig. 33).
Rice. 33. Even front sight
Holding your breath as you exhale, moving your elbows, and if necessary, your body and legs, bring the front sight straight to the aiming point, while simultaneously pressing the trigger with the first joint of the index finger of your right hand.
When aiming, you need to ensure that the mane of the aiming bar is in a horizontal position.
To release the trigger, you must, firmly holding the machine gun (machine gun) and holding your breath, continue to smoothly press the trigger until the trigger, unnoticed by the machine gunner (machine gunner), is released from the cocking position, i.e., until the shot is fired.
If, when aiming, the straight front sight deviates significantly from the aiming point, it is necessary, without increasing or decreasing the pressure on the trigger, to clarify the aiming and again increase the pressure on the trigger.
When releasing the trigger, you should not attach importance to slight vibrations of the level front sight at the aiming point. The desire to pull the trigger at the moment of best alignment of the straight front sight with the aiming point, as a rule, leads to pulling the trigger and an inaccurate shot. If the machine gunner (machine gunner), pressing the trigger, feels that he can no longer breathe, it is necessary, without increasing or weakening the finger pressure on the trigger, to resume breathing and, holding it again as you exhale, clarify the aim and continue pressing trigger.
When firing, especially in bursts, you must firmly hold the butt in your shoulder, without changing the position of your elbows and maintaining an even front sight under the aiming point. After each burst (shot), quickly restore correct aiming. When shooting from a prone position, the machine gun is allowed to rest its magazine on the ground. When shooting with continuous fire at a wide target, smoothly move the even front sight from one flank of the target to the other.
Techniques for shooting from point-blank range and from behind cover
Rice. 33 Position when shooting from a rest: a - holding the machine gun by the magazine; b - holding the machine gun by the fore-end; c - from a machine gun without using a bipod; g - from a machine gun using a bipod
Rice. 34. Position when shooting from behind cover: a - from a standing position from a machine gun; b - from a prone position from a machine gun Fig. 35. Position when shooting from a trench: a - from a machine gun; b - from a machine gun
Depending on the height of the support or cover, the machine gunner (machine gunner) assumes shooting positions: lying down, kneeling or standing.
To fire from a machine gun from a rest, place the machine gun with the fore-end on the rest and hold it with your left hand by the magazine or fore-end, and with your right hand by the pistol grip (Fig. 33, a, b).
To fire a machine gun from a rest, place the machine gun with the fore-end on the rest so that the rest does not interfere with the operation of the mechanisms; The legs of the bipod can hang freely in front of the stop (Fig. 33, c) or must be folded. However, machine gunners should always strive to use the bipod of the machine gun as a stop (Fig. 33, d).
To soften the hard stop, cover it with turf, a rolled-up raincoat, a roll of an overcoat, etc.
To shoot from behind a tree, corner of a building or other cover, take a shooting position, lean against the cover so that it protects the machine gunner (machine gunner) from enemy fire; hold the machine gun (machine gun) in the same way as when shooting without cover (Fig. 34). When shooting from behind small cover (a trench for prone shooting, a hillock, a hummock), position yourself behind the cover.
To shoot from a trench or trench, lean your body against the wall of the trench, rest the elbows of both hands on the ground, and press the butt tightly to the shoulder;
in this case, shooting can be carried out both from a rest and from the hand or with the magazine resting on the ground (Fig. 35). Tags: fire training
Stop shooting
116. The cessation of shooting can be temporary or complete.
117. To temporarily stop shooting
“Stop”
is given , and when shooting in motion -
“Cease fire”
. Following these commands, the machine gunner stops pressing the trigger, puts the machine on safety and, if necessary, changes the magazine,
118. To change store
necessary:
— separate the magazine from the machine gun;
— attach a loaded magazine.
If all the cartridges in the magazine have been used up, then after attaching the loaded magazine to the machine gun, you need to remove the machine gun from the safety lock, pull the bolt frame back by the handle until it stops, release it and put the machine gun on the safety again.
Rice. 64. Position of the machine gun after the ceasefire
119. To completely stop shooting
after the command “Stop” or “Cease fire” the command
“Discharge”
. At this command, the machine gunner puts the machine gun on safety, pulls the clamp back and sets the sight to “P”, unloads the machine gun, and in the case of a machine gun with a folding stock, he also folds the butt. When shooting from a prone position, holding the machine gun with your right hand by the fore-end and the receiver guard, lowers the butt (the back of the receiver) to the ground, and places the muzzle on the forearm of your left hand (Fig. 64).
When firing from a trench, after unloading, the machine gun can be placed on the parapet of the trench with the bolt handle downward.
120. To unload a machine gun
necessary:
— separate the store;
— remove the machine from the safety lock;
- slowly pull the bolt frame back by the handle, remove the cartridge from the chamber and release the bolt frame;
— pull the trigger (decock the hammer);
- put the machine gun on the safety, take it “on the belt” if shooting was carried out from a standing position, or put it on the ground if shooting was carried out from a prone or kneeling position;
— remove the cartridges from the magazine and attach it to the machine gun;
- pick up the cartridge removed from the chamber"
| Rice. Rice. 65. Removing cartridges from the magazine | Rice. 66. Folding the stock |
To remove cartridges from the magazine, you need to take the magazine in your left hand with the neck up, the supporting protrusion towards you, with your right hand, using the cartridge, moving the cartridges one away from you, remove them from the magazine (Fig. 65).
121. For folding the stock
It is necessary, while holding the machine gun with your left hand by the fore-end and the barrel guard, with your right hand, place the shoulder rest parallel to the rods; placing your right hand on the rods at the receiver, with the thumb of this hand press the lock cap and, pressing the palm on the rods, fold them down (Fig. 66); Having transferred the machine gun to your right hand, apply the shoulder rest to the fore-end with your left hand.
122. To get up
you need to pull both hands to chest level, holding the machine gun with your right hand by the fore-end and the receiver lining, at the same time bring both legs together (Fig. 67, a), sharply straightening your arms, lift your chest off the ground and move your right (left) leg forward ( Fig. 67.6), quickly stand up and, if necessary, start moving.
123. After unloading, if necessary, the commander gives the command “Weapon - for inspection.”
. With this command you need to:
Rice. 67. Executing the command “Stand up”:
a — position of the machine gun before standing up: b — putting the right (left) leg forward
- in a prone position: separate the magazine and place it near the machine gun with the neck facing you, remove the machine gun from the safety catch, pull the bolt frame back by the handle and turn the machine gun slightly to the left; After the commander has inspected the chamber and magazine, release the bolt frame forward, release the hammer (press the trigger), put the safety on the machine gun, attach the magazine to the machine gun and take the position specified in Art. 118;
— in a standing position with a machine gun “on the belt”: take the ready position for shooting while standing; holding the machine gun with your left hand from below by the forend, with your right hand separate the magazine and transfer it to your left hand with the feeder up, the convex part away from you, with the fingers of your left hand press the magazine to the forend of the machine gun; remove the machine from the safety lock, move the bolt frame back and turn the machine slightly to the left (Fig. 68).
After the commander has inspected the chamber and magazine, release the bolt frame forward, decock the hammer (press the trigger), put the safety on the machine gun, attach the magazine and take the machine gun to the “belt” position.
FIREING FROM A MACHINE MACHINE
The machine is prepared for firing to ensure trouble-free operation during firing. To prepare the machine, it is necessary to: clean, inspect the machine in disassembled form and lubricate it; inspect the assembled machine; look around the shops.
Immediately before shooting, wipe the barrel bore (rifling part and chamber) dry. If the machine gun has been in the cold for a long time, then before loading it, you must manually vigorously pull back and push forward the bolt frame several times with the magazine disconnected.
When handling the machine, you must strictly observe safety precautions. Before starting classes, you should check whether the machine is charged. When inspecting the machine gun, equipping and unloading the magazine, be careful and follow the sequence of actions. It is strictly forbidden to point a machine gun at people, regardless of whether it is loaded or not.
During shooting it is prohibited:
■ take and load a machine gun without the command (permission) of the shooting director;
■ fire from a faulty machine gun and with the white flag raised;
■ aim and direct even an unloaded machine gun to the sides and rear;
■ remove a loaded machine gun from the firing line; leave a loaded machine gun anywhere or transfer it to other persons without the command of the shooting director.
Before firing, the magazine is loaded with cartridges.
To equip the magazine, you should take it in your left hand with the neck up and the convex side to the left, and in your right hand - the cartridges with bullets towards the little finger so that the bottom of the cartridge case rises slightly above the thumb and forefinger.
Holding the magazine with a slight tilt to the left, using thumb pressure, insert the cartridges one at a time under the bends of the side walls with the bottom of the cartridge case towards the rear wall of the magazine. The equipped magazine is placed in a bag.
Firing accuracy is significantly influenced by correct preparation for shooting, which ensures the stability of the machine gun. In addition, a comfortable and natural shooting position creates the least muscle tension.
The most comfortable position for shooting is lying down. When shooting while lying down, the body and elbows of the shooter rest firmly on the ground, which ensures stability of the machine gun, which can be increased by using a rest. Turf, bags of sawdust or sand are usually used as support.
Preparation for shooting while lying down includes taking the shooting position and loading the machine gun. It is accepted at the command: “Lying down, charge.”
When taking a prone shooting position, you need to move your right hand slightly up along the belt and, removing the machine gun from your shoulder, grab it with your left hand by the trigger guard and receiver. Then take the machine gun with your right hand by the barrel lining and the fore-end with the muzzle
forward; At the same time, take a full step forward with your right foot and slightly to the right. Leaning forward, lower yourself to your left knee and place your left hand on the ground in front of you, fingers pointing to the right (Fig. 4.10, d); then, leaning successively on the thigh of the left leg and the forearm of the left hand, lie on your left side, quickly turn onto your stomach and take a position so that the body is located at an angle of 15-30° (relative to the aiming line); spread your legs slightly to the sides with your toes outward; At the same time, place the machine gun with the fore-end on the palm of your left hand, and hold the pistol grip with your right hand (Fig. 4.10, b).
After taking the shooting position, the machine gun is loaded (if it was not loaded earlier).
When loading a machine gun , you need to hold the machine gun by the fore-end with your left hand, remove the magazine from the bag with your right hand and insert it into the receiver window so that the latch jumps over the magazine's support ledge. Set the translator to automatic fire if the machine gun was on safety. With your right hand, pull the bolt frame back as far as it will go by the handle and sharply release it.
Firing includes: installation of the sight and translator, positioning, aiming, releasing the trigger and holding the machine gun while firing.
Shooting is carried out by command, which indicates: who to shoot, target, sight, type of fire, aiming point. For example: “Private Petrov, chest figure 3, single shots, fire on target.”
To install the sight , bring the machine gun closer to you, use the thumb and index fingers of your right hand to squeeze the clamp latch (Fig. 4.11) and move the clamp along the aiming bar until its front section aligns with the desired division (mark). If the “P” sight is indicated, then check its installation.
To set the translator to the required type of fire, pressing the thumb of your right hand on the protrusion of the translator, turn the translator down until the first click - for automatic fire (Fig. 4.12, a) and until the second click - for single fire (Fig. 4.12, b ).
To attach a machine gun , you need to hold the machine gun with your left hand by the fore-end or magazine (Fig. 4.13), and with your right hand by the pistol grip and without losing sight of the target, rest the butt against your shoulder so that you feel the entire butt plate fit tightly to your shoulder. Place the index finger of the right hand (first joint) on the trigger. At the same time, place your elbows on the ground approximately shoulder-width apart, tilt your head slightly forward and, without straining your neck, place your right cheek against the butt.
The butt plate of the butt should fit snugly in the middle of the shoulder. When the butt rests on the shoulder with the upper (obtuse) angle, i.e. with a low butt, the bullets will, as a rule, deflect downwards when fired, and when resting at the lower (acute) angle, i.e. when applied high, they will go up. To check the correct position of the butt, after making the butt, raise your right hand to the side to shoulder height. If the stock is not tightly or incorrectly attached to the shoulder, it will slip down or up when you raise your arm.
Aiming is done with one eye. The question of choosing an eye for aiming is resolved by determining the so-called leading eye. To do this, make a round hole with a diameter of 2.5-3 cm in a piece of paper and, holding the paper vertically in an outstretched hand, and your head motionless, look with both eyes through the hole at the target mounted on a light background. Then, closing your right and left eyes alternately, watch the target. If when closing the left eye the target was visible, and when closing the right eye it was hidden behind the paper, then the shooter’s leading eye is the right one.
To aim, you need to look through the slot of the sight at the front sight with your dominant eye so that the front sight is in the middle of the slot, and its top is level with the upper edges of the mane of the sighting bar, i.e. take an even front sight. Holding your breath as you exhale, bring the front sight straight to the aiming point, while continuing to keep the first knuckle of your index finger on the trigger.
When aiming, you need to ensure that the mane of the aiming bar is in a horizontal position. When the machine gun is tilted to the right (left), the bullets will go right (left) accordingly.
In order not to reduce shooting accuracy, it is not recommended to aim for a long time. If the opening of fire is delayed for some reason, it is better to stop aiming and give the eye a rest for 5-10 seconds.
To release the trigger , you need to firmly hold the machine gun with your left hand by the fore-end or magazine, and with your right hand, pressing the pistol grip to your shoulder, holding your breath, smoothly press the trigger until the trigger is released from the cocking position unnoticed by the shooter, i.e. . until the shot is fired. When releasing the trigger, you should not attach importance to slight vibrations of the level front sight at the aiming point. The desire to pull the trigger at the moment of best alignment of the straight front sight with the aiming point, as a rule, leads to pulling the trigger and an inaccurate shot. If, when aiming and pressing the trigger, you feel that you can no longer stop breathing, you must, without weakening the pressure of your finger on the trigger, resume breathing and, again holding it as you exhale, clarify the aim and press the trigger.
When firing in bursts, keep the butt of the machine gun firmly pressed to the shoulder, without changing the position of the elbows and keeping the front sight straight in the sight slot under the selected aiming point. After each burst, quickly restore correct aiming and continue shooting.
The cessation of shooting, depending on the situation, can be temporary or complete. To temporarily stop firing, the command “Stop” or “Cease fire” is given. Following these commands, the shooter stops pressing the trigger and puts the machine on safety.
To completely stop firing after the “Stop” command, the “Unload” command is also given. Following this command, it is necessary to put the safety on the machine gun, install the “P” sight (if another sight was installed) and unload the machine gun.
To unload the machine gun , separate the magazine, remove the machine gun from the safety catch, slowly pull the bolt carrier back, remove the cartridge from the chamber and release the bolt frame, pull the trigger, put the machine gun on the safety and put it on the ground, remove the cartridges from the magazine. To remove cartridges, take the magazine in your left hand with the neck up, the supporting protrusion towards you, with your right hand, using the cartridge, move the cartridges one by one away from you from the magazine, then attach the magazine to the machine gun and collect unspent cartridges. Holding the machine gun with your right hand by the fore-end and the barrel guard, lower the butt to the ground, and place the muzzle on the forearm of your left hand (Fig. 4.14).
After unloading, if necessary, the machine gun is inspected using the command “Weapon - for inspection.” For this command you need to:
■ in a prone position - separate the magazine and place it near the machine gun with the neck facing you, remove the machine gun from the safety catch, move the bolt frame back and turn the machine gun slightly to the left;
■ standing with the machine gun in the “on the belt” position - take the shooting position while standing, holding the machine gun with your left hand from below by the fore-end, with your right hand separate the magazine and transfer it to your left hand with the feeder up, the convex part away from you, with the fingers of your left hand press the magazine to the forend of the machine gun, then remove the machine gun from the safety catch, move the bolt frame back and turn the machine gun slightly to the left (Fig. 4.15).
After the commander has inspected the chamber and magazine, it is necessary to release the bolt frame forward, decock the hammer and put the safety on the machine gun, then attach the magazine and take the machine gun to the “on the belt” position.
Techniques for shooting from point-blank range from behind cover
124. Depending on the height of the support or cover, the machine gunner takes positions for shooting: lying down, kneeling or standing.
125. For shooting from a rest position
Place the machine gun with the fore-end on the stop and hold it with your left hand by the magazine or fore-end, and with your right hand by the pistol grip (Fig. 69). To soften the hard stop, cover it with turf, a rolled-up raincoat, a roll of an overcoat, etc.
| Rice. Rice. 68. The machine is prepared for inspection in a standing position | Rice. 69. Position when shooting from a rest |
126. For shooting from behind a tree, corner of a building and other cover
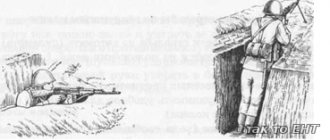
take a shooting position, lean against the cover so that it protects the machine gunner from enemy fire; hold the machine gun in the same way as when shooting without cover (Fig. 70). When shooting from behind small cover (a trench for prone shooting, a hillock, a hummock), position yourself behind the cover.
Rice. 70. Position when shooting from behind cover:
a - from a standing position; b - from a lying position
127. For shooting from a trench or trench
lean your body against the wall of the trench, rest the elbows of both hands on the ground, and press the butt tightly to the shoulder; in this case, shooting can be carried out both from a rest and from the hand or with the magazine resting on the ground (Fig. 71).
Rice. 71. Position when firing from a trench
Shooting techniques on the move
128. Shooting on the move is carried out from a machine gun offhand or with the butt pressed to the side,
129. Shooting offhand
can be driven from a short stop and without stopping (Fig. 72).
For shooting offhand from a short stop
you need to stop and at the moment of placing your left foot on the ground, simultaneously rest the butt on your shoulder (throw up the machine gun); without placing your right foot, take aim, fire one or two bursts (shots), lower the machine gun, continue moving.
Rice. 72. Position when shooting on the move offhand
For shooting offhand without stopping
raise the machine gun to your shoulder, point it at the target and, continuing to move, open fire.
130. Shooting with a stock
, pressed to the side, is carried out without stopping. To do this, with your right hand, press the butt against the right side without resting or with resting the butt plate into the shoulder part of the right hand at the elbow joint (Fig. 73). If the stock is folded, press the machine gun with your right hand to the side with the receiver and pistol grip (see Fig. 56); hold the machine gun by the fore-end with your left hand. Point the machine gun at the target and, without stopping movement, open fire.
Rice. 73. Position when shooting on the move:
a - with the butt pressed to the side; b - with the butt resting on the shoulder part of the arm
131. When shooting on the move, reload the machine gun without stopping the movement.
Ski shooting techniques
132. Shooting from skis can be carried out from a machine gun from a place (lying, kneeling, standing) and on the move.
133. For shooting from skis while lying down
take the machine gun in your right hand, the sticks in your left. Leaving the heels of the skis in place, spread the toes of the skis to the sides. Leaning on sticks, kneel down. Lie down, put the fastened sticks under your elbows (Fig. 74) and hold the machine gun in the same way as when shooting while lying down without skis.
134. For shooting from skis from the knee
place the poles on the left side, turn the right ski with the toe to the right, lower your right knee onto the right ski (Fig. 75) and take the position as for shooting from the knee without skis.
| Rice. Rice. 74. Prone ski shooting position | Rice. 75. Position when shooting from skis from the knee |
135. For shooting from skis while standing
place the poles on the left side, slightly turn the right ski with the toe to the right (Fig. 76) and take the position as for shooting while standing without skis.
| Rice. 76. Standing position when shooting from skis | Rice. 77. Using ski poles as a support |
For stability when shooting from skis while standing, you can use sticks as a support, for which you fasten the sticks with loops and place the machine gun with the fore-end on the loops (Fig. 77).
136. For shooting from skis on the move
put the loops of the sticks on your hands; with your right hand, press the butt against the right side without resting or with resting the butt plate into the shoulder part of the right hand at the elbow joint; with your left hand, holding the machine gun by the fore-end; direct it to the target; without stopping movement, open fire (Fig. 78).
Shooting can also be carried out with the loops of both sticks fastened together on the right or left hand.
Rice. 78. Position when shooting from skis in motion:
a - without using a belt; b - using a belt
Shooting techniques while moving
137. For shooting from a moving armored personnel carrier, car and from landing transport vehicles, any convenient positions are used to ensure the stability of the machine gun and the safety of neighbors. For shooting from an armored personnel carrier and from a car from a standstill (or from a short stop), the techniques shown in (Fig. 79 and 80) can be used. In this case, the walls of the seats and other structures inside the body of the armored personnel carrier are used as support for the arms, forearms, sides and legs. The machine belt must be placed under the forend.
Rice. 79. Position when firing from armored vehicles:
a - forward; b - into the loophole; c - on top of the side board; g - into the loophole
When firing through the loophole, move the barrel of the machine forward so that the sight slot is 5-7 cm from the side, and the buildings do not interfere with the movement of the bolt handle.
When taking a position for shooting over the side, you must stand with both feet on the bottom of the armored personnel carrier, slightly bending them at the knees, or with your left knee on the seat (Fig. 79, c), move the muzzle of the machine gun over the side and with your left hand, holding the side, hold the machine gun above.
Rice. 80. Position when shooting from a car:
a - forward; b - on top of the side board; in - back