Part 1: Basic knowledge needed to shoot a pistol
Learn the difference between a revolver and a semi-automatic pistol
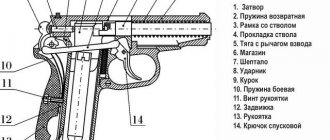
There are two main types of pistols - semi-automatic pistols and revolvers. Something you often saw in cowboy movies were revolvers. The cartridges in the revolver are loaded into a drum located in the middle of the body. It typically holds six rounds, but some hold five and fit comfortably in smaller hands. A semi-automatic pistol has a sliding mechanism (breech) at the top and a magazine in the handle.
Each type of gun operates a little differently, so it's important to be clear about what you'll be dealing with before you go to the range and learn how to handle the gun.
- The revolver has a rotating drum for ammunition. The cartridge is loaded into it, then the drum is inserted back into the revolver. After this, you can already shoot from a pistol of this type. After the bullet is fired, the drum rotates and thus the next cartridge aligns with the barrel and hammer, and the used one moves further. Most revolvers operate in a double-action mode: pulling the trigger cocks the hammer until it drops and fires. This operating mechanism forces the shooter to put more effort into firing a shot, however, the hammer can also be cocked manually - before pressing the trigger. The cylinder is then snapped out (or the revolver is broken, exposing the cylinder), allowing the empty cartridges to be removed.
- A semi-automatic pistol forces each round into the chamber from the magazine. After firing, he ejects the empty cartridge through a special hole - the ejection window. The bolt on top of the pistol is used to load the first round into the chamber and can be locked in the open position using a button or pin on the side. The magazine is removed and charged separately, which is why it is called removable.
Choose the right pistol and ammo for shooting
There are different types of pistols, and if you count the combinations of “pistol - type of ammunition”, you get just an infinite number. In addition, when choosing a weapon and ammunition, take into account your physiological parameters (physique, hand size, etc.) and the purpose of the pistol.
- You don't need a .357 Magnum to simply learn how to shoot a pistol at targets at standard pistol range. Don't buy guns that are too large or have a large caliber if you are just starting to learn how to shoot. Instead, spend your money on something small but reliable. For example, a .22 caliber pistol would be a good choice. Talk to a dealer or someone who already has experience in choosing and using a gun. Such people will be happy to share their experience and give important recommendations.
Wear eye and ear protection
Headphones combined with good earplugs will protect your ears from loud gunshots. Special shooting glasses will protect your eyes from cartridge fragments, hot gases and empty cartridges that constantly fly out of a semi-automatic pistol.
- Do not think that ordinary glasses are suitable for this task. Even if you already wear them, be sure to also wear protective ones. They are called “protective” because they protect your eyes so well that simple ones simply cannot do.
Always follow safety rules when handling a pistol
When handling the gun, always keep it pointed downwards. Do not use weapons in places where there is no special equipment for shooting, an equipped bullet catcher and personal protective equipment specified in the previous paragraph.
- Be careful and follow all safety precautions while at the shooting range. It's not just important to follow range safety rules, you also need to be aware of what the people around you are doing. This is called situational awareness.
- It is not easy for a beginner to operate the shutter using only the thumb and forefinger (as is usually done by the pros). The situation gets worse when the gun has a tight spring or when the shooter's hands become sweaty. If you need to use your entire palm to pull the bolt, lower the pistol, turn slightly sideways and, with the barrel facing away from you, move the weapon slightly away from your body.
Part 2. How to hold a gun
ALWAYS check that the gun is loaded first.
EVERY TIME you pick up a gun, you need to check that it is loaded. Even when you first bring it home from the store, make sure it's charged. If you've just taken it out of your safe for the first time in ten years or the second time in a day, check that it's charged. If you just drained it, check to see if it is actually discharged. If at the range or anywhere else another person gives you a weapon, check that it is unloaded. Let this become your habit!
Failure to comply with this simple requirement can result in serious property damage, personal injury, and even death!
- In the case of a revolver, put the safety on and remove the cylinder. All closets must be empty. When working with a semi-automatic pistol, first remove the magazine from the weapon, then pull the slide back to check the chamber for bullets. If the cartridge is in the chamber, then do not try to reach it with your hands - if you pull the bolt further, the cartridge will fly out on its own.
- Keep the slide open while you practice holding the pistol correctly to ensure that it is unloaded at all times and to get used to placing your thumb in the correct position (where it is not in the way of the slide).
Handle the gun carefully without touching the trigger with your finger to avoid accidentally firing
Keep your index finger outside the trigger guard. Straighten your index finger and keep it parallel to the pistol slide (you can place your finger on the pistol frame). Whenever you remove the gun from its holster, point the muzzle down or away from people. When outdoors, always keep your gun pointed downwards, not upwards. A bullet fired accidentally can injure someone.
- NEVER point a gun at anyone, even if it is unloaded, much less make a joke like that. Pointing a gun at someone is a crime in some states, and it's the dumbest thing you can ever do while holding a gun. It may happen that, purely by chance, the gun turned out to be loaded just when you were sure of the opposite, and then an accidental shot, and that’s all...
- Learn to properly hold your pistol on the range, but remember to keep it unloaded.
Form a grip on the pistol—the “ready to shoot” position
Open your “strong” hand (the hand you write with) to expose the webbing between your index finger and thumb. With the pistol in your other hand, insert the pistol grip between your thumb and index finger. Keeping your thumb on one side of the handle, grip it securely just below the safety bar with your middle, ring, and little fingers.
- In reality, you only wrap your middle and ring fingers around the gun; your little finger rests on the gun but is not used for gripping; and the thumb is also not used to hold the weapon. Remember that the grip should be strong enough and not excessive. If you grip the gun so tightly that it shakes, you won't be able to control it or make accurate shots.
Complete your grip on the pistol with your other hand.
Hold the gun with both hands. Your weak hand should wrap around your strong hand, providing the best support for the gun. Place the thumb of your weak hand along the frame of the pistol and place the index finger of your strong hand on or in front of the bottom of the safety guard, where it is most comfortable for you.
Make sure no fingers interfere with the slide or trigger
Some older semi-automatic pistols have a habit of "biting" the webbing between the index finger and thumb. The “bite” at the bolt can be very painful and dangerous, because you don’t expect it and risk dropping a loaded, cocked weapon from the pain, with the safety lever removed.
Get into the correct shooting stance
Your feet should be shoulder-width apart, with the foot of the leg opposite your strong arm about a step in front of the other. Lean forward slightly with your knees bent and make sure you are well balanced. The elbow of your dominant arm should be almost straight, and the elbow of your weak arm should be slightly bent. Your strong hand should be in line with the gun and pointed at the target.
- Some shooting practice is done with one hand. In such cases, the stance is more “open”, in which the cut of the pistol barrel and your body are almost at an angle of 90 degrees to the plane of the target; feet turned towards the target. In this case, a secure grip on the pistol with your strong hand is more important since you are not using your other hand for support.
- Never point the gun sideways or hold the gun with your wrist bent, as is often done in movies. This is extremely dangerous and unsustainable!
- Here you can read in more detail about shooting stands for pistol shooting.
PRACTICAL SHOOTING: secrets of mastery (Part I)
When constructing exercises, targets are located at different distances, and the target environment changes from competition to competition so that athletes do not get used to the same shooting conditions. All this makes practical shooting one of the most exciting types of shooting sports, competitions in which are exceptionally entertaining and dynamic and always take place in the atmosphere of a real holiday.
At PS competitions, people shoot from pistols and revolvers, smooth-bore shotguns and rifled carbines. The technique of shooting a pistol is the most complex and interesting.
It is probably very difficult to find a sport that would require such tension of nerves, concentration of the intellect and physical strength of the athlete. During the exercise, you need to process every shot and score points. You need to move quickly, controlling the position of the weapon - you will be disqualified for dangerous movement with a pistol - and the competition is over. You can't miss - these are big penalty points. You cannot shoot at penalty targets; hitting them will also result in punishment. At the same time, time is pressing on you: faster, faster... During this race, you need to keep the entire game plan in your head: in what order to shoot, how to move, where to change the magazine, etc. This creative process captures the shooter, preventing him from feeling tired or boredom.
Practical shooting classes are an exciting pastime in the fresh air, improving your shooting skills, strengthening your health, strengthening your character and achieving more and more new sports results. You can practice practical shooting at any age. Employees of security companies and law enforcement officers have already appreciated practical shooting and accepted this sport as an applied one - to improve the fire training of personnel. Many citizens who took part in the exercises at least once became ardent fans of practical shooting and acquired an interesting and healthy hobby.
ABOUT THE AUTHOR
Vitaly Kryuchin is the Chairman of the Central Council of the Russian Practical Shooting Federation LLC. Multiple winner of Russian championships in practical shooting with a pistol, shotgun and carbine. European champion in practical shotgun shooting. Two-time European champion in dueling shotgun shooting. Bronze medalist of the European Championship in practical pistol shooting. Two-time winner of the Nordic Practical Pistol Shooting Championship.
This is how he himself talks about his hobby: “I have been involved in shooting sports all my life - since the age of seven. First there was a scarecrow, then homemade “arson” and “kurkach” pistols. A little later there was a homemade bow, then a small-caliber rifle and a Margolin pistol. In 1999, I was introduced to practical shooting, which changed my whole life.”
Determining your dominant eye
Before you begin, you need to determine which eye is your dominant eye. To do this, you need to connect the index fingers and thumbs of both hands into a ring with a diameter of about 5 cm. Stretch your arms in front of you and look through this ring with both eyes at some distant object. Then, without taking your eyes off this object, bring your hands closer to your face.
The eye that has a ring of fingers will be dominant - strong, and the other - weak.
Aiming with both eyes
You should always aim with both eyes. Scientists have found that if you squint one eye, the visual acuity of the other eye automatically drops by 15-20%. The eyes work in pairs. A closed eye creates unnecessary tension in an open one. This happens because the brain, compensating for the darkening in the closed eye, unnecessarily dilates the pupils in both eyes. When shooting at speed, aiming with one eye is especially harmful. In this state, the field of view is reduced by half, the time it takes to transfer the weapon from target to target increases, and the reaction to changes in the target environment worsens.
To prevent your weak eye from interfering at first, you need to stick a piece of translucent tape on the lens of your glasses in front of the pupil of your weak eye. This will make it possible to aim without squinting.
After some time, you will develop the necessary skill, and the tape can be peeled off. You will aim with both eyes open, and it will happen naturally, without tension.
Rack
A large number of errors when shooting arise from incorrect holding of the pistol, hand position and incorrect stance. Over the past ten years, practical shooting has developed the most convenient and “fast” front stance with a double grip, which allows you to make accurate aimed shots in a static position and at the same time easily hit targets in motion.
Before we begin to study holding a pistol, let’s agree that the right hand of a “right-handed” shooter will be called strong, and the left hand weak. For a left-handed shooter it’s the opposite.
The stance in practical shooting is free, frontal. The head is held straight, feet shoulder-width apart. Sometimes the pushing leg is slightly forward. The back is straight, the shoulders are perpendicular to the line of fire. Some shooters move their heads forward a little.
You need to bend slightly at the waist and lean your body slightly forward to make your stance more aggressive. When shooting at speed, it is more convenient to control the pistol. If you stand completely straight, your body will lean back after each shot. To fire another shot, you will need to return to the starting position. At the same time, you should not lean forward too much, this will constrain the shooter and increase the time it takes to transfer the weapon from one target to another.
Pay attention to the sensations in your feet. The center of gravity of the body should be shifted closer to the toes of the feet. Many shooters squat a little, bending their knees slightly, which makes the stance more stable.
In high-speed shooting with wide carries, a low stance is preferable.
The thumb of the strong hand is parallel to the bolt of the pistol. You need to make sure that there is no gap between the base of the thumb of the strong hand and the hand of the weak hand.
This stand is also called Isosceles, which means “triangle” in English. When viewed from above, the body and hands with a pistol resemble a triangle.
Some shooters with smaller hands hold the pistol by placing the index finger of their weaker hand on the front of the brace. This grip is not suitable for everyone. Shooters with large hands may grip the bolt carrier with the heel of their weak hand's thumb, causing delays during shooting. Therefore, you need to experiment yourself and consult with an instructor or an experienced shooter.
We look at holding a pistol in such detail because it is the foundation of marksmanship training. An incorrect grip will be a source of shooting errors in the future. This will be especially acute in difficult shooting positions and when shooting on the move.
So, the palms tightly clasp the pistol, the shoulders do not rise, the arms are slightly bent at the elbows and spread apart, and the strong arm is bent a little more than the weak one. This will be observed if the stance is correct and the shoulders are perpendicular to the line of fire. The hands do not squeeze, attract or push away the gun, that is, they do not oppose each other in any way. The hands simply hold the gun. Imagine how you would hold an ax in front of you, intending to cut a log.
At the moment of firing, under the influence of recoil, the arms themselves bend at the elbows and wrists, working as shock absorbers, and automatically return the pistol to its original state without changing the position of the body. This allows you to quickly fire a second shot. At first, this position will seem uncomfortable, but after several weeks of training you will feel comfortable and confident.
| 1 - Start of the exercise. Pistol at chest level; 2 - Pistol on target. The shooter imitates a shot; 3 - The shooter takes half a step to the right, pulls the pistol to his chest and removes his finger from the trigger; 4 - Taking a stance, the shooter points the pistol at the target and simulates a shot; 5 - Without stopping, the shooter takes half a step to the left. At the same time he pulls the gun to his chest. |
We will not consider the widespread Weaver stance, when the strong hand with the pistol is straightened at the elbow and tense, playing the role of a butt, and the weak one is bent at the elbow and pulls the pistol towards itself. This stand is outdated. It is no longer used in practical shooting. Compared to others, it is more constrained and slow and is not suitable for shooting on the move.
Stance and grip training technique
Stance and grip are the foundation of practical shooting.
While performing the exercise, keep your eyes on the target at all times. Only the hands and the gun should move, the rest of the body is motionless. Movements should be smooth and measured. Repeat this exercise until your arm muscles get tired, but at least 10 times. If you feel tired, place the gun in the holster and give your hands a rest.
Remember! When moving and moving, unless you are hitting targets, your finger should always be outside the trigger guard. Do the exercise until your arm muscles get tired. If you feel tired, place the pistol in the holster and give your muscles a rest.
At a shooting range or shooting range, the exercise is performed facing the targets. Indoors - facing a bulletproof wall. At home, you can cut out a smaller model of a cardboard target from paper and attach it to the wall. Similarly, you can use a piece of colored tape or a fragment of a pattern on the wallpaper.
| 1 - With a double grip of the pistol, a strong hand tightly holds the handle, the index finger touches the trigger with the last phalanx; 2 - The hand of the weak hand bends down at an angle of 45° to the forearm and clasps the hand of the strong hand; 3 - When forming a grip, the third phalanx of the index finger of the weak hand should rest tightly against the lower part of the trigger guard; 4 - The fingers of the weak hand should firmly hold the handle and secure the grip of the strong hand. |
Exercise 1
Aiming a weapon at a target
The training is in vain. No timer. The exercise is designed to train the ability to quickly point a pistol at a target, as well as to practice the skill of removing a finger from the trigger when the shooter removes the weapon from the target.
STARTING POSITION
. The shooter holds the unloaded pistol with a double grip, with the barrel pointed towards the targets, as described above. Check the position of your legs. It is necessary to bend slightly forward at the waist so that the shock from the recoil of the shot does not tilt the body back (when shooting with cartridges). Aim the weapon at the target. Check the position of the brushes. Check to see if your shoulders are raised. Elbows should be bent and directed in different directions. The head is straight or slightly pushed forward. Both eyes are open. If the second eye interferes, then you need to stick a piece of translucent tape on the lens of the glasses in front of the weak eye.
EXECUTION PROCEDURE
. After making sure that your grip and stance are correct, place your finger on the trigger and align the sights with the center of the target. Then, with the last phalanx of your index finger, lightly press the trigger, simulating a shot. There is no need to press hard with your finger; it is enough to make an effort that would be enough to pull the trigger if the gun were loaded. Then, without lowering your elbows, pull the weapon to your chest about 20 cm, while simultaneously removing your finger from the trigger. After a short pause, bring the pistol to the eye-target line and pull the trigger. Next, pull the gun to your chest and remove your finger from the trigger. So you continue to make “shots”, pointing the pistol at the target and pulling it towards your chest.
While performing the exercise, keep your eyes on the target at all times. Only the hands and the gun should move, the rest of the body is motionless. Movements should be smooth and measured. Repeat this exercise until your arm muscles get tired, but at least 10 times. When you feel tired, place the gun in the holster and give your hands a rest.
Exercise 2
Step - shot
The training is in vain. No timer. This exercise gives you the ability to control the stance and grip of the pistol when moving, and trains the ability to quickly point the pistol when a target appears. It also reinforces the skill of removing your finger from the trigger when the shooter is not aiming.
STARTING POSITION
. The shooter holds the unloaded pistol with a double grip at the level of the solar plexus. The barrel of the gun is parallel to the surface of the earth. The index finger of the strong hand is straightened (outside the trigger guard). Legs are slightly bent at the knees to lower the center of gravity.
EXECUTION PROCEDURE
. Point the pistol at the target and simulate a shot, as in exercise 1a. Then take half a step to the side with your right foot, at the same time pull the weapon to your chest about twenty centimeters and remove your finger from the trigger. After completing the step, point the gun at the target, place your finger on the trigger, and simulate a shot. Then, without pausing, take half a step to the left, at the same time pulling the weapon to your chest, removing your finger from the trigger. When completing the step, point the gun at the target and simulate a shot. Without stopping, take another half step to the right, while simultaneously pulling the pistol towards your chest, etc. Repeat the entire cycle several times. Half a step - to the left with an imitation of a shot, half a step - to the right with an imitation of a shot. Try to keep the center of gravity of the body in a horizontal plane at the same level. Make sure that the barrel of the pistol is always pointed at the target and does not rise up while pulling to the chest and moving. Movements should be uniform, without jerking. Control the index finger of your strong hand.
Typical errors and methods for eliminating them
Error 1
. The shooter tenses and raises his shoulders. Elevated shoulders constrain and quickly tire the shooter. It is necessary to constantly monitor the position of your shoulders and keep them down.
Error 2
. The shooter lowers his elbows bent as the pistol is aimed at the target. With lowered elbows, the pistol will “lift up” more from the recoil of the shot, thereby requiring more time to fire a second shot. To avoid dropping your elbows while shooting, turn your elbows out to the sides and imagine that you have a large bag of cotton candy between your hands. You have to shoot and hold the package. It is not possible to lower or bring your elbows together - the package does not allow it.
Error 3
. The shooter tilts his head to the right towards his strong hand (as when shooting a gun). A tilted head shifts your field of vision and causes unnecessary tension in the neck muscles. To avoid perpetuating these mistakes, you need to practice empty in front of the mirror from time to time. In the mirror you can easily see all your mistakes and correct them immediately. You need to remember the feeling of the correct stance and try when shooting, remembering this feeling, to maintain the correct position.
Error 4
. Moving your head while aiming. Sometimes novice shooters, when pointing a pistol at a target, begin to move their heads in search of the front sight. Under no circumstances should this be done. The head and torso should be motionless at this moment (if this is shooting in a static position). Only the hands work. The weapon is brought to the eye-target line. Any head movement increases the aiming time.
Error 5
. Raising the barrel when pointing the pistol at a target. Some novice shooters, having watched enough militants, begin to lift the barrel of the pistol while aiming. It’s as if they make a “bump” on the trajectory of the pistol and bring the sighting devices to the target from above. This movement is reminiscent of casting a fishing rod. They say that this is how V.I. Chapaev aimed his Mauser in the film of the same name when he fired at the White Guards. At the same time, Vasily Ivanovich also narrowed his eyes. With such a trajectory of movement, the pistol covers the target for some time. This increases the overall aiming time. It is necessary to get rid of this habit by constantly monitoring the movement of the gun. When aiming a pistol, the barrel must be parallel to the surface of the earth and aimed at the target at any point in the trajectory.
Error 6
. Lowering the barrel of a pistol when pointing the pistol at a target. When aiming a weapon, some shooters first lower the pistol, straightening their arms at the elbows, and then bring it from below to the target. The gun makes a long journey from the beginning to the end point. This movement is more reminiscent of digging with a shovel than aiming a weapon at a target. When approaching from below, the pistol suddenly appears in the line of fire. Therefore, additional time is required to align the sights.
More often than not, this mistake is made by shooters who have previously completed Olympic shooting disciplines. As you know, the shortest distance between two points in three-dimensional space is a straight line. Therefore, it is necessary to ensure that the movement of the pistol is closer to a straight trajectory. And the barrel should always be pointed towards the targets. This also applies to this case, when you point the pistol at the target from the chest.
Try to avoid unnecessary movements and unnecessary tension when pointing and aiming your weapon. All the errors described above increase the time and worsen the quality of shooting.
(Beginning. Continuation and Ending in the articles “PRACTICAL SHOOTING (Part II
), (
Part III
), (
Part IV
), (Part V), (
Part VI
), (
Part VII
), (
Part VIII
), (
Part
IX
), (
Part X
), (
Part XI
)")
Vitaly Kryuchin Photo from the author’s archive
Part 3. Aiming
Align the front and rear sights
Make sure the top of the front sight is level with the top of the rear sight and that the front sight is exactly in the center of the rear sight slot. This will ensure that you are holding the gun level.
- Most often, people aim by using their dominant eye and closing the other. Proper pistol shooting requires depth perception, so try to practice aiming with your eyes open. You will need to learn to ignore the image of your non-dominant eye, while perceiving the full volume of the image.
Focus correctly when aiming
When shooting a pistol, there is often confusion about what to focus on: the target or the sights? Once you have leveled the gun and ensured it is pointed correctly, you will need to focus on the front sight, otherwise it will be impossible to get an accurate shot. This method also has a drawback - the target and rear sight will be a little blurry, but this can be survivable.
Lock the gun on the target
The top of the front sight should be clearly visible in front of your eyes, lightly touching the aiming point on the target, which will be blurred. Now you can put your index finger on the trigger and prepare to fire.
Load the gun
And only now - when you are ready to fire the pistol, only after you have had enough practice with aiming and gripping the weapon; learned to focus on the target correctly - load the gun. Keep the safety on while you load it (unless your particular pistol has a safety) and only remove the safety when you are in a shooting stance with your weapon pointed at the target.
- If the gun is semi-automatic, you will need to cock the bolt to force the first round into the chamber.
Shooting safety
- Be sure to keep your index finger on the brace before shooting.
- Point the gun in a safe direction. You should always point the gun away from people to avoid injuring anyone or damaging other people's property. If you're at a shooting range, hold the gun pointing downwards.
- Consider your gun loaded even if it isn't. This is necessary to prevent a possible tragedy.
- You must clearly see where your target is, as well as the entire area around and beyond it. It is important to ensure that all precautions are taken and that no one is caught in the line of fire. The target must be positioned so as not to pose a danger to anyone or anything in its vicinity. If you are going to shoot on private property, make sure there are no homes or businesses nearby.
According to the rules and regulations of the International Confederation of Practical Shooting (ICPS), or in English the International Practical Shooting Confederation (IPSC), since its founding, THREE “golden” basic safety rules for shooting have been established, also called the ARROW CODE:
My weapon is always loaded!
In any case, in any case and with any weapon, we treat it as if it were loaded (remember how much you heard about a gun that hung on the wall for several years and then suddenly fired?)
I will only point the gun where I intend to shoot!
The pistol is always in a holster on the belt, a carbine or shotgun is always with the barrel up in the hands or in a weapon rack, and only when performing an exercise at the command of the judge is the weapon directed towards the targets. The same applies to handling weapons outside of competition, for example, at home, at the shooting range and at the shooting range (remember how many times you heard about hunting accidents?)
My finger will only touch the trigger when I see the target through the sights!
Literally means that the finger always lies outside the trigger, on the frame of the pistol, on top of the trigger guard, except when aiming and/or shooting at a target (again, remember about the cases of pistol owners shooting themselves in the foot, and how they accidentally shot when cleaning gun)
Experienced shooters will also name another rule:
I will always check what is in front of and behind the targets
And they will be right, this must be done both in competitions and in training at shooting ranges, while hunting and in any shooting situations. A random person, a gaping colleague, a mushroom picker in the forest, an animal at a shooting range - this way you will at least avoid unpleasant circumstances.
You can read more about safe shooting, as well as about the history of IPSC and the development of this wonderful sport in our article Practical Shooting.
Typical mistakes when aiming
Mistakes happen when aiming incorrectly. They occur if the front sight is not installed correctly in the rear sight slot. How correctly you aim can be determined by bullet hits on the target.
- If the bullet landed below the center of the target, then when aiming, the upper part of the front sight was below the upper edges of the rear sight slot.
- If the bullet hit above the center of the target, then the top of the front sight was above the top edges of the rear sight slot.
- If the bullet landed to the right of center, then the front sight was closer to the right side of the rear sight slot.
- If the bullet landed to the left of the center of the target, then the front sight was located closer to the left side of the rear sight slot.
Parallel offset. This error occurs when the front and rear sights are installed correctly, but your hand is thrown up by the recoil.
- It will all depend on where the recoil sends your hand - up or down. Accordingly, try to aim slightly above the center of the target or slightly below.
Mistakes when holding a pistol. Parallel displacement is not the only error that can occur when shooting. Bullet holes in the target may also indicate other errors.
- If the bullet hits the target closer to your dominant side, then you are most likely gripping the gun too tightly with your thumb or pulling the trigger too hard. Accordingly, if the bullet lands in the other direction from the center of the target, then you are pressing the trigger too lightly.
- If you're right-handed and the bullet hits the lower right corner (or vice versa if you're left-handed), then you're probably gripping your gun too hard when you pull the trigger. If you hit the bottom left corner, you are most likely pulling the trigger too hard.
- If you are right-handed and the bullet hits the upper right corner (or vice versa if you are left-handed), then you expect recoil when firing. If the bullet hits the upper left corner, then you are also expecting recoil or not “following the shot.”
Now you know (in theory) how to properly stand on your feet, hold a gun and aim it at a target. All that remains is to consolidate this knowledge with practice. Therefore, feel free to go to the shooting range!
And remember that the MOST IMPORTANT thing is SAFETY!
Part 4. Pistol shooting
Control your breathing
Just before you fire the gun, that is, after you have taken careful aim, you will need to take a deep breath and hold it. Calm your body. Looking at how the sights (front and rear sights) move, you will notice that with their movements they outline a small figure in the shape of a number eight. It has to do with your heartbeat. Start squeezing the trigger when the scope reaches the bottom of the figure eight, and when the scope is at the aiming point, finish pulling the trigger.
The time between the moment you hold your breath and the moment you pull the trigger should be short. However, you should not rush or fuss - this will not lead to anything good.
Pull the trigger
Each firearm requires a different trigger pull—the trigger pressure required to fire a shot differs from weapon to weapon. Before you load your pistol, it's a good idea to dry-fire it (point the unloaded pistol down and pull the trigger until you hear a click). This will help you know at what minimum pressure the gun fires.
When you are ready to fire, slowly pull the trigger in one smooth, controlled motion. A common reason for inaccurate shots when shooting a pistol is the so-called. “waiting for recoil” (the shooter jerks the pistol forward, expecting that it is about to fire). It may seem counterintuitive, but for the most accurate shots, try to let the recoil “surprise you” rather than trying to predict when it will happen.
Completion - descent support
Every sport has an “end stage,” and target shooting is no exception. When you pull the trigger, the gun will fire. This means it's okay to relax, but don't suddenly let go of the trigger or weaken your concentration, stance, or hands. Keep calm. Release the trigger slowly and then when you hear the click, take a breath and prepare for the next shot.
- Taking things one step at a time improves accuracy and reduces bullet spread, just like for a golfer or tennis player (each shot follows the previous one).
Practice shooting a pistol several times in a row
Take your time between shots. There's no hurry. It is better to make a few accurate hits than many unsuccessful ones. Practice on the range to improve your skills. Don't turn money spent on ammunition and training into empty words.
Unload your weapon and double-check it to make sure it is EXACTLY fully unloaded
While the pistol is still in the ready-to-fire position, return the safety to its place (if your pistol has one) and remember to keep the pistol pointed down while you unload it. For revolvers it's a little different: check the cylinder to make sure there are no rounds in it or remove any that are left there.
In the case of a semi-automatic pistol, remove the magazine and then retract the bolt to remove any cartridge that may be left in the chamber.
How to Shoot a Pistol: Questions and Answers
Tell me, can I get injured the first time I use a revolver?
Keep your fingers away from the front of the cylinder - this is where hot powder gases escape when firing this type of pistol. Do not point the gun at yourself or anyone else, and do not point the gun at anything you are afraid of breaking or destroying. Don't shoot at anything that might make you angry, such as an animal (and don't shoot at live targets anyway - it's inhumane).
How do I know which of my eyes is dominant?
Hold your hands in front of you, palms facing away from you, and make a small triangle by placing one thumb on top of the other and the fingers of one hand over the fingers of the other. Now look at a distant object through this triangle. Close one eye. If you can still see the object, the eye that remains open is your dominant eye.
I'm only 11 years old, but I already want to shoot a pistol. Do I need parental permission?
It is entirely up to your parents since you are a minor and under their guardianship. Try to find classes/trainings available for teens in your area and ask your parents if you can take a gun safety course. If you complete the course well, it will show them that you are serious and responsible enough to handle a gun.
Should you cock your weapon before every shot?
For a semi-automatic pistol, you only need to cock the bolt if there is no round already in the chamber. In most cases, this will only happen after you load a new magazine, since when you fire, the semi-automatic pistol will place the next round in the chamber for you.
If I have hardly ever shot a pistol before, should I buy one? Does this require prior practice?
It is better to practice at the shooting range and gain a little theoretical knowledge before buying a weapon. In most cases, before purchasing, you will have to take a test to see if you can handle the gun.
How to properly eliminate a delay when firing a pistol (for example, if a cartridge is stuck in the chamber)?
First, remove the magazine, then pull the bolt back to pop out the stuck cartridge. Doing these steps in this order prevents other rounds from entering the chamber and causing even more problems.
Can you pull the trigger with two fingers?
Yes, but it is strongly not recommended. By using two fingers at once, you weaken your grip and therefore reduce your ability to control recoil. If you have to use two fingers to fully pull the trigger, make sure you have a firm grip on the gun and be extremely careful.
What else do I need to know about revolvers and how to shoot them?
Keep your fingers away from the front of the cylinder (closer to the barrel) when you shoot. Hot powder gases burst out at this point and can burn your fingers. Be careful not to put your fingers between the cartridge and the trigger. Getting hit on the finger by a striker is very painful.
Will the shutter become less tight over time?
Yes, after a certain number of shots from an automatic pistol, the bolt “explodes”. It will become more convenient and easier to use.
My mom has a 9mm pistol. Can I shoot someone with this gun if they break into a house?
No way! You should immediately leave the house and call the police, and not rush with a weapon (which you do not yet know how to handle) at the burglar. Trying to resist an attacker is dangerous. The things in your house are not worth your life.
Is it safe to aim at people if I have the safety on the gun?
No, it is NEVER safe to aim at someone, even if the gun is on safety. Accidents happen very often, and unless you want to hurt or kill someone, don't point a gun at anyone.
Do I need to clean up the range after shooting my pistol?
This depends on the firearm you are using and where you are shooting. Most ranges require you to clean up the shell casings. This is easy to do with a revolver because all the spent cartridges remain in the revolver.
How to shoot a pistol: Helpful tips
- When you grip the gun, make sure your index finger is not on the gun's mechanisms, outside the trigger guard, and parallel to the slide, not at an angle.
- Always be prepared for recoil from your weapon, regardless of its type, but don't try to anticipate it or your shots will miss.
- One hour of instruction makes a significant contribution to your pistol shooting skill. You will learn how to train correctly. This will allow you to improve your accuracy and speed rather than burning through hundreds of rounds without any improvements, which will tire you out and only reduce your accuracy.
- If you are using a pistol with a lot of recoil, be careful not to let it hit you in the face.
- It is important to practice regularly and consistently. A great practice is dry shooting. In this case, the weapon is not loaded, but special blank cartridges should be used to prevent damage to the pistol from the trigger, which simply fires. Such cartridges are widely available, but most of them are limited in the number of uses. When dry training, still carefully check that the weapon is unloaded, even if you remember that the ammunition is in another room. Aim at the basement wall or earthen rampart, but not at the door or the place where random passers-by might be.
- Never forget to protect your eyes and ears.
- Proper safety precautions are extremely important. You may find that experienced gun owners are very security conscious. They know that gun handling habits that are only 99% safe are a recipe for disaster. Here we need a solid hundred!
- Clean your pistol after you finish shooting. Never leave it in the safe for long unless you have thoroughly cleaned it, inside and out.
How to Shoot a Pistol: Warnings
- Treat the weapon as if it is loaded. ALWAYS!
- In most European countries and Canada, you are required to have one or more licenses to possess firearms and ammunition.
- You may need a license to carry a handgun in your car and in a holster.
- The instructions in this article apply to target shooting. Other types of shooting, such as hunting and sport shooting, require different techniques. If you are not familiar with them, it is best to hire an instructor. Not knowing the proper techniques for a given situation will be potentially dangerous.
- Pistols are inherently dangerous (due to their design). Improper use of the gun and, in general, any carelessness when using it can lead to property damage, personal injury and death. Careless handling of a gun has sent many to prison for negligence. Be careful and careful when using the gun.
- Handguns are illegal for most civilians in many countries. Please check the law in your country carefully before following the steps above.
- Most ammunition contains lead cores, and lead is a toxic heavy metal. Use copper jacketed bullets to eliminate or reduce the presence of lead in the air when shooting. Always wash your hands after firing or disassembling a pistol.
Original article: How to Shoot a Handgun