- April 26, 2020
- Weapons and ammunition
- Vlasova Victoria
There is an opinion that shooting from an air rifle is not serious, they say, what can it do? But in reality, pneumatics are capable of a lot. Today, rifle manufacturers have been able to realize everything that twenty years ago owners of air guns could not even dream of. The range of hitting the target has been improved, the accuracy, power and speed of the shot have increased. A modern rifle makes it possible to achieve high performance in a wide range of applications. Therefore, if you want to learn the technique of shooting with an air rifle, but it is not clear where to start, this article will come in handy!
Where to start
First of all, in order to learn how to shoot from the air correctly, you need to purchase an air rifle itself. However, you shouldn’t immediately run to the store and buy a super-powerful model or a very expensive weapon. Beginner shooters should pay attention to the following options:
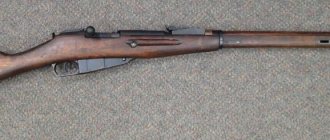
- Mosin rifle;
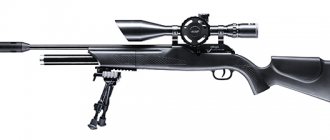
- PPP model (spring-piston);
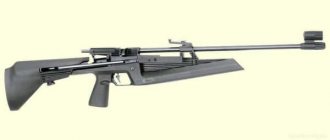
- Gama rifle;
- PCP model (with pre-pumping);
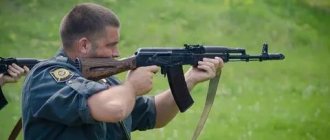
- Dragunov sniper air rifle.
The next step is choosing bullets and targets for training. It is also necessary to determine the location where air rifle shooting is permitted. The best places for shooting practice are: the attic or basement of a house, a forest outside the city, or a training range - that is, an area where there are no unnecessary people.
Checking the sight mount
In order for the shooter to aim correctly with an air rifle, he needs to adjust the optical sight. The accuracy of shooting from an air gun depends on its correct fastening.
- It is worth using high-quality fasteners. Make sure they have rings of the exact diameter to fit the scope tube and the correct height for easy scope alignment.
- It is extremely important that the distance between the rear lens and the eye is correct. You need to attach the scope, tighten the screws loosely, and check whether you need to move it back or forward to get a better view.
- Before tightening the screws, make sure that the vertical crosshair is locked in the desired position. This is critical to ensuring that the pellet's trajectory remains in line with the reticle.
The telescopic sight on an airgun must be securely mounted at the correct distance from the eye, and the reticle must be in an upright position.
Shooting process
The new rifle is being tested at different distances. The results of shooting at targets are recorded in a special table (distance, deviation from the target), analyzed and adjusted.
Cold shooting
You can test the rifle without shooting. To do this, you need to buy a laser cartridge of a suitable caliber. This projectile has an LED that glows thanks to the batteries inside.
How to perform a cold zero:
- insert the laser cartridge into the chamber;
- do not shoot;
- point the barrel at the target;
- direct the laser beam at the target;
- take aim.
Important! The main thing in laser zeroing is to remember in what position the rifle, rear sight and front sight (or optical sight) should be in relation to the laser-illuminated mark.
Test shot
Before you begin testing for range and accuracy, it is advisable to fire the rifle several times. It is better to shoot at a target located at a distance of 3-5 meters. A test shot from a minimum distance will demonstrate the power of the projectile (penetrating force) and accuracy of fire. True, the accuracy of hitting the target will depend on the ability to aim correctly.
Zeroing in at 10 meters
It is recommended to start testing a rifle from a distance of 10 m. At a short distance it is easier to test a new weapon. If you are using an optical sight, then before shooting you need to adjust the optics depending on the selected distance. The adjustment is made every time the distance changes. Before using optics, it is recommended to zero the rifle on the rear sight and front sight.
How to zero from 10 meters:
- set a target on the horizon of the weapon;
- move 10 meters away from the cardboard;
- point the barrel at the target (or adjust the optics to 10 m);
- aim exactly at the center mark;
- Fire;
- fire 5 shots;
- lower the barrel;
- activate the fuse;
- approach the target;
- evaluate the spread of bullets;
- set a new target;
- fire 5 shots, taking into account previous errors (bullet deflections).
The accuracy of hitting the target will depend on the distance. If the bullets spread strongly, the distance must be reduced. The method of aiming (at the target, rear sight or front sight) plays an important role. Usually the adjustment is made like this: if the bullet goes to the left, they shoot to the right; if it flies too high, they aim lower (and vice versa).
At 20 meters
The powerful rifle can be tested at a distance of 20 meters. Shooting must be performed in several stages. Initially, you can fire 5 shots at a target using the same shells. Then you can change the ammunition and shoot again, but at a different sheet of cardboard. You need to aim exactly at the target. This method of aiming will allow you to analyze the trajectory of the bullet and correct errors.
Rifle shooting technique
The pneumatic shooting technique itself includes the following stages: the shooting position is assumed; moment of aiming; trigger release. The main difference between a pistol and a shotgun is that the latter is applied to the shoulder (usually the right) and held with both hands in a ready position.
At the beginning of shooting practice, it will be useful for beginners to observe and study the actions of a more experienced shooter, and analyze the sequence of his movements. It is important to pay special attention and learn from him the leash and raising of the weapon.
For safety reasons and to avoid accidentally shooting, you should keep your hand on the handle while aiming. The trigger is released smoothly, calmly and slowly. It is important for the shooter to concentrate. Many professionals advise holding your breath for a short time just before shooting.
Preparation, determination of the dominant eye
The first step in learning the rules of shooting is to find out which eye a person will aim with.
- How? Stretch your arms forward so that you can see an object in the distance exactly between them. Close first one, then the other, this way you will understand which eye you see a distant object with.
- For what? This is done in order to determine which eye you will aim with. To relieve the load on the shooter, experienced shooters advise covering the other eye with non-translucent fabric, rather than squeezing your eyes shut.
Shooting from a sitting position
This is a good static position that ensures muscle relaxation. The shooter should be comfortable, regardless of the pose. The weapon is taken with the right hand in the area of the trigger so that there are four fingers on the left, and the thumb on the right clasps the pneumatic gun. With your left hand you hold the rifle in the muzzle area, and do not hold it with your fingers, but rest on your palm. The torso is located slightly to the left of the pneumatic, the elbow of the right hand remains at the level of the body, and the shoulder and elbow of the left hand are carried slightly forward. The butt rests on the shoulder of the right hand, which allows the shooter to lean against it when aiming. In order to properly aim with an air rifle while sitting, you need to determine your dominant eye.
When the shooter takes aim, his dominant eye should look through the hole in the sighting bar at the top of the front sight. In this case, it should be in the center of the slot. The scope is then aimed at the bottom edge of the center of the target. Aiming at its middle is wrong. You need to shoot at the moment between the heartbeat, holding your breath and smoothly releasing the trigger.
Adjusting sights
Zeroing air rifles with open sights is not as easy as it seems. To hit the top ten, the arrow needs to combine 3 points in one plane:
- rear sight;
- front sight;
- target.
In this case, the front sight should not visually extend beyond the boundaries of the rear sight. The human eye is designed in such a way that it cannot focus on 3 points at the same time, but only in 2 planes:
- rear sight;
- target front sight.
The situation is different with optical and collimator devices, where only 2 points are combined in one line:
- aiming mark;
- target.
The mechanical sight is adjusted based on the results obtained from 3-4 shots, namely, based on the ratio of the average point of impact (MIP) and the aiming point (AP):
- If the STP is above the TP, then the shooter lowers the rear sight or raises the front sight.
- When the STP is lower than the TP, the rear sight is set up or the front sight down.
- When the STP moves away from the TP to the left or right, the rear sight moves in the opposite direction, and the front sight follows the middle point of impact.
The optics are adjusted using the same principles, by turning the top and side screws. Raising and lowering the aiming reticle is done by top editing, and to shift the marking to the left or right - by side editing.
Prone rifle shooting
If shooting from a rifle is carried out at a stationary target, then the prone position is the most comfortable position. However, for moving targets it can cause some difficulties, for example, difficulty in quickly changing the sight. There is a risk of your view being obstructed by tall grass or bushes, so it is important to consider the surface and area where the shooter is located.
To accept this provision you must:
- Leaning on your elbows, lie on your stomach and hold the rifle in front of you. The right leg should be slightly bent at the knee. Place the toe of your left foot on the surface and level it.
- Monitor the angle (15-30°) between the aiming line and the shooter’s body. When the angle decreases below normal, excessive tension in the arm muscles occurs. And its increase will complicate aiming and affect shooting accuracy.
Rifle shooting from the kneeling position
This shooting position is rarely used. To achieve at least some result, a shooter in this position needs to accustom his body for a long time not to experience pain. Muscle spasms and imbalances may occur, making it difficult to accurately hit the target.
When shooting an air rifle from the knee, the shooter's entire weight is transferred to the left knee, on which the left hand rests. The weapon rests on the right shoulder. The shot is carried out with the right hand.
Sports shooting
Shooting as a sport has been practiced for hundreds of years in European countries, with some German shooting clubs dating back over 500 years. The sport's popularity grew in English-speaking countries with the formation of the National Rifle Association in 1959. There are 15 events on the Olympic program, divided into three groups: rifle, pistol and shotgun. Air rifle shooting competitions are held on shooting ranges where shooters aim at targets at distances of ten, twenty-five and fifty meters.
During competitive air rifle shooting, shooters must be as steady and accurate as possible. To achieve this, they use relaxation techniques and lower their heart rate to half their normal rate to shoot between heartbeats and use flashing lights to more easily hit the bull's-eye, which appears to be nothing more than a tiny dot in the distance.
Reasons affecting shooting accuracy
Below are the most common interferences that affect the quality of aerial shooting.
Screws for attaching the stock. Loss of accuracy in pneumatic shooting is caused by loosening of the fastening screws. This reason is the most common. Most often, many rifles have two screws on the stock and one next to the trigger, with bushings on them. If the screw is untwisted by only 1/4 turn, the deviation will be exactly fifty millimeters by twenty-five meters.
Bad bullets. Many shooters, especially beginners, cannot correctly select the correct caliber bullets. To identify the required type, it is worth buying several types of pellets and, after shooting, choosing which ones are best suited to the usual distance. Do not use oxidized, deformed or old bullets. The best choice would be lead and high-quality specimens from trusted manufacturers.
Additional Tips
And now, the basic training has been completed, the technique has been successfully mastered, and in addition you should become familiar with the reasons that may affect shooting accuracy:
- Make sure that the screws on the stock mount are always firmly screwed in - even a slight looseness can lead to quite strong deviations when firing.
- Always make sure the front sight is firmly attached to the barrel. Also, the sighting bar must be securely attached to the weapon.
- Buy several types of bullets at once - some manufacturers are chasing the speed of release and make them too light, and this has a significant impact on accuracy. Also, bullets may not be universal and only fit a certain model of rifle. Therefore, it is better to try several types at once and choose the optimal ones.
- Keep the barrel of the gun clean - free of oil and lead residues.
- During shooting, the rifle's rebound is unacceptable - it must be pressed tightly to the shoulder, but without indentation.
- Remember that you need to stand still for a while after firing and let the bullet leave the barrel (this process is a little longer than with a pistol due to the length of the barrel).
Also familiarize yourself with the various models of rifles; read about the IZH 61 MR 61 air rifle here. For the best air rifles without a license, see here. For information about what Chinese-made air rifles exist, see below.