The army bowler hat, in addition to its use in military service, has gained wide popularity among the civilian population, namely as an excellent option for hiking, outdoor recreation, fishing and hunting. Compactness allows you to save space in your equipment, and versatility makes it possible to take a minimum of things for cooking.
In addition to its use in military service, the army bowler hat has gained wide popularity among the civilian population.
Design and use of an army bowler hat
The soldier's bowler hat has an oval shape, where one wall is oblong, for wearing on a belt. The second option is a spherical shape, but such pots are not popular because they are uncomfortable to wear on the body and compact transportation is difficult.
The item is equipped with a handle for carrying the product and hanging it over a fire or burner. The set includes a lid that can be used as a frying pan for cooking porridge or heating main courses. The handle of the pot is designed to hold the container during the cooking process, as well as to tightly close the product. A hole in the handle is provided for compact storage of the spoon.
The item is equipped with a handle for carrying the product and hanging it over a fire or burner.
Types of camping boilers with a bow:
- Cylindrical with flat bottom
- Oval (kan)
- With spherical bottom
Each pot has its own advantages. Flat-bottomed cauldrons can be placed on the ground or on a table. In a round cauldron, the spherical bottom heats up evenly and cooking goes faster.
Oval bowlers are convenient to pack in a backpack. It is easy to hang two boilers side by side over a fire. Their flat sides may touch.
High-quality boilers and heaters are made by domestic companies. They are produced in different volumes and different heights. The main advantage is the quality of the steel.
Advice.
For a one-time fishing trip or picnic, it is not necessary to buy a camping boiler. Making a cauldron from a suitable pan is simple. A bow made of steel wire or cable is attached to the handles.
Characteristics of combined army bowlers
The Army Combination Bowler aims to make it easier for military personnel to equip. The main element with a flask inside is convenient to carry on a belt or in a backpack. The multifunctional kit allows you to prepare a complete lunch or dinner.
Equipment
The set from a warehouse or store comes standard with:
- Pot with rotating handle;
- A flask with a tightly screwed cap;
- Podkotelnik.
The multifunctional kit allows you to prepare a complete lunch or dinner.
The factory set consists of a main element with a flask inside, which is inserted into the boiler compartment. The set can be placed in a case; it is purchased separately.
The aluminum army bowler is manufactured according to strict military standards. When assembled, it has dimensions of 180 x 160 x 90 mm.
Performance characteristics
All items in the set can be used to prepare a full meal, or individually.
Purpose of the main boiler:
- Container for cooking food in a standing or suspended state;
- Transferring liquid over long distances and transporting water to the cooking site;
- Product storage;
- Water collector;
- Technical needs.
Container for cooking food in a standing or suspended state.
Purpose of the flask:
- Liquid container;
- Metal option for making tea and other hot drinks;
- Like a sinker on hiking trips;
- Cleaning dirty water.
Metal option for making tea and other hot drinks.
Purpose of the sub-boiler:
- Cover for the main pot;
- Scoop for water, sand;
- Mug;
- Frying pan;
- Like a plate for prepared food.
The kit case also has an important purpose. In addition to the main protective function of preserving the elements from contamination, it serves as an additional item for collecting berries and mushrooms. In difficult times of war or during a long hiking trip, the structure serves to desalinate liquids, collect rainwater, and melt snow.
What do paint and varnish manufacturers offer?
Today's manufacturers offer a wide range of multi-colored acrylic paints and varnishes produced specifically for plastic. They create beautiful, fade-resistant colors, reliable film coatings, perfect gloss and smooth, quick-drying surfaces. They are excellent for restoration and decorative finishing of plastic window sills.
Related article: Do-it-yourself restoration of plastic window sills
Among such products, acrylic polyurethane paint for PVC PoliPlast RP Base stands out. The paint is practically odorless, dilutes well with water and can be tinted with any shade of color. After painting, the window sill will have a smooth, stain-resistant decorative surface and high resistance to aggressive weather conditions. The service life of the paint without obvious deviations from the original appearance is 5-7 years.
Swedish army bowler hat M39
SHAK is an abbreviated name for an army bowler hat originally from Sweden. This set has gained popularity among the civilian population due to its versatility and compactness. The set includes: main pot, mug with lid, casing, alcohol burner and alcohol burner. The functional element is equipped with a handle with a hook for the fire, and there are also convenient holders on the sides.
The functional element is equipped with a handle with a hook for the fire, and there are also convenient holders on the sides.
Only alcohol can be used in the burner, as rubber parts will melt when they come into contact with gasoline. The casing helps reduce fuel consumption and is usually made of steel or aluminum. The plastic flask and burner fit freely into the main pot. Spoon and mug are purchased separately.
How and with what to paint a plastic window sill?
An old window sill that has been updated several times still needs painting over time. However, you won’t be able to simply take paint and carry out the work, since cracks and unevenness usually appear on the old coating. Naturally, the product must first be restored before painting. And today we will tell you how to carry out the work to get a good result.
To complete the task, we need to purchase materials and tools: sandpaper, brushes, spatulas, gloves for safety, you may need putty, remover and, of course, the paints themselves.
Stages of work:
- First of all, wash the window sill using all the necessary products, which will remove grease, dust and fine dirt that can reduce the quality of the paint coating.
- After this, the window sill is carefully sanded with sandpaper, primed with a special compound for plastic, and then sanded again. After completing the work, degrease the product again and clean it of dust.
- It is necessary to cover all surfaces around the window sill with masking tape and cover the floor with film so as not to stain it with paint.
- To paint PVC window sills, it is best to use aerosol paint from a can (this is often used when painting plastic elements in cars). Having chosen what to paint the plastic window sills with, we get to work. For reliability, you need to apply several layers, but be sure to wait until the first layer dries, and then carry out secondary processing.
Despite the popularity of PVC windows, many still have wooden window sills. That is why we suggest familiarizing yourself with the stages of painting of wooden window sills, as well as concrete products.
In the Russian Armed Forces
An army cauldron in the Russian Federation has standard dimensions: 150 × 100 × 170 mm, lid volume - 0.5 liters. The pot is made of aluminum in accordance with GOST and painted green. This design was used during the 2nd World War. During military training, lunch is laid out in the main element, where the pot itself serves as a container for the first course, and the lid serves as a plate for the second course.
The volume of an army pot in the USSR was 1.3 liters, and this size remains the same today.
During military training, lunch is laid out in the main element, where the pot itself serves as a container for the first course, and the lid serves as a plate for the second course.
The Russian Airborne Forces use another option, where the kit includes a bowler hat with a flask inserted inside. In the 90s, a boiler frame was added to the set, and the dimensions changed accordingly: 182 × 160 × 90 mm. The volume of the army pot is 1 liter.
About sand piercing
This method is dry cleaning. This is mainly how carbon deposits are removed from pots in natural conditions. River sand is filled to the top of the container and the cauldron is placed on low heat for several hours. Next, the surface is scraped with heated sand. If you don't have river sand on hand, you can replace it with salt.
It should be poured into a dry pot and pierced for several hours. It is advisable to stir the salt periodically. At the very end, it will become dark, and there will be less fat ingrained into the surface of the vessel. If you decide to use dry calcination at home, then you will have to worry about ventilating the room. It is best to do this in a room that has a hood. After calcining with river sand or salt, take a dry rag and wipe the pot with it.
In the American army
At the beginning of the 19th century, the American Army completely abandoned the use of field kits. Since the 20th century, the United States has moved towards centralized food preparation, so employees were given a meal kit instead of a pot. The set included: a shallow plate, spoon and fork.
Today, American soldiers are given rations that include disposable plastic utensils.
Since the 20th century, the United States has moved towards centralized food preparation, so employees were given a meal kit instead of a pot.
Rule for writing "dyed"
The word “painted” is a verbal adjective, formed from the passive participle.
The presence of the prefix “not” will not change the number of letters “n”:
"dyed blonde"
= “undyed blonde”; "painted fence"
= “unpainted fence”; "painted bench"
="unpainted bench"
The following phrases show
passive participles in short form.
According to the rule, in such cases one “n” is written: We will choose the spelling of the words “painted” and “painted” depending on their belonging to the part of speech and on the context.
The verb “to paint” forms both an adjective and a passive past participle. These words in their full form differ in spelling: the verbal adjective “painted” is written with one letter “n”, and the participle - with two. Let's learn to distinguish these words in context.
Advantages and disadvantages of an army bowler hat
Like any product, a soldier's bowler hat has a number of pros and cons.
Positive sides:
- The army camp bowler is a universal set that is convenient during transportation and use;
- A minimum set of elements allows you to prepare a complete lunch;
- The soldier's bowler can be used on a gas and alcohol burner, on an open fire;
- Affordable price;
- The lid of the flask can be replaced with a plug.
The soldier's bowler can be used on a gas and alcohol burner, or on an open fire.
Negative sides:
- The flask is equipped with a rubber seal; during use, the material absorbs and retains unpleasant odors. The way out of the situation is to replace the element with a cork version;
- The safety plug is attached to the container with an iron chain, which creates a certain sound when walking. The solution is to replace this element with a rope or elastic band;
- With constant use on an open fire, soot is formed, which is difficult to remove from the surface;
- Sand and earth get between the flask and the pot, and it is subsequently difficult to separate them;
- The main element of the set is unstable, so it is recommended to carefully monitor the pot during the cooking process;
- Metal handles get very hot, the solution is to grab the handles with a rag.
With constant use on an open fire, soot is formed, which is difficult to remove from the surface.
The weight of the set is minimal, so it does not create discomfort while wearing. You can also reduce the load by removing the firebox or cover, and replacing the flask with aluminum or plastic containers.
How to paint a wooden window sill with your own hands - step-by-step diagram
Step 1: Remove the old coating
There are several methods for removing old paint. The first method is to peel off the old paint using a hair dryer. Be sure to ventilate the room, as the paint, when exposed to high temperatures, will begin to emit a very unpleasant odor. The second method takes longer, but is also the cheapest. To do this, we will need sandpaper, with which we need to clean the window sill from the coating. Sandpaper will help not only remove old paint, but also level the surface of the window sill.
Step 2: Apply Primer
If there are any unevenness on the surface of the window sill, they must be covered with putty, which was prepared not with water, but with soil. However, before this, you should definitely degrease the window sill, remove small debris and thoroughly wipe off dust. The next step is to level the surface with a spatula. A day later, when the composition is completely dry, go over it again with sandpaper.
Step 3: Protect surfaces from paint
If you don’t want to spend a few more days scrubbing the paint off the floor and furniture, be sure to cover all objects and furniture close to the windows with regular film, and the area in front of the window sill is usually covered with masking tape. Plain newspapers are great for protecting the floor.
Preparation for use
The army kit arrives from a warehouse or store treated with grease. Therefore, before use, it is necessary to boil all elements in a soda solution. After completely drying at room temperature, the pot and other items are wiped with a soft towel. Wash the flask and the main container inside with alcohol or boiling water. After all procedures, the kit is ready for use.
Before use, all elements must be boiled in a soda solution.
If a soldier's bowler hat is painted, it cannot be used on an open fire. Experienced tourists and fishermen remove paint before going on a trip.
First way
For those who do not know how to clean soot from a pot, we can recommend using household chemicals. Their direction is very different. For example, some are designed for cleaning ovens, others for cleaning stoves. There are also products for working with enamel surfaces. According to experts, many of these household chemicals will also work for your camping pot.
You can get the cleaning products you need at the supermarket. Before purchasing, it is advisable to familiarize yourself with the methods of use indicated on the packaging.
When dealing with purchased household chemicals, it is very important to follow safety precautions. So also buy rubber gloves
How to clean a pot after a fire? Experts recommend lubricating the surface of the product with a cleaning agent and leaving it in a tightly tied bag for several hours. After this, you can begin to wash off the carbon deposits.
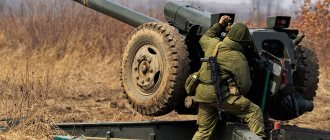
How to wear an army bowler hat on a belt
A soldier's bowler hat must be worn on a belt in a casing. There are two reasons for this: firstly, it is convenient, metal objects will not come into contact with the body, which will prevent damage to clothing, and secondly, during the cooking process, the product becomes covered with soot, which can ruin things.
And one more important point - the concave side of a military bowler hat is specially designed to be worn on a waist belt; it follows the shape of the human body.
A soldier's bowler hat must be worn on a belt in a casing.
A soldier's camping bowler hat is an indispensable item for hiking and outdoor recreation. The compactness and versatility of the product allows you to reduce equipment and prepare a complete diet for the whole day.
About the special tool
You can also use the professional cleaning product Schumanit. It is designed specifically for removing soot, soot and grease.
Apply it to the sponge and then start making circular movements
It is important that this product is completely distributed over the entire contaminated surface. After 15 minutes, it can be washed off along with any remaining dirt.
Of course, it all depends on the degree of contamination of the vessel. It is possible that you will have to hold the pot a little longer. If you are faced with an old layer of soot or soot, you should use a wire brush.
Before applying the product to the surface, in this case it is first cleaned, and only then Schumanit is sprayed on it. Then the pot is allowed to sit for 10 minutes, and then the remaining dirt is washed off with water. According to experts, Schumanit is a very powerful and aggressive professional product, and therefore it is advisable to work with it wearing protective gloves. It would be a good idea to wash the pot with laundry soap or regular dishwashing detergent.
Notes
- Ill. 387. Ordinary regiments of the Life Guards Preobrazhensky and Moscow. August 4, 1862. (in full dress uniform) // Changes in the uniform and armament of the troops of the Russian Imperial Army since the accession to the throne of Sovereign Emperor Alexander Nikolaevich (with additions): Compiled by the Highest Command / Comp. Alexander II (Russian Emperor), illus. Balashov Pyotr Ivanovich and Piratsky Karl Karlovich. - St. Petersburg: Military printing house, 1857-1881. — Up to 500 copies. — Notebooks 1–111: (With drawings No. 1–661). — 47×35 cm.
- Ceretti, E., C. Giardini, and G. Maccarini. Theoretical and experimental analysis of non-axisymmetrical deep drawing.
// Journal of materials processing technology 54.1 (1995): 375-384.
History of creation
That military army bowler hat, which is familiar to modern military personnel, did not appear immediately
For a long time - back in the 19th century - our country was concerned with the unification of this important item for the field life of soldiers. Since 1862, personal cauldrons with a wire handle and a steel lid came into use.
Nine years later, in 1871, the use of pots with red copper lids began. At the same time, cavalry units began to receive copper pots for 3 servings.
But since 1895, in the cavalry, the soldier’s bowler was transferred to a single-seat type. In the manufacture of such items, already in that distant era, standards were applied that were fixed by specially issued orders. However, one should not assume that such an important item of military life appeared only in the second half of the 19th century. The problem of feeding troops on the march and in the combat zone began to be of interest much earlier. This is evidenced by the engraving of the 17th century Dutch artist Cornelis Dusart “Old Age”.
On it, the army bowler hat is located almost in the center of the composition and is displayed in as much detail as possible. It is clearly visible that despite the much larger dimensions than is customary today, the design is quite recognizable.
Then they were made of copper, and the cost of such utensils was very high. Of course, cauldrons were also widely used in Rome. There was not a single legion where it was not part of the marching equipment. Already in that era, they came up with the option of installing dishes on a tripod. The so-called barbarian tribes also used cauldrons, but rather in magical rituals.
In the Middle Ages, military utensils were almost no different from those used in ancient times. It was mainly used collectively. In modern times, almost every army develops its own type of bowler hat. During World War II, the uniform pattern became widespread. It was used in a variety of countries.
Peculiarities
Army flasks are a simple bottle, screwed on with the same cap. Most often, the cap has a nipple that allows you to drink from the flask without opening it. It is issued to soldiers along with a cover, and sometimes with a special carrying strap.
In the army, such a container is used more for field conditions and is inserted into the bowler hat to make it easier for soldiers to move around. The capacity of a soldier's flask varied at different times. For example, in the old days in Russia they were cans of up to 40 liters. The weight of a modern military flask is 220 grams and the volume is 1 liter.
In addition to soldiers, this attribute is also used by those who love hiking or regular travel. After all, not everywhere there may be access to drinking water.
Materials
Stainless steel structures are cheaper than other options. Steel modifications are lightweight, however, under the influence of a fire flame they can burn out. This doesn't happen too often, especially if you only use camping utensils periodically. Rarely do people who go outdoors successfully use a high-quality steel container for 4–5 years. Cast iron is used even less often: it is too heavy to go on a long hike with such a product.
For those traveling by car, however, this circumstance is not very relevant. The aluminum pot is lightweight, does not rust and only occasionally leaks liquid. But you will have to pay a lot of money for such a thing. It is also worth remembering that reviews mention the danger of food burning. As for titanium structures, they are ideal in terms of practical characteristics, and only a very high cost hinders their spread.
What to take on a hike: a flask or a plastic bottle?
With the advent of a large number of plastic bottles, the question arises: is it worth buying an expensive flask if you can use a regular plastic drink bottle for water? It would seem that the choice is obvious. The flask was invented specifically for water, which means you need to take it, but it’s not that simple. Let's look at the pros and cons:
- You can choose a bottle of any size you need. A standard flask is usually 0.7 -1 liter; You can take as many bottles as you need, it will be cheap; If the bottle fails, you don’t mind throwing it away; It’s easier to control the amount of water you drink in a bottle.
The main advantage of the flask is its strength, although if it falls on sharp stones from a height, the damage may be irreversible. A plastic bottle is also not so easy to damage unless you do it intentionally. It turns out that the main advantage of using a flask is its prestige and brutality. You can’t argue with this; a tourist or hunter with a bottle looks ridiculous.
What do experts recommend?
The service life of boilers can be extended if they are properly cared for. Aluminum products are much easier to handle. It is enough to wash them regularly and keep them clean. It’s a little more difficult for owners of cast iron products. It is recommended to periodically calcinate such pots with oil.
For those who are interested in how not to smoke a pot over a fire, we can recommend doing the following. Kitchen utensils cleaned using one of the above methods must be put on fire. Next, vegetable oil or other edible fat is poured into the pot. At this stage, it is advisable to turn on the hood, as a large amount of smoke should be generated. A very small amount of oil is required so that it does not turn into drying oil. Next, the oil should burn out, and less smoke will be released. Now the pot should be cooled, and then this procedure should be performed several more times.
As a result, a non-stick layer is formed inside the cast iron pot, which will provide additional protection against rusting and burning. In addition, dishes prepared in such a vessel come out with a special taste and aroma.
According to experts, both cast iron and aluminum pots can be calcined. However, for aluminum products, low or medium intensity fire is considered acceptable. Overheating is undesirable for such boilers. Also, you cannot work with them with alkaline substances, since they corrode aluminum. After calcination, cauldrons cannot be washed with detergents. Just fill the container with water and bring to a boil.
Rules of care
When buying such an accessory for yourself, you must know how to properly care for it. After all, the flask must be washed not only from the outside, but also from the inside. It must be washed after each use. Only in this case the flask will not have an unpleasant odor.
You cannot use any detergent, as it will simply be impossible to completely wash away all the chemicals.
If conventional means have not been able to completely clean the flask, and an unpleasant odor remains, you can remove it with simple rice. It must be raw and clean. Place the rice in a flask and fill it with warm water, then close the lid tightly and shake it thoroughly. After some time, the rice will completely absorb the unpleasant odor and you can pour it out, then rinse the flask thoroughly with clean water and dry it.
The choice of a suitable army flask is determined by the requirements that you place on this camping accessory. You can take both plastic and metal.
For information on how to modify an army flask, see below.
What are they?
Water flasks can be made from a variety of materials. For example, a landing flask can be aluminum, plastic or a combination. But the most common among them are considered to be airborne flasks made of stainless steel or aluminum. The water in them remains unchanged for a long time. In addition, almost all of them come with a cover. Not only are they inexpensive, but they also never oxidize.
However, the true luxury is the flasks made of silver. After all, many believe that this material can clean any drink. But at the same time, this is a rather heavy thing, which, moreover, will not be very convenient to carry in your pocket.
Finnish
This flask is quite small in size. Its volume is no more than 0.65 liters. And this is more of an advantage than a disadvantage, because it can be put either in a trouser pocket or in a travel backpack, where it does not take up much space. Its shape is flattened, which makes it possible to fit quite tightly to the body.
Most often it is made of plastic, but you can also find metal flasks. They are attached to the belt using a carabiner. To pour water into it, you just need to unscrew the cap. The neck of this flask is quite wide, so you won’t need a watering can.
American
Flasks from the USA are also considered no less popular. Some of them are made from titanium. Therefore, they are distinguished by great strength and safety. But such flasks are more of an exception, since they are mainly made of plastic. They are also flat in shape, and all joints and connections are well soldered. Therefore, there is no need to worry about water leakage. They can fit in any bag, backpack or regular pocket.
The flask comes with a canvas cover, which makes it much easier to use. In addition, the flask also comes with a sieve, which allows you to thoroughly clean the water from various debris. But at the same time, the American flask also has some disadvantages. Firstly, it is not very strong. Secondly, if you put any heavy object on it, it will simply lose its shape.
Right
Painted – This word is a participle (passive, past tense) that is formed from the imperfective verb “to paint.” The presence of dependent words will tell you that you need to write two letters “H” in this word. The floor, painted the night before, was not yet dry. The cabinet, painted brown, was moved to the utility room. The antique-painted chair took pride of place in the museum hall. The window sill, painted last week, is already covered in dust.
Painted - this word is an adjective, which is also formed from the verb “to paint.” The word has neither dependent words nor prefixes, so it is necessary to write one letter “N” in it. The painted floor sparkled after cleaning. The painted window sill has not yet dried completely. The painted table slightly refreshed the overall decor of the kitchen. The painted built-in cabinet was still stained with paint.
We will choose the spelling of the words “painted” and “painted” depending on their belonging to the part of speech and the context.
The verb “to paint” forms both an adjective and a passive past participle. These words in their full form differ in spelling: the verbal adjective “painted” is written with one letter “n”, and the participle - with two. Let's learn to distinguish these words in context.
Terms of use
It is worth considering that you can use any camping boiler only after carefully studying its characteristics. Experienced people have long known that the vast majority of military structures are designed for eating food, and not for preparing it. But it is quite possible to fill the pot with fragile or sharp objects before going on a trip, without fear of negative consequences later. Some people even use these utensils to transport uneaten breakfasts or lunches. You need to wear it:
- in a backpack;
- on a special “sucker” valve;
- on the belt;
- on the backpack.
The pot and the pot are fixed to each other using a special handle. The guide handles are inserted into special grooves. The resulting block can already be heated on a fire or on another hearth. A wood chip stove can also be used as a fireplace. When used skillfully, the pot will bring only pleasant emotions.
The history of the flask
The oldest water flask was found by archaeologists and is over 60,000 years old. A camping flask of that time was made from any suitable items. The very first flask was made from so-called bottle gourds. In cold climates, leather wineskins or flasks made from animal stomachs were popular. With the development of mankind, more convenient wooden flasks began to appear.
During antiquity, the developed peoples of Greece had the first metal flask. For rich people they were made of silver, for common people - from copper. In the Roman army, the army flask was already in common use. Due to the high price of metal, the soldier's flask of an ordinary legionnaire was made of wood or ceramic; only wealthier people could afford a flask made of copper or bronze.
In Europe, the first flasks were made of leather and wood. With the advent of regular armies, they gradually left the world stage, giving way first to glass vessels, and then to aluminum flasks.
The word “flask” itself came to us from the German language. The word “flasche” was transformed into a more consonant Russian word “flask”.
By the time the First World War began, an army flask was part of the standard kit of every regular army soldier. The armies of each country developed a standard to which all flasks in the armies were fitted.
Post-war models:
Post-war versions of the German bowler hat and their copies deserve a separate topic. The German bowler hat, due to its practicality and convenience, was copied by most European armies both during and after the Second World War. The bowler hat was copied in the USSR, Poland, Finland, Hungary, Turkey, Austria, the GDR and the Federal Republic of Germany, Switzerland and so on. The list is big. These bowlers are similar to the bowlers of the Wehrmacht, and therefore you need to be careful, for example, when buying a bowler! Yes, in appearance they may resemble Kochgeschirr 31 bowlers, but they have small and sometimes significant differences by which they can be distinguished.
Below I have written how you can roughly identify a post-war bowler.
1. DDR bowler hat
The most common option on the market, after the USSR bowler hat. The top and bottom hinge strips on the handle caps are missing, making the cap unsuitable for use in WWII reenactments. The lugs for fastening the handle of the pot are very similar to the original ones from the war.
German Bundeswehr bowler hat
You can easily notice the differences from the military model by noticing the large space between the top of the lid and the hinge handle. This bowler is slightly taller than the original one
The handle mounting lugs are significantly different from the original ones.
German Police Bowler
This model is most similar to the military one. The only difference is the shape of the ears for attaching the handle of the pot. A good option for a reenactor, in the absence of the original one.