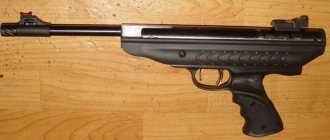
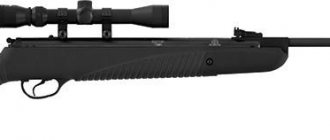
Rifle characteristics
- Caliber - 4.5 mm
- Shot speed is about 380 m/s.
- Magazine capacity - 1 bullet. This type of weapon is single-shot.
- Weight - 3.65 kg.
- Size - the length of the rifle is 120 cm. The barrel length is 50 cm.
- The energy source is a compressed mechanical or gas spring. It is activated by breaking the barrel.
- Type of bullets: lead bullets.
- Material - the handle, butt and body of the rifle are made of high-strength plastic. The forend and handle have notches for easy holding of the weapon.
- Power - up to 7.5 J.
- Barrel type: steel, with 10 grooves. The barrel material is high-quality weapon steel. At the end of the barrel there is an attachment that facilitates cocking the weapon.
- Release type: adjustable with a special screw.
- The type of fuse is a lever automatic fuse. It turns on itself when the rifle is cocked. If it is not forcibly turned off, it will be impossible to fire a shot. The safety has a red icon indicating that the rifle is ready to fire.
- Sights and the ability to install third-party devices - the rifle is equipped with an adjustable sighting bar with a front sight. There is a base for installing optics. The sight allows for precise windage and elevation adjustments using micrometer screws. The open sight has fiber-optic light-accumulating threads painted in contrasting colors. The purpose of the threads is to make it easier to aim at night. The front sight is painted red and the rear sight is green. The optics are mounted on a dovetail mount.
- Manufacturer: HATSAN ARMS COMPANY (Türkiye).
- Price - different prices are set for different models, which range from 4,500-10,000 rubles. Rifles with wooden stocks are more expensive.
Adjusting the hatsan 125 trigger
Post by Serafim » Feb 24, 2015, 10:36 pm
I’m trying to figure out how to adjust the trigger on my rifle, and something doesn’t get to me. Otherwise: 1) High idle speed 2) The trigger is too harsh - I move the rifle. I want to remove or minimize the idle speed and make the descent softer. In general, what are your recommendations in this regard?
1) Pressing force of the trigger 2) Idle speed 3) It’s not clear here - the force of the trigger pull until the end of the first point? — is this the descent? Well, that’s how much my English was enough.
Re: Adjusting the descent on Hatsan
- Quote
Posted by Panaslonic » Feb 24, 2015 10:47 pm
Re: Adjusting the descent on Hatsan
- Quote
Post by Serafim » 24 Feb 2015, 22:50
Re: Adjusting the descent on Hatsan
- Quote
Post by staray » Feb 24, 2015 10:53 pm
Re: Adjusting the descent on Hatsan
- Quote
Post by mar » Feb 24, 2015 10:59 pm
Re: Adjusting the descent on Hatsan
- Quote
Post by redcatstar » 25 Feb 2015, 01:45
Re: Adjusting the descent on Hatsan
- Quote
Post by Serafim » 25 Feb 2015, 18:08
Re: Adjusting the descent on Hatsan
- Quote
Post by redcatstar » 25 Feb 2015, 21:39
Re: Adjusting the descent on Hatsan
- Quote
Posted by redcatstar » Feb 27, 2015, 10:00 pm
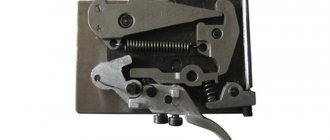
Hi all. I’ll tell you, as promised, how I set up SM on my Hatsan-85. We remove the butt. We look at the trigger mechanism (SM)
Above is a photo of the SM, with a hex key indicating the window through which the cocking of the SM to the combat (working) platoon is controlled. In the photo, the SM is not cocked, the sears are not engaged with each other. Cocking (without compressing the spring, coiled or gas) is done with a thin screwdriver or, like mine, with a hex wrench, pushing the sear through the hole away from the compressor. The photo shows that the sears are caught on each other, the SM is put on combat platoon. Let's look at the adjusting screws. To adjust the SM there are three adjustment screws (gougon), for a hex key. The above adjusting goujon regulates the force applied to the trigger; I adjusted it last. Shown above is the adjusting screw that regulates the firing stroke of the trigger (second stage). Before adjusting, unscrew this screw as much as possible, but make sure that it does not fall out. Shown above is the screw that controls the idle speed (first stage) of the trigger.
Let's start making adjustments. We have already unscrewed the screw that regulates the combat stroke. We cock the SM into combat platoon. We control the supply of the CM to the fuse.
Through the window we control the width of the sear contact zone; usually it is much wider than in the above photo. During adjustment, we constantly press the trigger so as not to adjust so that the SM will operate even with the safety on.
So, by tightening the first stage adjustment screw, while pressing the trigger, we ensure that the width of the contact zone is approximately one millimeter. When the width of the contact zone has reached one millimeter, we begin to tighten the second-stage adjusting screw until the width of the contact zone begins to decrease. I adjusted the width of the contact area with the second screw to approximately 0.6-0.5 mm. The third screw adjusts the force with which you need to press the trigger. I adjusted the force on the SK after installing the butt. We cock the screw with a break, insert a bullet, and try to shoot with the safety on. If the CM is adjusted correctly, then the shot does not occur. We take the safety off and shoot. After adjustment, the idle speed should be long, but easy to get out. Effort is applied only during the combat move of the SK, the combat move is very short. After firing, we listen to our sensations, and using the third adjustment screw, tightening and unscrewing, we achieve a comfortable force on the SK when firing. I don’t remember which way to turn to strengthen or weaken, you still need to adjust it for yourself. That seems to be all.
Modifications
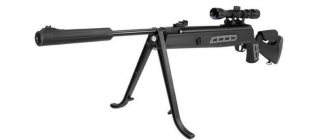
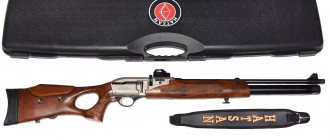
Hatsan 125 Sniper
The differences between this model and the base rifle are obvious. The stock of the Sniper rifle has been changed in shape, and the butt of the rifle can be adjusted in height. There are light plastic inserts on the butt. The sights and muzzle have also been changed. The cheekpiece on the buttstock is also adjustable. The scope mounting rail supports 11 and 22 mm standards. In addition to the standard equipment, the model has a built-in muffler, as well as a belt and bipod. No changes have been made to the interior of the rifle.
Review of the popular Leupold optics series. What rifles use Lupold optical sights? Advice from experienced hunters on installation, cleaning and sighting.
All about the Kalashnikov pneumatic assault rifle at the link. Review of the Taiwanese copy of Cybergun and the Russian one - Junker-4. Distinctive features.
Hatsan 125TH
This is the most popular rifle model in this series. The letters "TH" in the name indicate that this rifle has a pistol grip. A special feature of this rifle is that it allows comfortable shooting only for right-handers. The TRIOPAD-type butt pad on the rifle is designed to absorb the recoil of the butt.
Hatsan 125 MW
The difference between this model is that its butt imitates wood. The model is suitable for making shots from any hand.
Hatsan 125 TH MW
The butt of this rifle model is made of high-quality plastic and is stylized as wood. The rifle is designed for shooters who use their right hand as their main hand.
Hatsan 125 Camo
This modification of the rifle is distinguished by the color of the stock and butt in camouflage color. Like all models, the rifle has an adjustable scope mount and a shock-absorbing buttplate. The rifle body is made of plastic.
Video review of Hatsan 125 rifles of different modifications:
Purpose
The Hatsan 125 rifle is perfect for recreational and training purposes such as plinking or target shooting. With its help, you can hone your shooting accuracy. When installing an optical sight, the rifle significantly increases its striking range.
The rifle can be used for hunting small game. It makes it possible to kill hares, ducks and other living creatures from a distance of 50-70 m.
With appropriate skill, you can hit targets even from a distance of 100 m.
Disassembly
Partial disassembly of the Hatsan 125, which is usually sufficient for the average user, is carried out in the following sequence:
- The screws that secure the stock are unscrewed. Their number is five.
- The stock is separated from the rifle body.
- The screw of the fuse axis is unscrewed.
- The screw intended to secure the trigger mechanism is unscrewed.
- The spring is released, which protects the rifle from an accidental shot.
- The sear axis is removed.
- The back pin is removed.
- The spring and piston are taken out.
Depreservation
All samples of Turkish weapons are generously filled with lubricant. If you decide to shoot with it immediately after purchasing a rifle, then the presence of excess lubrication will almost immediately lead to failure of the spring and cuff. To prevent this phenomenon, the Hatsan 125 rifle needs to be reactivated. This process involves disassembling the rifle, removing excess lubricant, installing a weighting agent and the original spring.
After disassembly, you need to remove the piston and wipe it with a clean and dry cloth. The same should be done with the compressor. After this, you need to apply your own lubricant to these parts. You can use silicone lubricant or one of the special varieties that are available in abundance at any gun store. The lubricant will cover the surfaces with a thin layer. After this, assembly is carried out in the reverse order and the first shooting of the Hatsan 125 air rifle without optics is carried out.
Disassembly and assembly of the Hatsan 125 rifle:
Replacing the base spring with a gas one
The gas spring, which is installed on the rifle, uses the energy of compressed gas. When the weapon is cocked, the piston compresses the gas that fills the cylinder. When a shot is fired, the piston goes back, putting all the force into the energy of the shot. The gas spring significantly reduces recoil and makes it easier to cock the rifle. To install it, you need to partially disassemble the Hatsan 125, remove the mechanical spring and install a gas piston in its place.
What should you pay attention to when repairing air guns? Replacement of the main parts, the base spring with a gas one, re-preservation, cleaning and lubrication, trigger, straightening the barrel, replacing the pneumatic cylinder and more.
What bullets are best for an air rifle? The answer can be found in this article. Classification of bullets by shape, material, caliber, weight, purpose and what are their features.
Disassembling the trigger for HATSAN 125
Of course, first you need to remove the trigger mechanism. To do this, we carry out partial disassembly of the rifle (remove the stock with the butt), after which we disconnect the trigger and begin disassembling it. To avoid confusion, we recommend that you follow the steps described below exactly and remove the parts in this order:
Step 1 – knock out the second to last pins
It is best to use an awl and a hammer for this purpose. It is important not to touch the last pin, since the load from the spring falls on it (otherwise the metal part will simply bend).
Step 2 - pull out the fuse bar
First, lift it with a screwdriver so that the protrusion comes out of the small metal hole. After this, the fuse will be disconnected without much difficulty (you just need to turn the coupling clockwise).
Step 3 - remove all existing pins
It doesn't matter in what order they are removed, since most of them secure the same part. As soon as the procedure is completed, remove the trigger bar to the side.
Step 4 – Disassembling the remaining parts of the trigger
Once you knock out all the pins, the remaining parts of the trigger mechanism can be removed without much difficulty. However, be careful not to let any spring or bolt fall out or get lost.
Step 5 - remove the spring mechanism
It is also held on by two small pins, so disassembling it should not be a problem. However, under no circumstances should you try to remove the firing pin until at least one fastener remains.
That's all! The trigger mechanism of the Khatsan-125 rifle is completely disassembled. Nothing complicated, right? Not really. After all, disassembling the system is several times easier than assembling it. Professional gunsmiths often hear requests from clients: “I disassembled the trigger, but I can’t put it back together. Help!" So that you do not have to blush in front of a professional, we recommend that you carefully read the instructions for completely assembling the trigger mechanism.
What optics should you choose for this rifle?
Since the rifle has very strong recoil, installing cheap optical sights can lead to their failure after just a few shots.
Therefore, it is advisable to immediately install a high-quality monoblock and a reliable optical sight on the rifle.
Such a domestic sight as the VOMZ Pilad P4x32 LS has proven itself well. Its length is 27 cm. The sight provides 4x magnification. It will not lose its setting after a sharp shot.
Advantages and disadvantages
Like any other weapon, the Hatsan rifle has its advantages and disadvantages. Let's look at the advantages first:
- The rifle has incredible power, on par with the world's best brands. This is achieved through the use of a huge compressor. The compressor piston, under the action of an expanding spring, is capable of compressing the air so strongly that the bullet flies out of the barrel at a speed of about 380 m/s. Moreover, the bullet is pushed by air with equally high intensity throughout its entire path inside the barrel.
- The length of the stock can be adjusted thanks to elastic inserts.
- A budget option. You can buy it for relatively little money and become the owner of a very powerful and modern pneumatics.
Now let's talk about the disadvantages of the rifle:
- The large volume of the compressor causes strong kickback. In addition to being hit on the shoulder with a rifle butt, you can get a facial injury when shooting with a telescopic sight.
- The plastic stock is far from perfect. Due to the strong recoil, it breaks quickly.
- The mechanical spring of the rifle “sags” relatively quickly, requiring replacement. It is recommended to install a gas piston instead.
- The rifle's significant weight makes it difficult to use. The rifle is especially inconvenient for hunting.
- Breaking a barrel to load a rifle is very tiring.
Despite all its shortcomings, the Hatsan 125 rifle has found its adherents and has good reviews. The relatively low cost, combined with high power and excellent firing range, has ensured its high popularity among budget-class airgun models.
Replacing the trigger on the Hatsan 125
Replacing the trigger on a Hatsan 125 rifle is one of the main reasons why you have to completely disassemble the device. This procedure will not cause any particular difficulties if you have carefully studied the instructions described above or have already completely disassembled and reassembled the trigger at least once. However, there are still a few points that it is recommended to pay attention to when replacing a hook:
- Try to choose a part made of good steel. The standard “petal” of the “Hatsan” quickly breaks precisely because the metal is not of the best quality. Therefore, it is recommended to give preference not to beautiful, but to durable elements.
- Select a trigger with the same grooves and holes. For example, “petals” from almost any IZH rifle can be suitable for this purpose. As for the pins, it is better to use those that come with the Hatsan.
- Pay attention to the length of the trigger. If you choose a very short version, then it will practically not stick out from the receiver, which will make it difficult to fire a shot.
Assembly of the trigger after replacing the trigger is also practically no different from the algorithm that was described earlier. Carefully insert the pins with the springs, secure the parts with tape and carefully insert the firing pin back into the receiver, since sometimes it happens that the width of the new “petal” simply does not fit the cut in the plastic. In this case, you can slightly file the polymer or try to find a new trigger.
As you can see, assembling and disassembling the trigger on the Khatsan-125 rifle is quite a task! However, don't despair if you have no experience with such things. If you follow our instructions, and also show patience and care, then you will definitely be able to repair the rifle and put it back in perfect condition. The most important thing is that you don’t rush anywhere, and if in doubt, it’s better to convince yourself several times by checking the algorithm of actions and the trigger diagram. Well, as soon as you put the rifle back together, you will understand that the devil is not as scary as he is painted. In the future, such an event will not cause you any difficulties on almost any model, because everyone knows that Hatsan produces the most inconvenient triggers.
Hatsan mod 125
Sibiriak
Sergey Aleksandrovich
Novosibirsk Administrator Forum Team Registration: 07/03/07 Messages: 14,131 Rating: 15,671 Thanks: 2,301 Address: Novosibirsk Weapons: “Stoizher 2000”, Hatsan Optima, IZH-58, “Remington-700” 223, Browning BAR 308
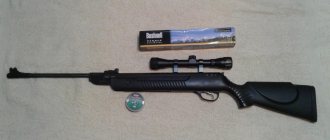
I shot my Hatsan at the dacha today.
Wind 3-5 m/s
Distance 25 m
Without optics
The bullet is in the photo.
Target; The first shots went up, then I adjusted them a little and they hit within the center. True, not quite in the center
The force of the shot surprised me. the bullet pierced an old car seat, wood and almost right through the iron on a wheelbarrow.
Attachments:
01.jpg
File Size: 172.9 KB .494
02.jpg
File Size: 191.9 KB .708
03.jpg
File Size: 193.6 KB .740
Airgun.Org.Ru
With the creation (or rather the introduction of the Webli-Scot design) of the QUATRO TRIGGER mechanism, the Turkish company Hatsan took a serious step forward. For the first time, rifles were safe to use. Schematically, the Quattro trigger repeats the record release, but is adapted to the lateral engagement of the piston. But there are also some catches. In the as-is condition, the force on the hook depends on the force of the spring, which is unacceptable for lowering such a structure. Having examined the structure almost 2 years ago, I immediately understood why this was so. There is no radius on the third sear and under the action of the hook it tries to push the 2nd sear to the side and pull it deeper onto the first.
Yes, it is, judging by the photo of your trigger, my spring was much longer and there was no point in adjusting it at all.
With Strannik's permission, I am posting a “method” for adjusting the Quatro Trigger trigger. The “methodology” is from personal correspondence, so I apologize for some misunderstandings.