Total information
Multi-shot hunting shotguns MP-133, MP-153 are designed for various types of hunting, sports, for self-defense of citizens and protection of their property, in all climatic conditions at any time of the year at ambient temperatures from minus 30 to plus 50 ° C.
FSUE "Izhevsk Mechanical Plant" produces guns of the following versions:
Depending on the length of the chamber, the MP-133 and MP-153 guns can have two versions - with a chamber length of 76 or 89 mm;
Depending on the design and size of the choke constriction, the MP-133 and MP-153 shotguns can have three versions - with a constant choke constriction and with replaceable choke constrictions for lead or steel shot;
According to the design and material of the gun stock, guns can have a wooden butt and fore-end, a plastic butt and fore-end, a plastic folding butt and fore-end, a forend and a pistol grip instead of a butt;
In terms of the design of the sighting devices, guns may differ in the presence of a rail, the installation of a front sight without a rail, the installation of a front sight with a rear sight without a rail, and the presence of seats for mounting a collimator or optical sight.
Depending on the barrel nut design, the shotgun magazine can hold 4, 5, 6, or 8 rounds of 12/76 caliber ammunition.
MP-133 shotguns are manufactured with a barrel length from 500 to 750 mm, MP-153 shotguns - from 610 to 750 mm. Some guns can be equipped with barrels with a wide rib (10 mm) and compensating holes to reduce the recoil of the gun when fired. The operation of the reloading mechanisms for MP-133 shotguns is carried out manually due to the energy of the shooter, for MP-153 shotguns automatically due to the energy of the powder gases diverted from the barrel bore into the gas chamber.
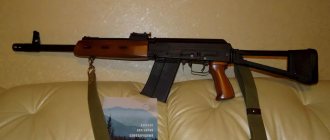
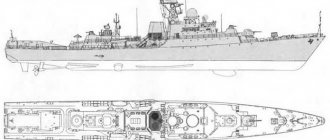
General overview of the MP-133 pump-action shotgun
This gun is designed on the basis of one of the popular models of Izhevsk weapons - the IZH-81 gun. Of the foreign-made pump guns, the closest analogue of the Izhevsk gun is the American Mossberg 500 rifle. The MP-133 is a weapon that can be used for hunting, and, in addition, it is used for sports bullet shooting and for self-defense. In 2013, serial production of the gun was discontinued.
From its very beginning until the serial production of the gun was discontinued, it was produced in only one caliber - 12 mm. The gun was made with two types of classic semi-pistol stocks - wooden and plastic. As for the butts, they were also made in two types: a folding butt, supplemented with a pistol grip, and a traditional butt. Traditional stocks were made of wood - walnut or beech. In addition, modifications were produced that did not have stocks at all, but only a pistol grip. Thanks to the MP-133 handle, as well as the absence of a butt, such models began to be called “sawn-off shotguns.”
The frame of this type of weapon is made of aluminum alloy. Sights are traditional. This is a solid bar with a bronze front sight. Additionally, you can install a ventilated rail on the gun or equip the weapon with a rifle rear sight with an open front sight.
Marking of guns
The location of the markings is shown in Fig. 1
Specifications. The main parameters and their meaning are given in Table 1.
| Parameter name | Gun models | |||||
| MP-133 | MP-153 | |||||
| Barrel material | High quality steel barrel | |||||
| Caliber | 12 | |||||
| Barrel length, mm | 510; 540; 610; 660; 710; 750 | 660; 710; 750 | ||||
| Chamber length, mm | 89 | 76 | 89a | 76 | ||
| Channel diameter, nominal value, mm | 18.4 | |||||
| *Choke constriction, nominal value, mm | 0.0; 0.5; 1.0 | |||||
| Average value of the maximum pressure of gases developed by cartridges during weapon operation, MPa (kgf/cm2), no more | 90 (918) | |||||
| Butt and fore-end material | Walnut, beech, plastic | |||||
| **Magazine capacity, pcs. cartridges. | 3; 4; 5 | 4; 5; 6 | 3; 4; 5 | 4; 5; 6 | ||
| Weight of the gun, kg, no more | 3.4 | 3.6 | ||||
Notes:
*The designation and nominal values of interchangeable choke constrictions are given in Table 2.
**A distinctive feature of the gun with a larger magazine capacity is that this gun uses an increased barrel nut.
Table 2.
| Designation of choke constrictions | C | IC | M | I.M. | F | XF |
| The size of the muzzle constriction for lead shot, mm | 0.0 | 0.25 | 0.5 | 0.75 | 1.00 | 1.25 |
| The size of the muzzle constriction for steel shot, mm | — | Extension 0.1 | 0.2 | — | 0.4 | 0.52 |
Section 2.
MAINTENANCE
Telescopic folding stock for MP-153 ATI Strikeforce, B.1.10.1135.c
product information
Telescopic folding stock for MP-153 ATI Strikeforce, B.1.10.1135.c
Folding telescopic stock, six-position, manufactured by ATI (USA).
Designed for installation (using
an adapter Taktika Tula, 12000 ) on the MP-153 instead of the standard stock.
Attention! An adapter for installing ATI stocks on the MP-153 Tactics Tula, 12000 is included in the delivery package. The height-adjustable butt comb ensures a uniform position of the shooter's head and allows you to select the optimal height for comfortable aiming using both standard mechanical and optical/collimator sights. The stock is equipped with the Scorpion recoil control system. Material: high-strength DuPont polymer. Black color.
Attention! The buttstock does not block the possibility of shooting in the folded position! When installed on models of shotguns with a short (500 mm or less) barrel with the butt folded, the total length of the weapon will be less than 800 mm, which contradicts the requirements of the Weapons Law of the Russian Federation.
Color
The following shades are available:
- Black;
- Beige;
- Grey.
Please indicate the desired color in the order notes.
User manual
Read full description
Fits: Most Maverick 88, Mossberg 500/535/590/835, Remington 870 and Winchester 1200/1300 12 GA Shotguns
- Strikeforce Shotgun Stock
- Stock Side-Folds to the Left of the Receiver Can be Fired from Folded Position
- Eliminates Horizontal & Vertical Movement of the Stock on the Buffer Tube
- Elongated Design to Fit All Users
- Sure-Grip Texture
- Upgraded 1 1/4″ Thick Pad
- Adapters for All Supporting Models Included
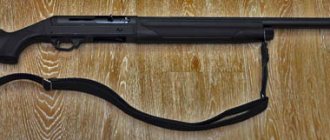
Design and principle of operation of the MP-153 shotgun
The MP-153 self-loading hunting shotgun consists of the following main components:
— a barrel with a gas chamber and a regulator for the rollback speed of moving parts;
— boxes with an under-barrel magazine and an interceptor;
— a movable system of the gun, which includes a piston, a rod assembly (bolt frame), a wedge, a bolt with a reloading handle;
— return spring;
— trigger mechanism (trigger mechanism);
- butt;
- handguard.
To increase corrosion resistance, the bore and chamber of the barrel, as well as gas engine parts (piston, gas chamber), are chrome-plated, and the valve is made of stainless steel. The operation of the gun's reloading mechanism is carried out automatically due to the energy of the powder gases discharged through holes in the barrel wall into a gas engine located on the barrel, as well as due to the energy of the return spring located on the magazine tube.
The speed regulator for the recoil of moving parts is mounted in the gas chamber and consists of valve 6, valve spring 5 and chamber nut 4. The speed regulator allows the use of cartridges with different characteristics, as well as compensate for the influence of the temperature conditions of the gun - by releasing excess pressure of powder gases from the chamber in atmosphere. The bolt is longitudinally sliding, the barrel is locked by the lug lug of a wedge located in the bolt and raised to the extreme forward position using a rod. The wedge's lug fits into the corresponding recess in the barrel coupling.
The trigger mechanism is mounted on a separate base and allows only single shots. The gun has a push-button safety located in the trigger mechanism housing (Figure). The gun has a mechanism to delay the bolt in the rear position when the cartridges are used up.
The mechanisms of the gun work as follows:
- when you press the trigger, the sear rotates on its axis and releases the trigger, which strikes the firing pin, and with its lower tooth moves the holder, thereby releasing the interceptor;
— when firing a shot under the influence of powder gases, the piston with thrust begins to move backwards and the barrel bore is unlocked due to the action of thrust on the wedge; subsequently there is a joint rollback of the entire moving system: piston, rod (bolt frame), bolt with wedge;
— at the same time, the cartridge is fed from the magazine to the tray;
— when the recoil parts move backward, the cartridge case is removed from the chamber, the cartridge case is removed outside the box, and the hammer is cocked;
- when the moving system moves forward, under the action of the return spring, the tray with the cartridge is lifted, due to the interaction of the earring with the recess on the bolt frame, and the cartridge is sent into the chamber;
- when the bolt comes to the forward position, the barrel bore is locked by lifting the wedge into the coupling recess due to the additional movement of the rod with the piston forward. The gun is ready for the next shot;
- when the cartridges in the magazine are used up, after the last cartridge is fired, the interceptor, opening access from the magazine tube, closes the tray, the bolt frame rests with a recess on the earring and stops in the rear position.
Design of MP-153
The MP-153 shotgun differed from its base in the following ways:
- The dimensions of the receiver have changed. To accommodate 12/89 cartridges, it needed to be lengthened by 10 millimeters. The width and height have become smaller;
- The rod responsible for the movement from the piston to the bolt received a symmetrical U-shaped part. It is made of steel sheet. A rectangular window was placed in the center, with symmetrical rods remaining at the edges. The design has become stronger and more durable;
- The weight of the locking latch and bolt has been reduced. This is done to achieve an optimal balance between the driving link and the driven links;
- There is only one cartridge interceptor left. It performed the functions of stopping the ammunition before feeding it to the tray and cutting off the remaining charges in the magazine. The stability of operation has increased, the possibility of feeding two cartridges at once has been reduced to zero; The feed tray device has been redesigned.
The cartridges are delivered without interruption due to the fact that the tray rises until the edge stops. When the magazine runs out of cartridges, the bolt is locked in the rearmost position by a special mechanism. The user can independently adjust the magazine volume. This is done using a simple nut. Some European countries limit the maximum capacity to 2 charges. The use of a nut in such a situation is indispensable.
Automation works due to powder gases after the shot. The cylinder-piston design includes a barrel stand, a gas chamber and a piston, the movement of which occurs along the outer side of the holder. To remove gases, holes with a diameter of 3 millimeters are used. Behind these holes there are special windows that receive part of the energy received so that there is no excess.
The weakness of the automatic operation stability is considered to be the wide range of ammunition used: depending on the caliber, the energy received from the powder gases is reduced. The problem was solved by adding a mechanism for releasing excess energy through a pressure relief valve in the gas chamber.
The design of the valve mechanism is simple. The main part is the annular piston, which closes the annular gap with its end. The piston interacts closely with the spring that presses it. If the pressure is exceeded, the gas presses the piston, and the excess part is sent through special windows outside the MP-153 gun. The amount of energy that is required for stable operation of the automation remains in the working chamber. The mechanism is subjected to severe loads and high temperatures. To achieve a high supply of working life, strong materials and modern processing technologies are used in production.
The barrel bore, chamber, piston and gas chamber interact with the powder gases. To increase the service life, these components are coated with chrome. The valve and piston ring are made from steel that resists corrosion. Carbon steel is used in the production of barrels; hot forging technology is used. The barrel can withstand shooting with metal shot.
The manufacturer claims a working life of three thousand shots. Practical use shows the mark of 4-5 thousand shots. Upon reaching this mark, the stability of operation decreases, and replacement of the main components or technical units as a whole is required.
The design and principle of operation of the MP-133 shotgun
The MP-133 multi-shot hunting shotgun consists of the following main components:
- barrel with coupling;
— boxes with an under-barrel magazine and an interceptor;
— a movable system of the gun, which includes the forend assembly, the bolt assembly with the wedge;
— trigger mechanism (trigger mechanism);
- butt.
To increase corrosion resistance, the bore and chamber of the barrel are chrome-plated.
The design and operating principle of the mechanisms of the MP-133 and MP-153 shotguns are largely similar. The difference is that the operation of the reloading mechanism of the MP-133 shotgun is carried out by moving the forend to extreme positions with the hands of the shooter. In this regard, in the trigger mechanism of the MP-133 gun, the delay plays the role of delaying the moving parts in the forward position until the shot and the disconnector are fired, and in the trigger mechanism of the MP-153 gun, only the disconnector, which allows you to fire only single shots. Due to the higher speeds of the moving parts on the MP-153 shotgun, the cartridge is fed to the tray at the moment of the shot (from the actuation of the holder). In the trigger mechanism of the MP-133 shotgun, this part is absent and the operation of the reloading mechanism is determined by the movement of the rod.
The mechanisms of the gun work as follows:
- when you press the trigger, the sear rotates on its axis and releases the trigger, which strikes the firing pin, and with its delay pin frees the fore-end to move backwards;
— when the forearm moves backward, the cartridge case (or cartridge) is removed from the chamber, the cartridge case is removed outside the box, and the hammer is cocked. In this case, the thrust releases the interceptor and the cartridge is supplied to the tray. When the hammer is cocked, the handguard can be moved back by pressing the delay button up;
— when the forend moves forward, the tray with the cartridge is raised, due to the interaction of the earring with the recess on the bolt frame, and the cartridge is sent into the chamber;
— when the bolt comes to the forward position, the barrel bore is locked by lifting the wedge into the coupling recess due to the additional movement of the forend with traction. The gun is ready for the next shot;
- when the cartridges in the magazine are used up, after the last cartridge is fired, the interceptor, opening access from the magazine tube, closes the tray, the bolt frame rests with a recess on the earring and stops in the rear position.
Proper handling and timely maintenance increases the service life and guarantees reliable operation of the gun. If this is not necessary, you should not completely disassemble the gun.
Let's improve the MP-133
Photo by the author
I wanted to purchase a model with a wooden stock and fore-end and a barrel length of 710 mm. I saw these guns in various stores, but I was never able to buy them. I have not seen concentric rings in the barrel of any gun.
Of course, because of the aiming bar. Guides the trunks when it is soldered. I looked at guns of other brands and observed the same picture. What to do? A solution has been found. On sale was an MP-133 with a folding Kalashnikov stock with a barrel length of 660 mm and interchangeable chokes. For some reason I thought that a shorter barrel would not behave this way when installing the sighting bar. And exactly. The rings were even. I bought it. I’ll say right away that the automatic plastic handle and butt were not particularly convenient for me, and I decided to install a regular wooden stock. And it fit perfectly from the MP-153. You just need to be very careful when removing the folding stock. To get to the screw securing the stock to the box, you need to dismantle the stock latch, and there, after removing the pin, one spring-loaded part, which serves as a latch button, can fly out. It hit me on the forehead, leaving a bloody mark on it. If it were in the eye, then that’s it... So you only need to act with plastic glasses, holding and not pointing this thing at yourself. It’s even better to take it to a workshop...
So, now I have a gun with a walnut stock and a plastic forend. In my opinion, there is nothing wrong with this. In some ways it’s not even bad. Plastic is not afraid of dampness. Although wood, of course, is more beautiful and more pleasant to hold in your hands, especially in the cold. What else?
The bore has a diameter of 18.4 mm with a chamber for a 76 mm sleeve. There is a pressure mark of 90 MPa (918 atm). Replaceable chokes with snakes: 0.25; 0.5 and 1.0 mm. I decided to definitely buy a cylindrical nozzle. Light alloy shotgun box. This confused me a little at first, but then I somehow calmed down. Now it is used on many guns, including the semi-automatic MP-153 and the Bekas, apparently this alloy has proven itself well.
One well-known disadvantage was discovered, which was already written about in the newspaper when talking about pump-action shotguns. When reloading it makes a great noise. And simply, when you hold it in your hands, the forend moves a little and makes loud sounds. Some things have been improved. To do this, rubber rings were placed on both the front and rear of the forend on the magazine tube. One is close to the box, and the other is to the ring coupling for attaching the barrel. Plumbing seals with an internal diameter of about an inch and a thickness of three millimeters were suitable as these shock-absorbing devices. But, I think, something else can be selected or made (for example, from leather, it will be much better, especially if the gun is used in cold weather.) Now, when moving backwards, there is no loud impact of the forearm on the receiver, but when closing bolt, when the forend goes forward, there is no other shock, the source of which is somewhere in the connection of the rods with the bolt. You just need to move forward now more accurately so that the forend snaps into the forward position. Or slightly reduce the thickness of the front ring (up to 2.5–2.2 mm is quite possible). What’s unusual, perhaps, is that you have to stretch your left hand forward more than on other guns. This is the position of the forend. A barrel length of 660 mm instead of 710 gives the gun greater controllability, which can be useful. And if you need to shoot shot further and more densely, then, I think, it’s worth trying a small, commercially available cylindrical barrel extension with holes to relieve muzzle pressure. But it will probably be better if the shot is in a container.
About changing the cartridge. You can change it in the barrel, but this has its own specifics. One option: by pressing the bolt stop button at the trigger guard, move the forend back a little, then push the feeder tray inside the box, as when filling a magazine, and open the bolt. Pull out the unnecessary cartridge, insert the one you need (do not change the position of the tray, otherwise cartridges will come out of the magazine), and close the bolt. The method, of course, is not particularly successful. The second option (noisier, but simpler): send the required cartridge into the magazine (provided that it is not completely filled), open the bolt, shake out the unnecessary cartridge, and send the desired one out of the magazine by moving the bolt forward.
This is all that I have so far managed to understand and improve in the MP-133 gun. I would be interested in reading stories from other owners.
Alexey Krasavin November 24, 2011 at 00:00
The procedure for partial disassembly of the MP-153 shotgun
To ensure the necessary care (cleaning, lubrication, inspection), the gun is partially disassembled (see figure):
1. Unscrew the barrel nut 7.
ATTENTION! In the version of the gun with an increased magazine capacity (with an extension nut 11), there is no cup 14 and when unscrewing the barrel nut it is necessary to hold it to prevent the magazine spring 15 from flying out.
2. Remove the handguard 75.
3. Move the bolt back using the handle 10...20 mm and separate the barrel from the box.
4. Remove the charging handle, pulling it out with some force in a direction perpendicular to the bolt axis.
5. Remove piston 20, rod 23, bolt 30 with wedge 41, return spring 21, ring 22 from the gun.
6. Remove the trigger by knocking out two pins 67 from the box that hold the base of the trigger in the box.
The procedure for completely disassembling the MP-153 shotgun
1. Carry out partial disassembly of the gun.
2. Separate the butt 79; to do this, unscrew the screws 81, separate the butt plate-shock absorber 80 and unscrew the butt clamping screw 82.
3. Disassemble the trigger. To do this you need to do the following:
— remove holder 68 with spring 69;
— release the trigger, holding the trigger with your finger to avoid impact in the extreme forward position;
— use a hammer to knock out the trigger axis 56, the sear axis 50, the trigger axis 84, the axis with the ring 66;
— knock out the fuse pin 46 and separate the fuse 43.
4. Disassemble the shutter, for which you need to:
— knock out the axis 37 of the striker;
— remove the hammer 40, spring 39 and washer 38, holding the wedge in place;
— separate the wedge 41 down, taking measures to prevent the ball from being lost;
ATTENTION! When the wedge is separated from the bolt, ball 25 is released, which is located in the wedge groove on the right.
— knock out axles 37 of the extractor and ejector;
ATTENTION! The axes of the extractor and ejector are knocked out only from the bottom up.
- separate the ejector 36, ejector bend 34, ejector spring 35, extractor 31, extractor bend 33 and extractor spring 32.
5. Knock out the axis of interceptor 72 and remove interceptor 70 with spring 71, interceptor button 73 and interceptor button spring 74.
6 To remove the spring of the tubular magazine 15 and the feeder 16, by pressing the protrusions of the plastic cup 14 through the side holes in the magazine tube, push the cup inside the tube flush with its front end and, turning it around its axis at a certain angle, remove the cup, holding it from flying out under the force magazine springs.
7. Disassemble (if necessary) the rollback speed regulator of the moving parts.
ATTENTION! Disassembling the speed controller is not recommended.
Due to the large force of pre-compression of the valve spring, disassembling the speed regulator should be done only in a service station in order to determine the reasons for the weak rollback of the moving parts, if necessary, adjust the pre-tension force of the valve spring or when replacing parts if they break.
Assembly procedure for the MP-153 shotgun
Reassembling the gun is done in the reverse order.
After complete disassembly:
1. The tubular magazine is assembled.
2. The interceptor is installed in the box.
ATTENTION! The axis of the interceptor, to prevent it from shifting when firing, must be cored along the contour of the box hole from below.
3. The shutter is assembled, for which it is necessary:
— assemble the extractor and ejector with the shutter;
— place the wedge in the bolt as shown in the figure, lowering it down until a groove appears in the bolt;
— place ball 6 into the groove in the wedge and lift the wedge up;
— insert washer 4 into the rear groove of the wedge;
— place firing pin 3 with firing pin spring 5 in the bolt, stitching the washer;
— hammer in the hammer axis 7.
4. The trigger mechanism is assembled.
ATTENTION! The sear axis, to prevent it from shifting when firing, must be cored along the contour of the hole in the base of the trigger on both sides. It is more convenient to install the holder with the hammer cocked.
5. The butt and butt plate are installed. The connection of the butt to the box must be strong, without rolling.
After partial disassembly:
1. Install ring 22 on the magazine tube with the annular groove forward and a return spring.
2. The moving parts are installed on the gun. When installing moving parts on a gun, the bolt with wedge, rod and piston must be assembled into one unit. Make sure that the rod is connected correctly to the piston; the protrusions of the rod should fit into the corresponding grooves of the piston. In this position, the bolt with a wedge and rod are inserted into the box, and the piston is simultaneously inserted into the magazine tube.
Before moving the bolt into the box, you should pay attention to whether the ledges of the ring 22 on the magazine tube are located correctly and whether it does not interfere with the advancement of the rod. It is more convenient to insert the bolt with a wedge and a rod into the box in a horizontal position of the gun; in this case, the bolt must be moved forward and the wedge lowered so that it does not interfere with the movement of the bolt into the box.
3. After installing the bolt into the box (before installing the barrel), it is necessary to install the bolt reloading handle.
4. Install the barrel into the box. In this case it is necessary:
— move the shutter back approximately half the stroke;
— insert the barrel into the box;
— release the bolt to the forward position, holding the barrel.
5. Install the handguard.
6. Tighten the barrel nut.
ATTENTION! Check for free movement in the bolt and the return of the firing pin under the action of the spring after pressing it with your finger.
7. Install the trigger, in this case it is necessary:
— move the bolt back and, pressing the interceptor button, carefully move the bolt to the forward position;
— cock 55;
— install the trigger.
When assembling a gun, it is not recommended to use great force or forcefully hammer in moving and removable parts in order to avoid nicks, scratches, and crushing of the contacting surfaces of parts.
The procedure for partial disassembly of the MP-133 shotgun
ATTENTION! In the version of the gun with an increased magazine capacity (with an extension nut there is no cup 11 and when unscrewing the barrel nut it is necessary to hold it to prevent the magazine spring 12 from flying out;
1. Unscrew the barrel nut 4.
2. Move the forend back half the stroke length and separate the barrel from the box.
3. Carefully moving the forend forward, remove the bolt with the wedge.
4. Remove the trigger by knocking out two pins 61 from the box that hold the base of the trigger in the box.
The procedure for completely disassembling the MP-133 shotgun
1. Carry out partial disassembly of the gun.
2. Separate the butt 67; to do this, you need to unscrew the screws 69, separate the butt plate-shock absorber 68 and unscrew the butt clamping screw 70;
3. Disassemble the trigger in the following sequence:
— release the trigger, holding the trigger with your finger to avoid impact in the extreme forward position;
— use a hammer to knock out the trigger axis 51, sear 45, trigger 45, delay 60;
— knock out the fuse pin 41 and separate the fuse 38.
4. Disassemble the shutter, for which you need to:
— knock out the axis 32 of the striker;
— remove the hammer 35, spring 34 and washer 33;
ATTENTION! When the wedge is separated from the bolt, ball 73 is released, which is located in the wedge groove on the right.
— separate the wedge 36 down, taking measures to prevent the ball from being lost;
ATTENTION! The axes of the extractor and ejector are knocked out only from the bottom up.
— knock out axles 32 of the extractor and ejector;
- separate the ejector 31, ejector bend 29, ejector spring 30, extractor 26, extractor bend 28 and extractor spring 27.
5. Knock out the axis of interceptor 64 and remove interceptor 62 with spring 63, interceptor button 65 and interceptor button spring 66.
6. To remove the spring of the tubular magazine 12 and the feeder 13, by pressing the protrusions of the plastic cup 11 through the side holes in the magazine tube, push the cup inside the tube flush with its front end and, turning it around its axis at a certain angle, remove the cup, holding it from flying out under by the action of the magazine spring.
Assembly procedure for the MP-133 shotgun
Reassembling the gun is done in the reverse order.
After complete disassembly:
1. The tubular magazine is assembled.
2. The interceptor is installed in the box.
ATTENTION! The axis of the interceptor, to prevent it from shifting when firing, must be cored along the contour of the box hole from below.
3. The shutter is assembled, for which it is necessary:
— assemble the extractor and ejector with the shutter;
— place the wedge in the bolt as shown in the figure, lowering it down until a groove appears in the bolt;
— place ball 6 into the groove in the wedge and lift the wedge up;
— insert washer 4 into the rear groove of the wedge;
— place firing pin 3 with firing pin spring 5 in the bolt, stitching the washer;
— drive the hammer axis 7;
4. The trigger mechanism is assembled.
ATTENTION! The sear axis, to prevent it from shifting when firing, must be cored along the contour of the hole in the base of the trigger on both sides.
5. The butt and butt plate are installed. The connection of the butt to the box must be strong, without rolling.
After partial disassembly:
1. The moving parts are installed on the gun. When installing moving parts on a gun, the bolt with wedge and the forend assembly must be assembled into one unit. In this position, the bolt with the wedge and the bolt frame are inserted into the box, and the forend is simultaneously inserted onto the magazine tube.
It is more convenient to insert the bolt with a wedge and bolt frame into the box in a horizontal position of the gun, while the wedge should be lowered and not interfere with the movement of the bolt back;
2. Install the barrel into the box. In this case it is necessary:
— move the forend back about half the stroke;
— insert the barrel into the box;
- tighten the barrel nut;
— move the forend back and press the interceptor button, holding it pressed, carefully move the forend to the forward position;
ATTENTION! Check the free movement in the bolt and the return of the firing pin under the action of the spring after pressing it with your finger;
3. Install the trigger, in this case it is necessary:
— cock the hammer 50;
— install the trigger.
When assembling a gun, it is not recommended to use great force or forcefully hammer in moving and removable parts in order to avoid nicks, scratches, and crushing of the contacting surfaces of parts.
Mr 133 handguard tuning
All this is the experience of several respected shooters, I am just passing it on to you.
I didn’t make such a forend for myself, because... Having twirled the finished product in my hands, I realized that the classics are dearer to me) Here is the manufacturing process itself. 1. Remove the plastic insert from the front (with a stopper for the nut) and bore it until the forend tube fits in.
2. Now you need to either heat the part that will run over the receiver with a construction hairdryer and expand it, or sharpen it from the inside and cut out the technical cavities above the rods. So that the forend moves freely along the barrel.
3. Cut off the plastic from the top in front (where it’s solid plastic).
4. Next, lubricate the tube and thread with oil, insert it into the forend, and begin to screw the forend into the nut. Next, pour epoxy resin (resin with plastic from the forend, or some other plastic) around the forend nut.
5. We disassemble, grind off all the excess, lubricate it well again with oil and fill the space between the tube and the fore-end with epoxy (with coal dust, after polishing we get a matte surface similar to plastic).
6. Well, then we sharpen the forend as necessary so that it doesn’t touch anything, fill the free spaces with epoxy, cut out a window for the bolt stop button and give the desired shape to the forend placed on the receiver.
The photo shows a gun with a deactivated bolt stop, so there is no slot in the forend for it.
Source
Cleaning and Lubrication
The gun should always be cleaned and lightly oiled. For cleaning, use clean wiping material. Clean immediately after shooting or within no more than one day after shooting. In winter, before cleaning, the gun should be kept in a heated room for 2-3 hours.
To clean the bore you need to:
- lubricate the surface of the barrel with gun oil;
— wipe the channel and chamber with cleaning material;
— to completely remove carbon deposits and lead, the process of lubricating and wiping the channel can be repeated several times. To remove heavy lead, you can use a mesh or brush made of thin brass wire, screwed onto a cleaning rod and thickly lubricated with gun grease.
When cleaning shotguns, you should also clean the case and trigger mechanism. The ingress of burning particles of gunpowder between the trigger and the rear axle with the ring on the first batch of guns released from the factory may be the reason for the lack of a shot when the trigger is pressed. When cleaning the MP-153 shotgun, it is necessary to remove carbon deposits from the parts of the gas chamber: from the cavity of the gas chamber, from the piston, from the surface of the magazine tube.
To remove carbon deposits, it is necessary to use gun oil or special liquids to remove carbon deposits. It is not allowed to use abrasive materials or metal objects other than brass mesh to remove carbon deposits. Lubricate the gun parts with a thin layer, especially when operating the gun at subzero temperatures to avoid thickening of the lubricant. The guide grooves for the bolt frame in the gun box must also be lubricated, as well as the outer surface of the under-barrel magazine tube. The parts of the gas engine of the MP-153 shotgun, as well as the tube of the under-barrel magazine in the gas chamber area, should only be wiped after cleaning.
Section 3.
Operating instructions
4.1. The service life and reliability of a gun largely depend on skillful and careful handling of it.
4.2. Do not shoot the gun with primers alone without gunpowder, as the combustion products of the explosive mixture of the primers will damage the bores.
4.3 Do not use cartridges that fit tightly into the chambers: this may make it difficult to remove the spent cartridge case.
4.4 Do not idle the triggers - this reduces the survivability of the firing pins and their springs. If you need to simulate a shot, insert cartridge cases with used primers into the chamber.
4.5 Do not hit the gun barrels as this may cause dents.
4.6 Periodically tighten the screw securing the butt to the frame during shooting, especially during the initial period of operation of the gun, to prevent the butt from rolling.
When disassembling several products at the same time, do not allow the wedge and the bolt to be mixed up - they are not interchangeable.
Section 4.
Possible malfunctions and methods of correction
Table 3.
| Possible cause of malfunction | Troubleshooting | Elimination method |
| Misfire | ||
| 1. Damage to the striker | No primer puncture | Replace the striker |
| 2. Weak puncture of the primer | 1.1. Rubbing the firing pin in a bolt with a wedge | Clean the groove in the wedge |
| 1.2. Dirt ingress Grease | Clean off old grease and dirt, re-lubricate with a thin layer of oil | |
| 3. The output of the striker is small | The output of the firing pin with the rear ends of the firing pin and the bolt aligned is less than 1 mm | Replace firing pin or bolt |
| No shot after pressing the trigger | ||
| 1. The trigger is pulled off when the barrel is unlocked | The gap between the rear end of the delay and the base of the trigger is more than 0.5 mm | Bend the side extension of the sear pusher to ensure a gap of no more than 0.5 mm |
| No cartridge feeding from the magazine after firing | ||
| 1. The interceptor does not release the cartridge from the magazine | 1. There is no sinking of the interceptor relative to the magazine tube | Attach the interceptor |
| 2. The feeder or cartridge jams when moving from the magazine nut to the magazine tube | 2. After pressing the interceptor, the cartridge leaves the magazine tube under its own weight | Apply a chamfer of 0.3….0.5x45o on the inside of the magazine tube in the front part |
| 3. High recoil speeds of moving parts (for MP-153 shotguns) | 3. The defect is observed when firing powerful cartridges; when firing 12/70 cartridges, the supply of cartridges occurs without delay | Unscrew the camera nut 0.5 ... 1.0 turns |
| The cartridge comes out of the magazine halfway and gets jammed on the tray | ||
| 1. There is not enough space between the tray and the guides in the box for the cartridge to pass through | 1.1. The protrusion of the interceptor above the frame when the shutter is in the “delayed” position is less than 2.3 mm | Replace tray |
| 1.2. The chamfer on the tray is small or missing | Apply a chamfer along the left inner wall of the tray | |
| 2. See “No cartridge feeding from the magazine after firing”, paragraph. 2 and 3 | — | — |
| The sleeve is not reflected outside the box when the bolt moves backwards | ||
| 1. Broken extractor or ejector | The sleeve is not removed from the chamber, the bolt moves to the rearmost position without a sleeve | Replace a broken part |
| 2. Worn ejector hook | The sleeve is not removed from the chamber, the bolt moves to the rearmost position without a sleeve | Repair the sharp edge on the ejector or replace the ejector |
| 3. Reflector failure | — | Replace the reflector (rivet a new one) |
| 4. The rollback speed of moving parts is low (for MP-153 shotguns) | The reflection of the cartridge case is observed every once in a while and as very weak (the cartridge case flies no further than half a meter from the shooter) | Tighten the camera nut no more than half a turn. |
| 5. High recoil speeds of moving parts (for MP-153 shotguns) | The cartridge case remains in the chamber, the bolt feeds a new cartridge from the magazine. Metal breakthroughs from the ejector are possible at the edge of the spent cartridge case. | Unscrew the camera nut no more than one turn |
Section 5.
The history of the creation of the MP-153 shotgun
The MP-153 is based on the IZH-81 gun, developed in 1993. Its design began in 1997. The first prototype was assembled a year later. It was sent for practical testing along with the IZH-81 for comparison. Tests showed that the first sample was of unsatisfactory quality. The IZH-81 receiver allowed the use of ammunition with a cartridge case length of no more than 70 millimeters.
The first weapon chambered for 12/70 received the index “151”. In 1999 it was shown at an exhibition in Nuremberg. The 151st model was preparing for serial production when American experts rendered a verdict that it would not be in demand. The management of the enterprise decided to make a gun for 12/89 ammunition, which expanded the scope of application. The finished MP-151 samples were adapted to the above charges. A batch of 70 pieces was sold in the Udmurt region.
Development of the MP-153 began in 1999. The project managers were Konstantin Evseev and Alexander Kalugin. To adapt the IZH-81 for 12/89 cartridges, a major redesign of the design and replacement of some technical components was required.
Product repair
ATTENTION! Replacement of the barrel, bolt or wedge is carried out only in the conditions of the head station for the repair of sporting and hunting weapons at the manufacturer. This replacement requires certification tests for strength in accordance with the requirements of the PMC (Permanent International Commission).
Replacing the ejector and extractor
When replacing the ejector and (or) extractor, you must remember that their axes are knocked out only from the bottom to the top. The extractor for the MP-133 gun is made of steel sintered powder billet, and for the MP-153 gun - from rolled steel strip (their strength is different). Installation of the extractor for the MP-133 gun on the MP-153 gun is unacceptable; reverse replacement is possible.
If it is necessary to restore the working edge of the ejector, filing must be done in accordance with the requirements of the drawing. If the requirements cannot be met, the ejector must be replaced.
If replacing the ejector or extractor was caused by their breakdown, it is necessary to inspect the grooves for them on the barrel. There should be no noticeable steps in the extractor groove (closed groove) that could cause the extractor to hit.
Existing steps must be cleaned flush. On guns produced in 2000-2001, a possible cause of ejector failure may be impacts of the ejector on the end of the barrel (the ejector does not fit into the groove on the barrel due to possible play in the bolt). In this case, it is necessary to saw the groove, increasing it up or down by no more than 0.5 mm. After replacing these parts due to their breakdown, it is necessary to check the free movement of the bolt to the extreme forward position on the assembled gun.
It is best to check without a wedge and a return spring (for MP-153), moving the bolt back and forth 10...20 mm from the front position and at the same time turning the forend (for MP-133) or the piston (for MP-153) to the right and left (choosing only gaps and not applying large loads). After installing new parts or attaching the ejector, you must check the dimensions in accordance with the drawing.
Valve spring replacement
Possible malfunctions of the valve spring that appear during operation may be: decreased elasticity, breaks or cracks in the coils. Check the elasticity of the valve spring when disassembling the valve assembly that regulates the rollback speed of the moving parts. The height of the new valve spring when applying a load of 4-M N (45 kgf) should not be less than 18.6 mm for the first group and not less than 19.4 mm for the second group. The height of the chamber nut should be 9-0.1 mm for the first group of springs and 8.6-0.1 mm for the second group of springs. If the spring, when applying a force of 441 N (45 kgf), shrinks to a height of less than 18.6 mm, then the spring should be replaced with a new one. If the groups of the nut and spring do not match, it is necessary to replace the spring or nut with a group corresponding to the group of the other part.
When replacing the spring, it is necessary to screw in the chamber nut until the spring is compressed by an amount that provides a valve preload force of 441N (45 kgf). The position of the chamber nut with the spring installed at the factory is marked by a mark at the chamber slot (barrel post). After replacing the spring, you must mark the new position of the camera nut in the same way.
Replacing the charging handle
When replacing the handle in case of its loss during operation, it is necessary to select a new handle with minimal swing of the handle in the hole of the bolt frame. Pitching with a handle end span of more than 2 mm is unacceptable.
Replacing the forend of the MP-153 shotgun
If the forend breaks, when installing a new one, it is necessary to check the presence of a gap between the rear end of the forend and the front end of the box of at least 0.2 mm. This gap is necessary to eliminate play of the barrel along the axis of the gun, which can cause a new breakage of the forend.
Replacing the stock
When replacing the buttstock in case of its breakdown, it is necessary to check the fit of the front end of the buttstock to the box without tightening it with a tightening screw. A gap between the ends of more than 0.3 mm indicates that when tightening, the load on the butt will be transferred unevenly from the box and the butt may chip during shooting. This is especially true for older shotguns with a long stock bushing. When replacing the stock, you must also replace the long stock bushing with a short one. If it is impossible to replace the stock bushing with a new one, you can correct the position of the bushing with light blows of a copper hammer to avoid loose fit of the stock to the box. However, it will be necessary to trim the clamping screw by mm.
Replacing the striker
If the striker is replaced, it is necessary to check the magnitude of the forced and inertial outputs of the striker. The forced output of the firing pin is measured when the rear ends of the bolt and the firing pin are aligned (when the assembled bolt is placed on the rear end on a flat surface) and its value should be 1.0... 1.4 mm. The inertial output of the firing pin (full) is measured when the firing pin is pressed to the extreme forward position (the firing pin is pinned in the bolt) and its value must be at least 2 mm.
Replacing the tray
After replacing the tray, you need to check the amount of protrusion of the end of the tray above the bottom plane of the box. The protrusion of the tray should be no more than 6 mm, otherwise it is necessary to select a new tray or trigger base. Next, the operation of the interceptor is checked. When you press the retainer button in the direction of the butt, the interceptor, when released, should block the upward movement of the tray. To ensure this requirement, it is allowed to nail down platform A (see Fig.) or platforms B of the tray. In this case, it is preferable to nail down platforms B, not forgetting about the limit on the protrusion of the tray above the box - 6 mm. After ensuring that the interceptor can operate, it is necessary to check the protrusion of the tray above the box when setting the moving parts to the delayed position in the rear position of their movement. The permissible amount of protrusion for this measurement is 2.5...4.0 mm.
The vertical roll of the front end of the tray (tray play) with the trigger pulled and the bolt locked from the bottom position to the stop against the interceptor should be at least 2 mm.
Interceptor replacement
When replacing the interceptor, the first thing to check is that there is no gap between the rear end of the interceptor and the vertical wall of the box (a gap of no more than 0.5 mm is allowed). This check is carried out after placing the new interceptor in the box, and the requirement is ensured by selecting the interceptor button.
After this, the sinking of the front end of the interceptor relative to the generatrix of the hole in the magazine tube is checked. The amount of sinking is not less than 0.3 mm. This requirement must be met by sawing the front end of the interceptor. After satisfying the requirement by filing, it is necessary to blunt the sharp edge of the interceptor, formed during filing, with a radius R of 0.2...0.5 mm.
When attaching the interceptor, it is also necessary to check the protrusion of the interceptor relative to the generatrix of the hole in the magazine tube with the trigger installed. When pressing the tray up, the interceptor rests against the holder, the overlap of the hole should be at least 1.5 mm. After fulfilling all the requirements, it is necessary to check the operation of the feeding mechanism on cooled (dummy) cartridges.
Read cyber fiction online on Phantom Worlds
Mr 133 handguard tuning
First of all, I was surprised by the following detail. I brought the gun home and, in order to check the weapon (we weren’t even talking about selection then)
), tried to load a dummy cartridge into it. Horseradish! It wasn't like that! The cartridge did not fit into the magazine. It turned out the following: The magazine cut-off is quite crudely made by casting (!), while the cut-offs on most imported “pumps” are made of spring steel. And this cut-off, even when pressed all the way to the receiver wall, does not allow the cartridge case flange to pass through it at all. I had to cut it. Instead of an evening with my wife (who then still had the status of a permanent girlfriend), I spent the evening with a file, a hammer and “so-and-so” mother. The gist is this: the vertical pin was knocked out, the latch was sawed off, put back in place, checked and sawed off again. as a result, I removed about 1.5 mm - not less, that's for sure! But after that the gun started working.
The funny thing is that there were clearly traces of powder residue in the barrel. That is, apparently, the weapon was loaded for test shooting at the factory through the extraction window of the box, and not through the magazine
Secondly, the gun has a completely ill-conceived magazine extension. So, the point is this: when installing the extension, the standard magazine cover for 4 rounds is removed, the plastic spring holder located underneath is removed, and then a kind of plastic adapter is put on the spring, into which an additional small spring is inserted. The last two items come with an extension cord kit. As a result, inside the store we have a structure of two springs and a plastic cup between them. This is fucked up! Both from a constructive and practical point of view. The consequence of this is that the spring jams and the magazine capacity is only 6 rounds, with a very decent length.
In order to eliminate this inconvenience, I took the spring I had from Mossberg-500A and installed it instead of this entire complex structure. And the magazine capacity increased to 8 places (if these are 12x70 mm cartridges rolled with an asterisk)! Naturally, the plugging in the store stopped. At first, the last cartridge did not feed into the tray, but I just slightly pulled out the magazine spring with my hands and everything immediately started working normally.