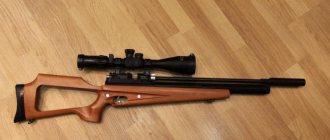
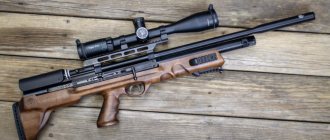
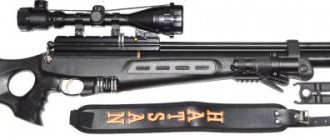
In gunsmith circles you can often hear positive reviews about the domestic air rifle called “Crocodile”. The MP-514K small-sized air rifle received this name for its appearance. Naturally, many questions arise among potential buyers about the tactical and technical properties of this weapon. In this article you can find all the answers that will help you make your choice before going to the store.
Complete transformation
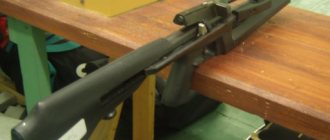
The Izhevsk Mechanical Plant is famous throughout the world for its wonderful air weapons: rifles, pistols and machine guns, but no one expected that the manufacturer would step so far and present to the world its vision of a weapon with a pre-pumping system. The MP-514K small-sized air rifle is a full-fledged bullpup system, albeit implemented in the Russian manner. The gas cylinder, which is located directly under the barrel, is pumped using a spring-piston mechanism by lifting the barrel of the rifle upward. From the outside, this action is very reminiscent of the mouth of a crocodile, hence the unofficial name of the weapon on the market.
The appearance of the air rifle is more reminiscent of a weapon from the movie “Star Wars” than the brainchild of a Russian mechanical plant, but after getting acquainted with the “toy” you get the feeling that this is exactly what it should be like. Everything is done for the convenience of the shooter: the butt, adjustable handle and fore-end fit completely into the hands without any discomfort.
Crocodile design
A bullpup is a shortened rifle where the trigger mechanism is located behind the handle, usually in the butt. The MP-514K pneumatic is a full-fledged bullpup - since the trigger mechanism is located in front of the handle. But still, the clip, the bullet chambering system and other components are located inside the butt.
The Krokodil stock is made of a plastic composite, butt-shaped, made of two halves. One of the halves is attached to the cylinder and to the second half. As a result, to remove the stock, you will need to unscrew 9 bolts (on conventional pneumatics no more than 5). The center of gravity has been moved to the rear and located behind the handle.
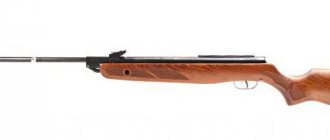
The barrel is steel, has six grooves. A muzzle is installed, the main task of which is to increase the leverage during cocking of the gun.
When disassembled, a strong similarity of all mechanisms borrowed from the MP-512 model is noticeable. The compressor is located under the barrel (this technology is called compound). The main advantage of this arrangement is its compactness.
Due to the parallel mounted cylinder and barrel, to cock the gun you need to grab it by the front of the stock and the muzzle, then move it apart. The rifle opens like the mouth of a crocodile (probably where the nickname comes from). At the same time, considerable effort must be made to cock the spring, especially after replacing the spring with a gas one.
In this case, the “ratchet” is especially useful, which prevents failure during the cocking process. With its help, in the middle of the cocking stage, you can reduce the force, and the gun will not close, but will be in a half-cocked state.
The model has a very strong recoil, since during a shot the piston moves into the shooter’s shoulder, this causes a serious blow, which negatively affects the accuracy of fire.
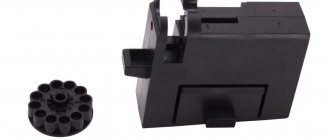
Multiple charges are achieved thanks to a clip-drum for 8 rounds, or a magazine for copper-plated explosive balls (for 10 bullets). To use steel balls, it is best to install a magnetized rammer (factory non-magnetized).
The 8-round drum is made of plastic and resembles the MP-651K clip. In the “Crocodile” it is installed almost near the end of the butt and is held in place by a spring-loaded axle. It is pulled back by pressing a button located behind the clip, then the drum simply falls when the gun is tilted to the side.
The clip for copper-plated explosive balls is a linear magazine where the bullets move in a circle under the influence of a spring feeder.
The trigger mechanism consists of: a sear with a hook that holds the piston, a trigger and a spring. The safety resembles a trigger, but turned in the opposite direction. It does not have clear positions, that is, there is no click, unlike the MP-512 model. To fully understand whether the gun will fire now, the safety must be set to its extreme position.
The standard sight is an adjustable rear sight and a non-adjustable front sight. The latter is located separately from the muzzle. That is, you can easily replace the muzzle with a sound moderator without worrying about the front sight.
The connector for mounting an optical sight is a Weaver-Picattini rail. It is made as part of the body, that is, from a plastic composite, and not from weapons-grade steel.
Performance characteristics
After an external inspection, a potential buyer is always interested in the capabilities of an air gun. The MP-514K rifle is intended for recreational shooting, so you shouldn’t expect anything special from it at first. After all, as you know, Russian weapons lend themselves well to modernization, and the “crocodile” is no exception. But more on that later.
The manufacturer’s declared power of 7 Joules officially emphasizes the status of a legal weapon in Russia, which does not require any documents for purchase. After all, the law “On Weapons” has just such a limitation. The shot speed is limited to 170 meters per second with a 4.5 mm bullet caliber. Since the weapon has a pre-pumping system, the rifle has a multi-charge capability, which is implemented in the form of a removable magazine.
Minor oddities in the characteristics
To the developers of the MP-514K rifle, many owners of this weapon have several questions regarding ammunition. The use of two types of bullets is officially announced: lead with a short skirt and steel balls, for which a magazine with a spring mechanism is supplied. If we take into account that the air rifle has a steel barrel with six grooves, then the manufacturer’s idea regarding shooting with steel balls is unclear. After all, logically, they will break a rifled barrel in a very short period of time, and you can forget about the accuracy of fire.
The sighting device for optical instruments - the Weaver rail - is made of plastic. This decision is completely incomprehensible, because shooting accuracy is achieved through the use of a single and indivisible aiming system with the barrel.
Characteristics of the Baikal MP-514K air rifle
| Barrel type | Threaded |
| Energy source | Coil spring |
| Blowback | No |
| Housing material | Metal |
| Equipment | Rifle, packaging, brief documentation, copy of certificate (upon buyer's request) |
| Caliber | 4.5 mm |
| Speed | 170 m/s |
| Number of charges | 8 bullets / 10 balls |
| View | Pneumatic rifle |
| Sighting rail Weaver (Picatinny) / Dovetail 11 mm | Eat |
| Fuse | Yes, automatic |
| Manufacturer | Baikal (Izhevsk) |
| Shooting mode | Single |
| Combat prototype | No |
| Country of Origin | Russia |
| Type | Spring-piston pneumatics |
| Stock material | Plastic |
| Length (mm) | 650 |
| Weight | 2.8 kg |
| Type of ammunition | Lead Bullets/BB Balls |
| Color | Black |
| Product weight | 2.8 kg |
| certificate |
Air rifle Baikal MP-514K (Crocodile) buy in the Popadiv10 online store. Air rifle Baikal MP-514K (Crocodile) at a low price of 17,990 rubles. You can pay for your order by mail upon receipt in any part of the Russian Federation. Before placing an order, be sure to check the price and contents of the product by phone (during business hours) or by e-mail and feedback system (at any time convenient for you).
Information on the product “Baikal MP-514K Air Rifle (Crocodile)” is for informational purposes only and is not a public offer determined by the provisions of Article 437 of the Civil Code of the Russian Federation; characteristics, appearance, color and equipment may be changed by the manufacturer without notice.
Brief overview of weapons
In practice, the MP-514K air rifle, if evaluated as a weapon for entertainment, shows quite interesting results.
- Cocking the spring-piston mechanism by moving the barrel in a vertical plane is very convenient when compared with breaking the barrel in a classic weapon.
- The rifle has two safeties (manual and automatic), which is very convenient for transportation.
- The beauty of the plastic case is complemented by very high strength, which will not allow the weapon to fall apart if dropped even on asphalt.
- While reviewing the MP-514K, it was discovered that compared to Russian competitors, it is not only the most compact rifle, but also the most powerful among its analogues.
- “Crocodile” has a very simple structure and is easy to assemble, which can attract fans of modernizing air guns.
Disassembling the MP-514K air rifle
Partial disassembly of the MP-514K is carried out as follows:
- Unscrew all the bolts on both sides of the butt and 2 under its butt plate.
- To disassemble the gun into two parts, you need to unscrew the axle bolt and remove the pin.
- To gain access to the cuff and spring, you need to remove the trigger mechanism. Since the coil spring is not reinforced, a tightening machine is not required.
- The back pin is removed and the spring is pressed, the trigger mechanism is rotated in the same way as in the MP512 model.
Partial disassembly is complete, this is enough to clean and lubricate all components of the air rifle.
When it comes to shortcomings
What different reviews there are in the media about the MP-514K rifle. Along with a huge list of advantages, there is the same list of disadvantages.
- Unfinished product. This is exactly how experts speak about the rifle. Plastic bullpup weapons, which have a pre-pumping system, produce only 170 meters per second. For entertainment, 100 is enough, but for hunting you need 260. Neither here nor there!
- Huge payoff. If you're not used to it, you can injure your shoulder when shooting from this weapon, because the very harsh recoil noticeably moves the rifle back after each shot.
- Not only is the Weaver sighting device made of plastic, but you also need to select Magnum class optics due to strong recoil. Such a device in the cheapest version will cost more than a new rifle.
- Manufacturers placed the magazine with bullets at the level of the shooter’s ear (while aiming), because of this there is discomfort when shooting from the MP-514K.
Bring it to mind
Not all buyers have a family budget that allows them to purchase an expensive pre-pumped pneumatic weapon of the “Matador” type, which is why they purchase the MP-514K PCP kit for further modification. There are not many options for improvement: replacing components with modernized spare parts or mechanically reworking a factory defect during mass production.
First of all, defects in the breech are eliminated, which is noted by almost all owners of this weapon. Poor metal processing at the factory has led to the fact that the bullet head is cut off with sharp edges when fired, which significantly affects the speed and accuracy of the shot. Complete replacement of seals and rubber bands in the rammer will help achieve maximum sealing, because initially the weapon was equipped with rubber rings from lighters, which seriously bleed air. Some experts drill out a bypass inside the barrel to fire bullets that have a long skirt. As a result, the MP-514K air rifle receives an initial bullet speed after modernization of 230-240 meters per second, which is quite suitable for hunting fur-bearing animals weighing up to 2 kg.
The main pros and cons of the rifle
| Advantages | Flaws |
| Pleasant tactile plastic. Reminiscent of a weapons-grade polymer composition due to its steel cast, durable and high quality | Poor implementation of the idea. The rifle was made for the purpose of making a profit, so breakdowns are often observed in the form of a bent rammer lever, a poorly fitting clip, or jammed magazine |
| The appearance is similar to the FN2000 air rifle model, which is very popular among hardball players | Very high cost of the rifle |
| Maintainability | Floating workmanship, so be sure to inspect the gun in the store before purchasing |
| Ease of modernization. You can make a minimal improvement by changing only the spring, or make a full upgrade, up to PSP | Guarantee. Unfortunately, after modernization or any improvements, the warranty of the manufacturer and the store where the gun was purchased disappears |
A little convenience wouldn't hurt
For the MP-514K rifle, the upgrade can be performed in the form of increasing ease of use. First of all, you need to decide something with the spring in the pre-inflation system, because its high rigidity quickly wears out during the process of pumping air into the cylinder. In the media, experts recommend installing a spring designed for the Gamo Hunter 440 air rifle; it is slightly weaker, but your hands do not get so tired during the pumping process.
It wouldn’t hurt to install a muffler-moderator weighing 300-350 grams, which will not only reduce the noise from the shot, but also balance the barrel, which will have a positive effect on the ease of aiming, and, accordingly, on the accuracy of the shot. Also, some experts make the plastic case of the MP-514K heavier with metal, or completely replace it with a similar version carved from wood. This solution is quite expensive, but many people find it more pleasant to hold a real weapon in their hands rather than a plastic toy.
I decided to write this article because there seems to be a lot of information on upgrading and disassembling this rifle, but it is scattered and very “diluted”. For example, the best IMHO, the topic “How I tortured MP 514” by participant Ganzov under the nickname LP-P38 has been discussed for 3 (!) years, and there are more than 70 pages. I wrote to him - he no longer remembers how and what happened - he switched to PCP. Participant Ganzov under the nickname Jew (many thanks to him for the article) seemed to describe everything (disassembly/assembly), but did not emphasize some of the nuances. I read a lot of material - I was everywhere, like a gold digger, trying to find some information on this rifle.I tried to combine all my “notes” into a long, but one article. In addition, my own inventions are posted here - evaluate and decide what is better.
The article is intended for beginners who have normal hands, but have never upgraded before. 3 months ago I was exactly like this.)))
Briefly about why I chose this particular rifle. In my opinion, it is well balanced, short (although the barrel is almost the same as that of a bullpup) - good to shoot from a car - multi-shot! And besides, after AP it is not much inferior to the much longer MP 512 AP. A very nice stock - very durable plastic - tested with a hammer. The backdrop is well-bored and can be easily disassembled. In other words, it’s a good “constructor”, while playing with it you can use your brain and crazy hands.
In the future, I will provide links to source topics, so that their authors will not be offended by me: Which, by the way, for the most part have long switched to PCP.
Well, it says this: I bought an MP 514 k, a new one from Glam. I don’t know for sure, but it seems that he still checks the rifles for jambs. Overall, my copy had no problems, even the barrel chamfer was not bad.
Therefore, it is better to buy not in an online store, but from him (if in St. Petersburg) or Kuente (if in Moscow). It’s better to pay extra and get a selected copy (at Kuente this service costs about 500 rubles). Don’t take it as an advertisement - it’s just that in the store they may not give you several pieces to choose from, and besides, you won’t see many without disassembling them. In the process of "smoking" forums, I heard a lot of "popados" - for example, the trunk of a curve.
The rifle in the stock/boxed version is a raw material that is not fun to shoot. I don’t have a chronograph, but from about 25-30 meters the bullet bounced off the wooden muzzle of the scarecrow in the country. And after the accident, a heavy bullet (Barracuda Match extra heavy) enters the muzzle of the same stuffed animal 1.5 cm..))) 30 meters - a beer can - right through - a straight hole. So the game is worth the candle))) The upgrade itself and assembly/disassembly is not particularly difficult, and anyone with hands can easily do it: What we need. 1. Hammer 2. Punch (nail, thin screwdriver) 3. Screwdrivers (Phillips and flathead) 4. Diamond sharp needle file 5. Electric drill (screwdriver, Dremel) 6. Drills with a diameter of 5 mm and 3.2 mm (important!) 7. Spring from GAMO Hunter 440 rifles (available in any store for about 500 rubles) 8. Nail scissors 9. Epoxy (100 ml was enough for me) still left. 10. Some kind of reinforcement (cuts of nylon stockings or wire) 11. Lubricant. Either CV joint oil or motor synthetics (whichever you prefer) 12. Automotive sealant (heat-resistant), rubber band for money. 13. A plumber's tourniquet (the gray one with talcum powder) is sold in pharmacies. 14. Vise. Not necessary, but having them will make some work easier. 15. A jar for parts (so you don’t lose anything) 16. Several old lighters (anything except Cricket - it’s not good) 17. A sharp knife 18. A rag (an unnecessary towel) on the table so as not to scratch/smear it. 19. Repair kit for pistol MP 651 k (optional) 20. Rubber, 1 mm thick. Plumbing, or from a car camera (not necessary) It’s better for everyone to stock up in advance, so as not to be distracted later.
Explosion diagram of a rifle - https://forum.guns.ru/forummessage/24/145335-5.html
Begin.
Dismantling the stock. We unscrew the plastic muzzle (if it does not unscrew, you will have to find a hexagon). We tilt the rifle with the barrel down and catch with our hand the falling part, which fixes the barrel when closing. Remove all screws from the stock. Place all the screws in a jar. These screws come in three sizes (lengths); the most important ones are the two shortest and the two middle ones - they secure the compressor to the stock. Next, carefully open the lower part of the stock like a shell - remove the barrel lock with the spring, put it in a jar.
The author of the photos is participant Ganzov with the nickname Jew from the topic. Then we take out the compressor with the trigger and the barrel, and put the stock aside.
We take a hammer, rest the rifle on the floor with the barrel down and lightly hit the base of the front sight and knock down the upper part of the stock with the weaver. It is held in place by internal ribs at the rear of the rifle. This action may not work right away, so we use our imagination))) Some comrades, when removing for the first time, advise slightly bending the plastic in the breech area. Next time it will come off easily.
Epoxy filling.
Now you can dilute the epoxy and fill the inside of the bed with reinforcement.
Advice. It is better to buy epoxy either in syringes (allows you to accurately measure the mixing proportions) or in a volume of 100 ml and then mix it (thoroughly and for a long time) in full. A slight failure to comply with the mixing proportions can result in a week-long wait for it to harden. I read about such a case on the Hanse and now I’m clarifying, just in case. Why do you need to fill the upper (with Weaver strip) part of the stock with epoxy?
The fact is that without filling the stock there will be a constant scatter of the pile - due to the fact that the barrel relative to the weaver (i.e. optics) slightly “walks”, which gives the scatter - at 25-35 meters - this is significant - we want get a hunting screw)))
I advise you to choose in advance a place where the bed will dry and not disturb anyone))) Near the radiator, on the sunny side - it will dry faster. The place should be such that cats/wives don’t push it away - I had such a precedent)))
There are two options for epoxy filling. Either just under the weaver - up to the barrel seat, or in general - put the barrel back and fill everything with the barrel together. In the second case, before putting the barrel in place, it is necessary to make cuts across the barrel at the point of contact with the epoxy. Then lay reinforcement under the weaver. And only then put the barrel in place and carefully pour the epoxy - try not to stain the stock - it is beautiful. Filled it up. We carefully place it in a pre-prepared place and forget about it for at least a day.
Personally, I filled only plastic - without the barrel. Why? I wanted to continue working while the epoxy hardened, but I think it’s better to do it together with the barrel.
Option with filling along with the barrel.
Photo by LP-P38
Here you go.
Disassembling iron. We need to separate the barrel with the cocking lever (geared) from the compressor with the trigger. Look at this picture.
We begin to cock the rifle until it “clicks” until it becomes possible to pull out the gray plate (between the stop nut and the ratchet). They pulled it out and put it in a jar. Now we need to restore the status quo - to do this, we strain our arm muscles and CAREFULLY release the ratchet from the lever tooth and smoothly connect the barrel and the compressor back. ATTENTION. I advise you to read this paragraph a couple of times and think through the motor skills of your actions in advance - so as not to get hit on the hands with a barrel. Personally, I did this. I wrapped the compressor in a rag and placed it on the table with the barrel facing up. Then he rested the elbow of his right hand on the compressor, and cocked it with his left hand (to the required level to remove the part described above). Then, with his right hand he released the pressure of the spring, and with his left he “released” the hook. It’s a little confusing, but I can’t explain it any other way. Perhaps you can come up with another way)))
So, let's move on. We unscrew the axial screw connecting the barrel to the compressor. We put the rifle on the table like this - the barrel points to the right, the trigger points down. Carefully begin to move the compressor relative to the barrel with the breech downwards (i.e. towards ourselves). NOW ATTENTION! A small part with a spring will fly out from under the horns of the compressor - you need to catch it - it is very important! I successfully lost it and had to grind it out of a bolt for the computer - it’s very messy. First of all, you can simply cover this part of the barrel with a rag at the time of disconnection. Ufff: The detail was caught and put in a jar.
Dismantling and modification of the compressor.
Fortunately, on our rifle there is no need to bore the backplate - the spring from the GAMO Hunter 440 rifle (hereinafter GC) fits there without problems))) Using a hammer and drift, carefully knock out the pin near the backplate and we are not afraid that the spring will pop out - there is a lock there (this).
To simplify the procedure for removing the USM backdrop, I came up with this thing - stick 2 rubles. attach the coin to the back with any kind of glue - so that it does not “stick” during our further actions.
Now we wrap the compressor in a towel, hold it with two strong hands, and press the safety button with the thumb of our left hand (this one)
, pushing it all the way, we rest the compressor strictly vertically on the floor (we have a coin temporarily glued to the backdrop), press hard (with all our weight) and at the same time lightly push the backdrop with the trigger clockwise with the thumb of our right hand, releasing its hook - AT THIS MOMENT THE MAIN SPRING WILL BE RELEASED, so be careful. (think about the motor skills of the actions in advance)
If everything is done correctly, the spring is released from the compressor, pulled out into the light of God and put aside in a box intended for the theme “Giving out everything for free or happiness for everyone for nothing> ))) The piston weighting agent is also removed and placed to the side. We carefully look at the position of the safety button in the trigger - during assembly it will need to be placed in exactly the same way!!! Next, pull out the piston and look at the cuff. Anything can happen to her, to be honest. There may be dirt on it, it may be melted from diesel, etc. It all depends on what kind of rifle you got. If the new one is unfired, then most likely you will only have to remove the excess grease inside, and if not, then you may have to buy a new cuff. There is a spare one in the box)))) If you buy it second hand, ask them to give it to you, because not all stores have it. There is an option to install a cuff from GAMO, but I did not install it.
Shine a flashlight inside the compressor. In the new version of the rifle, it will most likely be normal, i.e. without burrs and “mirrors”, as well as its bottom. In case of any damage inside, it’s sad.. You’ll have to think about how to eliminate this matter. The only important point here is that you cannot polish the walls of the compressor and lubricate them.
Refinement of the cuff. Most likely you will not be able to buy a cuff from Petrucha - the best option is that you will have to modify the standard one. There are several ways. Here you can look at https://www.mpmurka.narod.ru/#_Toc155267110 in the section - Refinement of the cuff - there is a photo there.
I did this. (Unfortunately, I lost the source, may the author forgive me) I’ll say right away that this method is good, first of all, because it allows, in most cases, to “cure” a disfigured cuff, saving (for experiments or mistakes) a spare one: Like <on every fireman:> (c)
Without removing the cuff from the piston, use a sharp knife to cut off approximately 1 mm from its height, then sand it with sandpaper (just do not sand the working edge - only the plane where you worked with the knife). It is convenient to grind when the cuff is put on the piston, but you can also remove it. Next is the most important part of working with the cuff. We take a sharp knife and with its sharpened end lightly scratch (raise) the entire groove. This is a type of reinforcement so that the sealant holds better (reel). Then we cut off a piece of elastic from the money and push it into the groove to the bottom with a small screwdriver. Select the length of the elastic band experimentally, I don’t remember what length it was. The most important thing is that it does not come out, but fits properly into the groove. After this, we apply sealant on top of it, flush with the plane of the cuff. Make sure that the elastic does not “come out” - this can happen if you push it in while simultaneously pulling it slightly. Remove excess sealant using the edge of a knife blade. When the cuff is dry (it’s better to wait a day), you need to go through it again with fine sandpaper. Why is all this being done? In order to reduce the dead volume, as well as slightly increase the length of the piston stroke. While the cuff is drying, let's deal with another important point of Apa.
Rammer sealing. This is how I did it. We take the barrel with the lever, remove the clip eject button (if it is still there, obviously) (this one)
— be careful not to break it — it’s plastic! We place the rifle with the lever down, the barrel points to the right.
ATTENTION! People advise knocking out the fixing pin (this one)
and carefully pull out the rammer lever (the one on the left is broken, then I’ll tell you how it happened)
Personally, I just used a wide screwdriver to pry it out (unknowingly) from its mounting socket. Nothing happened to it, but you never know - it’s better to knock out the pin anyway))) After removing the rammer lever from the mounting socket, the rammer itself with a spring will jump out. It will not get lost, since both it and the spring are large enough. The rammer lever is a very important detail. They are not on sale anywhere, so if you break or bend its axis, you will have to wait until it is sent to you from Izhevsk: it has very thin walls
here she is
For example, I was very lucky, I bought it used (how I ruined it is written below). But if you still break it, order from Cuente and wait. By the way, he has a lot of interesting things in his store, for example, a good muzzle/moderator that fits our rifle well and is inexpensive))) as well as a telescopic guide for the mainspring (this will be discussed later).
Okay, we safely removed the rammer lever, we didn’t lose the rammer with the spring, we didn’t lose the locking pin - everything is in the jar! We break the old lighter. We unscrew the valve (the plastic one that regulates the flame of the lighter - it is on a regular thread)
and we see his black rubber band below. It must be removed very carefully so as not to damage or scratch it. A damaged (even slightly) rubber band is no good!!! You need to have one or two of them. A small note I came up with a simple way to make these rubber bands from car/moto/bike inner tubes or plumbing rubber. We take an unnecessary metal pen with a hole diameter (where the writing part of the rod comes out) of about 1.5 mm (IMHO, the optimal internal diameter of our rubber band), sharpen it with sandpaper so that the edges of this hole (former fountain pen) become sharp - like a carving for wads, and, in a circular motion <carve/cut out> in plumbing. rubber (its thickness is about 1 mm) the hole turned out neat, without burrs. Here.
Use scissors to cut around this hole. The result was a puck with uneven edges. Then we “dress” it in the groove of the rammer (described below) and insert its thin end into the drill. We start the drill and use a flat (diamond) file to bring the elastic band to the desired diameter. Actually, I’m getting ahead of myself - read below - everything will be clear. Grooving the groove on the rammer.
Take the rammer (this one)
We clamp its thin part into the drill. We start the drill at the lowest speed. We make sure that the rammer does not “beat” but spins smoothly. We take a diamond file (sharp) and begin to sharpen a groove on the thick part 1 mm (from the beginning of the narrowing) according to the type of operation of a lathe. After the file has slightly cut the groove, it is more convenient to continue with a hacksaw or just a blade. Please note that a hacksaw selects metal on the rammer MUCH faster than a needle file.
In the photo below, two grooves have already been machined and two different rubber bands have been installed (one from a tourniquet, the other from a lighter), and adjustment is underway using sandpaper (experiment)
https://forum.guns.ru/forummessage/24/180788-m3712032.html
Here is a drawing of a rammer with two grooves if you decide to turn to a turner. (author Twilight) https://forum.guns.ru/forums/icons/forum … 888984.jpg It is slightly longer than the standard one. ATTENTION! The groove should be such that the rubber band (from a lighter valve or a self-made one) protrudes just a little relative to the diameter of the thick part of the “body” of the rammer. Therefore, CHECK! We sharpened it, tried on the rubber, and put the rammer into the breech. Then they plugged the bypass with their finger (this one)
and blew into the barrel. Does it hold compression? Is the rammer not too tight to fit in? If it’s too tight, put it back into the drill and sharpen it again. The main thing here is not to overdo it - I checked it this way several times. If the groove is made deeper, then there will be no point in it. If you fail - you went too far with the depth of the groove - do not despair. Either we make a new rubber band using the method described above, or we sharpen another groove (below the one that didn’t work out) - but now more carefully))) You can do it in general - two grooves (as in the drawing above) But I came to the conclusion that one Enough is enough - strictly IMHO - it's up to you to decide.
This procedure is one of the most IMPORTANT in the APA process, because in the stock version at least half of the air pressure power when fired goes between the walls of the breech and the unsealed rammer. Even the spring and cuff are not that important, IMHO.
Chamfer in the breech. It is a good idea to make a small chamfer in the breech at this stage. It will increase the lifespan of the rammer sealing gum. Unfortunately, I didn’t succeed - I don’t have the appropriate tool - a long drill or an attachment with a ball-stone of a suitable diameter (to get into the side where the clip is installed). Maybe you can do it. Now let's put the rammer with the spring in place, also put the rammer lever in the seat and drive the locking pin back.
I didn’t disassemble the mechanism for turning the clip - I just lubricated it, because so far there are no complaints about it.
Increasing the bypass diameter. Here he is
In the original it is 2.2 mm, which is not enough. Nothing at all. Remove the rubber band - it can be easily removed with a thin screwdriver. There is an opinion (Grand Master - airgun.org.ru) that it is better to replace it with an elastic band from the repair kit for the MP 651 k pistol - sold in almost all stores.
We take a drill with a diameter of 3.2 mm and carefully, at low speeds, drill out this hole to the diameter of the drill. Only one point is important here. If, after drilling, there is even a small “shoulder” inside the breech, the bullet will be crushed. Therefore, you need to check the breech for the absence of this moment. You can put a bullet in the barrel and push it with a cleaning rod and a cloth along the channel to the breech. Then he examined the dropped bullet. Are there any scuffs? So everything turned out well. We put in place either the standard one or the rubber band described above from MP 651 k. It is imperative to clean the inside of the breech from dirt after drilling. ATTENTION. Try not to leave oil in the breech or in the compressor bypass. Even a small amount of it when fired can cause a diesel effect.
Now let's start refining the clip (magazine). We take a drill with a diameter of 5 mm and very carefully drill out the chambers of the clip. This is necessary so that the sealed rammer passes freely through the clip and does not fray the rubber seal placed on it. On each chamber we make chamfers on both sides. This requires some skill or a drilling machine. I did it well the first time, because I used an engraving machine with a drill bit clamped into it. But there is a spare clip, and it costs a pretty penny. You can buy a clip from the MP 651k pistol - it is metal.
Requires almost no modification.
(author of LP-P38 from the Hans) But drilling out chambers in metal, IMHO, is an order of magnitude more painful, in the absence of a drilling machine. After we drilled out the chambers - the bullets don’t stay there, they fall out - we need to do something))) I dug up several methods (elastic band, thread winding, metal spring from the oil seal) but I didn’t like them, and it’s very difficult to choose an elastic band . I came up with my own way. We take a sharp knife and clip in our hands. We turn the clip edgewise - imagine the place where the bullet installed in the clip has a “waist” and make notches in this place with a knife along the entire perimeter, on each chamber. We take a hacksaw for metal (or a blade) and carefully make cuts along each notch to such a depth that the blade appears in the chamber by about 1 mm, maybe a little more. Now we take nail scissors and a piece of tourniquet (for plumbers, the one with talcum powder) like this
Cut a smooth hole approximately 1.5 - 1.8 cm (select experimentally) in diameter. We cut this hole around so that we get such a washer from the rope.
After that, we put this washer into the cuts in the clip. Its internal diameter should be such that the washer fits tightly but not too tightly into the cuts. If everything is done correctly, a kind of “curtain” will appear in each chamber, which will prevent the bullet from falling out of the clip.
One more detail regarding the clip (read in the LP-P38 thread). Our rifle does not have any kind of indicator for the moment when all the bullets (8 pieces) from the magazine are fired. That is, when you shoot the entire clip, you will most likely forget about counting the number of shots (especially when car slapping in the park) and: A blank shot will occur (which, by the way, is much louder <sound>)
Shooting blanks is bad for all rifle mechanisms. I liked the idea expressed there - to number all the chambers or paint one (like the last one) red and place the magazine in a certain position. Here it’s up to you to decide whether to invent something or count the shots)))
Important note! I don’t remember where, a participant from Ganzov with the nickname Veterinarian reported that his heap increased when shooting balls (obviously lead, like Gamo Round). A special magazine is used for balls (comes with the rifle). In this case, as I understand it, almost nothing needs to be done with the magazine - just drill a hole and make a chamfer. Try it, the main thing is not to shoot explosive balls (copper-plated) - you will ruin the barrel!!!
Compressor assembly and testing. Now that the sealant in the cuff has dried (it is advisable to be patient and wait a day), we put it on the piston (if you removed it, of course). Wipe the inner walls and bottom of the compressor dry. Lightly lubricate the working edge of the cuff and the piston with oil (CV joint or motor synthetics) - make sure that the oil does not get on the upper (processed) plane - and, carefully, so as not to damage the working edge of the cuff, insert the piston into the compressor. We check how the cuff works - we take the compressor in our left hand, plug the hole called the bypass with our thumb and use a flat screwdriver to push the piston forward towards the bypass. If the cuff is modified correctly - after you release the screwdriver - the piston will return to the same place from where it started to be pushed)))
We continue to work.
We cut out a circle with scissors to the size of the bottom of the piston from a soft synthetic material, I forgot what it is called (foamed propylene, caprolon?) and place this circle inside the piston. Plumbing gaskets and leather are suitable for this purpose. This spacer will dampen the clanging sound produced by the spring when fired. Lightly lubricate the weight cap with grease. We put it into the piston - with the cap down. I didn’t dance with a tambourine around the weight of the weighting agent - I just left the standard one. There is an opinion that it is better to cut it by about 30 mm. In this case, do not forget to “smooth the edges” at the sawing site, in other words, make a reverse chamfer and grind/polish the end. This is an important point, don't forget. Then, finally, we pick up the GC spring. Ideally, you need to polish both ends of it and also lightly lubricate it. We insert the spring into the piston and weighting material. Here's a small note. Kuente sells a so-called “telescopic weight guide” in the store. If I understand correctly, it serves to prevent the spring from “twisting” in the compressor. Personally, I haven’t installed it or held it in my hands, but I’ve only heard good reviews about it. You decide. Now we install the back with the trigger into the compressor on the hook (in the reverse order from disassembly), drive the pin into place. NOW ATTENTION! A very important point in the assembly - you need to make sure that we have installed the safety button correctly
(this one).
If it's wrong, the rifle won't fire at all! And you will have to disassemble it again in the cocked state, which is not good at all (((. In this regard, after installing the backdrop (trigger), you need to check its operation. To do this:
this USM detail
you need to snap it all the way up, simulating cocking, and then, pressing the safety button with your finger, release the safety and press the trigger. If there is a click, then everything is assembled correctly.
Alternatively, you can disassemble the trigger and remove the fuse altogether. To do this, you need to knock out the fuse axis and remove it along with the part and the top button. And at the same time, polish and lubricate everything in the USM. Replace the SK tension spring with a softer one. Many people do this - it is much easier to assemble/disassemble the compressor. But personally, I left the fuse and did not disassemble the trigger, since the trigger suits me.
Here. This means that our compressor is already ready and the joyful ending of this whole story is near.
Rifle assembly
In principle, assembling a rifle is done in the reverse order of disassembling. So at this stage we have it in stock. 1. Compressor, with a modified cuff, GC mainspring, standard weighting (or guide from Kuente), with a CORRECTLY INSTALLED SAFETY BUTTON (or without it, if the safety has been removed) 2. Barrel with a lever, with an installed (modified) rammer with a return spring , with the rammer lever installed in the seat, the pin secures the rammer lever as expected. We put back the plastic part of the stock filled with epoxy with the weaver - exactly the same as we removed it - with a hammer on the front sight (obviously, if the N2 filling method is not selected - that is, together with the barrel)
Now is the time to put the hardware together.
Before this, I recommend lubricating all rubbing parts on both counts (except for parts directly in contact with the breech)
Take the button to extract the clip. We turn the rifle with the barrel to the left, apply the button to its seat and place it on the hook, pushing it (like this, for example)
axis (on which the clip rotates). Then we pull out the part - the button is fixed with a spring and an axis with a hook. We carefully turn the rifle over (so that the clip button does not jump out) with the barrel to the right and pick up the part/clamp (which was difficult to catch during disassembly) with a spring inserted into it. We place it in the seat of the rammer lever (if necessary, add a drop of lubricant there). We take the compressor with our right hand, insert the cocking lever (geared) into place (don’t forget) and begin to align the horns of the compressor with the hole for the axial screw while simultaneously pressing the spring-loaded part/press (the same one) with your finger - WE CAREFULLY WATCH SO THAT IT DOESN’T FLY AWAY, for example, through the hole in the horns of the compressor. We insert an axial screw that combines everything described above. Tighten the rear round nut and washer. Uff: Now let's check if everything was assembled correctly. To do this, we “raise” the rammer lever until it clicks up, while lifting the lever, carefully look at how the rammer enters the breech - is the sealing rubber scratched?
in this position
by LP-P38 If there is no click, it means the part/pressure was not put in place.
After this, we press the clip eject button - there is a click, the rammer bounces back, and the rammer lever goes down. (in this position)
If this is what happened, great. If not, the rammer is probably stuck in the breech - you didn’t check it properly when installing the rubber bands into the grooves. Let's go back and solve this issue. It is advisable to “click” several times - at the same time lubricate all the rubbing parts.
Now you need to put (this) part in place and install the lever in the ratchet
in the same way as we disassembled it. We are all back almost to the beginning of our work.
Installation of iron in the stock.
We put the iron in the bed opened by the shell, put in place the locking button with a spring (this one)
connect the two halves together.
ATTENTION THE CRITICAL POINT / RAKE, because of which I broke the rammer lever, and then searched for it for two weeks. As I said above, the screws that secure the iron to the stock have three sizes. They should be placed like this. We take a couple of the shortest ones and screw them into the holes in the REAR of the compressor (near the breech). Unfortunately, I screwed in MEDIUM-sized screws - as a result, the rammer lever axis was broken when cocking (((At the same time, the screws were screwed in normally: So don’t get confused! (c) So, two screws (on each side) - secure the rear part of the compressor, two medium-length screws - the front part, where the trigger is. All the rest (the longest) 5 pieces - connect the plastic. Everything is tightened and tightened.
Refinement of the muzzle chamfer.
In my copy, it was not bad. If you see that it is made crookedly - i.e. where you can see the end of the cut, but where you can’t, then you need to modify it. Because when fired, a bullet must “go off” all the rifling at the same time - there will be greater accuracy. People have come up with many ways to refine the chamfer. One way is to insert a ball-shaped stone bit into a drill or engraving tool, make a normal bevel, and then polish it.
Here's another way - a quote from a user with the nickname Printer, taken from airgun.org.ru <6mm balls from the bearing. One was previously skinned on a large skin, the other on a small one. A 5mm tube was clamped into the cartridge and a ball was placed on it. First, peeling with the first ball, then finishing with the second. The first one simply removes the chamfer but leaves large burrs. The second one removes practically nothing, but does an excellent job of removing burrs. All procedures were performed with a high abundance of GOI. Slowly the second ball rubs against the chamfer to zero and polishes it (and itself). The drill is always at maximum speed, the feed force is at a minimum, I pressed no more than 250-300g. This allows you to get rid of burrs and jamming of the steel. The tube was not held strictly along the axis, but as it swung (together with it, due to the greater adhesion to the tube, which had a larger diameter compared to the barrel), the ball also swayed. The swing angle from the barrel axis is from 10+/-2 to 45+/-5 degrees. >
After processing the chamfer, you need to clean the barrel from dirt.
Installation of the muzzle.
We put a detail on the barrel (this one)
We screw on the plastic muzzle and adjust (by rotating along the axis of the barrel) the position of the part so that the rifle snaps into place. Tighten the muzzle tighter. It is possible that you will purchase a muzzle-moderator with clamping screws - then the steps are the same as in the case of a standard plastic one. If you bought a metal muzzle-moderator with a 12 thread, then you will have to cut off part of the standard plastic muzzle in order to insert it between the barrel fixing part (in the photo) and the metal muzzle screwed onto the thread. The purpose of this action is simple - to firmly fix this part so that the barrel does not open.
Examination. We load the MODIFIED clip with bullets (don’t accidentally put in a spare one with undrilled chambers), put it in the rifle, and cock it. If something “disturbs” the platoon, don’t put too much effort, but think: have you forgotten anything? We shoot at the board several times. We look at the depth of the bullet. There may be a small diesel engine, but if everything is done correctly - no more than once or twice. In principle, this completes the standard Crocodile AP.
What else can be done additionally. I’m writing at the very bottom, because IMHO, this is not necessary.
1. Modification of the platoon (Cock rod and the place where it rests on the piston) The guru advises doing this as on the MP 512 - like this https://www.mpmurka.narod.ru/#_Toc155267092 The drawing is in the section called <Refinement of the platoon > I didn’t need this, but there are cases when, after installing the GC spring, the rifle simply cannot be cocked until the piston engages, supposedly due to the skew of the latter.
2. Increase the working stroke of the rammer. Press on the nut like this.
Author b-rom(https://forum.guns.ru/forummessage/24/145335-5.html post N101)
Instead, the rammer lever can be slightly bent. VERY CAREFUL! If you break it, it’s not my fault! If you have doubts about your own skill, it’s better not to try. It’s clear that you need to bend this part,
which pushes the rammer. If you look at the photo, it’s to the left and down. ATTENTION - NO MORE THAN 1 mm. This must be done extremely carefully - I read somewhere that Izhmekh produces either hardened or “released” levers. So if it doesn’t bend at all, to hell with it. I did it this way. I clamped the lever in a vice (at the place where it bends) and slightly bent it with a gas wrench.
3. Improvement of the clip rotation mechanism.
Author Jew (https://forum.guns.ru/forummessage/24/180788-m3712032.html first post)
Some comrades advise putting a weaker spring there (from a fountain pen), and on top of the spring a ball from a bearing.
4. Soundproofing the bed - https://airgun.org.ru/forum/viewtopic.php?f=6&t=27580 towards the end of the page.
5. Weighting the butt - construction foam + shot, but IMHO this is of no use, and there is not enough space there - the clip eject button goes into it when cocking))).
Links
https://forum.guns.ru/forummessage/24/145335.html https://airgun.org.ru/forum/viewtopic.php?f=6&t=27580&sid=0f18e3686028c8dfbc7ce09ef9c7e0b7 https://mpmurka.narod.ru/
Don’t kick me too hard, if I missed something, add it))))
A little about optical devices
There are a lot of recommendations in the media about installing optics on Russian-made air guns, but most of them are clearly not suitable for the MP-514K rifle. Owner reviews tend to favor inexpensive devices that have one-sided returns. Yes, and they are designed for installation on weapons with a gas spring. Buying very expensive optical sights for the Magnum system and installing them on a plastic Weaver rail is clearly very stupid for the buyer.
Therefore, there are few options to solve the problem: purchasing cheap optics from friends from the Middle East, the price of which is so low that you don’t mind breaking it with high recoil, or making an upgrade for the MP-514K that will reduce the shock during a shot. The same applies to the collimator - its glass has weak O-rings, and a hundred shots from a small rifle can destroy an expensive optical device.