How to remove copper plating from a rifled barrel using Bore Tech Cu+2 Copper Remover
Among the many products for removing copper from the bore, BoreTech Cu+2 Copper Remover occupies a special place. Firstly, this product was specially designed for high-quality cleaning of rifle barrels, incl. – being in a state of strong copperization. Secondly, this solvent is odorless, i.e. — it does not contain ammonia, the presence of which in other products often makes cleaning weapons at home impossible. Thirdly, BoreTech Cu+2 is a biodegradable chemical, safe for any barrel and, in addition, protects your weapon from corrosion.
BoreTech Cu+2 can be used every time you clean your gun. It is necessary to remove the copper film from the surface of the barrel bore even with a small number of shots fired. This is especially important if your solvent for removing carbon deposits cannot cope with at least partial removal of copper. If, after cleaning the rifle, even a slight copper coating remains in the barrel, the cleaning cannot be considered complete. Under the layer of copper, carbon deposits remain on the surface of the barrel bore, which inevitably leads to corrosion of the metal and subsequent deterioration in the accuracy of your weapon.
Before using BoreTech Cu+2, the barrel must be completely free of powder deposits, including in hard-to-reach places such as rifling corners. After this, you need to generously moisten a couple of patches with BoreTech Cu+2 and use a cleaning rod to drive them through the bore of the rifle. Next, you need to make 10-20 passes along the trunk with a bronze or nylon brush, also generously moistened with the product.
After this, you can remove the reacted (dissolved) copper and carbon deposits using a clean patch with BoreTech Cu+2 and leave the barrel to “soak” for 5-10 minutes. Simply put, the product needs to be given a chance to work, because any chemical reaction takes some time. After 10 minutes, remove the product from the barrel using clean patches. If you did everything correctly, the patches will come out with a bright blue-green color.
BoreTech Cu+2 is an effective copper remover. But you need to keep in mind that the use of bronze brushes when cleaning the barrel with BoreTech Cu+2 may give a false picture, because the chemistry will react not only with the copper from the bullet casings, but also with the brush. Therefore, use rigid nylon brushes or take into account the possibility of painting patches with bronze brushes.
After freeing the barrel bore from the “chemistry”, it is necessary to monitor the effectiveness of the manipulations performed. This can be done using a borescope or by visually inspecting the bore from the muzzle using a flashlight. In the latter case, it is advisable to drive a cylindrical felt patch into the barrel, which will reflect light and allow for a better inspection.
BoreTech Cu+2 has pronounced anti-corrosion properties, which makes it possible not to use preservative oil after cleaning. However, no one is stopping you from playing it safe and lubricating the bore with any specialized oil before placing the weapon in the safe.
You can buy Bore Tech Cu+2 Copper Remover in our online store.
Subscribe to our newsletter and receive only the latest news from our store!
Follow the news on the website, on social networks (VKontakte, Facebook), and you will be the first to learn about ongoing promotions, new products, and will be able to familiarize yourself with our products in more detail.
For any questions you may have, you can contact our consultants by email or by phone +7-985-456-90-09, +7-495-589-54-33.
Cleaning the rifled carabiner
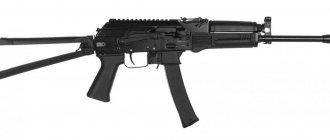
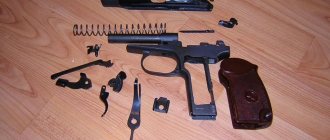
preliminary disassembly of the good old AKM before cleaning Let's look at this topic using the example of the civilian version of the AKM, the VPO-136 carbine. In principle, this method is quite universal; I use it on all my weapons, with minor modifications depending on the type of carbine. Write in the comments if there is a need to discuss cleaning under bolted systems where there are claims to accuracy. There are a couple of nuances in chemistry and methodology.
So, let's begin. We disconnect the magazine, remove the fuse, and check that there is a cartridge in the chamber. After this, you can begin partial disassembly - for ordinary cleaning, I leave only the trigger in place. The buttstock is removable to make it easier to work with a cleaning rod - this is easier than removing the cheekpiece, since on this model you need a hexagon for this.
Before cleaning, check the condition of the barrel with a borescope
Before cleaning, let's see what condition the barrel is in. A couple of dry patches to remove carbon deposits, and look with a borescope.
dirty barrel before cleaning at the beginning of rifling. traces of barrel wear are visible, the barrel is dirty before cleaning in the area of the gas outlet. copper plating and soot are clearly visible
We will control two areas - at the beginning of the rifling, immediately behind the chamber, and in the middle of the barrel, in the area of the gas outlet. As you can see, the barrel is quite seasoned - more than 5000 rounds fired. Cleaning will be thorough, although I did not immediately come to the understanding that this is really necessary for this weapon system. In one of the following articles we will touch on a topic often discussed by shooters - the influence of the thoroughness of cleaning on the accuracy of AK systems, or in other words - is it worth cleaning an AK at all)))
visher, bronze brush, nylon brush
Well, let's start cleaning. I will say right away that the chemistry was selected based on the combination of price and quality. We will need:
- cleaning rod with an aluminum visor (for AKM I use a clean gun)
- bronze brush (in terms of lifespan, Dewey showed itself to be better than others, Bore Tech in the photo)
- nylon brush (optional)
- patches (below I’ll tell you which ones I use)
- copper stripping foam (I use Neo Elements) (optional)
- water-soluble chemicals that work with carbon deposits and copper (for AKM I use Treal-M)
- neutral gun oil (I use Neo Elements)
- cleaning paste (I use Iosso) (optional)
For cleaning I use these soft patches, I order from Ali Express.
Let me explain the choice of patches. They are made of non-woven material and do not leave any lint in the trunk. Chemicals are perfectly applied to them, they are thin, and the number of patches pinned onto the visher can be adapted for cleaning of any caliber. Well, the icing on the cake is that they are cheap. This pack of 900 patches costs about 100 rubles when ordering on Ali Express.
block the gas outlet with a cotton swab
The first step in cleaning is to foam the barrel. This step can be skipped if the cleaning is urgent and we are in a hurry. If you can leave the barrel to soak for an hour, then this is a good way to make further cleaning easier.
position of the cotton swab in the gas outlet
We block the gas outlet hole with a cotton swab, and to prevent foam from protruding from the breech, we insert the patches tightly into the chamber with a visher together with a foam tube. In systems where the gas outlet hole is smaller and drilled vertically, we tightly block the entire hole for the entrance of the gas piston with a napkin.
some cleaning products
Foam the barrel and leave it like that for an hour. While the barrel is soaking, you can start cleaning the frame and bolt.
Let's start cleaning the frame and apply Treal-M to the bolt
For this we will use Treal-M. It copes well with soot. I douse the entire bolt, and on the frame I clean those parts that experience friction when the automation is operating. In particularly severe cases, you can leave the parts to soak in the product. We wait 5 minutes and wipe everything with napkins and cotton swabs.
wipe the shutter mirror
I use disposable napkins, they are sold in household stores as intended for cleaning, like patches, they are non-woven and do not leave lint, they are sold in many places, I buy them in Auchan for 100 rubles per roll.
as a result we have a clean shutter and frame
After cleaning, all that remains is to lubricate the parts, and you can return to the barrel.
lubricate the frame and bolt with neutral oil
For lubrication I use neutral oil from Neo Elements. There were attempts to use Teflon lubricant - the smooth operation of the shutter was worse. We lubricate the rubbing parts and return to the barrel.
let's start cleaning the barrel
We expel the foam with a dry patch and begin the cleaning cycles. We use Treal-M as a chemical; it works great with carbon deposits and copper plating. One cycle will include passes with patches soaked in chemicals, passes with a bronze brush soaked in chemicals, and a pass with a control patch. Let's look at all the stages in detail.
1. Pass with three patches moistened with Treal-M
we go through the trunk with a patch soaked in Treal-M
2. Passages with a bronze brush. We take it beyond the muzzle, apply Treal-M to it, and make 50 movements (25 times back and forth). When leaving the muzzle and the breech, we turn the brush to compensate for possible misalignment of the brush attachment to the cleaning rod, and thus have the same effect on all parts of the barrel
apply Treal-M to the brush; when it comes out of the barrel, a lot of dirt will fly, as well as needles from the brush
When working with a brush, it is very useful to use a catcher at the end of the barrel, as it will be quite dirty, plus needles will fly.
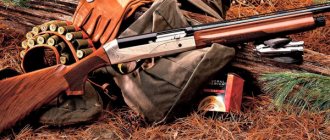
Please note: Every owner of a rifled weapon dreams of such a “swallow”; its unpretentiousness and convenience are what it combines.
A couple of times I picked them up from the floor with my feet, nothing pleasant. So it’s better to adapt at least a bottle, or use a specialized solution.
After each use, clean the brush from carbon deposits and chemicals with water. This way the brush will last longer and will go bald less.
wash away carbon deposits and chemicals from the brush
Also, do not forget to wipe the cleaning rod from chemical residues mixed with soot particles and dissolved copper.
wipe the cleaning rod from carbon deposits and chemicals
3. We pass a control dry test patch through the barrel
test patches. from left to right - first, second, third cycles
The number of cycles depends on the contamination of the barrel. Above we see that gradually the carbon deposits go away and a blue color appears on the patches. In this case, this is not necessarily related to copper plating - since we are adding Treal-M to a bronze brush, but it definitely shows us the removal of carbon deposits from the barrel.
Three cycles were enough for us to see the blue color. This indicates that the carbon deposits have been largely removed, so let's take a look into the barrel again with the borescope. Scroll through the gallery.
the same section of the trunk. left - before cleaning, right - after three cycles
What do we see? The main part of carbon deposits and copper has been removed. All that was left were carbon deposits and some copper where the chrome had chipped. Most people finish cleaning at this point, but we'll go a little further. In principle, by increasing the number of cycles, you can combat the remaining carbon deposits. But it’s much faster to do this with Iosso cleaning paste (not to be confused with polishing paste). It removes copper and carbon deposits quickly and effectively.
we will need Iosso paste and a nylon brush
Apply the paste to the patch, and rub it on the trunk with short movements back and forth.
apply the paste to the patch
Next, apply the paste to the nylon brush, filling it completely.
Apply the paste to a nylon brush
When working with a nylon brush, it is important not to go beyond the edge of the barrel, so during the first pass, close the muzzle with your finger and move the cleaning rod all the way. We mark in a convenient way the permissible depth of work (I use a strip of masking tape), and make 30 movements (15 back and forth), holding the cleaning rod by the body, and not by the handle. Wash the paste off the brush with hot water.
Our next task is to expel the paste from the trunk. To do this, we use the already known cycle of patches with chemistry - brush with chemistry - control patch. Only now we use a nylon brush.
at the end of cleaning we use a nylon brush
The remaining paste is soft and there is no need for a bronze brush. This way we save the resource of bronze brushes, and we are also guaranteed not to leave needles in the barrel.
this is the same case when the polluting shot turned out to be much slower than the main group due to the brush needle left in the barrel after cleaning. Naturally, I didn’t shoot with an AKM - here I worked with a VPO-114, this is a bolt gun in .308
I had a precedent on a bolt gun when this happened - because of this, the polluter shot turned out to be 15m/s slower, which led to a bullet drop of 9cm at a distance of 500m compared to the main group.
remove the remaining paste in three more cycles
Three more cycles and the barrel is clean. Let's look again with a borescope and compare with previous results.
three consecutive photographs of the same section of the trunk. before cleaning, after three cycles with chemistry, after pasting successive photographs of the same section of the trunk. before cleaning, after three cycles with chemistry, after pasting successive photographs of the same section of the trunk. before cleaning, after three cycles with chemistry, after paste
Due to the age and condition of the barrel, there is still some contaminant remaining in the cracks and chips of the chrome, but overall it can be said that most of it has been removed. In the before and after gallery for all the sections of the trunk that we followed.
before cleaning
Next, we wipe the barrel dry with patches. Since Treal-M is non-aggressive to the metal of the barrel, it can not be washed off, but simply wiped dry. We're done with the barrel, now we're finishing cleaning.
Remove the cotton swab and wipe the mainspring, receiver cover, and gas piston rod with a dry cloth. I don’t see the point in cleaning the gas chamber on an AKM, but where there are fewer holes, sometimes it is necessary. At the end of the cleaning, I use a napkin moistened with neutral oil to go along the guides of the bolt frame in the box, wipe the trigger and parts of the mechanism without disassembling. Next, we assemble the weapon and check the operation of the bolt and trigger. If, during previous use, the carbine was in aggressive conditions (snow, rain, fog, condensation), then I additionally wipe it with an anti-rust agent (I use Barricade from Birchwood Casey).
Something like this! You can, of course, get by with kerosene (removing carbon deposits) and ammonia (removing copper), but in apartments where the vast majority of users clean weapons, it is much safer to use water-soluble chemicals. For the same reasons, I do not use such popular (a little outdated, although still working perfectly) products like Butch, Sweet 7.62, etc., which are popular among many. If you have the opportunity to clean weapons on the street, then the above-mentioned products are perfect for you.
Accurate and accurate shots to you!
final result. before and after cleaning
More interesting articles here: Weapons.
Article source: Cleaning a rifled carbine.
- Previous: “Alabuga” is a weapon equal to an atomic bomb, but without radiation
- Next: Top 5 Soviet pistols that even people who are far from weapons like