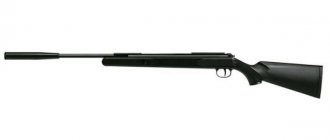
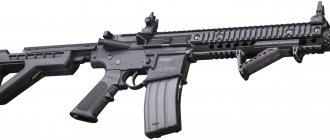
The MP-60 spring-piston rifle is very popular even today. True, not as a hunting weapon, but as a way to gain shooting skills. A copy of the MP-60 air rifle is available in each shooting range. But abroad, the domestic rifle has a special appeal due to its unique design, compactness and affordability.
Review of MP-60
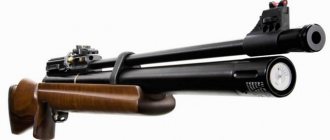
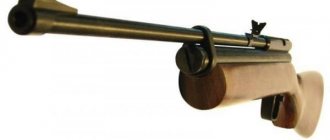
The steel barrel of the air rifle has a rifled variation. A certain design feature makes the rifle compact. The location of the working cylinder in the butt significantly reduces the overall length of the product.
Cocking is carried out by a side lever on the right side of the MP-60 in a back-and-forth motion. A very good feature is that you can adjust the operation of the trigger: force and stroke.
The cocking lever is blocked by a special mechanism, so an accidental shot is excluded
Sighting devices are represented by a fixed closed front sight and an aiming bar, which can be adjusted with draw and micrometer screws. The ramming bolt of an air rifle is longitudinally sliding. If desired, an optical or collimator device can be installed on the MP-60.
Upgrade of the air rifle IZH-60
Recently, air guns have become increasingly popular in Russia. This is due both to weapons legislation that is much stricter than in the West (it would be more accurate to call it anti-weapon legislation), and to the convenience and relative cheapness of pneumatic weapons, especially the current costs of ammunition. Also attractive is the lack of hassle with the police in general and the licensing department in particular:
pneumatic weapons with a muzzle energy of no more than 7.5 J and a caliber up to 4.5 mm inclusive are not subject to registration, and citizens of the Russian Federation have the right to purchase them without obtaining a license © Law of the Russian Federation “On Weapons”
On sale you can find several models of domestic pneumatics and a huge number of imported ones. Imported models are much more expensive, and although they are usually better and more powerful than domestic ones, we chose the domestic spring-piston rifle IZH-60. The rifle has all the qualities of a sporting weapon, first of all – it is not “breakable”, that is, when loading, the barrel does not move relative to the rest of the rifle, which ensures good accuracy. The rifle has an adjustable and very soft trigger, the adjustable length of the butt allows it to be used for teaching shooting to children (even the Americans appreciated this, although they clearly have no shortage of models) and in general the IZH-60 (as well as the similar IZH-61 and IZH-62 ) has an excellent design and a very successful construction. If you are going to buy such a rifle or have already bought it, then we recommend that you carefully read this page, because all the best advice is collected here and, most importantly, personally tested.
______________________________________________________________
Although the rifle is quite good, there are some shortcomings and unused reserves in its design that can significantly improve the performance characteristics of your rifle if you are ready to put your hands to it:
1. The very first thing you need to do after purchasing is to remove the forend and buttstock, then use a good screwdriver to carefully tighten all the screws on your rifle and wipe it with a rag to remove preservative grease. 2. You can stick a piece of rubber or leather about 1-1.5 mm thick onto the rammer limiter so that the rammer does not hit the limiter so much when returning. This will reduce the metallic sound when the rammer is thrown back by its spring.
3. To reduce air leakage through a poorly ground rammer, it can be sealed, after which no air loss through the rammer is observed.
SEALING THE RAMMER.
You've probably noticed that when you shoot a rifle, air blows into your face. This unpleasant phenomenon actually greatly affects the power of the rifle due to air loss when firing through the rammer.
To resolve this issue, follow these steps:
3.1. Having unscrewed the bolt screwed into the rammer limiter, we pull out the rammer itself from the breech and the spring. If the rammer initially does not have a smooth surface, then it should be slightly processed with fine sandpaper.
3.2. Using the thin part, we clamp the rammer into the drill chuck and, at a distance of approximately 1.5-2 mm from the beginning of its thick part, we machine a groove approximately 0.5-0.6 mm deep. It will be more reliable if there are several such grooves, in this case three. The distance between the grooves should be 1.5-2 mm. the main thing is that all the grooves, when the rammer is closed, fit entirely into the chamber.
3.2.1 Grooves (grooves) in the rammer are made using a needle file, first sharpened on a sharpener to a thickness of ~1 mm, or using a hacksaw blade for metal. First, we turn the drill at low speeds to mark the groove, and then at higher speeds we make the groove to the required depth, see Fig. 1. It would not be superfluous not to get too carried away and measure the depth of the groove at short intervals!
Scheme of the rammer groove. (Fig.1)
3.3. Rubber rings from the valves of disposable transparent lighters made in China are ideal for the groove. Please note that rubber rings vary in thickness, but this is not critical in this case; on the contrary, if the ring is thicker, then in our opinion it is better. To make it easier to put the rings on the rammer and not tear them, the rammer must first be slightly lubricated with oil or some other lubricant, the main thing is that the ring slides well.
3.4. Once the rammer is ready, do not rush to immediately insert it into place. Because the sharp edges of the breech will cut off the rubber and that’s it. the seal will deteriorate. To prevent this from happening, the breech must first be treated with a round needle file. To do this, insert a piece of cotton wool or rags into the barrel from the breech side so that sawdust does not get into the barrel and cylinder. Using a round file, we first bore the place where the rammer enters the chamber, that is, the place where the rammer spring is located. It is necessary to bore to such an extent that the rammer enters freely, and most importantly, freely leaves to its original place, as it was before sealing. Otherwise, there is very little room left to load the bullet. It is worth paying attention to the channel through which the rammer travels. It has sharp edges that also cut the rubber, all these sharp edges need to be processed. For more details about processing locations, see Fig. 2
Scheme for processing the rammer channel.
(Fig.2) 3.5. After modification, you need to make sure that no air is leaking through the rammer. To do this, with the rammer closed (the rammer must be held) and the lever cocked 1/3, blow into the barrel - it should not be blown. If the air no longer leaks, then we can congratulate you on successfully sealing the rammer.
3.6. Once sealed, the standard spring may not automatically push the rammer out when cocked. If such a problem exists, it can be solved by installing a more powerful spring or inserting another one of the same diameter. We select the length of the attached spring experimentally.
4. You can also install a spring from an IZH-38 rifle or another stiffer one, which increases the initial speed, penetration ability and range of the bullet.
REPLACING THE STANDARD SPRING WITH A MORE POWERFUL SPRING.
One of the important steps to upgrade a rifle and increase its power is to replace the standard spring with a more powerful spring, for example, a spring from the IZH-38 rifle.
We buy a spring from an IZH-38 rifle, count 11 turns and cut them off. All this can be easily done at home using a needle file. The spring is filed with a file in a circle and broken off using pliers.
Now all that remains is to install the new spring in the rifle. To do this, we disassemble the rifle. Disassembly must be done in the following order:
4.1. We unscrew the screws and separate the forend from the breech. Pay special attention to the front screw that is screwed into the post that holds the barrel. If it jumps out and falls inside the forend, you will have to shake it out for a very long time. To prevent this from happening, we cut out a circle made of rubber from a bicycle tube or some other ~1 mm thick circle along the diameter of the hole in the forend and pierce a hole in the center with an awl. Holding the bolt with a screwdriver, we put the rubber on the bolt. After this simple operation, you don’t have to worry that the bolt will fall inside the forend the next time you disassemble the rifle. If the bolt still falls through during the first disassembly and you don’t want to shake it out for a long time, you can carefully peel off the end of the forend with a screwdriver and, lifting it a little with the same screwdriver, shake out the bolt. Then lubricate the end with glue and return to its original position. But it’s better to make a rubber puck.
4.2. We remove the butt. To do this, unscrew the butt screw and remove it together with the washer. Using a screwdriver, remove the washer from the cotter pin of the cocking lever and knock out the cotter pin itself. After this, remove the cocking lever. Place the rifle securely on the rear end of the cocking lever sleeve and carefully rotate it so that the locking pin on the sleeve comes out of the cylinder socket. Separate the cocking lever coupling from the pusher, resisting the action of the spring. Remove the spring and rod.
4.3. After this, we insert the cut spring from the IZH-38, assemble the rifle in the reverse order and get a noticeable increase in power by about 30%.
5. You can increase the efficiency of the piston by replacing the standard hard cuff with a softer (translucent) one. To make the cuff even more tightly pressed against the walls of the cylinder, you can glue wire or cambric into it. It is recommended to use lubricants containing MoS2, for example CV joint-4.
6. After replacing the standard spring with a spring from IZH-38, on some rifles the connecting rod, which is made of steel 0.7 mm thick, cannot withstand the load. It can be replaced with the same one, made from sheet steel 1-1.2 mm thick. This allows you to use even more powerful springs - from the Spanish Gamo Hunter 440 rifle, from the front fork of the Karpaty moped, custom-made from 3 mm wire (there was even mention of using a return spring from a heavy machine gun - our people are generous with invention), or using a double spring, when a thinner spring with a reverse winding direction is installed inside the main one. This was done in IZH-62, but, unfortunately, it is no longer produced. If you do not plan to further strengthen the spring, you can not change the connecting rod, but modify it a little by holding it in a vice and giving the “whiskers” a more distinct shape using a hammer.
7. Often the standard butt length is not enough for an adult. To increase the length of the butt, just do a few simple steps.
STOCK EXTENDATION.
Usually the standard stock length is not enough for an adult. To increase the length of the butt, just do a few simple steps.
7.1. Remove the stock from the rifle and use a round file of a suitable diameter to sharpen the groove by approximately 10-15 mm. You can do the same using a drill and a drill bit with a diameter of 6 mm.
7.2. Remove the stock from the rifle and drill another hole with a diameter of 4 mm in the cocking lever coupling and cut the thread with an M5 tap. Now the length of the butt can be increased by a greater distance.
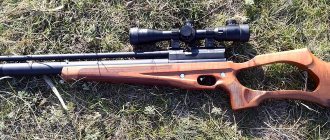
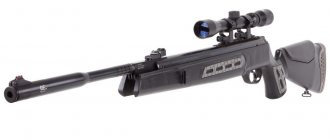
8. After your rifle has been modified, the thought of installing an optical sight on the rifle increasingly comes to mind. According to the general opinion of RU.WEAPON echo subscribers and our personal opinion, a four-fold optical sight is quite sufficient for an air rifle.
OPTICAL SIGHT ON AN IZH-60 AIR RIFLE.
Once your rifle has been modified, the idea of installing an optical sight on the rifle increasingly comes to mind. According to the general opinion of RU.WEAPON echo subscribers and our personal opinion, for an air rifle it will be quite enough to have a four-fold optical sight. In stores you can see a huge number of sights from different manufacturers and at different prices. Actually, as they say, good optics are more expensive than the rifle itself, so you should not buy cheap optics from an unknown manufacturer, although you must decide everything yourself. When we were faced with the task of choosing an optical sight, on the advice of echo RU.WEAPON subscribers, we chose an optical sight from the Krasnogorsk Zenit plant. You can see its appearance and get acquainted with its characteristics below.
The optical sight OP 4 X 20 SHU is designed for targeted aiming when shooting and is installed on pneumatic and small-caliber weapons.
The optical sight provides precise aiming and reduces eye fatigue due to the fact that the target is enlarged and at the same time the reticle is clearly visible.
General form.
1. Scale of the lateral correction mechanism.
2. Cover of the aiming angle mechanism. 3. Eyepiece. 4. Retaining ring. 5. Adjustment screws.
Installing a sight on a weapon.
The sight should be mounted on the weapon using a special bracket. As you move the scope forward or backward along the barrel of the weapon, position it at a distance from your eye that aligns the pupil with the exit pupil of the scope. When aligned correctly, the entire field of view is visible and there are no shadows at its edges.
Focusing.
Loosen the locking ring 4. Looking through the optical sight and rotating the eyepiece frame 3, achieve a sharp image of the observed object. Then securely secure the eyepiece with the locking ring.
Shooting a weapon with a scope.
Take a test shot at a control target, observing it through the scope. By rotating the adjusting screws 5, ensure that the deviation of the aiming point from the impact point is minimal. It should be taken into account that when the adjusting screws are rotated in the direction of the arrow, the point of impact moves up and to the left.
Maintenance.
It is necessary to protect the sight from impacts and falls. After fine adjustment of the sight, screw the protective caps onto the adjustment screws until they stop. Never leave the eyepiece locking ring loose after focusing. Never leave moisture on your lenses. Protect the scope from getting water in rainy weather.
Improvement of the optical sight.
After purchasing two optical sights and installing them on rifles, problems immediately appeared, which we recommend eliminating immediately, before they appear.
8.1. The crosshairs on the aiming mark are made of thick wire, so when aiming at very small and thin objects, these objects are not visible at all because of the crosshairs. To remake the crosshair, it is recommended to unscrew the reticle from the scope, unsolder or bite off the old crosshair with pliers, and make a new one from the braid of the third guitar string.
8.2. After installing the scope on the rifle, it was discovered that the monolithic mounting of the scope is very low in relation to the breech and the process of loading a bullet into the chamber becomes difficult. To get rid of this, we cut off the partitions between the two mounts that hold the scope. Now inserting a bullet has become much easier and more convenient.
8.3. After some shooting, we encountered another problem. Due to the strong recoil in the sight, some of the nuts holding the lenses came loose and the aiming mark itself began to spin after each shot. This problem was solved very simply by tightening the nuts and lubricating them with Moment glue. After 1500 shots, the nuts did not budge.
8.4. The covers that cover the lenses on the scope come off very well when transporting the rifle and are very easy to lose. To avoid this, it is enough to wrap electrical tape around the landing spots of these rings on the sight itself. Now the covers can be removed tightly, but it is no longer possible to lose them.
9. If you want to improve the accuracy of your rifle or have a damaged muzzle chamfer, you can try a method that has benefited many rifles. True, in most cases the quality of the IZH-60 barrel is very decent and there is simply no need to process the chamfer on the muzzle, but if the chamfer is damaged, then this method can help. In some cases, it is necessary to resort to more labor-intensive operations - drilling or sawing off part of the barrel, but this is only in the case of an obvious manufacturing defect or damage to the barrel as a result of improper handling. In this case, polishing is powerless. But if it is enough to level only the surface of the chamfer, then you can begin.
– You must have a copper or brass screw with a semicircular head with a diameter of 4-6 mm, and if you have access to a lathe, it is better to make special mandrels. You also need to have an abrasive paste (for example, GOI, or toothpaste), and an electric drill with adjustable rotation speed. – Before starting the procedure, insert a bullet or a dense lump of rags into the barrel from the barrel side to a depth of several mm so that abrasive particles do not get deep into the barrel. We clamp the copper screw or mandrel into the drill chuck and set the speed to the lowest. Apply abrasive paste to the head of the screw or mandrel and, shaking the drill a little, process the chamfer of the barrel until a small depression appears instead of the chamfer. The recess should have a spherical shape. – This operation must be carried out until you have a clear boundary of the new chamfer with each cut. After this, the plug must be removed from the barrel, the barrel must be blown out, and thoroughly cleaned with a rag soaked in kerosene.
10. Many sites devoted to piston pneumatics recommend another operation - honing the cylinder, or polishing it. However, after we disassembled one of the IZH-60 rifles and knocked out the cylinder, we were convinced that its internal surface did not require any processing, since it was already perfectly smooth and mirror-like. The only thing you should do after purchasing is to wash the inside of the cylinder with kerosene. It happens that there are some metal shavings and rust inside. Of course, whether to hone the cylinder or not is up to you, but we decided that there is simply no need to do this. It is better to lubricate the cuff that is in the rifle with graphite grease and shoot more - the cuff itself will wear out the surface of the cylinder, and after a thousand to one and a half shots, rinse the cylinder again, replace the worn cuff with a new, soft one, and lubricate it with CV joint-4.
based on materials from the Tula 2000 website from the 2002 web archive
and further:
Basic upgrade
consists of two stages (performed in any order):
Rammer sealing
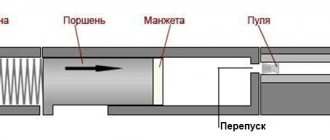
The rammer is removed, clamped by the thin part into the drill chuck (manual or electric with adjustable speed) and at a distance of about one and a half to two millimeters from the beginning of the cylindrical part, a groove is machined (preferably several through the same 1.5-2 mm) about half a millimeter deep (with a needle file or a hacksaw blade ). dosil.jpg (43K) Rubber rings are placed in the groove (exceptionally suitable ones can be obtained from the valves of disposable lighters). The rammer channel needs to be slightly refined with a round needle file. After modification, with the rammer closed and the lever cocked 1/3 (it is fixed), blow into the barrel - it should not blow. Naturally, before work, “load” the rifle with a piece of cotton wool or rags, which, after finishing work, push it back with a cleaning rod - so that sawdust does not get into the barrel and cylinder.
Spring replacement
You buy a spring for IZH-38 (or MP-512), count 11 (6 for MP-512) turns from any edge, file it with a file and break it off. These are extra. Sawed-off spring The resulting end is sawed off so as to obtain the maximum size of the surface perpendicular to the axis. The spring is installed with the sawn end facing the piston - a weighting guide is inserted into it from the same side.
Characteristics of MP-60
| Manufacturer | Russia |
| Caliber | 4.5 mm. |
| Weight | 2.7 kg. |
| Material | Plastic, metal |
| Shot speed | 110 |
| Energy source | Spring |
| total length | 790 mm. |
| Trunk | 450 mm. |
| Accuracy | 8,5 |
| Power | 7,5 |
| Magazine capacity | 1 |
| Descent | Adjustable |
| Trunk | Rifled, steel |
| Sight attachments | Movable bar, front sight |
| Bullets | Lead |
| Fastening | Dovetail |
| Fuse | Auto |
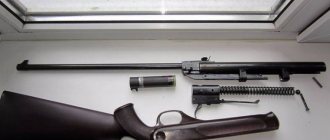
Dismantling MP 60
To disassemble the MP-60, you must first remove the stock. First, the mounting screws are unscrewed, then the rear ones that hold the forend. Next, all existing sighting devices are removed: you should start with the front sight base nut, then loosen the sight screw.
Remove the lock and lever. Pull out the spring, rod, piston. The pin is removed last and only then the sear and trigger are removed.
To assemble the MP-60, the operation is carried out in the reverse order
Possible tuning and upgrade
The performance characteristics of the rifle will greatly increase if you upgrade it.
To increase the piston stroke and, accordingly, the speed of the bullet, a metal insert can be placed in the piston. It is positioned so that the sear rests on the piston plate, and not on its end.
The part used is pre-bent and thoroughly processed with a file: the working area of the cylinder should not be damaged at all. The metal plate does not need to be secured - the spring presses it tightly.
There is also an option to increase the piston stroke of the MP-60 - install an additional element that extends the piston. To ensure the strength of the connection, soldering is used, and the seam is carefully ground.
Description
The IZH-60 family of air rifles was developed in the 80s by a group of designers consisting of V.A. Sterkhov, V.L. Cherepanov. and Romanov G.A., who tried to give the rifle “sporting” qualities as much as possible. Since 1991, the MP-60 rifle, as well as the MP-61, have been produced at the Federal State Unitary Enterprise Izhevsk Mechanical Plant, also known as Izhmekh. Do not confuse with Izhmash! Also at the Zlatoust Machine-Building Plant out of the box it can be used for recreational shooting or for hardball (for hardball they often take the five-shot Izh-61). After modernization, the rifle will be suitable for hunting at short distances. In general, for rifles in this line, there is some dampness in the design. However, incompleteness is a characteristic feature of Russian pneumatics. But the price of the Izh-60 aircraft is relatively low.