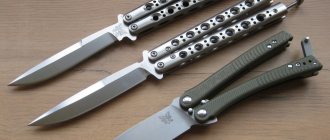
The balisong knife, better known as the “butterfly” knife, was originally invented in the Philippines. There it is used for its intended purpose, but in our latitudes it is used mainly to perform various tricks and tricks.
Theoretically, anyone can master butterfly knife tricks, but this will require patience and constant training. It is better for beginners to master the simple tricks that will be described in this article.
The history of balisong
Surely no one can tell you about the origin of the butterfly knife. But there is an opinion that the blade comes from the Philippines. Where this design was invented solely for work purposes. In the old days, no one thought about how to twist a butterfly knife.
A blade with such a design was necessary to adapt to harsh reality. Storms at sea are not uncommon. There were situations when it was necessary to simultaneously hold the gear and cut the rope. And the design of the product allows you to open the knife with one hand.
Which was quite convenient for the current situation. After World War II, the butterfly knife became widespread among residents of the USSR. It was then that the younger generation, having watched enough American films, sought to learn how to twist a knife like in the movies.
In the dashing 90s, this blade found its niche among racketeers, bandits and local punks. This greatly influenced the reputation of the butterfly knife. Its use was prohibited by law. It remains possible to use a knife, only with a blade less than 90 mm.
How to twist a butterfly knife: tips and tricks
The history of balisong
No one knows for sure the true history of the origin of the butterfly knife. But there is an opinion that the balisong comes from the Philippines, where local fishermen created this handle design for working purposes. Back then, people didn’t think about how to twist a butterfly knife.
They needed the product solely to adapt to harsh living conditions. When Filipino fishermen went out to sea, they could easily get caught in a storm. In order to survive, they had to simultaneously hold the gear and cut the rope.
And the design of the balisong makes it possible to open the knife with one wave of the hand, which was very useful.
They gained popularity among the population of the USSR after World War II. It was then that a huge number of young people wanted to learn how to twist a butterfly knife , imitating the heroes from famous American films.
Then, during the dashing 90s, these weapons began to be in demand among racketeers, bandits and local punks. This greatly tarnished the reputation of the balisong and led to a ban on the use of this type of bladed weapon, the blade of which exceeds 9 cm in length.
Balisong design
You must first familiarize yourself with the design of edged weapons in order to learn how to twist a butterfly knife. For beginners, a very important point will be the ability to distinguish between a safe and dangerous knife handle. The butterfly knife design includes:
- Blade.
- Two handles.
- Latch.
- A couple of pins.
- A pair of hinged axles.
The handles of a butterfly knife can be made of various materials, such as bronze, brass, bone, etc. But the design of a balisong designed for flipping - the artistic rotation of a butterfly knife - differs from the design of the product used in everyday life.
Butterfly knife design
In order to learn how to twist a butterfly knife, you should first become familiar with its design. The first important point will be to determine the dangerous and safe handle of the blade. The butterfly knife design includes the following elements:
- a pair of hinge axes;
- latch;
- two handles;
- a pair of pins;
- blade.
Butterfly knife.
The handle of a knife can be made of various materials: bronze, brass or bone. The design of the knife is adapted for opening the blade with one hand, but modern man has found a different device for the knife. Flipping is the artistic rotation of a butterfly knife.
Frequently tilting the handles can eventually become deformed at the point of contact with the latch.
Also, due to continuous rotation, the butterfly knife may become shaky. This, in turn, can lead to injuries during flipping.
In a product specially designed for artistic rotation, small indentations are made at the handle and the diameter of the pin is increased. There are knives with a spring-loaded latch. It can thus save you from the problem of fixing the blade.
Tips for Beginners
A real balisong is a serious weapon. For training, buy yourself a simpler product. Training products are inexpensive and have holes in the handle and blade. They are not heavy and well balanced. You will also need to learn some safety rules:
- If the training knife has a sharpened blade, it can be sealed with masking tape. If this part gets on your hand, and this definitely cannot be avoided, then in this way you can prevent a cut;
- For turning tricks, use only a working knife. Balisongs may have problems with the clasps coming loose;
- It is necessary to distinguish between balisong handles, safe - safe and bite - dangerous. The dangerous handle has a buckle that holds both parts together. To avoid confusion with the name, the handles can be painted in different colors;
- tricks should be divided into several parts. And they should be performed in order. It will be difficult to perform the entire feint at once.
How to twist a butterfly knife - closing the knife
- Close the knife with movements opposite to the opening maneuver.
- You will begin your work in the open position of the knife.
- Grab the safety handle (no latch) and move the second handle with the blade to the back of your hand. After touching the body with parts of the knife, flip it 180 degrees using the safety handle.
- At the end of the turn, touch the head of the handle and the blade to the back of your hand again.
- Press the handle from the back of your hand and begin to swing in the opposite direction to begin closing.
- Make sure your fingers are safe and close the knife completely, closing the latch.
How to twist a butterfly knife: instructions for beginners
In order to learn how to properly rotate a butterfly knife and not get hurt, it is important for beginners to understand the following:
Handle grip
The grip of the handle when performing a trick should be comfortable. If the blade falls out of your hand, nothing will work and injury cannot be avoided.
Dangerous knife
Butterfly knives are quite dangerous. Use special training products for training. If you are working with a real knife, then be careful and perform complex tricks step by step. It will be even better if you find yourself an instructor.
Prohibited product
In the US, balisongs are illegal in most states. In Russia you can use products with a blade no larger than 90 mm.
Examples of butterfly knives.
How to sharpen a knife correctly
PHOTO BELCHONOCK/DEPOSITPHOTOS.COM
Some believe that the process of sharpening knives can be universal, others think that each individual knife requires its own, special ritual. But in any case, the principle of reasonable sufficiency must be observed.
If a knife is a cult object, and its function is to amaze friends and acquaintances with its incredible sharpness (say, to cut a hair thrown onto the blade), then this is one thing. If you need a practical knife that will perform the task assigned to it for a long time and reliably, that’s a completely different story.
Sharpening knives has its own secrets and approaches, but before you start this business, you need to answer the questions why you need this knife, how and where you will use it.
Once upon a time, a penknife in a boy’s pocket was considered the norm and sharpening a knife was not something sacred.
I sharpened it on any whetstone to an acceptable condition - and okay. The quality of steel on widely used knives left much to be desired, and the razor sharpness of the blade seemed something unattainable. But times are changing.
Folding knives are now a rarity in the pockets of boys; they are increasingly found in the pockets of adult men. The quality and price of knives have increased noticeably, and sharpening them to razor sharpness has become possible.
But is it needed? The fact is that during operation, the razor sharpness disappears, turning into a normal working sharpness, which lasts for quite a long time. In this case, the transition from cutting soft raw materials (for example, brisket) to dense ones (raw smoked sausage) will be painless, while when switching from cutting dense raw materials to soft ones, the knife will seem dull.
Read the material “Katana - a symbol of Japan”
Thus, for yourself, you must learn to determine the parameter of sufficient blade sharpness, remembering that in each specific case it will be different depending on what you are going to cut. You must know exactly when it is enough to spend time, effort, and sometimes nerves on sharpening a knife. The sharpness of removing shavings from hair has no other meaning than planing the hair (of course, if it is not a knife for a microtome - a device for histological sections).
So, sharpening a knife is not a mindless act. Every movement must be meaningful. You need to clearly understand what happens on the microns of the cutting edge when performing a particular movement. The choice of sharpening options is huge; there is no universal algorithm. After all, the knives are different, and the steel, and the geometry of the blades, and the degree of wear, and the mode of operation, and the quality of raw materials, and experience, and skills in working with a knife.
Moreover, the same model of knife made of the same steel, when performing the same work in the same volume, will behave differently in different hands. I work as a sharpener at a meat processing plant.
The range of hand knives is not that wide. Boners and cutters receive the same model of knife, but for some the knife works for a week before the next time they come for sharpening, others are able to dull the knife to the point of a ruler before lunch.
Of course, hunters use knives much less, but some ideas that are suitable for deboners can be useful for them too. It always surprises me when some hunters are outraged that when cutting an elk carcass they need to sharpen a knife.
But this is completely normal: not every steel is capable of holding an edge for so long that it is enough to completely cut a carcass. In addition, it is the razor sharpening that dulls faster and causes repeated sharpening.
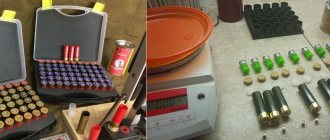
| Professional sharpening is certainly different from the meditation offered by companies that produce various sharpening devices. The photo shows the palm of a professional deboner who has dedicated his entire working life to his craft. A professional sharpener sharpens from 50 to 90 knives per day at his workplace. Photo by Anton Schmidt. |
Ask yourself how much time you are willing to spend sharpening your knife. No, if you love this process and for you it is akin to meditation, this question disappears by itself. I have between 50 and 90 knives a day at work, and most of them are large veining knives (blade about 20 cm long). Each knife takes little time, about three minutes.
Professional knives for cutting meat have a thickness of approximately 2.5 mm (from 2.3 to 2.8 mm, but not thicker than 3 mm). You can't do much work with a thick, heavy knife. A thick blade gets stuck in cold meat/fat. If the balance is heavily emphasized on the blade (or even outright chopping), then the knife is poorly controlled and causes premature hand fatigue.
As practice has shown, a hanging sheet of ordinary A4 paper is a good and convenient indicator of the quality of sharpening a knife for meat. By checking the sharpness of the sheet, you need to determine the nature of the cut. The best results on meat are obtained by a knife that has an easy feed (vertical) and a rough stroke (horizontal movement).
If the knife slips through the sheet like skates on ice, then the cut will be soapy and cutting off a piece of meat will take not one movement, but two or three (that is, two to three times more time and effort). This is the difference between the work of a microsaw and just the smooth clean edge of a knife, which will shave hair with a rebound, but will not cut.
In everyday conditions, the speed of sharpening one knife in three minutes is unattainable. The production uses a machine with an abrasive belt (120 grit) on a rubber wheel and mandatory constant wetting of the belt (a pump drives water in a circle), as well as a flap cloth polishing wheel under the abrasive paste to remove the edge burr (in technical documentation it is referred to as burr). Interestingly, the direction of rotation of the belt and polishing comes from the operator.
I wasn't wrong. Indeed, for sharpening (reaching the edge burr), an abrasive for metal with a grain size of 120 is used. Yes, during the work it is crushed and becomes closer to 140–180. If the abrasive has been worn down to approximately 200 grit, then after removing the burr there is a high risk of a soapy cut.
In fact, the knife becomes sharp after proper removal of the edge burr. You can remove it on a soft wheel with abrasive paste, alternately rubbing one and the other side of the knife until the burr comes off.
Practice has shown that after this it will not be superfluous to easily move around the same circle 4-6 times (2-3 times in each direction), without pressure, at a slightly greater angle than when removing a burr. Knife sharpness and edge stability are improved.
| For a hunting knife, sharpness is of paramount importance. PHOTO KANINSTUDIO/DEPOSITPHOTOS.COM |
You can also sharpen a knife well at home. Naturally, you won’t be able to sharpen a knife to the point of shaving hair if you only have a whetstone for sharpening and straightening braids. You will come across a burr, but you won’t be able to remove it well and correctly.
For sharpening at home, I really liked the 20-centimeter double-sided diamond whetstones made in Russia: a medium-grained abrasive and a fine one (I don’t remember the numbers of the diamond abrasives now). Diamonds must be wetted with water to prevent premature wear and clogging with steel.
I like diamond abrasives because of their predictability, stable grain size, and the fact that they work on any steel, including steel with increased wear resistance.
Final sharpening (deburring) can be done on a piece of leather fixed with glue on plywood. If this is done beautifully and carefully, then you can use such a device for a long time and with pleasure. The skin must be treated with an abrasive paste.
Diamond paste has shown itself to be very good, as it works cleanly and actively, removing edge burrs even from knives made of high-speed steels, resulting in a very good cut. For household, hunting and fishing tasks, it is enough to apply it to the skin once.
There is no universal algorithm and no universal angle. I briefly described a simple and quick way to make a knife sharp at home. It's more complicated with corners. The more inexperienced the knife operator, the duller the sharpening angle of his knife (look at what angles the knives on the counter are sharpened to and smile).
Some people can work for a week with one knife, straightening it on the underside of ceramic tiles, while others don’t need to give anything other than a chisel to their hands. So-called pure corners are not pure corners. All the same, you get a small lens on the edge. But there is no need to be afraid. When sharpening by hand, it is generally unavoidable.
| Sharpening a knife correctly is a real art. PHOTO OSTANCOFF/DEPOSITPHOTOS.COM |
And for deboners, this is even preferable: the knife goes less into the bone than with a clean, even approach and an excessively sharp edge.
In the fields, I take a folding double-sided diamond sharpener that opens up like a butterfly knife, and a couple of small aluminum-ceramic rods. Aluminum-ceramic abrasives are good, but not on all steels. I would not recommend them for knives made of high-speed steels. With such a sharpener it is quite possible to straighten a knife or even sharpen it without any problems.
I don't use sharpeners like Lansky and Spyderco. Of course, such tools add “professionalism” to the work, but for me, as a person who constantly works with sharpening knives, this is of no use to me. As a practical tool, in my opinion, they do not justify their price.
Hardware stores sell two carbide plates with a sharp edge that remove chips from the cutting edge of a knife, but, in my opinion, this is a heresy that I don’t even want to consider, real barbarism in relation to the knife. If you want, use it, the knife is yours. The faster you destroy one, the faster you buy a new one.
Musats are a separate conversation (musat is a metal, ceramic or other tool with a round cross-section for pointing and straightening knives). They certainly have the right to be used for knives with a steel hardness of 56–58 HRC, sharpened to a small angle.
You need to know how to use them, the main thing is not to apply excessive force.
Professionals, with light movements on the musat, are able to maintain the edge of the knife in a state of working sharpness all day long. A person without the skills and understanding of what his hands are doing will quickly twist and break off the cutting edge of the knife along its entire length with excessive force, so I recommend learning the intricacies of using a grinder before you start sharpening the knife.
What would you like to say in conclusion? A knife, like any tool, must always be sharpened and in good working order, but the sharpening procedure itself should not be elevated to a cult.
March 9, 2022 at 1:44 pm
Tricks for beginners - safety first
The tricks available to beginners are based on keeping the handle securely in your hand. There is the simplest trick called “trabucco”. Almost anyone can perform such a maneuver with a knife. With the correct rotation of the blade, the trick is not difficult.
For beginners, the best option would be to use a training balisong. This will help protect your fingers from injury. The blade on his blade is not sharpened. Such products are made with holes in the handle and on the blade itself for proper balancing of the knife.
The blade of a butterfly training knife is much thicker than that of the working versions. Having mastered the trick on a training apparatus, you will not have any difficulties with a real balisong. You can also seal the blade with tape on the working knife, this will prevent possible injuries.
Story
How did the balisong style—skillful rotation of a compound structure with a knife—come about? It is generally accepted that this hobby migrated to us from the Philippines, where such weapons have been used by fishermen for centuries to satisfy everyday needs.
Initially it was double-edged. But later, to ensure safety when performing tricks, one of the sides of the blade was blunted. Perhaps it is for this reason that almost every training butterfly knife has a one-and-a-half or one-sided sharpening.
Opening and closing the knife
Training product.
According to some historians, the balisong first appeared in the Philippine Islands. The version of the appearance of the knife is very similar to the legend. This story dates back almost 8 centuries; according to one version, it was then that the butterfly knife was invented.
One part of the handle symbolized the sky, and the other – the earth, the blade symbolized the surface of the water. Products were passed down from generation to generation. But again, this version is questioned, since not a single old blade of a similar design has been found.
Protect yourself and cover the blade with masking tape. For training you will need a butterfly knife and instructions. The simplest trick is opening and closing the knife. Once you have mastered the technique, you can continue to try other tricks.
In order to deftly open the knife, you need to turn its safe handle towards you. All fingers, with the exception of the thumb, should be on the dangerous side of the handle. Next follow the instructions:
- With a sharp movement, twist the balisong so that your index finger holds the safe handle on the right. The remaining fingers remain in the same position.
- Then release the bottom of the knife until it is in a free position.
- Next, you should raise the hand up and move it forward, thus throwing the lower part of the knife over it, and the blade, on the contrary, down. Then you should grab the safety handle from below, keeping your thumb slightly higher.
- We sharply raise the hand and remove the thumb, the handles should connect.
- To close the butterfly knife, turn the blade away from you. At the same time, place the dangerous handle behind your index finger.
- Then you need to lower the blade down, holding the second handle to the side. And then with a sharp movement you need to return it back.
How to open and close a butterfly knife
Before you start performing tricks with a butterfly knife, you need to learn how to open and close it correctly. These are basic skills that will help in further training (Figure 1).
The knife was invented in the Philippines, and its unusual shape is deeply symbolic: one part of the blade symbolizes the sky, the other the earth, and the blade symbolizes the water surface of the sea. It was believed that Filipino fishermen passed down their knives to their children and grandchildren, although this version has not yet received scientific confirmation.
Before starting training, be sure to cover the blade with a band-aid so as not to accidentally injure yourself. Opening and closing a knife are considered basic techniques. Only after mastering them can you move on to more complex tricks.
The step-by-step process looks like this:
- To open the knife, turn it with the safe handle towards you. In this case, all fingers, except the thumb, should lie on the blade.
- Next, with a sharp movement, the knife is turned so that the index finger is on the safe handle on the right side, and all the rest are in the same place.
- After this, the lower part of the knife is lowered so that it is free.
- Next, you need to lift the brush up and move it forward slightly. Due to this movement, the lower part of the knife will be on the hand, and the blade will go under the arm.
- With a quick movement, the safety handle is grasped from below, but the thumb must be held a little higher.
- After this, the hand is sharply raised up and the thumb is removed, after which the double handle is connected.
Figure 1. Before performing tricks, you need to learn how to open and close a butterfly knife correctly.
To close a butterfly knife, you need to turn it with the blade away from you, while simultaneously throwing the dangerous handle onto your index finger. Next, the blade is lowered down, holding the handle at the sides. All that remains is to make one sharp movement to return the handles back.
Trick "Ventilation"
The element refers to the simplest tricks. To perform safely, follow the instructions:
- Grasp the blade by the safe part.
- The blade should be lowered down and the fingers folded into a tube. It is necessary that the thumb and forefinger lightly hold the blade. The handle should move freely between the unused fingers and the hand.
- Next, you should make a rotational movement, in any available way.
- To return to the starting position, you need to catch the moment when the handle is located above the hand. And you should slow down its movement as much as possible. The knife should close on its own.
How to twist a butterfly knife - opening the knife
- One of the main manipulations with an object is its opening.
- Hold the knife firmly in your hand so that the handle latch reaches your small finger. Squeeze the handle and release the latch with your little finger.
- Slide the closed knife so that the handle extends outward away from your palm. Hold the knife straight in front of you, pointing forward.
- Now rotate your wrist. When you flip it back, the knife will open and the handle will hit you between your thumb and forefinger with the dangerous side.
- Turn the knife over. This time, place your wrist down so that it closes again.
- Open your thumb and turn the knife over again. The last time you throw it up, it should hit you with the handle on your thumb and index finger. This will leave the knife in the open position.
Latch Throw Technique
The trick is a little more difficult than the previous one, but it is not so difficult that you can master it without problems. We follow the following steps:
- You should take the knife with the blade away from you. The latch should be pressed against the index finger and held with the thumb.
- A sharp downward movement is made with the movement of the hand; the two halves of the handle should also descend automatically.
- In this case, the latch should be held with your thumb and forefinger. The remaining fingers should be moved to the side.
- After connecting the two handles, the balisong must be taken by the dangerous part and the hand is clenched into a fist.
Spectacular butterfly opening
The main manipulation is performed as follows:
- Firmly grasp the knife, squeeze the handle in your palm and use your little finger to release the latch.
- Holding the closed balisong in front of you (pointing forward), slide it so that the handle is on the outside, away from your palm.
- Twist your wrist sharply so that the knife opens and the side of the Bite handle hits you between your thumb and index finger.
- Flip the knife over, aiming your wrist down, which will force the knife to close again;
- Lift your thumb and flip the knife over again, with the last upward throw the handle will hit your first two fingers again, and the butterfly itself will remain in the open position.
If you decide to join the ranks of novice flippers and buy a butterfly knife, be prepared in advance for increased attention from friends, acquaintances and relatives. Watching videos of complex stunts being performed, you can’t help but feel admiration for the dexterity of the performers, but quite a strong impression is also made by photographs of serious cuts and wounds to the hands, which are generously posted on thematic forums by beginners who overestimated their strength and neglected safety.
Simple rotation technique
For those interested in how to spin a balisong, this basic technique will seem worthy of interest.
- Take the knife by the Safe handle, holding it with all fingers except the thumb, which should remain free.
- Start rotating the brush, moving the knife with your fingers as you move.
- While the butterfly is open, it is thrown over the middle finger, and at the same time the ring finger moves to the safe side. Then the sharp handle is placed on the index finger.
- The main thing when rotating is to make sure that at the moment of connecting the two handles, the thumb is removed from the area where it could be injured when performing a trick with a sharpened balisong instead of a training one.
The butterfly training knife completely eliminates the risk of cutting yourself during training. You can buy this option in an online store absolutely inexpensively, and besides, you can master the skill of flipping somewhat more comfortably and easily than by covering a sharp blade with an adhesive plaster.
Trick “Latch Throw”
This maneuver is also considered quite simple, but looks very impressive.
- Grip the knife with the blade facing forward, pressing the latch against your index finger and holding it with your thumb.
- Sharply lower the hand with the balisong down so that both halves of the handle also drop.
- Continue to hold the latch with your index finger and thumb, and move the rest to the side.
- When the handles are connected, the butterfly knife is taken by the dangerous part, and the hand is clenched into a fist.
Learning to twirl a butterfly knife is a laudable goal, since achieving it, in addition to being awesomely cool, will also bring you real benefits. By regularly practicing balisong rotation, flippers develop motor skills, mobility of fingers and hands, attentiveness and reaction speed, and coordination of their movements in general. Let us remind you once again that, although wounds and cuts from training with an unprotected blade will become a kind of incentive to be more attentive and careful, it is still better not to count on such powerful motivation and completely remove the risks by purchasing a training tool. In the catalog of the online store wellgo.ua you can choose a decent, high-quality and aesthetically attractive balisong for safely practicing feints at literally a symbolic cost.
Spinning a butterfly is a technique that requires a certain dexterity, skill and, most of all, training. To paraphrase Goethe, the skill of flipping is 1 percent talent and 99 percent sweat. If you make an effort, any trick will be available.
Simple rotation
The Basic Twirl trick requires more preparation. It is a little more complicated than the previous options. The knife should be taken with the safe side and should be held with all fingers except the thumb, it should be free.
When the movement is performed, the blade is moved with the fingers. The Bolisong should be thrown over the middle finger and at this time the ring finger is moved to the safe side. While the butterfly is open, you need to have time to do these movements.
When rotating the butterfly, it should hold onto the part first with the middle and index fingers, then the thumb replaces it. It is necessary to remove your thumb in time while folding the knife, otherwise injury cannot be avoided.
Structure and rotation patterns of the knife.
How to Twist a Butterfly Knife - Throwing a Latch
Throwing a latch is also considered a simple trick. To do this, take the knife with the dangerous blade away from you. Hold the latch with your thumb and forefinger. Bring your hand down sharply while still holding the knife over the latch. All fingers, except two, are spread out to the sides. When the two handles are connected, make a fist and grab the knife itself.
There are quite a few knife tricks that anyone can learn. The most difficult thing in this exciting activity is the beginning of training.
Sometimes in stores you come across knives that do not look like ordinary ones. They have two parts of the handle, between which the blade is hidden. And they are called “butterfly”. They received such a strange name for a cutting tool because when rotated they leave a mark reminiscent of the flight of this beautiful insect. Sometimes people buy it because it opens easily, sometimes because it is original. And some people buy it to demonstrate various tricks.
Learning the tricks of a butterfly knife involves opening and closing both parts of the handle, while rotating in the air - flipping (from English “turning over”). The simplest techniques are vertical opening and closing of the knife.
Difficult tricks
There are tricks that are more complex. Here are some of them:
Features of application
To use a butterfly knife, hold it by the safe side of the handle.
This region can be distinguished by the absence of a horse's tail. The most unpleasant thing with such a grip may be the butt of the blade hitting your fingers. Experienced users who know how to twist a butterfly knife can also hold the product by the other half to perform complex tricks. The likelihood of injury increases significantly. This grip should only be used in rare cases.
Have you tried twisting a butterfly knife?
Of course! Not yet...
Starting a new hobby
The most common domestic butterfly knife is suitable for training. You can perform tricks with it without undue caution, since if it breaks quickly, you can purchase a similar cheap tool.
How to twist a butterfly knife? To protect your own limbs, you will first have to wrap the blade with a thick layer of plaster. Otherwise, it will not be possible to avoid suffering from minor wounds that will certainly appear during the learning process.
The simplest basic butterfly knife trick is performed as follows:
- the safety handle is tightly clamped between the thumb and index finger;
- the second part of the handle goes down, after which the remaining fingers fold into a tube-like position;
- Rotational movements of the hand are performed, repeating the outlines of the figure eight.
How to handle a butterfly knife so that it lasts a long time
The knife should be handled carefully to avoid injury. The following instructions will help you with this:
- Training products with holes in the handle and blade must be washed regularly. This will prevent dirt and debris from accumulating and affecting the balance of the product;
- It is also recommended to periodically rinse the real balisong under water, then wipe the product and dry it;
- The disadvantage is the gap between the linings, regardless of the type of product;
- knife elements that move should sometimes be lubricated with gun oil;
- tricks should be performed where you don’t mind the floors, the product can often fall out of your hands;
- It is not recommended to throw a knife at a wall, it is not a throwing weapon, it may fail;
- Sometimes the pin that holds the blade may become loose; it can be tightened with a screwdriver.
Examples of butterfly knives.
How long does it take to master balisong techniques?
The techniques of simple tricks can be mastered in half an hour. But for the feint to be perfect, it will take repeated practice. You should start from simple tricks to more complex ones. You should move to the next level when simple ones are performed automatically.
It is clear that the more complex the trick, the longer it will take you to learn it. The ability to handle a butterfly knife also plays a role. You need to train your fingers. The better they are developed, the easier it will be for you to perform tricks.
Butterfly knife tricks for beginners
The balisong knife, better known in our area as a “butterfly”, was created and used for its intended purpose in the Philippines, but in our country it is used to perform various turns and tricks. To learn butterfly knife tricks you need patience, training and basic knowledge.