Optical sight device
Optical sight device
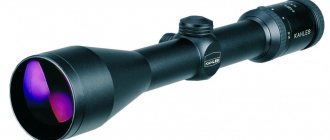
Before we delve into the insides of the optical sight, let’s understand its technical structure. The sight consists of the following components:
- Lens. This is a complex system consisting of several lenses. One of the key parameters of a lens is aperture; it directly depends on its diameter. The outer lens is coated with an anti-reflective coating.
- Sighting reticle. Thanks to it, you aim your weapon accurately. The reticle is localized in the focal plane of your scope (ocular or objective). The simplest grids are half-cross and cross.
- Wrapping system. It consists of a pair of lenses that reverse the image, making the picture “straight”.
- Eyepiece. An enlarged direct image is fed to the eyepiece, thanks to which the shooter examines the target. In rifle scopes, the focal length of the eyepiece is about 50-70 mm. Often the eyepiece is equipped with a rubber eyecup.
- Mechanism for entering horizontal/vertical corrections. Combines two points - aiming and hitting. Two types of correction mechanisms are common - tactical drums and permanent correction devices. The drums are equipped with a scale along the axis of which the handwheel rotates. When adjusting, the arrow is guided by characteristic clicks.
- Illuminated aiming reticle. Modern sights are equipped with an LED that illuminates the central part or the entire reticle. Some scopes have a brightness adjustment that allows you to adjust the acceptable level of illumination.
- Frame. Usually the body of your optics is plastic, sometimes it is made of a lightweight and durable alloy. The housing connects the components of the sight into a common structure that is resistant to overloads that occur during shooting.
Reticles
The reticle is located in the optical sight between the lens and the eyepiece, it is used to aim the sight at the target. To aim, you need to combine the target image with a certain part of the aiming reticle (crosshair, stump, corner).
The reticle is either a metal stencil or, most often, a lens with a reticle pattern applied to it. Part of the reticle may be a rangefinder scale, with which the shooter can calculate the distance to the target, knowing its dimensions.
Before firing from a weapon with an optical sight, the sight must be zeroed; for this, special handwheels are used to move the aiming reticle so that, at a certain distance, it coincides with the middle point of impact.
The reticle can be located on an optical sight in two planes: in the front focal plane (lens plane) designated FFP and in the rear focal plane (eyepiece plane) designated SFP.
If the reticle is located in the front focal plane (FFP), then the image on it itself will be inverted, but if the reticle is located in the rear focal plane (SFP), then the image on the reticle will be upright.
If a scope with a variable magnification has a reticle located in the front focal plane (FFP), then as the magnification increases, both the size of the target and the reticle itself increase.
For a scope with variable magnification with a reticle located in the rear focal plane (SFP), as magnification increases, the target image increases, but the size of the reticle and the thickness of its threads do not increase and remain the same.
There are many types of reticles. Most reticles are universal, suitable for shooting in different conditions, with different cartridges, at different distances. Some manufacturers of optical sights develop and produce their own specific sighting reticles, designed to fire certain cartridges, marked with impact points at different distances, such reticles are called ballistic.
Let's look at some of the most common sighting reticles.
Reticle "Cross" (Duplex)
The most famous and popular type of reticle. Such an aiming reticle allows you to aim the weapon with high accuracy, even at a small or very distant target. There are two varieties of this mesh: classic, the threads of which have the same thickness, and improved, the threads of which are narrower near the crosshair itself. The improved version of the grid is much more convenient. With this reticle, you can measure the distance to the target using the angular distance from the crosshair to the thickening of the sight threads.
Sighting reticle “Stump” (German)
This type of reticle was popular many years ago, but nowadays its popularity has decreased significantly. The main advantage of this reticle is the ability to quickly aim the weapon at the target. Using the distance between the side lines, you can measure the distance to the target, knowing its size.
Sighting reticle "PSO-1"
It was first used on the Soviet optical sight PSO-1, and is now still used on many optical sights of domestic production.
The PSO-1 mesh is intended for military purposes; it is not suitable for hunting purposes, although many hunters use it. This aiming reticle allows you to point the weapon at a small and/or distant stationary target with high accuracy.
The reticle has a ranging scale that allows you to quickly determine the distance to a standing person. Additional sighting angles allow you to shoot at different distances without having to readjust your sight.
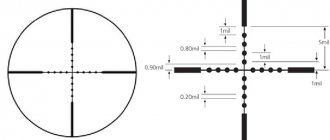
Mil-Dot reticle
The most popular sighting reticle among those who like to shoot from a wide variety of weapons at long distances, it allows you to point the weapon with high accuracy at a small and distant stationary target.
The Mil-Dot reticle consists of two coordinate axes with equidistant marks. The angular distance between the grid points is 1 mil, the size of the dot itself is 0.25 mil, and the angular distance between the edges of two dots is 0.75 mil. Knowing these distances, the shooter can determine the distance to a target with known dimensions.
Ballistic reticles
A whole group of sighting reticles have several aiming points designed for firing a specific cartridge at various standard distances. There are ballistic reticles that have additional side marks designed to compensate for wind drift of the bullet. Sights with ballistic reticles give the shooter an advantage in accuracy and speed of aiming.
The shooter, when choosing the reticle of his optical sight, must take into account what weapon the sight will be installed on, under what conditions, at what distances and at what targets the shooting will be conducted. For most hunters, the most convenient reticle will be the “LR Duplex” type, which has a crosshair with thinning towards the center.
Illuminated reticle
When hunting in poor visibility conditions, at dusk, at night, against a background of vegetation, thin threads of the reticles become difficult to see for the shooter. To eliminate this drawback, manufacturers of optical sights produce sights with an illuminated reticle.
In old military sights, the illumination of the aiming reticle was done according to the principle of the spiral of an incandescent lamp; in the dark, when the illumination was turned on, it glowed orange. In modern optical sights, the illumination of the aiming reticle is based on LEDs, which are powered by a small coin cell battery.
Most often, the illumination of the sighting reticle is made in red or green, less often blue. Many modern sights have several backlight colors and you can select it yourself using a switch. It is highly desirable that the scope has an adjustable backlight brightness, otherwise, in some hunting conditions, too bright illumination of the reticle may illuminate the target and become an obstacle to making an accurate shot.
Parallax
The target image in an optical sight is projected by the lens onto the plane where the aiming reticle is located; parallax is the discrepancy between the target image plane and the plane of the aiming reticle.
Depending on which plane the reticle is in, the parallax in these two types of sights will look different. With a front focal plane (FFP) scope, when you move your eye to the left or right relative to the eyepiece, the target image appears to float relative to the center of the reticle and the aiming point moves away from the target. With a rear focal plane (SFP) sight, parallax appears a little differently; when the eye moves left to right relative to the eyepiece, the reticle is blurred and the shooter cannot clearly see both the reticle and the target at the same time.
Some scopes have a fixed parallax adjustment at a certain distance, made at the factory, without the ability to change it later. Other sights, more expensive, often with higher magnification, have a special mechanism for adjusting parallax depending on the shooting distance; for this, either the entire group of objective lenses or only the back part of the lenses, located closer to the aiming reticle, moves in the sight.
There are two parallax adjustment systems for optical sights:
- AO (Adjustable Objective)
- the parallax adjustment ring is located on the lens of the sight; the focusing distance scale in yards or meters is printed on the ring. This system is more common because it is simple and cheap. The disadvantage of such a system is the impossibility of adjusting parallax without looking away from the target. - SF (Side Focusing)
- a special regulator is located on the side of the sight; you can adjust the parallax without changing the position of the body and head and without looking up from the target.
Amendment mechanism
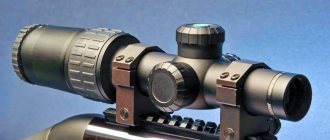
Any optical sight, after installing it on a weapon, requires zeroing. Zeroing the sight is necessary so that the center of the reticle coincides with the midpoint of impact. For this purpose, any sight has special handwheels, which are also called drums or turrets. One of the drums regulates the vertical movement of the sighting reticle, the other drum adjusts the horizontal movement of the sighting reticle.
Reels on optical sights can be of two types: hunting and tactical.
Hunting drum sights have a screw-on cover, under which the rotating drum itself is hidden. The cover is unscrewed only when the sight is zeroed; after the sight is zeroed, the lid is screwed on. During hunting, no adjustments are made to the sight.
Tactical drums are designed in such a way that they can be tightened at any time. Immediately before the shot, the shooter can make the necessary adjustments, depending on the distance of the shot, the speed and direction of the wind.
The optical sight correction mechanism must have the following mandatory qualities:
- The adjustment mechanism of the optical sight must have a large range of vertical adjustments; it must be at least 45-50 minutes of arc (MOA). This range of adjustments allows shooting at long distances.
- The adjustment mechanism of the optical sight must ensure strict perpendicularity of the settings, that is, when adjusting the sight vertically, there should be no deviation to the side.
- The mechanism of the optical sight must ensure repeatability of corrections, that is, when adjusting the correction drum in the forward and reverse directions by the same number of clicks, the reticle point of the sight must point to one point.
Gas filling
The housings of high-quality optical sights are completely sealed and filled from the inside with an inert gas, most often nitrogen. The lenses of the sight filled with nitrogen do not fog up due to temperature changes. This property of the scope is especially important when hunting in difficult weather conditions, with high humidity and low temperatures.
Installing a sight on a weapon
Many carbines and rifles have a ready-made Weaver/Picatinny rail, or dovetail mount, on the receiver. Other carbines and rifles have a mounting seat with threaded holes that accept either scope rings or a Weaver/Picatinny or dovetail adapter.
Scope rings can be of two types: with a diameter of 25.4 mm and 30 mm. The appropriate type of rings is selected depending on the diameter of the scope tube. The rings also vary in height. The height of the sight rings is selected depending on the diameter of the sight lens: the larger the lens diameter, the greater the height of the rings should be.
Rings can also be in the form of two separate rings, or in the form of a monoblock. It is recommended to install rings in the form of a monoblock on weapons with strong recoil.
Some examples of domestically produced hunting weapons with a military background may require the installation of a sight on the side, on a special bracket.
Disassembly
Before disassembling the scope, make sure you have the necessary tools and “accessories.” You will need:
- repair kit (set of flat screwdrivers);
- inexpensive transparent sealant (solvent-free);
- cotton buds;
- a clean cotton cloth;
- jars (for storing small bolts);
- flashlight.
As an example, consider disassembling the VOMZ-P model. You will encounter the following configuration:
- lens;
- eyepiece;
- lever;
- screw;
- lid;
- net;
- angular scale of lateral corrections;
- lens wrapping system;
- installation ring;
- aiming angle scale.
First you have to unscrew the lenses (back/front). The adjusting drums are screwed in until they stop (clockwise), then unscrewed together with the pressure washers. Then the pressure and locking bolts are unscrewed one by one. Half of the pipe is unscrewed. The cassette containing the adjustment lens is carefully squeezed out.
The lens is removed from the cassette (while trying not to touch the glass with your fingers).
The lens-turning system is localized in the remaining segment of the pipe. If desired, it is not difficult to unscrew it - the system is secured with one microbolt.
The structure is assembled in reverse order. Pay attention to the stained lenses - they should not be touched with your fingers. The lenses are wiped with one-sided movements (zero pressure).
Background
It was in the evening..... I decided to shoot, placed a beer can at a distance of about 50 meters, fired 10-15 shots, and then I began to notice that the horizontal line of the crosshairs (the left half) began to bend, I didn’t immediately understand what was wrong, but after several shots, this strip completely fell off, and the right half began to bend, just like the left, and after a couple of dozen more, it also fell off. I didn’t worry too much, since the vertical ones remained standing as they were and it was possible to aim without the horizontal ones. I read forums on repairing optics, but didn’t find anything useful, I asked the gunsmith if they would undertake to restore the crosshair, but I was refused, they said “it’s easier to buy a new sight” (then I realized that they were wrong)
Some time passed and I decided to shoot again, this time everything became more interesting, having probably fired a couple of shots I realized that I was missing a lot, well, I think the setting miraculously went wrong, but that was not the case, adjusting the sight I did not understand what was happening to it, how no matter how hard I tried, the rifle shot more to the right with every shot, and finally the horizontal adjustment stuck (there was nowhere to turn further)….what kind of garbage do I think this is!…. And at the same time, I continue to shoot and watch as I shoot harder and harder... but suddenly the picture in the optics completely disappeared, as if you were looking into cloudy glass with a huge distortion, and a glass clanging appeared inside the sight itself, so I thought and it happened, what so much is about conversations on the forums - the lens fell out.
I decided to put off this optics until better times, and these times came on vacation, the weather was bad, it was raining, and so I decided to disassemble the optics - there was nothing to lose.
Since I had no particular idea about the device (but had experience in repairing binoculars), I simply began to unscrew the first countersunk locking screws at the very edge of the case
(during assembly, I replaced it with a normal screw with a head, for ease of assembly and disassembly),
The lens body could be twisted out
A view of a broken crosshair opened in front of me, (in the photo it was already restored since the photo was taken later) it is installed on a block of wraparound lenses, in order to pull out this block, you need to unscrew the stop nut
(or a washer or a ring, I don’t know what it’s called correctly) and a screw for adjusting the multiplicity,
then move this adjustment forward,
and a slot opens in the body through which, with a little effort, we push out the block of lenses, one of which is simply lying around in the optics body,
Lens, ring - washer and nut with external thread
the tongue also falls out of the case
which serves as a spring for the lens block during vertical and horizontal adjustments (during assembly, you must manage to put it in place in the groove)
This is how it should be when assembled.
Having unscrewed the stop ring, I insert the lens into its place,
(the lens is placed, then the ring which serves as a washer, so that when twisting it does not damage the lens), but then there is a mystery, since the lens is unequally convex, it needs to be installed correctly, this was checked at random, installed, put everything together, looked at it, the image is cloudy, took it apart again, turned it over, reassembled it - now everything seems to be fine
and again I’m taking it apart in order to figure out what to do with the crosshairs.
What is the crosshair made of? And how to attach it, well, after scratching my head a little, and I couldn’t do without 100 grams... I came up with the idea of drilling holes in the old crosshair body (it’s apparently made of brass) in order to stretch the thread,
I took the thinnest drill I had - 0.8 mm and carefully trying to keep equal opposite sides, I made holes (I didn’t succeed the first time)
Next, I decided, as a test, to pull through the holes the thinnest thread that I could find in the sewing kit, I collected it - horror!! It looked like the crosshairs were made of ropes)))
I'm taking it apart again... I decided to try a fishing line for winter fishing, I don’t remember the exact cross-section, I think it’s 0.2mm, I stretch it,
I tie it, assemble it, look - again garbage, the thickness of the crosshairs is even more or less tolerable, but the fact that it turned out to be not even irritated me, I take it apart again, since the holes are larger than the line stretched through them, it’s worth paying attention to this gap, after a little experimenting, I finally found it how to optimally tie the fishing line so that the crosshairs are as even and centered as possible,
I put this whole thing together again (I can probably do this with my eyes closed)
installed it on the rifle, shot at 40 meters... and breathed a sigh of relief.))
I apologize for the quality of the photo, my Nokia simply cannot do better.
I hope the article will be useful to novice optical sight makers, by the way, as I understand, the device is the same for everyone, just out of curiosity I disassembled my BSA Deerhunter 8-32×44 AO Mil-Dot and it turned out that the design is the same, only the lens sizes are different, if anyone has If you have any questions, I’ll try to answer them, don’t throw away your broken optics, they can still live and will be useful to you, good luck to everyone in the repair!
Do-it-yourself scope repair - highlights
The time has come to study the mounting of the basic components of the optical sight. Please note that this is a fragile device, so you need to disassemble it with extreme caution. It starts to act up after about one and a half thousand shots. To prevent future problems, tighten the mounting screws and watch for horizontal alignment.
This video explains how an optical sight works and how to repair it (Leapers 3-9×40 model):
Attaching the lenses
Lenses for hunting weapons have a large diameter, designed for shooting at short distances (150-200 meters). Hunting optics have many rubbing surfaces that wear out over time. Backlashes, mechanical displacements and optical parallaxes occur.
Optical sight lens diagram
The lenses are attached using sealant. After disassembling the sight according to our instructions, you reach the ring nut that holds the crosspiece. The next procedure is as follows:
- squeezing out the cassette (do not lose the pressure spring);
- unscrewing the front nut, lens and guide screws (2 pcs.);
- removing the adjustment lenses from the inner cylinder (this must be done carefully, without giving the cylinder a vertical position);
- remembering the location of the lenses;
- repair.
If the tuning lens (usually the front one) has a loose locking ring, the threads will have to be lubricated with sealant. After waiting for it to dry, reassemble the entire structure in reverse order.
Pressure spring
During repair operations, you will inevitably encounter a pressure spring, which you need not only to preserve, but also to ensure its functionality.
A little advice: you can unscrew the nuts (if you don’t have a repair kit at hand) with pointed tweezers.
Loose screws and nuts (if they do not tighten well) should be placed on sealant. Now the repaired structure, together with the spring, must be pushed back into the pipe - this is a rather labor-intensive process. One end of the spring should end with teeth, the other should be completely smooth.
If necessary (presence of jags), the second end of the spring must be sanded. The spring is installed in the central part of the sight - between the holes intended for the adjustment drums. The tube slides onto the cassette with the assembled lenses, while the spring must be held through the holes.
Lubrication
Not all parts and components of an optical sight require lubrication. And even more precisely, only the rings need this. It is highly undesirable for grease to get on the surface of the lens. For the lubrication procedure you will need:
- alignment control rods;
- abrasive lapping paste;
- tools (torque screwdrivers, wrenches and levels);
- thread locker.
Aluminum, steel and titanium rings are used to mount the sight. After lubricating them, install the scope so that the nuts are on the other side of the receiver port and bolt handle.
The video shows how to properly clean an optical sight:
An optical sight on a pneumatic rifle goes astray, how to fix it?
on Hansa many say that the standard bracket is no good
STP does not hold. I took a Crown Leepers under the weaver bar, for attaching optics (through rings) and a collimator. Haven't checked yet.
I took Rassolov’s crowns (10,000 rubles) and everything was fine.
How much does this “Leepers” cost on SOK95?
It's not about the fastening, but about the side bar itself. Look there.
Cron has nothing to do with it. Whatever I put on Vepr and other Vepris, everything holds up perfectly. Another reason lies in the scope itself. It changes its stp when the temperature changes, even by 5-10 degrees C. Therefore, you need to understand what kind of scope you are buying. In this regard, the combat SVDs are better than other models from European companies assembled in China.
The optical sight constantly gets lost when firing. Pilad4x32 on Vepr308win.
Look for it like this on the bar. Are the planks sometimes wobbly or what?
It happens that the strip is not riveted enough and when used
it is not “worth” heavy crowns and sights. Second: the guide crown itself has quite a few “dirty” edges, and don’t expect stability until they wear off. These edges must be aligned, carefully, and the clamp must be adjusted so that the tightening occurs from the very beginning of the movement of the bracket. If this does not help, then look at the crimping in the rings. If this does not help, then change the carbine or optical sight, or come to me with a buck, and I will send it to Vladimir.
where do they sell side crown lipers?
Tell me, I've been looking for a long time and can't find it.
Vlad, what kind of crowns are you worth? VOMZovsky or another?
Otherwise, the other day I also bought PRILAD4x32L for my Vepr, I also bought a VOMZ kroner (BIII-1a (aluminum)). It upset me a little. Meanwhile, MOLOT supplies VOMZ optics and crowns for its carbines.
I don't know the manufacturer of the crown. Photo in the gallery, take a look, maybe you can figure out the production.
I *** one crown for two months. I set my sights on Bars, everything is fine.
I'm betting on Vepr 3006, it's crappy. So the sight has nothing to do with it. I think the straight line in the brain is bent and closes to a second straight line. During a short circuit, I start to think and throw away the crowns. I go to Bergen and buy the same one and everything is okay. It turns out that the thread was not completely cut and was additionally torn off. You won't understand right away.
If I understand correctly, then I have the same problem. For me it’s definitely all about the crown, I’ve already bought a second one. But I can’t bring it to my mind, I have a vertical displacement of the STP in the upper part, where two bolts are located and two pins need to be installed, on the first one the pins were installed incorrectly, the tolerances are probably large and they were broken after 20 shots, the second one was threaded and screwed in bolts, haven’t tried it cold, closer to spring. But I made an unambiguous conclusion: cheap optics and cheap crowns are a waste of money. Although the combat monoblocks from the SVD are quite strong, they are not cheap (and the optics are, frankly, crap), but they are easy to set up and shoot. As a budget option, one crown costs 8-10 thousand rubles. and install optics on it for 3 tr. It’s inconvenient, and it’s not a fact that it will stand. Conclusion, expensive crowns + expensive optics and is equal to the cost of the carbine itself, or even more.
Backlight repair
The basis for the illumination of the aiming reticle is an LED lamp. It is connected to the battery, but it receives energy not directly, but through a stabilizer. Repair activities need to begin with checking the stabilizer.
Having disassembled the microscopic power supply, take a closer look at the ballast resistor (capacitor). If the resistor burns out, it must be replaced. Sometimes the diodes in the rectifier burn out; they should also be checked. The third potential problem is low-impedance current limiting resistors.
If the LED is made in Asia, it means that a primitive Chinese capacitor has burned out. Replace it with a new one and live in peace.
A brief overview of three models of the Lupold optical sight: VX-6, VX-R, Mark 4. Features of care and battery replacement, design and installation. What is the magnification factor for these models? Instructions on how to zero an optical sight on an air rifle are given at this link. Selecting the distance and target for shooting.
Elimination of reticle displacement
Modern optics use a luminous aiming mark with brightness adjustment. The brand illumination should turn off automatically after a certain time. This saves battery power, as many shooters forget to turn off the battery. In general, aiming marks are of the following types:
- stump;
- Mildot;
- PSO-1;
- Crosshair;
- SVD.
The aiming mark tends to shift due to recoil - this should not be allowed. Paradox: the mobility of the aiming mark is welcomed when zeroing a rifle. The brand is adjusted by turning the drum (you need to focus on the number of clicks). The offset scale varies depending on the scope model and manufacturer.
Having discovered a mark shift, it is worth examining the scope mount - did you do everything correctly? Proper installation guarantees long service life for your aiming system. You should not save money by purchasing cheap mounts - this is self-deception, leading to a loss of accuracy.
Adjustment
The process of bringing together the mechanical and optical axes
“Zeroing” the sight (adjustment) is the process of bringing together the mechanical and optical axes. The need for adjustment arises after purchasing a new sight - the shooter is not yet sure of the correct range set by the adjustment drums. The sequence of actions for adjustment is as follows:
- The vertical correction drum is turned all the way down, and the horizontal drum is turned all the way to the left.
- The vertical and horizontal drums are clicked (“up” and “right”, respectively).
In this case, it is necessary to count the number of clicks over the entire range. It’s best to do this in splendid isolation—household members can throw off your mental calculations. In addition, a rifle occupying the kitchen table (on a special machine) is not the most positive sight for a wife. - Let's assume that you are 300 clicks away from the extreme positions of the drum. Count halfway (in this example, 150 clicks). This is the middle of both ranges. The sight is “zeroed” - its optical and mechanical axes are combined.
To reduce the risk of repair work, protect your scope from bad weather - heat, humidity and direct sunlight. Cover the lenses with caps, avoid mechanical damage and contact of harmful substances (lubricants, alcohol solutions) on the lenses. Periodically (after 1000-1500 shots) check the internal fastenings. Have a good hunting!
