The NKVD Finka is a legendary knife, which is currently very rare - most of these knives were destroyed in the 90s of the last century. Today, the remaining copies are often exhibited at various auctions and exhibitions. Of interest among collectors is not only the rarity of these knives, but also their history. The fact is that in the USSR all data in any way connected with the GB Committee and the NKVD were subject to destruction. And the edged weapons used by these special services were no exception.
DIY Finnish knife: drawings and dimensions
In Finland, for a long time, a knife was required for hunting, cutting prey and surviving in cold weather. Hence the structure of the blade, which can cut down a frozen branch or cut frozen meat or fish with equal ease. And the material for the handle is always made of wood or birch bark, so as not to chill your hand in severe frosts.
Puukko knife.
- Story
- Puukko and Leuku
- Russian Finnish
- How the Puukko became the fighting knife of Finnish warriors
- Puukko in the Red Army
- Features of the national knife Puukko
- Finnish knife blades
- Handle and sheath of Finnish knives
- Finnish knife Puukko: drawing how to make it yourself
- How to make a Russian Finnish
- Conclusion
Making a finca with your own hands
The original Finnish car is quite expensive, but don’t be upset: in any situation there is a solution, and of course, in this one too. A DIY Finnish knife is the best solution. Finka can be made from available materials. So, the most important thing in a knife is good steel.
You can get it at the market or at a power tools store. Tool high-speed steel is best. It’s good to have access to a metallurgical plant, but you can buy a saw blade that cuts thick metal. That's all the material for the blade, next is the handle. What is suitable for the handle? You can take birch, maple, beech. There should be no problems with the material for the handle, since wood is available to anyone.
How the puukko became the fighting knife of Finnish warriors
Puukko gained new fame after Finland successfully repelled the Soviet attack. The armament of the army of the small state played no small role in this.
Mobile units of Finns attacked the Red Army at night, silently massacred entire enemy combat units, and took away food. With the help of puukko, they could act quickly and quietly, which gave a tactical advantage and instilled fear in the aggressor. Moreover, each Finn had this weapon as his personal weapon, and not as an official army weapon. After all, the majority of warriors were also hunters, accustomed to handling puukkos from adolescence.
Watch the video about how the puukko became the combat knife of Finnish warriors:
Features of the national knife Puukko
With a variety of model options, there are also common parameters:
- blade from 10 cm to 15 cm;
- Scandi descents;
- the handle has a round shape, 12 to 13 cm long, made of wood;
- the handle ends with a flare or bend to make the knife fit better in the hand.
Finnish knife blades
It is based on a relatively short and powerful blade, with a straight thick spine from 3 to 5 mm thick. Scandinavian bevels start from the middle or 1/3 of the width of the blade and converge without changing the angle, forming a cutting edge.
Due to this, with skill, it could be used as a mini plane. This blade is easy to sharpen and can withstand heavy lateral loads.
Handle and sheath of Finnish knives
There are no cutouts for fingers on the handle; it is round in shape, oval in cross-section. In the classic version, the handle of a Puukko knife should be made from the root part of a Karelian birch. This is a very dense wood that is resistant to rot. It is soaked or boiled in linseed oil.
The scabbard was made of birch bark or wood.
Greetings to all.
Today I want to describe the process of making the classic “Finka” using the example of 2 forestry knives I recently made; for me and another user of the Nepropadu project. This article describes the basic techniques and subtleties that you should remember. Blade: Lauri SS-95 Handle: Cap Souvel impregnated with Danish Oil Mounting: Mounted 2/3
Why Finnish, you ask? “Yes, because it’s convenient,” I’ll answer.
It’s not for nothing that the Finnish knife (and the Scandinavians in general) has become so famous and widespread, let alone a custom copy for your hand with your wishes and whims taken into account. But the most important thing is quality, I’m tired of seeing a bunch of fins for crazy money that are loose, the mounting is crooked, the handle is cracking, the bolster is fitted crookedly, etc. and so on. As an example, I’ll give you a Finnish Martini that we once lost in Karelia and then found safely a month later. To be honest, it’s scary to look at it... I’m not talking about the disgusting treatment of the blade itself and the short handle, which is small for my hand, although not small.
The Finn was almost new. In no case do I want to say anything about the Martinni company, I am only talking about the mass production of traditional knives, which is replete with just a bunch of jambs, any, although of course there are exceptions.
So, in my knife, I will never allow poor impregnation of the handle, poor fit of the bolster, poor fastening of the handle and blade, etc. That is why the quality of mass production and a single custom one differ significantly, and the price tag is true too (if we are not talking about independent production).
If we talk about making it yourself, then this is not only interesting, but also useful - it helps to move your hands from your ass to a normal place. What can we say about a knife in which part of the soul is invested and one simply cannot help but like it.
We've sorted out the introductory part, let's get to the point. I needed another working forestry knife that met some of my parameters. I chose and bought a stainless steel blade (some kind of their patented steel like Morov’s Sandvik) from Lauri for about 500 rubles, as a blade with a fairly good price/quality ratio and meeting my requirements.
After this, the handle material was chosen - birch burl, as the most convenient and high-quality material for the handle, in my opinion the best. Although a little difficult to process due to its enormous strength. You can also read about making a burl handle and its preparation here.
The burl must be thoroughly dried and then cut into pieces of the required size with any saw.
After this, we mark on top of the burl, with a marker, an approximate image of the handle, centering on all sides and very boldly the location of the future hole for the shank of the blade. We draw an approximate image of the future handle and a bold projection of the internal hole. We make sure that it is in the center and check everything again, or better yet, again.
Next is the most important thing in the entire manufacturing procedure, and at this point you can screw up the entire handle with one movement, so it is better to approach this procedure with the utmost seriousness. We take a long drill of the required thickness, usually it is 0.5 mm greater than the thickness of the shank, and drill a hole for the shank.
This must be done as follows: Drill 2 holes parallel to each other, or with a slight convergence, and then remove the resulting bridge with the same drill or needle files.
The most difficult thing is to drill 2 parallel holes, there are many ways to do this, one of them, the simplest, is to fix the drill on the table using a clamp, ensuring that the drill is parallel to the table by placing pieces of newspaper or something else under it (the drill). Next, we set the height of the workpiece in the same way; in the end, we only need to control the deviation of the drill along one axis; the height is fixed. Marking the surface of the workpiece will help you drill the hole accurately. Now we simply bring the workpiece closer to the drill as on a lathe and the holes are ready.
After this, we cut off all obviously unnecessary parts with a saw. If suddenly the drill went a little to the side, the reserve on each side will allow us to correct this, we will simply redraw all the markings and that’s it, rather than throwing away the handle blank, but you shouldn’t overdo it either, a very small reserve will be enough. With experience, you will be able to drill workpieces directly on the fly without any devices and nothing will come off. We finish everything with a drill and check how the shank itself fits in; if everything is in order, we move on to the next step. We take medium-grain sandpaper and level the plane to which the bolster will need to lie. It should be noted that you should not resort to fine-grained sandpaper at this stage, because... otherwise, due to the smooth surface, the glue will not attach well to the plane, but in the case of medium sandpaper, microgrooves will form and the glue will hold perfectly.
After this, we take the blade in our hands and prepare it for work. Namely, we completely wrap it with electrical tape so as not to accidentally cut yourself if it is sharpened and so as not to accidentally scratch the blade while sharpening the handle. It will not be difficult to remove the adhesive from the electrical tape, but returning a scratched blade to its original form will not be so easy. We cut off the excess part of the shank, because Often the blades come with a reserve for through installation with riveting. We prepare a stacked sandwich from layers, check how everything fits and that there are no gaps.
In this article I do not talk in detail about the manufacture and fitting of the bolster, because... This is a very delicate and thorough procedure that requires a separate article with photographs and I will limit myself to only the main points. This is due to the fact that in this work, a bolster purchased specifically for this blade was used and was slightly adjusted with needle files for a better fit. Before planting, the bolster needs to be heated a little and through a layer of some soft material, I used a piece of leather with a hole for the shank, pressed with gentle blows onto the shoulders of the shank. If necessary, you should further refine the hole with needle files. In the end, it should turn out that the bolster sits quite firmly on the shoulders of the shank and does not dangle on it; before assembling the handle, it would be useful to additionally settle it with a couple of blows through something soft.
When everything is ready, the handle is assembled, the bolster sits firmly on the blade,
(by the way, some knife makers additionally solder it to the wedge from the inside. This is also done to prevent any dirt and water from penetrating inside the handle between the blade and the bolster)
The plane of the bolster fits perfectly to the plane of the handle, there are no cracks and everything is fine - let's move on to the next stage.
We cut micro-notches along the entire length of the shank with a grinder or a file for better fixation with glue. It wouldn’t be a bad idea to even make something like an anchor, like I did, making cuts away from the wedge. You can also make very small irregularities inside the handle in the hole we drilled, but you don’t need to get hung up on it.
We mark the end of the hole bold marker on top of the handle and the hole itself, “probing” it with a piece of wire, in order to further guide us when turning. We also apply alignment.
Now let's move on to the gluing process. We dilute the epoxy resin according to the instructions and pour it into the holes in excess. We ensure that there are no air bubbles, insert the blade for a moment, lubricating it with glue, into the hole, and remove it. Add more resin and grease all planes of the sandwich layers. After checking for the absence of large bubbles and excess glue, we finally insert the blade, collecting the entire sandwich in place.
We clamp everything into a clamp to firmly fasten everything together. We wait until the glue dries and another 2 days, only after that we open the clamp.
After clamping, you should remove the glue from the bolster so that you don’t have to scrub it off later; you can hammer it onto the handle, but we’ll still grind everything down. Or a very reasonable solution would be to first cover the front part of the bolster with electrical tape and then remove it.
Let's move on to turning the handle. Using the lines marked on the surface, we estimate the image of the handle and begin turning the top and bottom, giving an approximate profile in accordance with the approximate image of the future handle drawn on the side. We cut the end of the handle to give it the required length, mark the centering. Then we grind the handle on the left and right without rounding the corners, watch the centering, if necessary, apply it again. In general, alignment lines are an extremely useful thing at this point; you need to constantly monitor them and apply them every time again and again as they are erased; it is best to apply them once at the end, where they will last for a very long time because We will deal with this part only at the end. This will make the handle symmetrical and not make a lot of mistakes. We gradually grind down the wood from all sides to create the final image of the handle.
It is worth noting that at the very beginning you should work with the coarsest sandpaper that can be found, for me it is 30, in order to remove unnecessary wood as a rough sandpaper and then, as the layer of material being removed becomes thinner, move on to a finer grain size, namely somewhere around 125-160 . You shouldn’t do everything with one 40, because... She removes the material too quickly and it is not possible for her to work at the end. It would also be irrational to switch to fine-grained wheels too early. To turn the handle, I used a hammer drill with a grinding wheel from an angle grinder and an adapter for it. This allows me to regulate the speed and work at low speeds, which is extremely convenient, unlike an angle grinder. Also, the quick-change sanding wheels allow for very flexible work. It is worth noting that first of all it is worth processing and creating the final image of the back, and only then dealing with all the other parts. The second one would be better to remove the belly and, last but not least, the sides. The fungus, if one is planned, should be done at the very end, leaving a supply of wood for it. Grinding is actually a very fun activity, especially when you neglect your own advice and switch to fine-grained abrasives too early. In the end, we get a slightly thick handle that already resembles the end result. At this point, we take approximately 130 grit abrasive and begin to carefully polish the handle. We look at how it lies in the hand, we adjust everything to fit the hand so that it is convenient, if we need to go plan a log to understand where we don’t like it, after that we wrap it with electrical tape again. The handle is made individually to fit the hand, it is very convenient. After this, we smooth out and round out all the unevenness, prepare everything for the “Finish”
The finish is done incrementally by hand with sandpaper from 500 and ending... Up to 2500. However, I believe that 1000 grit is quite enough for a working knife, because... it will get scratched quite quickly and lose its beauty, but for a shelf-handler it’s a yes. We polish the handle, removing all traces of large chips, polish all sharp corners, polish the edges of the bolster.
A carefully polished handle is something unforgettable and also beautiful. This way the drawing will appear better and working with a knife will become extremely pleasant, because... just tactile contact with the handle itself already causes an extremely pleasant feeling, I’m keeping quiet about working with such a knife. Let's move on to impregnation. You can impregnate it in different ways, with linseed oil, drying oil and a bunch of other substances, and in each case you can get your own effect. Lately I have been doing this with Danish Oil, it polymerizes very quickly and reveals the texture of the wood very well. St. Petersburg stores sell many types of Danish oil; in my opinion, it is also worth noting WATCO oil, which is also a worthy example.
I’ll make a reservation right away that it’s better to simply rub Danish Oil into the handle by dropping a little oil on a rag. In this work, I impregnated the handle with the first layer, as I did with linseed oil in the work to which I gave a link above. This was done mainly for the sake of experiment. It turned out well, although I expected a little more. Then I waited a few hours, waiting for the oil to polymerize, and began to rub the second layer into the handle. In this case, it is better not to apply the oil, but to rub it in. Heat the oil and place the previously frozen knives into the heated oil. I described the whole process earlier in the article at the link above. This is how the drawing appeared. If you compare it with the original, the result is very good. After polymerization of 1 layer.
After applying another 2-3 layers, the handle looks like this:
Z.Y. The Martinni sheath is a temporary measure. In the near future I’m going to finish the classic traditional Finnish scabbard with a side seam, maybe I’ll even write a separate article.
****************************************** Photo Clickable
As it turned out, it was not Cap, but Suvel that was used for the handle.
Unfortunately, I did many procedures almost automatically and I forgot to take pictures of many moments. Therefore, I am ready to answer any questions that interest you in the comments.
It is also worth noting that the knives in the first and last photos have already been through about a month of intensive use, so some scratches are noticeable on them. I even managed to fly into mine with all my might with the carabiner coupling, which left a small, barely noticeable dimple. I’m afraid to imagine what would happen to an ordinary Karelian birch.
Finka is not just an ordinary knife, it is an extension of a human limb
The main advantage of the knife is its versatility. The knife cannot boast of large dimensions, it is very simple, but despite this, it can be used to cut tree branches, cut bread, sausage, butcher game, you can even open canned food and bottles. If the Finnish woman is real, you can safely hit her thick butt with a hammer. Finnish hunting knives are very strong; Finns used them to do any work. They could remove splinters, crush ice, shave, repair household items, equipment and other gear. The knife is so comfortable that you don’t even want to let it go – the handle naturally fits into the palm, as if it were an extension of the limb. Even the very contemplation of a blade can awaken the hunter's instinct. Primitive man would not have survived without such a knife. As for more refined models (decorated with notches, etched), they are perfect for collectors.
Russian Finnish woman and her features
When the conversation starts about the Russian Finnish knife, you need to understand that we are talking more about the HP-40 scout knife. And it was already quite noticeably different from the real Finnish Puukko knife from Finland. They began to use this modification in the 40s. The differences can be briefly described as follows:
- obvious guard on the blade, S-shaped;
- the bevel on the blade has moved closer to the end;
- the knife itself has increased in size;
- the handle acquired anatomical characteristics.
Replica of the Russian Finnish Red Army. But during the Great Patriotic War, the soldiers of the Finnish army must be given credit for their ability to work more efficiently with their knives. And they armed themselves only with their national Puukko; they did not need any other modifications.
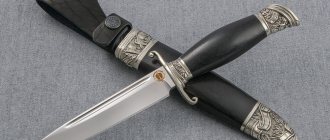
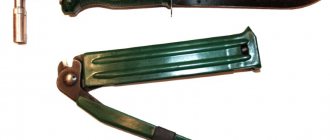
The history of the appearance of the NKVD Finnish knife, its main characteristics
Main characteristics
The NKVD Finnish knife, which was issued to security service workers during the Soviet Union, differed from conventional cutting tools in a number of technical characteristics:
- the narrow blade had a short length - 125 mm;
- blade width – 20 mm;
- thickness – 4-4.5 mm;
- weight – 185 g.
The blade was made of special steel, its Rockwell hardness is 58-62 HRC.
Design
The production of these knives in the USSR was organized in the small town of Vacha, located in the Nizhny Novgorod province. The designers of the Trud enterprise took as a basis a Scandinavian knife intended for hunting. This was an early prototype of a Finnish knife, intended for the work of the Commissariat of Internal Affairs.
Edged weapons for the security forces of the Land of the Soviets were manufactured taking into account the design features of the Finnish original:
- narrow blade – 125-130 mm;
- width – 17-18 mm;
- through installation;
- thickened butt – 4.0 mm;
- one-sided sharpening;
- straight point;
- high slopes;
- narrow valleys;
- unsharpened heel;
- slightly curved guard;
- barrel-shaped handle, the length of which was 130-135 mm;
- curved cast pommel.
The dimensions and characteristics of the original Finnish knives were strictly regulated, and all the main indicators of edged weapons were maintained. The finka was necessarily equipped with a leather belt on which the handle was fixed.
Drawings of folk knives included a short narrow blade with a one-sided sharpening, as well as a fuller. At the same time, the thickness of the blade was 4 mm and was characterized by high rigidity.
The finka was characterized by a double-sided guard resembling an S-shape. There was a non-pointed heel in front of it; it made it possible to comfortably place the index finger to perform a certain grip. The knife was attached to the belt with a buttonhole, which was secured with a special button, which made it possible to quickly fasten the accessory.
Despite the insufficient strength and poor quality of the handle, which could break, the Finn was a mandatory attribute of state security workers. It even received an underground name - the NKVD Finnish knife. KGB officers used such weapons when guarding important objects, as well as for conducting external surveillance.
In addition to the original product, they often used an ordinary Finnish knife without a guard - it was very convenient, it did not cling to clothing, it was possible to hide its carrying and quickly snatch it. To use such a tool as a piercing weapon, it was necessary to use a special grip: the handle had to rest against the palm.
Material
Soviet designers decided to create their own Finnish car, which was supposed to be different from its Scandinavian prototype. Many years ago, Finnish blacksmiths used an old hand scythe to make knives.
Technologists decided to replace this material with U7 carbon steel. After hardening, its mechanical strength increases (HRC 58-62), this metal is easy to sharpen, and has high impact toughness. Modern options are often made entirely from ordinary stainless steel.
The handle material was also changed. Finnish manufacturers used animal horns for this element. In the USSR, the handle began to be made from a polymer, carbolite, obtained artificially.
Each NKVD knife was distinguished by an original handle design, which had a huge variety of design options. This element was distinguished by its color design and material hardness. Dark, very thick leather was used to make the sheath.
Modern copies
It is very difficult today to become the owner of a real Finnish NKVD knife. The originals can only be seen at foreign auctions. The cost of such copies reaches several thousand dollars.
Those who wish to become the owner of such a historical item have the opportunity to purchase numerous copies of the legendary knife of the Commissariat of Internal Affairs. They are produced by different manufacturers. These products may differ in their appearance, as well as quality characteristics.
Usually copies have a slightly different design. To make such tools available to everyone, they were modified, eliminating the possibility of being used as edged weapons.
The original Finnish NKVD and the differences between the replicas
The original Finnish weapon from the 1930s was undoubtedly a bladed weapon. A thick 4-mm butt 125-140 mm long with a straight or beveled “pike” blade provided excellent penetrating ability; the palm of the security officers was reliably protected by a large S-shaped guard. The knife was made from hard carbon - U8 and the like, hardened to 58-59 HRC.
Most modern manufacturers - for example, the forges of Zavyalov, Semin, Koval, Lemax, Antares - produce fins with a relatively thin butt - 2-2.4 mm. Thus, the question of whether the knife belongs to a bladed weapon is removed. At the same time, modern steels are much more resistant to fracture, so the blade retains high piercing properties even with a small blade thickness.
There are also NKVD rifles with a thicker butt, up to 4 mm, like the original. In this case, they either do not have crosshairs at all (in the 1930s, models that were more convenient for concealed carry were also produced), or are equipped with a removable guard. For example, the Zavyalov partnership from Vorsma produces fairly thick blades with a blade attached to the handle on a screw sleeve. You take off the pommel, unscrew the sleeve, take out the blade, remove the guard - and you have a legal tourist and household fixative in your hands. I put the guard in place - and got a convenient and safe hunting knife, 100% consistent with the original NKVD knife!
Puukko in the Red Army
Some Finnish combat knives became trophies of Soviet soldiers. Scouts began to use them. But without the habit, using traditional enemy weapons was inconvenient and led to injury to the new owner, as the hand slipped onto the blade. Russian soldiers did not know how to hold this knife correctly.
Then the USSR began to develop its own version of the weapon:
- with an S-shaped guard;
- with a longer blade that has a bevel at the tip;
- with an anatomically shaped handle with finger rests.
This is how the HP-40 knife appeared in service with the Red Army.
Puukko and leuku
The Finnish puukko knife is a prototype of the classic Finnish knife. Its name comes from the Finnish word for “forest” and refers to tools for working with wood, gutting fish, skinning and butchering game. In essence, a puukko is a universal household knife, optimized for certain climatic and social conditions. There are the following types of puukko knives: for woodworking with a smoothly curved spine; a knife with a wide blade and a comfortable long handle; universal knife for hunting; knife with a short blade for performing wood carvings, others. The making of puukko is a tradition in every Finnish family, and its design is a historical reflection of the masters who made it. Its blade often has grooves on the sides of the blade, there are descents from the middle of the butt and a reduction to zero. This creates convenience when working with wood. The puukko is characterized by a through-mounted blade, and the front end of the handle is reinforced with a metal bolster. The blade itself is not long, not exceeding 10 cm in length.
Leuku knife is the second type of Finnish knife. Unlike puukko, this species is thicker, longer and heavier. A suitable characteristic for it is a cleaver knife. It is used for trimming pegs, clearing bushes, for rough camp work, and splitting wood chips. In some cases, this knife can replace a light ax. The end of the handle is designed in the form of a symmetrical mushroom so that the knife sits firmly in the hand during sweeping blows.
Imagining a traditional, classic example of puukko and leuku, you can make a Finnish knife with your own hands.
Knife characteristics
The Finnish blade usually has a straight or slightly blunt spine, a blade meeting angle and a large spine. A striking feature of the Finnish knife is the absence of a limiter. The hanging method is used to attach the handle. A special feature of the knife is its wide bottom edge, which sometimes covers part of the heel. The handle thickens towards the top of the handle. Once inserted into the sheath, only a small portion of the handle remains on the outside. Finnish knife technology is characterized by an ideal blade to handle length ratio, as well as a blade width to length ratio.
Almost all modern knives have a manufacturer's mark. The blade of the finca must have a certain shape, since the defect is immediately noticeable. If we take the rustic form, the length of the blade does not exceed 10 cm.
In ancient times, the scabbard was hung from the belt at both ends, and it hung parallel to the ground. After a while they began to make just a strap for a Finnish knife. The photo of a modern knife shows that the sheath has only one ring, which is attached to the belt, and the knife hangs perpendicular to the ground.
Sources
- https://VashNozh.ru/izgotovlenie/finskiy-nozh-svoimi-rukami
- https://FB.ru/article/139790/finskiy-noj-finskiy-noj-svoimi-rukami
How to make a binding or bolster?
To make a binding or bolster you will need a sheet of copper or brass about 3 mm thick. Bolster is much easier to make, so I will tell you right away how to make it. Cut a piece of brass or copper into a square or rectangular shape. The most difficult thing is to make a hole for the shank of the blade. The slot is cut using a file or an engraving machine. As a last resort, you can drill several holes side by side and connect them together. Then the slot in the bolster is widened using a needle file.
To make a binding you will need:
- A plate of copper or brass that needs to be shaped into a round shape;
- Matrix;
- Punch.
The matrix can be made from a piece of ¾-inch iron water pipe, the punch from a piece of fittings of suitable diameter. The round plate is annealed on fire (possibly gas), after which it is given the desired shape. The process is very labor-intensive, so it’s better not to bother with the binding.
History of creation
The prototype of the Vachin finka was the national Finnish blade, known as the “pukko”. Over time, the Soviet version of the knife improved, acquiring specific characteristics that the Scandinavian ancestor did not have. The official history of the existence of Finnish women ended in 1935, when the carrying, manufacturing and sale of this type of bladed weapon was banned at the legislative level.
The original Vachin finca was designed and created in the 30s of the last century. The model was made for special units of the NKVD, which needed reliable and compact combat knives. Schemes and drawings were created on the basis of short Finnish national knives, which were designed by Pontus Holmberg. Since the creator was from Sweden, the blades were initially classified as the “Norwegian” type of blades.
Origin story of the original
REFERENCE. The national knife of the Finnish people called “puukko” served as the prototype of the Soviet NKVD knife.
But over the years, the Soviet knife began to differ somewhat from its progenitor. After the ban on Finnish knives, their production and sale legally, it became impossible to purchase the product. But since 1935, they began to produce a Finnish knife for the needs of NKVD employees .
Puukko as a prototype
You can probably guess from the name that this weapon came to Russia from Finland. That is, the Russian Finn is a type of national knife of the Scandinavian state. In its homeland, this edged weapon has a completely different name, namely “puukko”.
Since Finland is a hunting and fishing country, the knife should be easy to use, but functional. He must successfully cope with many responsibilities - cut wood, rip open the belly of river and sea fish, help in gutting game.
This knife has a straight steel blade with fullers. Its butt is thickened, and its handle is without a guard. It can be grasped and carried in different ways.
REFERENCE. Puukko is the pride of the Finnish people; for many centuries it has been part of the national clothing of both men and women, they wore it tied to their waist.
Since in the period from 1809 to 1917 Finland was subordinated to Russia, it is not surprising that the Finnish knife spread in the northern regions of our country. But if the Finns used this knife in the household, then in Russia it became popular among crime bosses.
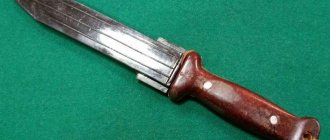
How to make a Russian Finnish
After the 1917 revolution, finks were made in a handicraft way, by sharpening kitchen or hunting knives. After the appearance of the NKVD knife, craftsmen began to make simpler versions in its likeness. This refers to a reduced guard.
When making a Russian Finnish, the sequence of actions remains the same. You just need to add a few nuances:
- a dol is added to the drawing;
- in paragraphs 2 and 3, respectively, the contour of the groove is outlined, and it is cut to the required depth;
- in paragraph 5 a guard is added;
- when preparing the handle in point 7, you need to pay attention to the fact that the shape is distinguished by the presence of anatomical contours.
Finnish knife.
Let's start processing materials
- We take a brass sheet, cut out a square fragment from it and make a hole in it of the diameter we need. Then we put it on the shank - this will be the bolster of our knife.
- We cut the birch bark into rings and make holes in it of the desired shape and size.
- We mark the birch block and drill it through with a 5mm drill. It is recommended to use a drill press. Using a hand drill it is possible to drill a hole that is not straight.
- We saw a hole in a birch block to the shape we need. Let's check. The shank must fit freely into the block.
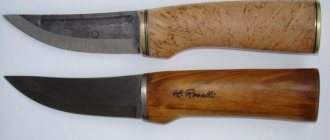
Approximately the same set of materials as in Fig. 2 you should succeed.
Rice. 2. Details of the Finnish knife
How the puukko was modified into a finca
In fact, the finka is one of the variants of the puukko, but not the Finnish hunting or combat knife itself. It appeared shortly after the revolution in Russia, when the new government banned the carrying of weapons by law-abiding citizens. But the difficult financial situation of the majority of the population led to an increase in crime. And the bandits used finks, which were easy to convert from kitchen and hunting knives. They have longer blades and a small guard. And yet this is not a puukko.
Finnish knife dimensions
History of origin
How did the word for Finnish knife come about?
“Pukko” is the name of the weapon in Finnish, “puu”, in turn, means “tree”. Initially, the Finnish knife played the role of a household tool, but a little time passed and it changed. Knives began to be made in such a way that they were used as weapons. They were used during a fight.
An embossed design was applied to the scabbard, painted red, and engraved brass plates were attached to it. They hung the knife on a chain, and while walking it swayed, thus drawing the attention of others to itself and its owner. It was very stylish at the time. The handle of the Finnish knife was made from Karelian or wavy birch, that is, hardwood.
Finnish knife in folklore
Finka, like any other household item, has found its place in the customs and folklore of the people. In Karelia, all girls for a certain period of time wore an empty knife sheath on their belt. The guy who wanted to marry the girl inserted his knife into her sheath. If at their next meeting his Finnish knife remained in the sheath, it meant that he was a desired groom. This was a special sign, after which the guy could send matchmakers to the girl. If a girl took the finca out of its sheath, it meant that she did not want to marry this guy.
In the Far North, men also had their own customs. If a man worked in the forest for a very long time and had to spend the night there, he stuck a knife into the wall above him, thus protecting himself from evil spirits. A similar thing was done in houses, people stuck a knife over the door, as if blocking the path for all evil spirits. In addition, there was another custom: if a baby in the house began to cry, a knife was inserted just above the door.
The invention of the knife can be put on a par with the achievements of primitive man: making fire and taming domestic animals, since with the advent of the knife, people’s lives became much simpler, obtaining food became an easy matter, and people were able to defend themselves from wild animals and invader tribes.
Sewing a sheath is one of the main stages of creating a finca
Making Finnish knives is a labor-intensive and very complex process. Some craftsmen believe that the most important task is sewing the sheath. To make a good sheath, you need to spend a lot of time, unlike making the sheath itself. The whole secret lies in a special technology that must be followed without fail. If you do not fulfill at least one condition developed by the Finns, the case will be damaged and can be thrown away. The sheath is made exclusively from wet leather, it fits the insert well and is stitched. The Finns take a more responsible approach to making sheaths than to the knife itself.
Particularly popular are the sheaths made of dark red leather with a curved tip. Such a scabbard is called a “bishop’s hat” (in honor of one of the prelates of the Catholic Church, who was killed by a simple peasant for ruining his entire farm).