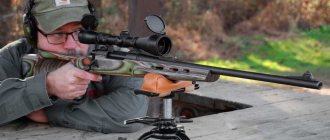
Bracket height and butt cheek fit
Bracket height and butt cheek fit. Achieving the correct bracket height can be costly. Achieving this means more comfort and more targets hit. The main factor when choosing a mount kit (after the correct diameter) is the clearance between the scope lens and the barrel. For a scope with lens adjustments, mounting it too close to the barrel can cause the barrel to touch and even move when the scope is adjusted.
Another factor is correct head position. If your scope is set too low you may find that you have to squeeze your head into the cheekpiece or turn your head all the way in order to see the image. Conversely, if your scope is mounted too high, you may find yourself “hovering” over your cheekpiece without your head touching the stock. In both cases it will cause instability as you struggle to see the picture. Adjustable cheek stocks eliminate this problem because as long as the lens is not touching the barrel, the scope can be mounted at any height the shooter chooses, allowing for optimal head position for maximum comfort. This is usually the most vertical head position, but it depends on the shooter. Many shooters use eyecups, rubber cuffs for the eyes that cut off light from behind or from the sides and improve the viewing image.
Depreservation
Before shooting the optics on a pneumatic rifle, it is necessary to properly de-preserve the weapon. However, this is true not only for pneumatics, but also for firearms.
A schematic algorithm for this process looks something like this:
- complete disassembly of the rifle;
- removing the spring-impact mechanism;
- complete removal of factory preservative grease;
- cleaning compressor system elements.
In this case, special solvents and compounds are used. Cleaning and lubricating the barrel when carrying out work on depreservation of weapons is not a mandatory requirement.
Alignment of correction drums
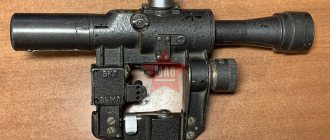
There is a smaller tube inside the scope that contains the crosshairs and wraparound lenses. When we adjust the drums, we actually move this tube and this changes the relationship between the reticle and the target image. A scope is optically centered when this inner tube is completely aligned within the scope body. This means that the mechanical and optical axes coincide, and this position gives the least amount of optical errors and image distortion. Another important reason for centering the scope is the fact that if the wrap system is positioned at its extreme positions in any direction, it may touch the main tube and we may not be able to use the full range of adjustment or may even move the reticle horizontally while adjusting the elevation.
This means that we always have to center the scope, then align it roughly with the bracket and only fine adjustments (within a few clicks) can be made with the drums.
Centering the scope, as is usually done, the middle of the turret adjustment range is used, but it is not accurate and can damage the scope mechanism.
The correct way to center a sight is by "rotating" (even the Schmit-Bender factory uses this method to center their sights). You secure the rifle and place the scope in the open rings of the mounts, aiming at highly detailed targets (to guide the offset). It is worth placing strips of paper between the mount and the scope to avoid damaging the coating of the scope.
Sight rotation
Then rotate the tube slowly, pressing it down, in half rings, so that the sight does not rise, but simply rotates around its own axis:
Estimate where the center of the resulting arc is located (marked in red in the pictures) - set the reels so that the crosshairs move approximately along this arc. Repeat this several times until the crosshairs begin to point in the same place as you rotate the scope. The sight is now optically centered. Mark the position of the drums for later use.
How to use a weapon correctly
- You cannot store a rifle in a state ready to fire, as this can result in injury or death to the owner or others.
- Firearms can cause a lot of damage to its owner or others if used ineptly. If you are not confident in your own abilities, you can sign up for weapons safety classes or courses for novice hunters. This will help you be confident in your abilities and calmly shoot in the presence of other people without the risk of injuring them.
You cannot point the rifle where it is prohibited. - You cannot point a loaded rifle where shooting is prohibited.
- Don't keep your finger on the trigger unless it's time to shoot. The hand may tremble, which will lead to unpleasant consequences.
- When zeroing an air rifle, it is necessary to use the same bullets that will be needed when going hunting or competing.
- In order not to make a mistake with a shot, you need to confirm their correctness whenever you change the rifle settings with three shots at one target.
- You should not rush into shots to avoid unnecessary hits. You should breathe calmly and make measured movements so as not to injure yourself or your fellow travelers.
- Before firing a shot, you need to make sure that the barrel is completely cold. If there is an increased temperature, you should wait until it cools completely. This will help keep the weapon safe, since if it gets too hot, it can jam.
- Do not neglect rifle zeroing exercises. If this procedure is carried out correctly, hitting accuracy is ensured if you have shooting skills.
All these warnings apply to the SVLK 14c sniper rifle, and to the ataman air rifle, as well as to the Barrett m107.
Installation of fastening (rings)
Remove the screws from the top half rings and remove the top section. Loosen the side screws slightly and slide the mounts onto the rifle's dovetail (or other base). Carefully tighten the side screws without force. Take the scope and place it in the half rings. Cover the scope with the top half-rings and finger-tighten the set screws. The scope must be able to move back and forth and rotate, albeit with some effort. Then, follow these steps:
- Let's assume your normal shooting position is sitting on level ground with the rifle resting comfortably on your shoulder.
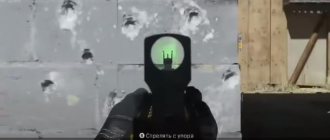
- Allow your head to meet your butt cheek in a comfortable, natural motion. Close your eyes so that the pre-positioning of the sight does not affect your position. Rest your head on your cheek in a comfortable position and if you open your eyes, you should see the correct picture (see photo below) for the first time. The point is that the optimal position is when you place your head with the least amount of muscle tension and force, and you should align your scope for that position. Observe the picture in the sight. You will initially be on the hunt for a good picture, and will move your head back and forth to achieve the correct distance from the eyepiece to the eye.
- Determine whether you need to move the sight forward or backward and move the sight lengthwise until you get a picture. The image should be clear close to the edge have a thick black ring around it.
- Install the rings so that they are as far apart as possible. This gives the most stable base for the scope. Then tighten the screws well (but do not damage the scope tube!
- Roughly align the vertical portion of the reticle perpendicular to the dovetail, then tighten the top screws. The crosshairs will be more accurately aligned later, but for now this will suffice.
Looking through the scope from too close a distance (top row) and too far away (bottom row): the crosshair is in poor focus, the image is “narrow”, with a blurry edge.
A sphere with correct eye relief and a clearly visible aiming mark, the edges of the picture are sharp at the edges.
Test shot
Any instructions for setting up an optical sight will say that the first stage of zeroing is a test shot, which will need to be fired from a distance of 15 to 20 meters. It is not carried out to identify the difference between the point of impact and the aiming point, but to detect possible malfunctions in the operation of the weapon. You may have secured your optical sight poorly, and a test shot will let you know. You can even do it at an improvised target - a bottle, a can, a tree trunk, and so on.
Focusing the eyepiece and reticle
Your riflescope will have an adjustable eyepiece. This allows people with different vision to use the scope. If a poorly adjusted crosshair appears out of focus, the eye will try to compensate and become very strained.
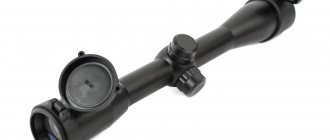
There are two types of adjustment mechanism. The most common is the one where an adjustment ring rotates around the eyepiece, locked with a special locking ring. The other type, known as “fast focus,” is a single, narrow ring at the back of the eyepiece. This type of focus ring sometimes moves randomly, but has markings for the desired position.
Rotate the eyepiece until the threads are in focus, then tighten the locking ring.
Rotate the focus ring until the reticle is in focus
With the rifle shouldered and parallax set to infinity, look through the scope at a bright, clear sky (not the sun!!). Rotate the eyepiece or fast focus ring until the filaments appear as black and defined as they would be visible to your normal naked eye. If it was not a “quick trick”, secure it with a locking ring. Do not make large turns - 1/3-1/2 turns at a time. Take a short break between each attempt, looking at distant objects to relax your eyes. If you look at the reticle with one eye and the horizon with the other, both should perceive the image sharply at the same time.
What to do if you wear glasses? In theory, since spectacle lenses have some dioptres, a slightly myopic shooter could live without glasses, he could use eyecups, but he might have trouble finding the target when looking at the crosshairs, and he might have to put the glasses on and then take them off again before the shot. Things are a little easier for long-sighted shooters; they can use reading glasses to see the markings on the scope and they can look into the scope over the glasses when shooting.
Ammo selection
Setting up an optical sight for a rifle should be done using the ammunition that will be used during hunting. Obviously, for pneumatics it is best to purchase those bullets that are recommended by the manufacturer of your rifle. For firearms, the choice of ballistic weapon is entirely based on what kind of game you intend to hunt. Be that as it may, the ammunition must comply with the technical characteristics of your weapon. Excessively light bullets will be blown away by the wind during flight, and heavy ones will not reach the target at long distances.
Setting the optical center to Optimal range
For field target, the most important distance is 55 yards (50.2 meters). This is the longest distance and therefore where your scope should work at its best. So, the scope should be in the “Optical Center” position when the elevation turret is set at 55 yards. By this we mean that when set to 55 yards, the elevation turret will be in the middle of its adjustment range. This means that the optical center is set at 50 yards so that the field of view will be very close to ideal within the most difficult range of 45 to 55 yards. But the most important thing is that you understand the meaning and significance of the optical center, and it looks at difficult targets with height correction and strictly centered horizontally. When shooting with an extension, it must be set at the shooting distance. There is another reason why this should be done. Some scopes don't have a wide range of adjustments, and if you don't use this technique, you simply won't have enough adjustments for longer distances. We achieve the desired result by "spacers" in the rear ring, or by using angled brackets. Usually, if your scope has a smaller front lens diameter and is mounted low, spacers will suffice. But for taller brackets you will need a much greater slope and it is easier to achieve this with a special bracket.
It's time to head to the shooting range. You must have access to the line at 50 m and 100 m. Using a ballistic calculator, you need to calculate the “near zero” to a distance of 100 m. Measure the “near zero” distance from the muzzle of the barrel and set the target. It is enough to use a simple cross as a target. Keeping the alignment from the previous section out of the box, adjust the “objective” or side parallax adjustment wheel so that both the target and the crosshair are in focus. Shoot at the center of the cross. Most likely, the bullet will strike significantly lower and to the side. Fire three more bullets with the same settings to see the sequence.
Ignore the scope's elevation settings for now and correct the left-to-right setting. Rotate the drum the required number of clicks. You'll have to do this through trial and error, by shooting and tweaking, until you get what you want. (If you were aiming at the central +, then the hits should fall on the line below the +). The windage adjustment settings are not critical at this stage, because they will be accurately adjusted after zeroing is completed. If the vertical STP is more than two inches (5 cm) below the aiming point, it is necessary to bring the STP to the AIMING point by raising the rear of the sight relative to the front by installing a piece of incompressible, flexible material inside the rear ring. Most people use old film stock, but you can use thin copper plate, plastic, or aluminum foil.
2-3 pieces of film placed under the scope in the rear ring
Cut several pieces of your chosen packaging material (about 15x20 mm). Mark the positions of the ring with a pen. Loosen the bottom mounting screws (the ones that hold the dovetail). Move the sight off the dovetail. Loosen the screws on the back ring until there is a gap large enough to fit two of the three spacer pieces.
Once inserted, return the scope, using the marks you made earlier to find the correct position, and allowing the front ring to guide the rear, re-tighten all screws. (Note: Do not over-tighten the top screws as the scope does not currently sit flush in the mounts and over-tightening with the shims may cause the scope to become warped. Just use a reasonable amount of force.)
Return to the range, check the STP again at ten yards = 9.14 m. If the STP falls within 1 inch = 2.5 cm from the aiming point, then it's time to check it at 55 yards = 50.3 m. If if it is not, then you need to continue adding (or removing) shims until the STP is adjusted at ten yards.
Then set the windage using the rings (still leaving the drums intact). High-end rings have windage adjustment. Adjust them until the difference is less than half an inch. Very fine adjustment of the horizontal is not very important for now, you can do this later. If you have regular rings, they can also be adjusted using spacers. Only spacers need to be placed not between the scope and the ring, but between the base of the ring and the base on which the rings are installed. The lining must be installed on the stationary foot of the ring, under the front or rear ring, depending on which direction the adjustment needs to be made. Use only one layer of lining, with a maximum thickness of 1 mm. This is only an additional solution; it would be better to purchase rings with horizontal adjustment.
Using a shim to make horizontal adjustments
At 55 yards, set up a large piece of plain paper or cardboard. On this sheet, draw a line, with a thick black felt-tip pen, from left to right, exactly in the middle. Leaving the elevation unchanged at (10 yards) and adjusting the parallax, fire three shots at the black line. It doesn't matter whether the group of hits ends up left or right, focus on "up or down."
If the group is more than 4 inches above or below this drawn line at 55 yards, it may be advisable to add/remove some spacer material. The reason for this is that a 4-inch difference at 55 yards equates to half a turn of the elevation turret and will take your scope beyond its optimal values after centering using the technique above.
If you can get the STP within 2 inches of your 55 yd (50.2 m) aiming point, simply lock the rear ring and leave the elevation turret "centered" so the scope will perform better at longer ranges. distances and rangefinder capabilities will be optimized.
Measuring the inclined base for the scope
Using shims is an easy and effective method, but this method does not allow the volume of the scope to fit into the rings and can be easily damaged if you over-tighten the screws. The ideal solution may be to buy/make a sight base that already has the appropriate tilt or one where the tilt can be adjusted. The slope will be about 0.5-0.7% (not degrees!), but this depends on the height of the scope and the type of bullets used, so you must find the exact value for your complex. If you have an adjustable base like this, install two "low" rings, preferring windage adjustable rings, of course. This way you can mount your scope without shims, scope body stress or distortion.
If you are going to MAKE a tilt base like this, you can measure the required tilt as follows: place the scope on the weapon with any rings or bracket (they can be of any type and any height) and follow the steps described above up to chapter 3.4 - so that the scope is at the optical center, but instead of the instructions in Chapter 3.5, you shoot at a large piece of paper at 55 yards. The slope can be calculated using the following formula:
Slope in% = (STP + H2 – H1) / L * 109
Where:
STP – the difference between the aiming point and the STP (middle point of impact) in centimeters, cm;
H1 – distance from the optical center of the sight to the axis of the barrel, cm;
H2 – required height, cm (all in centimeters);
L is the distance to the target in yards (!), the slope is calculated in % (for example, 0.7% means 0.7 mm difference in height per 100 mm of length) (a multiplier of 109 is used when applying the distance to the target in yards. If you for some reason, suddenly decide to measure the distance in meters - well, you never know - then multiply by 100 - approx. transl.)
Zeroing a rifle at 25 meters
Zeroing an optical sight on an air rifle at 25 meters is the main, so to speak, basic action.
25 meters is the basic effective fire range for most rifles. A bullet, for example, fired from an MP-512 in a series of 10 shots at 25 meters, both in the first shot and in the tenth, has approximately the same flight path:
- Zeroing begins with aligning the bore to the target using a cold zeroing cartridge. The laser beam has a point dispersion of only 0.2 mm at this distance, so aligning the air gun with optics along the barrel bore to the center of the target is very simple.
- The next step is to fire a series of 5 shots to determine the aiming point of the sight. The optical sight is first adjusted vertically. If the bullets go too low or too high, you can adjust by moving the scale 4-5 clicks at once. After the height has been selected approximately correctly, shooting is done for fine adjustment.
- The optics on an air rifle should be adjusted horizontally after the sight has been adjusted vertically. Here the scale moves much more accurately. Series are made smaller, 3 shots each.
After the result is achieved, you need to take a break and, after changing the target, fire 3-4 series of 5 shots each. The results are evaluated after each series.
Side shift of the sight
This can be seen from the top view of the rifle. The average shooter places a lot more emphasis on this issue than it really does. Overall, I have to say that it is not very significant in practice and is almost unnoticeable if the scope is zeroed correctly. Let's see why:
1. The sight is offset - this is the case when the sight is not in the plane of symmetry of the rifle and it is offset in any direction. For example, this happens if the scope base prism (dovetail) and the rings do not match, but you still install the ring with a spacer on the dovetail. If you have a 10mm dovetail and a 12mm ring, then the offset is (12-10)/2=1mm. This offset can be obtained in two directions (the following examples assume that the sight axis is 1 mm to the right of the barrel axis):
Maintain parallelism, that is, zero windage correction so that the crosshair is located 1 mm to the right of the STP at the shooting distance, to the same extent. With this setup, the rifle will shoot 1mm to the left at all ranges. This is not a big deal, it is believed that you should extend the aiming point even several diameters of the killing zone to compensate for the wind.
Zero the windage adjustment to 30-35 yards (midway of the possible range). This means windage is working perfectly fine at this distance, with the rifle shooting 0.7mm to the right at 55 yards and 0.75mm to the left at 8 yards.
Obviously, these errors should not be taken into account.
2. Sight not parallel - This could be because the dovetail profile is milled at an angle or because the mount, scope or rifle is warped. It is important to note that the bullet's trajectory is determined by the relative position of the barrel and the scope, so even a perfectly mounted scope can be angled (relative to the barrel) if the barrel bends. But this angle can be corrected using the sight's windage adjustment tower and does not apply to the entire distance. So, if a dovetail has a 1mm twist at 12cm, that doesn't mean we'll be shooting 42cm sideways at 55m. This will only be 1-2mm (determined by the displacement of the front lens associated with the bore axis) and will not cause too many problems, see previous paragraph above.
We can conclude that the lateral skew of the scope (as seen from the top view) does not really compromise accuracy. The real problem only arises when the scope rotates around its longitudinal axis, i.e. The crosshair is not aligned. Although this does not seem difficult, it is a real danger, since in this case the vertical corrections affect the horizontal ones, and we also have a much greater chance of crashing the rifle - and this is a lot of millimeters at short distances and several centimeters at long distances.
Required Note
It should be remembered that zeroing is not a one-time operation, but a regular operation. Settings can get lost due to shocks and shocks, and even simply over time (you will still be carrying and transporting your rifle along with the scope, it will still be exposed to vibration and vibrations).
Keep in mind that any changes, such as changing bullets, or the smallest tuning of your rifle, entail the need for a new zeroing.
You can consider these facts as additional reasons why you should learn how to zero your own air rifle in person.
Don't worry, millions of people have mastered this science. It will definitely work for you too!
Leveling the grid
The purpose of leveling is to ensure that the vertical reticle line is absolutely vertically aligned with the top of the trajectory and the barrel of the rifle. As the name suggests, this involves the use of a "plumb line", a suspended dangling rope or thread that provides a true vertical reference line.
This procedure can only be performed with a spirit level mounted, namely small glass tubes with a common liquid level. One of these "bubbles" should be temporarily attached to the plane of the dovetail so that you can see it with the non-aiming eye while the aiming eye is looking at the plumb line.
ATTENTION! Some cheap bubble levels are not actually level, check them before using.
The rope should be quite visible, such as orange nylon from a falling target, and should be mounted at a sufficient distance from the scope to detect any errors. 10-15 meters is enough, depending on the closest distance that the scope's parallax adjustment will allow.
1. Focus the parallax adjustment on a plumb line.
2. Adjust the rifle by holding it until the bubble level is level.
3. Without changing the hold, observe the plumb line.
4. Align the reticle vertically along a plumb line and observe the degree of inclination that is obtained in the bubble level.
The sight in the picture must be turned counterclockwise, in the rings, until the vertical thread is parallel to the plumb line when the level mounted on the dovetail is in the middle position
If the degree of tilt is significant, then you need to rotate the scope in the mounts. Loosen the top mounting screws enough to rotate the scope body. Repeat steps 2-3 and if the slope is no longer observed in the bubble level, then the crosshairs are aligned with the trajectory of the bullet. Before re-tightening the mount, make sure that the eyepiece position has not changed. After checking the pupil position, tighten the fasteners. Always tighten the screws alternately, half a turn at a time, otherwise the top half rings may rotate the scope. This is worth using to level the fence if you have one.
Precautionary measures
Safety is also important when shooting. It is necessary to follow simple rules that will help the shooter avoid a bullet wound, and a passer-by not become a victim of an accident.
- The shooter should pay attention to rustling in the bushes, as there may be a person there. Experienced gun owners, in particular hunters, violate this clause of the rules, which leads to accidents.
- Weapons must be maintained in working order. The owner should periodically inspect the air vent, clean and lubricate the parts. You also need to keep an eye on the aiming device. The result of neglecting this rule will be a rupture of the muzzle channel during shooting from a pneumatic rifle with an optical sight.
- It is necessary to use standard bullets and accessories in pneumatics. Shooting from homemade shells, which should not initially be used in weapons due to poor quality, will lead to malfunction of the rifle. The worst-case scenario is that the shooter gets injured in addition.
The safety should always be used, even if the shooter has moved away to the target to record the shooting results. Sometimes danger comes from unexpected places, especially when the shooter is standing in the affected area.
Final adjustment of horizontal corrections
Before moving on to the trajectory adjustment stage, it is necessary to re-fine-tune the scope's windage adjustments in relation to the barrel.
There are different “schools” regarding the distance for setting horizontal corrections to zero. What they mean is that there can be no doubt that it is best done at 55 yards, indoors, from a soft rest. However, most people do not have access to an indoor 50 meter line.
Alternatively, the distance can be shortened to such an extent that the bullet is completely unaffected by any wind. This range is about 15 meters. Zeroing the horizon at such close range allows you to shoot much more consistently than at longer distances.
At 15 meters, place a target that consists of white paper/cardboard with a vertical black line. Aim at this vertical line and shoot a bullet at it. Now, shoot into the hole. Then shoot at the new hole. You should see a line (trend) with the same distance between the holes. Correct the horizon and start all over again along the vertical line.
When you are reasonably sure that the holes do not deviate in both directions, then shoot at various places on the vertical black line. If the windage adjustment is correct, you will be able to “draw” a line of holes along the black line. If not, then start all over again.
Going through the stages of horizontal zeroing
CALCULATING THE HEIGHT OF THE SIGHT ABOVE THE BARREL
- We measure the diameter of the sight body of the output lens “A”.
- We measure the diameter of the barrel in the place above which the sight body of the output lens “B” is located.
- We measure the distance between the output lens body and the barrel in the place where the barrel diameter “B” was measured, this will be the value “H”.
- We carry out a mathematical calculation: (A+B)/2 + N
Correction using the front sight
How to pre-adjust an optical sight using a front sight? The procedure largely depends on the correct positioning of the open sighting device. The front sight must be positioned as evenly as possible, and not be shifted to the side or distorted.
In order for the adjustment of the optical sight using the front sight to show the maximum result, it is necessary to use the central axis of the barrel as a reference. We match the aiming bar with it, after which the bullets will fly to almost the same point as when using an open sight.