Share the news with your friends
All mines of the PMN line are anti-personnel high-explosive push-action mines. Designed to destroy and incapacitate enemy personnel. A person is injured due to the destruction of the lower part of the leg (foot, lower leg) when a mine charge explodes at the moment the foot steps on the pressure cover of the mine. Usually, when a mine explodes, the foot of the leg with which the enemy soldier stepped on the mine is completely torn off, and, depending on the distance, damage to the second leg from the explosion site can be sustained, it can also be significantly damaged or not damaged at all, but despite this , the fatality rate for someone who steps on this “beauty” is very high. The fact is that, in addition, the shock wave of a sufficiently large explosive charge deprives a person of consciousness; the high temperature of explosive gases can cause significant burns to the lower extremities. Death can occur from painful shock or blood loss if first aid is not provided in a timely manner.
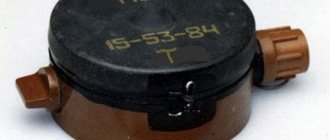
PMN mine
Unofficially, the PMN mine received the nickname “black widow”. There is no exact information why this mine was dubbed the “black widow”. Most likely, because of the black color of the rubber cover, and maybe because the person who steps on it has little chance of surviving. But most likely - because of that irrational fear of mines, which covers even experienced fighters who have been “fired at”, paralyzes their will, deprives them of courage and the ability to move forward.
Anti-personnel mine PMN (training)
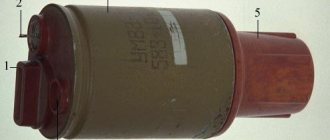
Anti-personnel mine PMN, bottom view
The PMN mine was born in the USSR back in 1949 and was adopted by the Soviet Army in 1950. Just like the famous Kalashnikov assault rifle, the PMN anti-personnel mine was and is being produced under licenses and without licenses in many countries around the world: in China it is produced under the designation Type 58, in Bulgaria - PMN, in Hungary - Gyata 64, in Argentina - FMK- 1, as well as in Iraq, Iran, Pakistan, India, Cuba and other countries.
This mine was first discussed during the Vietnam War of 1964–1975. Along with the fighting, “black widows” also spread through the jungle: Vietnam, Cambodia, Laos and Thailand. In 1967, the “widows” reached the Middle East, where they were actively used by Egyptian and Syrian troops. Thousands of them were installed during the Soviet-Afghan war from 1979 to 1989. This mine could be found in any country affected by armed conflict in the second half of the last century. It was this mine that deprived the bastard Shamil Basayev of his legs when he and his terrorist henchmen were breaking out of Grozny in January 2000.
In recent history, according to unofficial data, these mines were also used during the 2011 war in Libya and are currently being used during the civil war in Syria.
Main tactical and technical characteristics of the PMN anti-personnel mine
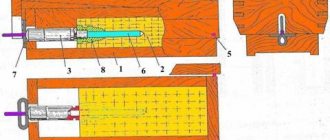
Device
Anti-personnel mine PMN cross-section
The mine consists of
1) Housing. 2) Explosive charge (explosive) 3) Pressure device (lid). 4) Trigger mechanism. 5) Impact mechanism. 6) MD-9 fuse.
The body of the mine is plastic, inside it there are two channels: vertical and horizontal.
The explosive charge is a special TNT block fixed in the body with varnish.
The pressing device (cover) of the mine consists of a rubber cap and a plastic shield. The rubber cap is placed on the body and secured to it with a metal tape.
The trigger mechanism is mounted in the vertical channel of the housing and consists of a plastic rod, a spring and a split ring. The rod has a window with a lug. When a mine is triggered, a striker passes through the window. The combat ledge holds the firing pin on the combat cock after cutting the metal element. In the assembled mine, the rod is pressed upward by a spring towards the split ring.
The impact mechanism is located in the horizontal channel of the housing. It is assembled into a separate unit and has a temporary fuse. The impact mechanism consists of a bushing, a striker with a cutter in the form of a loop of steel string, secured with an insert, a metal element mainspring, a safety pin with a ring, a cap with a rubber gasket that seals the junction of the impact mechanism with the mine body.
PMN mines manufactured before 1965 have a different cutter design. It is made in the form of a piece of steel string fixed in a metal frame at the end of the striker rod.
In the assembled striker mechanism, the mainspring is compressed, the striker rod passes through the bushing and is held in it by a safety pin. The metal element is placed in the groove of the sleeve in the cutter loop.
Impact mechanism of the PMN anti-personnel mine
The MD-9 fuse is located in the horizontal channel of the housing on the side opposite to the striking mechanism. The fuse consists of a plastic sleeve, a tetryl block weighing 6.5 g and an M-1 impaling detonator cap fixed in a socket, the block on varnish. The tetryl block acts as a transfer charge. The MD-9 fuse is secured in the mine with a plug with a rubber gasket.
Preparation and installation of the PMN mine
To prepare a mine for installation you must:
- Unscrew the cap from the impact mechanism bushing and check the serviceability and presence of the metal element.
- Screw the cap back on.
- Unscrew the plug.
- Install the MD-9 fuse into the mine and screw the plug all the way. The preparation of mines can be carried out in a sheltered place immediately before going out for mining. Prepared mines (equipped with MD-9 fuses) are transported to the installation site in duffel bags.
In summer conditions (when the ground is thawed), mines are installed in the ground with the lid raised 1-2 cm above the ground surface and masked with local material (grass, leaves, soil, etc.). In winter (if there is loose snow cover), mines are placed in the snow, masked with a layer of 3-5 cm of snow.
Mines are installed in hard compacted snow (ice) in the same way as in the ground. In case of frozen and very hard (rocky) soil, mines are installed on the surface of the ground and masked with local materials.
To install a mine in the ground or hard, compacted snow, you must:
- dig a hole the size of the mine, 3.5-4 cm deep;
- install the mine in the hole and, holding it with your hand by the cap, without pressing the lid, pull out the safety pin and tighten the cap with your hand;
- disguise the mine.
Installation of a PMN anti-personnel mine in the ground or compacted snow
Installing a mine in loose snow is done as follows:
- a depression of 8-10 cm is made in the snow near the installation site;
- pull out the safety pin without pressing on the mine cover and tighten the cap by hand;
- holding the cap, place the mine under the snow, through the side wall of the recess without disturbing the layer of snow above the mine;
- to disguise the depression in the snow through which the mine was installed, without disturbing the snow cover around the mine.
Installing a PMN anti-personnel mine in loose snow
Along with all its advantages, the PMN also had a very significant drawback: the time it took to bring this mine into the firing position was very dependent on the ambient temperature: if at a temperature of +40°C the mine is transferred to the firing position in 2–3 minutes, then at t –40° This takes on average up to 2.5 days - the cold sharply increases the resistance of the metal of the safety plate to cutting.
Fragmentation anti-personnel mines: device, methods of use
Fragmentation mines are activated both through direct action on the network of tripwires around the installed ammunition, and remotely using a radio fuse. Mines vary in their effect.
POMZ-2
The simplest version of fragmentation mines is POMZ-2 and POMZ-2M. This is a cast iron jacket with a ready-made notch, inside which a standard 75 g drill bit is inserted. In the lower part of the body there is a hole for a peg, on top there is a glass for placing an MUV tension fuse with a P-shaped pin.
The principle of operation of the fuse is similar to the action of the UZRGM fuse, but without a moderator. The fuse fires instantly. Currently, POMZ is not produced, but, like PMD, production of casings of this type of ammunition can be launched in a matter of days at any foundry.
MES
The USSR anti-personnel mines of the MON series are the most famous in the modern world; in fact, they are an analogue of the American Claymore, but with Soviet additions. The body is curved to direct the sheaf of fragments in the desired direction; the body has simplified sighting devices and whisker legs for its installation. Depending on the range of damage there are:
- MON-50, destruction range 50 meters (actually 25-30);
- MON-90, a greatly enlarged and inconvenient version of the MON-50;
- MON-100, a directional mine designed to kill at a range of up to 100 meters. But given its mass and size (the basin is 23 centimeters in diameter, weight 5 kg), it is not the miners’ favorite item;
- MON-200, a monster in the mine kingdom, circumference 45 cm, weight 25 kg. Probably no one except the designers of this masterpiece can imagine how to disguise such a basin during installation.
Defeat due to fragments of the hull and ready-made submunitions located in the hull. Two types of striking elements are used - ball-like and roller-like fragments.
Balls – 540, rollers 485 on MON-50. It is installed with the curved part towards the enemy. Mines of this series can be installed using a radio fuse, or use conventional pull-action fuses.
OZM-72 or simply “Witch”
Fragmentation barrage mine, this is what this abbreviation stands for. When detonated, the ready-made submunitions make a noise similar to a whistle, hence the name. This ammunition was developed on the basis of German springmines or simply “frogs”.
When the fuse is triggered, the expelling charge is detonated first, the body flies up to a height of 1.5 meters above the ground, and only after that the main charge is triggered. A hail of shrapnel is falling all around; the OZM body contains 2,400 ready-made submunitions. OZM-4 is an earlier version of OZM-72, currently not produced.
Characteristics of OZM-72 and OZM-4
| Characteristics | OZM-72 | OZM-4 |
| frame | Steel, ready-made submunitions | Cast iron |
| Weight, kg | 5 | 5,4 |
| Explosive mass, g | 660 | 170 |
| Target sensor | Tensioner, all range | Tensioner, all range |
| Damage radius | 25 | 12 |
Enlarged versions OZM-160 and OZM-152 are also known, which are used in a controlled version. The warheads of these ammunition are 152 mm OFZ and 160 mm mortar mines.
Manual installation of this type of anti-personnel mines is extremely time-consuming, since placing them requires digging a well of decent depth.
Mine PMN-2
By the second half of the 60s of the last century, the PMN-2 mine was adopted by the Soviet army.
It differed from the PMN in that instead of a cut metal element, a rubber bellows was installed in it, in other words, a short rubber corrugated tube, which was in a compressed state in the safety position.
In the language of miners, such devices are called “long-range cocking mechanisms.” By pulling out the safety brace, the miner released the bellows, which began to fill with air through calibrated holes and straighten out. At the same time, at the end of its straightening, the bellows released a spring-loaded engine with a detonator, which stood opposite the striker.
The PMN-2 mine, in addition to the fact that the time it took to bring it into combat position was incomparably less dependent on temperature (under all conditions from 2 to 10 minutes), had another valuable property - it was always ready for work. The only operation that the miner performed was to turn and pull out the safety bracket.
Anti-personnel mine PMN-2 (training)
Main tactical and technical characteristics of the PMN-2 anti-personnel mine
PMN-2 device
The PMN-2 mine consists of:
1) Housings. 2) Charge. 3) Pressure sensor. 4) Built-in fuse with a pneumatic long-range cocking mechanism.
The body of the mine is plastic, has cavities for accommodating the charge and the long-range cocking mechanism, one vertical and two horizontal channels for accommodating the fuse mechanisms. The top of the case is closed with a lid.
The charge (TG-40) has an additional detonator (Tetryl (trinitrophenylmethylnitroamine)) weighing 4.5 grams.
The pressure sensor consists of a spring-loaded rod placed in the vertical channel of the housing and a cross resting on it, closed by a rubber cap secured on top of the housing with a union nut.
Operating principle of PMN-2
The built-in safety type fuse ensures that the fire chain of the mine is broken in the transport position, cocked into the firing position by decelerating for 30-300 seconds, and the mine charge explodes when it is pressed into the firing position.
The fuse consists of a pneumatic long-range cocking mechanism, a spring-loaded engine with a detonator cap, and a firing pin with a mainspring.
The long-range cocking mechanism consists of a bellows spring-loaded bushing with a diaphragm. The bushing with its tooth holds the engine in the transport position. In the transport position, the detonator capsule is moved away from the firing pin and the additional detonator, the bellows is filled with air. The bushing is moved to the lower position, compresses the spring and is held in this position by a rod connected by a lock to a safety pin, which is secured with a shear pin.
The firing pin compresses the mainspring, passes through the hole in the rod and is held cocked by the engine. When the safety pin is turned, the shear pin is cut off, and when the safety pin is pulled out, the rod moves, releasing the bushing.
In this case, the sleeve rises upward under the action of the spring.
The bellows is compressed and the air is squeezed out of it through the hole in the diaphragm. After 30-300 seconds, the bushing tooth releases the engine, which, under the action of a spring, moves into the firing position and is held by the protrusion of the rod. The detonator cap is still retracted from the firing pin.
When you press the mine, the crosspiece presses on the rod. The rod lowers and releases the engine. The engine, under the action of a spring, moves forward and closes the fire chain. The detonator cap is an additional detonator. The firing pin, under the action of the mainspring, punctures the detonator cap, which explodes in a chain reaction, causing the explosion of an additional detonator and a mine charge.
The procedure for installing the PMN-2 mine
PMN-2 mines are installed:
- in summer - in the ground or on the ground with camouflage with soil or vegetation;
- in winter - on the surface of the ground or in the snow with camouflage with snow.
Mines are installed in hard compacted snow in the same way as in the ground.
To install a mine in the ground manually you must:
- dig a hole along the diameter of the mine with a depth of 3-4 cm;
- place a mine in the hole;
- turn the safety pin and pull it out of the mine;
- disguise the mine.
In winter, with snow cover up to 10 cm, the mine is installed on the ground surface. When the snow cover is more than 10 cm, the mine is installed in the snow. Through a hole pressed into the snow with a foot, after removing the safety pin, the mine is slipped under the snow so that the camouflage layer of snow above the mine is no more than 5 cm. The hole is camouflaged with loose snow.
Installation of the PMN-2 mine: a - into the ground; b - in snow on the ground surface with snow cover up to 10 cm; c - on the ground surface; d - in snow with snow cover of more than 10 cm.
Compared to its predecessor, PMN-2 turned out to be much more complex to manufacture, and therefore significantly more expensive to produce. She was not particularly popular. While PMN is widely known throughout the world, PMN-2 has been used to a limited extent, mainly in Afghanistan and some other countries.
Mine PMN-3
By the end of the 70s of the last century, the PMN-2 mine no longer met the needs of the military. The maneuverable nature of modern wars and their short duration led to the fact that troops were often hindered by their own minefields. In addition, after the end of hostilities, minefields had to be cleared, which took a lot of resources and time.
It was required that after a certain time, anti-personnel mines either became harmless or self-destructed. Therefore, the PMN-3 mine was developed, which did not differ in appearance from the PMN-2, but had an electronic fuse, which ensured reliable operation of the mine under the soldier’s foot, eliminating the explosion of the mine from the impact of a shock wave on it when detonating mine clearance charges (due to the difference in duration pressure on the mine from the shock wave and legs) and automatically exploded the mine after a specified period.
You can set the counter in advance for a period of 0.5 to 8 days, after which the mine explodes without causing harm to anyone. Knowing the combat operation time of the minefield, the unit commanders were confident that by the right time this minefield would no longer exist.
The PMN-3 mine is designed for constructing anti-personnel barriers that self-destruct at a given time, as well as for constructing booby traps and delayed-action mines.
Anti-personnel mine PMN-3
Main tactical and technical characteristics of the PMN-3 anti-personnel mine
The device is fundamental
The PMN-3 mine consists of:
1) Cases with a built-in electromechanical fuse. 2) Explosive charge. 3) Source of electric current.
The basic design of the PMN-3 anti-personnel mine
The mine body is plastic. It has a socket (4) for a current source (15) and a compartment with a removable cover (20) for an explosive charge (28).
Removing the cover from the compartment is done using green nylon tape. There is a light indicator on the side surface of the case. Next to the self-destruction time switch handle there is a marking of the mine’s self-destruction time, and on the side of the base of the mine there is a current source circuit with “+” and “-” signs.
The built-in electromechanical fuse consists of a switching unit with a safety pin, a pressure target sensor closed with a rubber cap, a non-removable element (inclined target sensor), an electronic unit with a light indicator of the time switch, self-destruction and a safety actuator (PIM).
The switching unit consists of a spring-loaded rod with a plate and contacts. In the transport position of the mine, the rod is held by a safety pin installed in the slot of the rod. For easy removal of the receipt, it is equipped with a red nylon ribbon.
The target pressure sensor consists of a spring-loaded cross with a screw and a contact.
The rubber cap covering the crosspiece is secured on top of the mine body with a lid and a cap nut.
An inclined target sensor (ball contact) ensures that the mine is triggered when it is tilted at an angle of more than 90°.
The electronic unit is a printed circuit board with radio elements placed on it and performs the functions of a long-range cocking mechanism, an indication unit, a non-neutralization device, an actuator and a self-destruction mechanism. It provides the time for long-range cocking and transfer of the mine to the firing position, as well as its activation when the power source is removed or at the end of the set self-destruction time.
The indicator light flashes intermittently for 4.5±1.5 minutes after removing the safety pin to indicate the connection of the current source and the serviceability of the electronic unit.
The self-destruction time switch allows you to turn the knob to set one of five positions for the mine’s self-destruction time (0.5; 1; 2; 4; 8 days).
The safety-actuator mechanism is a two-ignition safety type, electric igniters (EV-1) and (EV-2) type NH-PCh-A, engine, contacts, firing pin and detonator cap 21 (MG-8T). In the transport position of the mine, the engine, restrained from moving by the shear pin, ensures that the fire chain of the mine is broken. When the EV-1 electric igniter is triggered, the engine moves, cuts the pin and closes the contacts of the EV-2 electric igniter activation circuit.
The EV-2 electric igniter is triggered, the striker pierces the MG-8T detonator cap, which explodes and transfers the detonation to an additional detonator and the explosive charge of the mine.
The charge is made of compressed explosive A-1X-1 and has an additional detonator made of explosive PETN weighing 1.1 g. The source of electric current is placed in a special socket, which is closed with a plug.
Operating principle
When the safety pin of the switching unit is removed, the current source is connected to the display unit and the long-range cocking mechanism, the indicator light begins to glow intermittently and glows for 4.5 ± 1.5 minutes, and then goes out.
At the end of the long-range cocking time (8.5±1.5 minutes after removing the safety pin), the current source is connected to the self-destruction mechanism, the actuator and the non-neutralization device. The mine goes into combat position.
When the push target sensor (when stepping on a mine) or the inclined target sensor (when the mine is tilted at an angle of more than 90°) is acted upon, the actuator, the safety actuator, and the mine charge explode. A mine explosion also occurs when the non-neutralization device is triggered during an attempt to neutralize the mine by removing the current source or the self-destruction mechanism is triggered at the end of the set self-destruction time.
The procedure for installing the PMN-3 mine
PMN-3 mines are installed manually:
- in summer - into the ground with a masking layer of soil up to 2 cm thick or on the ground with a masking of vegetation;
- in winter - on the surface of the ground or in the snow with camouflage with snow. Mines are installed in hard compacted snow in the same way as in the ground.
Before installation you must:
- open the package;
- inspect the mine and make sure there is a safety pin, check for mechanical damage on the mine body;
- set the self-destruct time switch to the required position;
- check and install an electric current source into the mine.
To check and install the current source you must:
- connect a 1.6 kOhm resistor and a voltmeter in parallel with the current source, and the voltage shown by the device must be at least 8.75 V;
- if the voltage is less than 8.75 V, short-circuit the positive and negative terminals of the current source once or twice (no more than 1 s);
- Check the battery voltage again, if it is less than 8.75 V, replace the battery; unscrew the plug of the socket for the current source;
- insert a current source into the socket, as shown on the base of the mine body;
- screw in the plug.
Place a mine in the ground for:
- dig a hole with the diameter of the mine and a depth of 3-4 cm;
- Use green tape to remove the cover from the charging compartment;
- holding the mine with one hand and pointing it with the charge compartment away from you, remove the safety pin;
- by the intermittent glow of the indicator light, make sure that the mine is in working order;
- install a charge in the mine and close the compartment with a lid;
- place the mine in the hole with the pressure sensor facing up;
- disguise the mine and no later than 3 minutes after removing the safety pin, leave the mine installation site.
In winter, with snow cover up to 10 cm, the mine is placed on the ground surface. If the snow cover is more than 10 cm, the mine is placed in the snow so that the camouflage layer of snow above the mine is no more than 5 cm. After installing the mine, the safety pin is handed over to the commander.
Anti-personnel mines of the Russian army
POM-2
Cluster mounted anti-personnel fragmentation mine, also used for manual deployment. The device is similar to the OZM; it also has an expelling charge. Staging is carried out from cassettes, stabilization in flight is carried out due to perforated stabilizer flaps.
Manual installation only POM-2R. The weight of the mine is 1.5 kg, the mass of explosives is 140 grams, it can be damaged by fragments of a metal body and two types of ready-made submunitions. Similar to MON-50.
FOB, replacement for “The Witch”
To replace the OZM-72, a new anti-personnel fragmentation munition was developed, an analogue of the American M86, which seems to be not a mine.
The steel of the body was replaced with plastic, the damaging elements were in the form of flat rings with teeth stacked in the body around the explosive charge.
The expelling charge was transferred, this ensured a vertical position of the hull when rising above the ground. The lifting height was significantly reduced to 0.4-0.6 meters. The weight of the FOB is 2.3 kg, the mass of the explosive is 510 g.
Surprise mines type MS and ML
Mines designed specifically for catching sappers and curious people. All types of fuses are used. Contact, non-contact, vibration and electric induction triggered by the mine detector.
Mine ML-7
Used to install sapper ammunition in the “non-removable” position. The weight is only 100 grams, with a charge weight of 40. The type of target sensor is unloading, in other words, to trigger it, it is enough to remove a load weighing at least 300 grams from the sensor.
Using surprises is quite simple; under the body of an OZM or TM-57 it is enough to put a cocked ML-7, after the long-range cocking time has expired, the fuse is cocked and when the load is removed from the target sensor there will be an explosion, from which the mine being removed will most likely detonate .
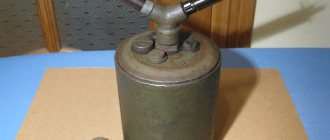
MS-5, cigarette case mine
One of the rare booby traps that imitates a specific object. Weight 660 g, explosive weight – 110 g. Unloading type target sensor, reaction to opening a cigarette case or opening its lid.
ML-2 or MS-6M, sapper trap
Mines of this type have a fuse that reacts to the operation of the electromagnetic inductor of the metal detector, no further than 30 cm. The second version is MS-6Shch, with a contact target sensor. Weight 4.4 kg, with electric induction fuse 8.4 kg. Explosive mass – 1.2 kg.
It is used for organizing mine protection of strongholds and for mining anti-tank minefields that are of particular importance. There is only one option to combat this type of mines. Do not pick up anything from the ground, even a box of matches or an empty magazine.
When clearing mines, assume that all mines, including OZM, are set to “non-removable” by default. Tank minefields can be opened by trawls or by using mine clearance systems, although the latter no longer depends on us.
Mine PMN-4
The PMN-4 mine is the latest in the line of PMN models. It visually differs from previous models in its noticeably smaller overall dimensions and design.
Anti-personnel mine PMS-4 (training)
Main tactical and technical characteristics of the PMN-4 anti-personnel mine
Device
The mine arrives at the troops, is stored and transported in its final equipped form. Comprises:
1) Housing. 2) Explosive charge (TNT). 3) Built-in fuse.
The housing is sealed, cylindrical plastic, and has cavities to accommodate the explosive charge and fuse mechanisms. The top of the housing is closed with a rubber cap, which is attached to it using a steel clamp.
The explosive charge is a ring pressed TNT block placed in a housing socket under the lid.
The built-in fuse consists of a pressure target sensor, a long-range cocking mechanism, a safety-actuating mechanism and a pin. The fuse ensures the rupture of the fire chain in the transport position, cocking and detonation of the mine when exposed to the target sensor.
1 - body; 2 — rubber cap; 3 - explosive charge; 4 - rod; 5 and 7 — springs; 6 — cross; 8 and 9 — MDV rods; 10 - rubber; 11 — PIM bushing; 12 — check cover; 13 - cord; 14 - cover
The target pressure sensor consists of a rod (4), a spring (5) and a cross (6).
The long-range cocking mechanism (DCM) consists of two rods (8 and 9), a spring (7) and rubber (10), placed in a cylindrical body.
The safety-actuating mechanism (PIM) consists of a slider (3) with a KD-N-10 detonator cap (4), a spring (2), a stop bracket (1), a bracket (6) and a striker (5) with a spring. In the transport position, the detonator capsule is offset relative to the axis of the firing pin (5) and the detonator (7).
The detonator is a block of PETN (tetranitropentaerythritol, pentrite) weighing 3 g, pressed into a cap with a cup.
The pin is a flexible metal cord (11) connected to a pin cover (10), which is placed on the body of the mine. The rope is wound on the PIM bushing. In 1989–1990 mines were made with a bracket (1) (Fig. below), which was attached to the body of the mine.
Anti-personnel mine PMN-4 model 1989-1990 : 1 - bracket; 2 — steel clamp; 3 — rubber cap
Operating principle
The mine is transferred from the transport position to the combat position after the pin is pulled out. When the pin is pulled out, the bushing rotates and moves, releasing the MDV rods.
The MDV rods rise under the action of a spring, and rubber flows through the annular gap of the piston from the upper to the lower cavity.
The engine with the KD-N-10 detonator capsule, under the action of a spring, turns the stop and takes a position on the same axis with the firing pin and the detonator. The firing pin is held by the protrusion of the target sensor rod. The mine has been placed in combat position.
When the crosspiece of the target sensor is acted upon, the rod rises and releases the firing pin, which, under the action of a spring, moves and punctures the detonator capsule. There is an explosion of the detonator capsule, detonator and explosive charge.
Transport and combat position of the main parts of the PMN-4 mine
1 — bracket-stop; 2 - spring; 3 — engine; 4 — detonator capsule; 5 - drummer; 6 — emphasis; 7 — detonator; 8 — rod protrusion; 9 — cross; 10 — check cover; 11 - cord; 12 — explosive charge; 13 — rod
Installation
The mine is installed:
- to the ground surface;
- into the ground with a camouflage layer of 2 cm;
- in snow with a camouflage layer of snow of 20 cm;
- on fords up to 50 cm deep
Before installing the mine, it is necessary to check for mechanical damage and the presence of a pin.
To install a mine in the ground manually, you must:
- dig a hole 3-3.5 cm deep;
- place a mine in the hole;
- holding the mine with one hand by the side surface, and with the other, remove it from the latches and lift the pin cover;
- remove the check cover along with the cord;
- camouflage the mine and its installation site;
- hand over the cover check to the squad commander.
In areas with vegetation that provides camouflage, the mine can be installed on the ground surface.
In winter conditions, with a snow depth of up to 20 cm, the mine is installed on the ground, and in greater depths - on compacted snow:
The markings on the mines and packaging are made with black indelible paint.
On the lower end surface of the mine are marked:
- mine index;
- symbol of the manufacturer;
- batch number and year of manufacture.
An additional red stripe is applied to the lower end surface of the combat mine.