General instructions
59. Shooting from a machine gun consists of performing the following techniques: preparing to fire (assuming a position for shooting, loading and installing the sight), firing and stopping fire (temporarily suspending shooting and changing the magazine).
60. The machine gunner fires at the commands of the commander or independently.
61. Shooting from a machine gun is carried out from a prone position, from a kneeling position, sitting and standing, from the hand, from a rest and on the move.
62. To load the machine gun, the command “Load” is given. On this command, the machine gunner loads the machine gun in the position in which the team found him.
If necessary, the firing position can be indicated before the "Load" command.
In a combat situation, the machine gun must be loaded in advance.
63. To open and conduct fire, a fire task is set or a command is given, which indicates the target, sight, aiming point (if necessary) and type of fire.
To open a single fire, the commander gives a command, for example: “Landmark 2 - a pile of stones, closer than 50 - a trench, along the loopholes, 10, single - fire.”
“Right on the arable land there is a trench, in the left corner there is a periscope, on the periscope, 20, single, 2 rounds - fire.”
To open automatic fire, the commander gives a command, for example: “Landmark 3 - dry tree, two fingers to the right in the bushes - a machine gun, on the machine gun, 20, two short ones - fire.”
“Right across the dash, 20, in the chest, short - fire.”
“At the attackers, long ones - fire.”
When firing in volleys on the command “Fire”, the machine gunner fires one short burst.
To temporarily stop firing, the command “Stop” is given, and for a complete ceasefire - “Unload”.
The machine gunner must perform all techniques quickly, without stopping observation of the target, with the exception of the time required to install the sight on a machine gun with a sector sight.
64. Each machine gunner, guided by the basic rules set out below for preparing for shooting, must, depending on his individual characteristics, develop the most advantageous and stable shooting position for himself, while achieving a uniform position of the butt in the shoulder.
Getting ready to fire
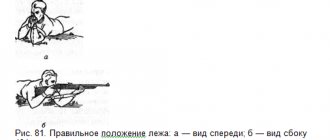
65. To fire from a machine gun while lying down you need to:
1. Throwing the belt off your shoulder (from your neck) and holding the machine gun with your right hand by the neck of the stock, with the muzzle forward and up, take a step with your right foot forward and slightly to the right.
2. While tilting the gun towards the target, quickly lower yourself to your left knee, then, successively leaning on the ground with the palm of your left hand and elbow, lie on your left side and elbow of your left hand.
3. Place the machine gun on the palm of your left hand at gunpoint and lower the butt to the ground.
4. Lie flat on the ground, legs spread slightly to the sides, toes facing out. If you have to immediately open fire, then move the safety to the right, set the translator to the desired type of fire, then with your right hand, pull the handle back to full stop and grab the neck of the butt with it, putting your index finger into the trigger guard, and clasping the neck with the rest of your fingers; hold the machine gun in your left hand, lowering the butt and magazine body to the ground (Fig. 59).
Rice. 59. Prone position
66. To install the sight, turn the rear sight with your right hand to the required setting, and with a sector sight, squeeze the clamp latch with your fingers and move it to the appropriate division.
Shooting production
67. To apply the butt, without losing sight of the target, you need to firmly rest the butt against your shoulder, at the same time tilt your head a little forward, without straining your neck, put your right cheek on the butt; With your left hand, support the machine gun in your palm. from below between the magazine and the trigger guard (Fig. 60) or under the magazine (Fig. 61); With your right hand, without tension, grasp the neck of the butt and place your index finger with the first joint on the trigger.
Rice. 60. Position of the left hand when shooting prone
Rice. 61. Left hand under the magazine on the rest
68. When aiming, close your left eye and look through the slot at the front sight with your right eye so that the front sight is in the middle of the slot, and its top is level with the upper edges; in this position, point the machine gun at the aiming point, while simultaneously pressing the trigger.
69. When firing single-handedly, release the trigger after each shot.
70. When firing in bursts, hold the butt firmly in the shoulder with your right hand. After each burst, pause briefly in shooting to check your aim.
Stop shooting
71. The cessation of shooting can be temporary or complete. In the first case, if a change in the shooting location is not expected, put the bolt on the safety in the rear position, for which: move the bolt handle a little back so that the safety is positioned against the cutout on the cover of the bolt box, after which move the safety to the left; by shaking the handle, check the tightness of the fuse. If a change in shooting location is expected, you need to. put the bolt on safety in the forward position, for which: pressing the magazine latch with your left hand, move the magazine away from the bolt box with your right hand by approximately the thickness of the cartridge; pressing the trigger with the finger of your left hand and at the same time holding the handle with your right hand, smoothly send the bolt forward, then put the bolt on the safety in the forward position and push the magazine under the latch.
72. For a complete ceasefire: place the sight on a permanent installation and separate the magazine; smoothly move the bolt forward and put it on safety; unload the magazine, remove the cartridges removed from it and attach the magazine to the machine gun.
Shooting positions
Shooting positions, with a certain degree of convention, can be divided into three groups - standing, kneeling and prone.
Standing shooting positions
The first group is standing shooting positions. For close combat this is the most applicable position. They allow you to quickly move and change positions. The downside is that a standing shooter makes a good target. There are few shelters that allow you to be in this position.
Gun
Existing standing pistol shooting positions can be divided into one-handed and two-handed shooting positions.
A sports stance for pistol shooting requires rigidly securing the joints, relaxing the muscles and accurately aiming the weapon at the target. The shooter stands sideways to the target, raises his hand with the pistol and points it at the target. The other hand is freely lowered or placed behind the back. This position allows you to make an accurate shot, because the distance from the pupil to the rear sight is greatest and the rear sight and front sight are visible quite sharply, this makes aiming the most accurate. Aiming in this position is affected by all sorts of stimuli, from elementary tremor to sharp gusts of wind. In addition, the sideways position, although it reduces the area of the shooter’s figure, makes him more vulnerable to enemy bullets. The following stance will be more practical for close combat. The shooter stands in the basic hand-to-hand combat stance, the pistol is held with one hand in line with the eyes, the arm is slightly bent at the elbow.
In such a stance, there is no need to change body position to transfer a weapon from the left hand to the right. It is also easy to assume a two-handed shooting position. The ability to shoot with both the left and right hand is important when taking an advantageous position. For example, when firing through a doorway or from around the corner of a building. If the shooting space is on the left, then the greatest protection is provided by a left-sided stance, and vice versa, if the space is on the right - a right-sided stance.
The two-handed shooting position has several options. If you need to quickly move after shooting, a left- or right-handed stance is suitable for this. It is accepted as follows: in the basic stance, the shooter moves his right leg forward approximately the length of the leg from toe to knee and the width from the hand to the bent elbow. From this stance it is easy to move into the position for shooting from the knee and prone.
When there is less opportunity for movement, but there is a need to transfer fire along the front, a frontal stance is preferable. To accept it, the shooter takes a basic stance and takes the weapon with a two-handed shooting grip at eye level.
Machine
In the classic position, the shooter stands sideways to the direction of fire, the legs, slightly bent at the knees, are rigidly fixed with muscles that are equally tense. The torso bends slightly back at the lower back and turns in the direction of shooting. The hip joints are rigidly fixed. The left hand, supporting the weapon, rests on the ribs of the left side, its elbow rests on the iliac crest of the pelvic bone or on an element of equipment (pouch, waist pouch, special roller, etc.). The right hand grips the pistol grip tightly without unnecessary tension. It is better to lower your elbow along your right side. This position reduces the size of the shooter. The shoulders are slightly raised so that the sights are at the level of the head, without excessively tilting it. The butt of the weapon rests comfortably on the shoulder socket (if the shooter is not wearing special equipment such as body armor, rigid unloading, etc.). The cheek touches the butt or is near it. In this position, it is difficult to transfer fire to large angles, especially to the left (for a left-sided stance), since the body already has a slight bend to the left side, and the left leg is moved forward. It is also difficult to quickly move in any direction from this position. All this limits the use of this stance in close combat. Another option for shooting while standing is more practical.
To assume the position, you must stand in a right-sided (left-sided) stance. The position of the legs and torso is identical to the position in hand-to-hand combat. The butt is pressed to the shoulder. The left hand holds the weapon by the forend or a special handle, the right hand clasps the pistol grip. In this position, aiming at the target is faster, although with less accuracy. Fire can be transferred to larger angles and at higher speeds. When shooting, you can look with both eyes, left or right, depending on the situation. Taking into account the distance to the target, the shooter can make precise aiming when vision is concentrated on the front sight, medium when the situation is clearly visible and the front sight is blurry, and fast when the direction of the weapon is controlled by peripheral vision in the direction of the barrel.
Kneeling Positions
Gun
When taking a kneeling position, the shooter sits on the heel of the right (left) leg, with most of the weight distributed between the knee and the heel of this leg. The legs are at an angle close to 90. When shooting from a pistol, the position of the hands can be the same as when shooting while standing. This position allows you to quickly aim the weapon at the target and transfer fire. A position is also possible when the left (right) hand rests on the knee with the hole behind the elbow, and the palm supports the pistol grip from below. The right (left) hand is straightened at the elbow and holds the pistol with a normal grip.
Machine
When shooting from a long-barreled weapon, the left (right) hand holds the weapon by the fore-end or a special handle, resting the ulnar fossa on the knee, while changing the position of the leg in front, you can change the position of the weapon in height. The right (left) hand holds the pistol grip in the same way as when shooting while standing. As when shooting standing, the butt rests on the shoulder.
When the shooting distance is short, the weapon can be held as if shooting standing (without support on the knee). If cover allows, the shooter does without resting the gluteal muscle on the heel, straightening the back leg at the level of the pelvis. In this position, the possibility of maneuvering fire, changing shooting positions and moving behind another cover increases significantly.
Prone shooting positions
Shooting prone makes the shooter a small target and allows for the greatest stability of the weapon.
Gun
When shooting a pistol while lying on his stomach, the shooter can hold the weapon with either two hands or one. When holding with both hands, the shooter rests his elbows on the surface, aligning the sighting device with the eyes and the target on the same line. When holding a weapon with one hand, the free hand rests with the forearm on the surface, and the hand with the weapon may or may not rest with the elbow on the surface, depending on the conditions. It is important to note that when gripping with two hands or one with the elbow resting on the surface, it is significantly more difficult to transfer fire to large angles, and it is impossible to do it quickly at all. In such cases, shooting with one hand is applicable. The fire can be transferred much faster, but the position itself is very uncomfortable due to the tension in the muscles of the arm and shoulder girdle. To carry out the transfer of fire and avoid an awkward body position, it is advisable to roll onto the appropriate side.
Lying on your side with a pistol is characterized by a horizontally rotated position of the sighting devices. The neck muscles also receive additional tension.
The supine position allows you to fire towards your legs. In this position, the legs are slightly spread and bent. The body and head are raised to an amount that allows visual control of the weapon and the target. It is more convenient to hold the weapon with a two-handed grip. When shooting from this position, you must watch your legs so that when transferring fire they do not fall under the trajectory of the bullet.
Lying on your back you can also fire towards the head. To do this, you need to tilt your head back as much as possible, move your hands holding the weapon behind your head so that your eyes - sighting devices - target are on the same line.
Machine
You can fire from a long-barreled weapon lying on your stomach, side or back. Taking into account the characteristics of the weapon and its grip, the shooting positions differ from pistol positions.
The most common position is for the shooter to lie on his stomach. The weapon rests with the butt against the shoulder socket (in the absence of protective equipment on the arrow), while it is turned at a small angle to the left relative to the axis of the spine. The left leg is slightly moved to the side. Both feet touch the ground with their heels (the latter is not at all necessary). The shoulders are slightly raised and at the same level. The left hand holds the weapon by the fore-end, which rests on its palm, or by a special handle. The elbow rests on the surface, creating a support for holding the weapon, and is under the weapon or as close as possible to this place. The right hand also rests the elbow on the surface. Its fulcrum depends on the length of the shooter's arms. The right hand completely covers the pistol grip. This is the most common position in the army.
The position is applicable both for long-range shooting and for close combat. In this position, as for short-barreled weapons, there is a problem of quickly transferring fire to large angles, the need for which may arise in close combat. You can't grab a long gun like a pistol from one hand to the other. It involves the use of two hands. The only possible way to transfer fire is for the shooter to change the position on his stomach to the position on his side.
When shooting lying on the left side, the weapon also rests with the butt on the shoulder. The left arm rests on the surface from shoulder to elbow, the hand holds the forend or a special handle, slightly shifting the fulcrum, which is located on the palm and side of the forend or handle. The sights are rotated 90° relative to their normal position. When shooting at long ranges, a special correction is required, which can be ignored in close combat conditions. The legs remain as if lying on the stomach, only they turn in the appropriate direction and touch the surface, the upper one with the inner edge of the foot, and the lower one with the outer edge. In this position, fire transfer is good. To transfer fire to small angles, it is enough to change the position of the forearm of the hand holding the forearm. If a high angle carry is required, the shooter moves the entire arm, changing the angle of the hand support surface.
It is also possible for the shooter to be positioned on his side, with the weapon resting on his lower shoulder. When resting on the right shoulder, this position is on the right side. In this case, the shooter with his left hand holds the weapon by the fore-end or a special handle, adjusting the direction of the target with the position of the hand and the bend of the elbow. The right hand holds the pistol grip and touches the surface with the outside, creating additional support. In this position it is also easy to carry out the transfer of fire, with the exception of the position when the weapon is directed towards the legs at an acute angle. In this case, it is uncomfortable for the right hand to hold the pistol grip. This position is used for shooting through low holes or shelters that have an acute angle to the surface (tank tracks, etc.).
The supine shooting position is handled as follows: the shooter lies on his back, placing the main weight on the right side of the gluteal muscle and back. The shoulders are raised, the butt of the weapon rests against the armpit. The head is tilted towards the right shoulder so that the eye, sights and target are in line. The right arm from shoulder to elbow serves as additional support. The hand holds a pistol grip. The palm of the left hand supports the forend, and the hand rests on the inner thigh of the right leg. The legs are spread apart so that the feet do not fall into the possible trajectories of the bullet. The right leg touches the surface of the outside of the foot, and the left leg touches the inside. Transfer of fire in this position is possible only at small angles. But shooting can be carried out with a sufficient degree of accuracy. A quick transfer of fire while lying on your back is possible when the weapon does not rest against the shoulder and is rotated along its axis 90° counterclockwise. The described shooting positions can be changed and modified by the shooter to suit his anatomical and physiological characteristics. With increasing professional skill and increasing practice, the requirements for the certainty of the shooter's posture will decrease. The body at an unconscious level will take a rational position.
Vyacheslav Dmitriev Photo from the author’s archive
Kneeling shooting techniques
73. To shoot from the knee, you need to: remove the machine gun with your right hand, throwing the belt off your shoulder (from your neck), and grab it from below with your left hand; simultaneously step back your right leg, quickly lower yourself to your right knee and sit down on your heel; place your left hand with the machine gun on the thigh of your left leg, and move your right hand to the bolt handle (Fig. 62); load the machine gun, install the sight. Keep the shin of your left leg as straight as possible; The hips of the right and left legs should form an angle slightly less than a straight line.
Rice. 62. Kneeling position
74. To apply from the knee, rest your left elbow on the flesh of your leg or, depending on your build, lower it slightly from your knee; Raise the elbow of your right hand and insert the butt into your shoulder (Fig. 63).
| A | b |
| Rice. 63. Shooting from the knee | Rice. 63. Shooting from the knee |
Stable position of the shooter-weapon system
For successful pistol shooting
— taking the correct and stable position of the shooter is of great importance. When shooting standing from any type of handgun, an important condition for ensuring the stability of the shooter-weapon system is the positioning of the feet.
Getting ready to fire
– this is giving the body a position that ensures maximum stability of the “shooter-weapon” system for making an accurate shot.
To shoot successfully, you must maintain a stable pistol shooting position, which requires a minimum amount of movement.
Rational preparation has a significant impact on shooting results.
When taking the shooting position, it is necessary to control the position of the torso, legs, arms and head. At the initial stage of training, it is sometimes difficult and difficult for a shooter to simultaneously control the position of all parts of the body and weapon.
Universal recommendations for positioning the legs and body position:
- the legs should be positioned at least as wide as possible, regardless of the type of position (“front”; “half-turn”; “sports”, etc.)
- center of gravity on both legs (possibly a slight shift in the center of gravity to the front leg to compensate for recoil)
- The position of the legs should be organized in such a way that the toe of the front leg is in line with the heel of the leg standing behind (these recommendations do not apply to the front stance). Feet parallel to each other
- it is important that the upper shoulder girdle, pelvis and projection of the feet are in the same plane. The shooting position should be natural and, if possible, comfortable for the shooter
At the same time, each student needs to individually, through training, determine for himself the most comfortable and stable position of the legs and torso.
Head and shoulder position
When shooting from a pistol (machine gun), you must keep your head straight, keeping your eyes horizontal.
| Correct head and shoulder position | Incorrect shoulder position | Incorrect head position |
The position of the shooter's head when shooting should provide the best visibility of the target and the sighting device of the pistol.
When looking at a target, the shooter naturally turns his head towards the target. This position of the head creates the best conditions for obtaining visual sensations, since the image of an object is obtained in the area of the macula of the retina of the eyeball without much tension in the eye muscles.
With some rotation of the shooter's body to the left, turning the head towards the target will be inevitable. This rotation should not cause uneven tension in some and relaxation of other neck muscles, as well as tension in the eye muscles; therefore, it should not be large.
The head should not be tilted forward or thrown back.
There are different preparations that can be used for different situations:
Standing with one hand
Leg and body position
Foot placement is the basis for standing shooting.
There are many options for making and holding a pistol (revolver).
At this moment, we will consider the main options for shooting while standing with one hand.
There are three main options for shooting positions while standing with one hand:
"FRONT"
Feet are shoulder-width apart or slightly wider, knees slightly bent, feet turned outward.
The shooter is fully turned towards the target, the shoulder girdle and pelvis are in the same plane.
Center of gravity on both legs.
"Half Turn"
The right leg is half a step forward (left for left-handers), the feet are turned to the left (to the right for left-handers).
The toe of the right foot is in line with the heel of the left foot; this position of the feet ensures a stable position and helps reduce vibrations of the shooter-weapon system.
The shoulder girdle and pelvis are turned 35-45 degrees relative to the target.
Center of gravity on both legs.
"Sports"
The right leg is one step/half step forward (left for left-handers), the feet are turned to the left (to the right for left-handers).
The shooter is turned with his right side to the target. The body weight is distributed on the right leg in a ratio of 70% to 30%, with some shift towards the toes.
The projection of the shoulders should be above the projection of the feet.
The position of the body is strictly vertical, without displacements or deflections in the thoracic and lumbar regions.
To compensate for the weight of the gun, an offset to the left is possible.
Position of the left (right) hand. The left hand can be lowered into the trouser pocket or rest on the belt.
Standing with two hands
To assume a standing position with both hands, you need to take half a step forward, turn your feet 35-45 degrees relative to the target, the toe of the front leg is in line with the heel of the back leg.
The rotation of the feet is selected individually for each shooter, in order to ensure the stability of the shooting weapon system.
The projection of the shoulder girdle, pelvis and legs should be in the same plane without additional twisting.
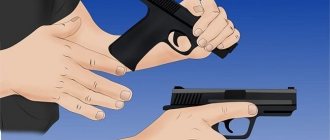
When taking a standing position with both hands, you must pay attention to the correct execution of the following elements:
- the weapon must be placed deep in the hand - so that the back of the frame does not come off the hand
- the axis of the barrel bore and the forearm of the leading hand (if possible) should lie in the same plane
- the handle should be held with the same force of both hands, while the base of the palm of the leading hand (right-handed for right-handed people, left-handed for left-handed people) seems to try to push the weapon “away from itself”. At the same time, the fingers of the weak hand pull the weapon “towards themselves”; the main force on the handle should be distributed in the vertical plane
From the knee with one hand
To take a kneeling position with one hand, you need to take half a step with your right foot (for left-handed people with your left).
Get down on your left knee and sit on your heel.
In this case, the feet of the left and right legs, as well as the knee of the right leg, create a projection of an isosceles triangle.
The left hand is placed on the left thigh and closes the biomechanical chain in order to create a stable position of the shooter-weapon system.
When taking a kneeling position with one hand, you must pay attention to the correct execution of the following elements:
- the weapon must be placed deep in the hand - so that the back of the frame does not come off the hand; the axis of the bore and forearms (if possible) must lie in the same plane
- the handle should be held with the same force of three fingers with the dominant force of the middle finger
- the thumb is extended along the slide and pressed against the frame with medium force
- the main force on the handle should be distributed in the vertical plane
From the knee with two hands
To take a kneeling position with both hands, you need to take a step with your left foot (for left-handed people, your right foot).
Get down on your right knee and sit on your heel.
In this case, the feet of the right and left legs, as well as the knee of the left leg, create a projection of an isosceles triangle.
When taking a kneeling position with both hands, you must pay attention to the correct execution of the following elements:
- the weapon must be placed deep in the hand - so that the back of the frame does not come off the hand
- the axes of the barrel bore and the forearm of the leading hand (if possible) should lie in the same plane
- the handle should be held with the same force of both hands, while the base of the palm of the leading hand (right-handed for right-handed people, left-handed for left-handed people) seems to try to push the weapon “away from itself”. At the same time, the fingers of the weak hand pull the weapon “toward itself”
- the main force on the handle should be distributed in the vertical plane
Lying with one and two hands
To take a prone position with one/two hands, you need to take a full step forward and to the right.
Lean forward, kneel on your left knee and place your left hand on the ground in front of you.
Leaning successively on the thigh of your left leg and the forearm of your left hand, lie on your left side and quickly turn onto your stomach.
| | |
| Option for shooting prone with one hand | Variant of positions for shooting prone with two hands |
When taking a prone position with one/two hands, you must pay attention to the correct execution of the following elements:
- the weapon must be placed deep in the hand - so that the back of the frame does not come off the hand
- the axes of the barrel bore and the forearm of the leading hand (if possible) should lie in the same plane
- the handle should be held with the same force of both hands, while the base of the palm of the leading hand (right-handed for right-handed people, left-handed for left-handed people) seems to try to push the weapon “away from itself”. At the same time, the fingers of the weak hand pull the weapon “toward itself”
Seated shooting techniques
75. For shooting while sitting, one of the following techniques can be used (Fig. 64 and 65):
a) sit on the ground half-turned in relation to the target and firmly rest your heels on the ground; place your left hand on the thigh of your left leg, as is more convenient, and with this hand take the machine gun at gunpoint or by the magazine, or place the magazine on your left hand; open the bolt with your right hand, load the machine gun and set the sight, as when shooting while lying down;
b) cross your legs and tuck them under you so that the foot of the right leg is passed between the thigh and shin of the left leg, or so that the foot of the left leg is tucked under the shin of the right leg; put your left hand on the thigh of your left leg, as is more convenient, and with this hand take the machine gun at gunpoint or by the magazine; open the bolt with your right hand, load the machine gun and set the sight, as when preparing to fire while lying down.
| a Fig. 64. Seated preparation | b Rice. 65. Shooting while sitting |
When applying in a sitting position, rest the elbows of both hands on the knees or, if the fighter’s physique allows, lower them behind the knees.
Perform the remaining techniques for firing a shot and stopping fire in the same way as when shooting prone.
Shooting techniques from kneeling and standing positions. Fitting, aiming and triggering
Shooting techniques from kneeling and standing positions
The sniper is prepared to shoot on command or independently. During training sessions, the command to prepare to fire can be given separately, for example: “To the firing line, march at a pace” and then “Load.” If necessary, the firing position is indicated before the “Load” command.
Firing preparation includes taking the shooting position and loading the rifle. In addition, when taking the shooting position, the sniper removes the cover from the optical sight and places it in the bag for the optical sight and magazines, and also removes the rubber cap from the lens and places it on the battery housing; in inclement weather and when the sun's rays fall from the front, it moves the lens hood forward.
To assume a kneeling shooting position, take the rifle in your right hand by the barrel lining with the muzzle forward, at the same time put your right leg back, lower yourself onto your right knee and sit on your heel; The shin of the left leg should remain in a vertical position, and the hips should form an angle close to a right angle. Place the rifle with the barrel linings in your left hand, pointing it towards. side of the target.
To assume a sitting shooting position, take the rifle in your right hand by the barrel lining with the muzzle forward and at the same time, leaning on your left hand, sit on the ground half-turned in relation to the direction of the target, placing your heels firmly on the ground (Fig. a) or crossing your legs and tucking them under you so that the foot of one leg is passed between the thigh and shin of the other leg (Fig. b); place your left hand on the thigh of your left leg, as is more convenient, and grab the rifle by the barrel linings with this hand.
To assume a standing shooting position, turn half a turn to the right in relation to the direction of the target and, without placing your left leg, set it to the left approximately shoulder-width apart, as is more convenient for the sniper, while distributing the weight of the body evenly on both legs.
At the same time, moving your right hand slightly upward along the belt, remove the rifle from your shoulder and, grabbing it with your left hand from below by the barrel linings, vigorously push the muzzle forward towards the target.
Kneeling position
Position for sitting shooting: a - with heels resting on the ground; b - with legs drawn up
Standing shooting position
To load a rifle you must: - attach a loaded magazine to the rifle, if it was not previously attached to it; - remove the rifle from the safety; - pull the bolt frame back by the reloading handle until it stops and release it; - put the rifle on safety if there is no immediate opening of fire or the “Fire” command is not followed.
Fitting, aiming and triggering
Holding the rifle when shooting prone: a – by the barrel linings; b – for the store
To attach the rifle, remove the rifle from the safety (if it was on the safety); holding the rifle with your left hand by the barrel linings (Fig. a) or by the magazine (Fig. b), and with your right hand by the butt and, without losing sight of the target, rest the rifle with the butt against your shoulder so that you feel a tight fit of the entire butt plate to the shoulder ; tilting your head slightly forward and without straining your neck, place your right cheek against the cheek of the butt; Place the index finger of the right hand (first joint) on the trigger.
Elbows are set as follows: - when shooting prone, as well as from a trench from a prone position, place your elbows on the ground in the most comfortable position, approximately shoulder width apart.
To aim with an optical sight, keep your right eye near the eyecup along the optical axis of the sight, and you can close your left eye; by moving your elbows, and if necessary, your body and legs, bring the tip of the reticle square under the aiming point, while simultaneously pressing the trigger with the first joint of the index finger of your right hand. The lateral correction scale should be positioned horizontally, and the sniper should see the entire field of view of the sight.
If the sniper's eye is shifted to the side, up or down from the optical axis, a moon-shaped shadow will appear in the field of view of the sight in the direction where the eye is shifted. In the presence of moon-shaped shadows, bullets are deflected in the direction opposite to the shadow (see Aiming Errors).
When aiming with an open sight, close your left eye and look with your right eye through the slot of the sighting bar at the top of the front sight so that the front sight is in the middle of the slot of the sighting bar, and its top is level with the upper edges of the mane of the sighting bar, i.e. take an even front sight; bring an even front sight to the aiming point while simultaneously pressing the trigger.
When aiming, you need to ensure that the aiming bar is in a horizontal position.
Aiming using an optical sight
To release the trigger, you must, holding your breath, continue to smoothly press the trigger until the trigger, unnoticed by the sniper, is released from the cocking position, i.e., until the shot is fired.
If, when aiming, the reticle square (flat front sight) deviates significantly from the aiming point or a moon-shaped shadow appears in the field of view, it is necessary, without weakening the pressure on the trigger, to clarify the aiming and increase the pressure on the trigger until the shot occurs.
When releasing the trigger, you should not attach importance to slight vibrations of the reticle square (flat front sight) at the aiming point.
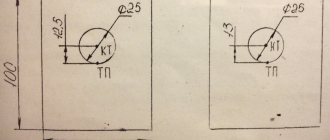
Aiming errors: 1 - the eye is 68 mm away from the eyepiece - normal; 2 - the eye is located close to the eyepiece, a shadow is visible in the field of view of the sight; 3 - the eye is located far from the eyepiece, a shadow is visible in the field of view of the sight; 4 - the eye is located along the optical axis of the sight at a distance of 68 mm, there is no shadow - the holes will be located in the center of the target; 5 - the eye is located above (below) the optical axis of the sight, the moon-shaped penumbra is above (below) - the holes will be located below (above) the target; 6 - the eye is to the left (right) of the optical axis of the sight, the moon-shaped penumbra is to the left (right) - the holes will be located to the right (left) of the target
The desire to press the trigger at the moment of best alignment of the reticle square (straight front sight) with the aiming point, as a rule, leads to tugging on the trigger and an inaccurate shot.
If the sniper, pressing the trigger, feels that he can no longer breathe, then he must, without increasing or weakening the pressure on the trigger, resume breathing, then, again holding it while exhaling, clarify his aim and continue pressing the trigger . Tags: fire training
Standing shooting techniques
76. To shoot while standing, you need to turn half a turn to the right in relation to the target and, without placing your left leg, set it to the left shoulder-width apart, as is more convenient for the shooter, while distributing the weight of the body evenly on both legs; at the same time, remove the machine gun with your right hand, throwing the belt off your shoulder (from your neck), and move it forward with the muzzle towards the target, picking it up with your left hand from below (at gunpoint); With your right hand, pull the bolt back and grab the neck of the butt (Fig. 66).
Rice. 66. Shooting while standing
77. In relation to placing, aiming and shooting while standing, follow the instructions of Art. 67–70.
78. In tight shelters and in case of a sudden attack on the enemy from a short distance, use the following method for shooting while standing: take a machine gun, as indicated in Fig. 73, pointing the muzzle at the target, fire at it with an automatic weapon.
Techniques for shooting from behind cover, from skis and from horseback
79. The use of a rest significantly facilitates shooting conditions, promotes camouflage and creates cover for the machine gunner from enemy observation and fire.
The stop should provide the machine gunner with a comfortable position for shooting.
80. When shooting from a rest, to improve shooting accuracy, place the machine gun with the magazine not on the rest, but on the palm of your left hand, resting on the rest.
When shooting from a rest for a long time, place the machine gun directly on the rest with its casing, without moving the magazine beyond the rest (Fig. 67). In this case, hold the butt from below with your left hand, pressing it tightly against the shoulder.
Rice. 67. Shooting from point blank range
Cover the hard stop with an overcoat roll, turf, etc.
In addition to available means, you can use a spare magazine as a stop.
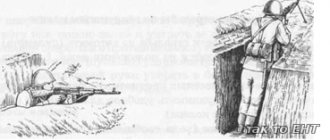
81. When shooting from behind cover from your knees or standing, lean firmly against the cover with your left side and shoulder, making sure that the machine gun and the left hand supporting it do not touch the stop to avoid deflecting the bullets to the side. The position of the machine gunner when firing from behind cover is shown in Fig. 68, 69, 70, 71, 72.
| Rice. 68. Shooting from behind a stump | Rice. 69. Kneeling from behind a tree |
| Rice. 70. Shooting from behind cover (a tree is used as a stop) | Rice. 71. Shooting from a tree | Rice. 72. Shooting standing from behind a tree |
Shooting techniques on the move
82. For shooting on the move, have the machine gun in the “chest” position on the belt.
Firing from a machine gun on the move can be done in two ways:
1) When the target moves away to a distance of more than 100 m, the machine gunner must pause to fire, inserting the butt into his shoulder, quickly take aim and fire one or two short or one long bursts, and then continue moving.
2) When the target is less than 100 m away, fire can be fired without stopping movement. To do this, hold the machine gun with your left hand by the casing, and with your right hand by the neck of the stock and pressing the butt to the right side (Fig. 73), fire with dispersion along the front, pointing the machine gun with the muzzle at the target. When the cartridges are used up, quickly replace the magazine and, if necessary, continue shooting.
Rice. 73. Machine gun in position for firing on the move
Shooting techniques and rules
Long guns are notable because they are more predictable than pistols and are typically used when the target is far away. Because of this, the shooter has time to take a comfortable position, take good aim and calmly shoot without undue haste.
Air rifle shooting
The rifle shooting technique itself consists of the main stages: taking a ready position, aiming and pulling the trigger. The main difference from a pistol is that when ready, the gun is held with two hands. Usually the gun is applied to the right shoulder.
At first, it is better to observe a more experienced shooter - study his movements, what he does and in what sequence, analyze his actions. Particular attention should be paid to how he performs the throw and leash - easily and accurately, without turning the body 180 degrees.
The first thing you need to learn is to raise the rifle, and not keep its butt pressed to your shoulder.
When aiming, your hand should be kept on the handle to avoid an accidental descent. Do not forget to control this, this also applies to safety precautions. The descent is carried out slowly, smoothly - it is important to concentrate well, so many even advise holding your breath immediately before the shot.
It is better to start learning to shoot at distant targets - this will teach you how to make adjustments for the distance to the target; working with moving targets at a distance will teach you to anticipate their actions, which is also important.
Once you learn how to properly raise a rifle and bring this process to automaticity, the remaining actions will also be performed just as easily. It is advisable to practice with 150-200 targets during one training session.
Techniques for shooting from skis
83. To shoot from skis in a prone position, take the machine gun in your right hand and the sticks in your left; leaving the heels of the skis in place, spread the toes of the skis to the sides, leaning on the poles, stand on the left and then on the right knee; quickly lie down, putting the sticks in front of you; place the elbow of your left hand on the sticks and take the machine gun at the ready (Fig. 74).
Rice. 74. Butt for shooting from skis in a prone position
To shoot from skis in a kneeling position, place the poles on the left side; turn the toe of the right ski to the right and place its rear end on the heel of the left ski; lower your right knee onto your right ski and take the machine gun at the ready (Fig. 75).
Rice. 75. Butt for shooting from skis in a kneeling position
To shoot from skis in a standing position, take the same position as for shooting without skis (Fig. 76). For stability when shooting while standing, you can use sticks as a support, for which you fasten the sticks and put them in loops on your left hand (Fig. 77); put the sticks on the left side and put the machine gun on them.
| Rice. 76. Butt for shooting from skis in a standing position | Rice. 77. Butt for shooting from skis in a standing position from a rest |