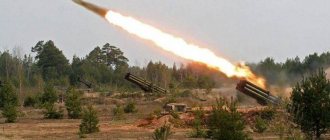
Methods for determining the position of the midpoint of impact
Determining the position of the midpoint of impact by sequentially dividing the segments: a - into three; b and c - four each; d - for five holes. With a small number of holes (up to 5), the position of the midpoint of impact is determined by the method of sequential division of segments.
To do this, you need to: - connect two holes (meeting points) with a straight line and divide the distance between them in half; - connect the resulting point with the third hole (meeting point) and divide the distance between them into three equal parts; since the holes (meeting points) are located more densely towards the center of dispersion, the division closest to the first two holes (meeting points) is taken as the average point of impact of three holes (meeting points);
Determining the position of the midpoint of impact by drawing dispersion axes: BB1 - dispersion axis in height; BB1 - lateral dispersion axis - connect the found average impact point for three holes (meeting points) with the fourth hole (meeting point) and divide the distance between them into four equal parts; the division closest to the first three holes (meeting points) is taken as the midpoint of the four holes (meeting points).
Based on four holes (meeting points), the average point of impact can also be determined this way: connect adjacent holes (meeting points) in pairs, connect the midpoints of both straight lines again and divide the resulting line in half; the division point will be the midpoint of the hit.
If there are five holes (meeting points), the average point of impact for them is determined in a similar way.
With a large number of holes (meeting points), based on the symmetry of the dispersion, the average point of impact is determined by the way the dispersion axes are drawn.
To do this, you need to: - count the lower (near) half of the holes (meeting points) and separate it with the axis of dispersion in height (range); - count the right or left half of the holes (meeting points) in the same order and separate it by the lateral dispersion axis; — the intersection of the dispersion axes is the midpoint of the impact.
The midpoint of impact can also be determined by calculation (calculation). To do this you need:
| Holes | Distance in cm from holes to | |
| vertical line | horizontal pinion | |
| 1 | 13 | 52 |
| 2 | 3 | 44 |
| 3 | 0 | 35 |
| 4 | 27 | 39 |
| 5 | 8 | 27 |
| 6 | 17 | 33 |
| 7 | 20 | 22 |
| 8 | 3 | 13 |
| 9 | 35 | 15 |
| 10 | 24 | 0 |
| Amount divided by the number of holes | ||
Determining the position of the middle point of impact by calculation (calculation)
- draw a vertical line through the left (right) hole (meeting point), measure the shortest distance from each hole (meeting point) to this line, add up all distances from the vertical line and divide the sum by the number holes (meeting points); — draw a horizontal line through the lower (upper) hole (meeting point), measure the shortest distance from each hole (meeting point) to this line, add up all the distances from the horizontal line and divide the sum by the number of holes (meeting points).
The resulting numbers determine the distance of the midpoint of the hit from the indicated lines.
Tags: fire training
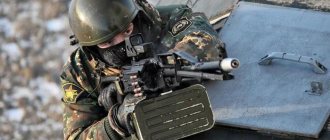
Procedure for partial disassembly
Federal Law of June 28, 2022 No. 231-FZ “On Amendments to the Federal Law “On Weapons” and Certain Legislative Acts of the Russian Federation” (the document has not entered into force)
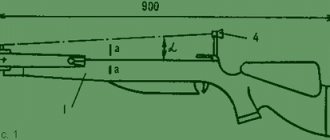
Before proceeding with disassembly, it is necessary to remove the under-barrel grenade launcher and bayonet knife, if used.
Assembling and disassembling an AK-74 always begins with removing the magazine. We hold the weapon with our left hand, grab the magazine with our right, pressing the latch with our thumb. Then we push the magazine forward, and it easily comes out of the slot.
We move the fuse box to the “OD” or “AB” position. We move the bolt handle back and inspect the chamber. If there was a cartridge in it at that moment, it will fly out. Drop the handle, release the cocked trigger
An important rule: we release the handle sharply, and do not try to smoothly bring it back. We take out the pencil case. To do this, press your finger on the round cover of the butt socket
We take out a brush, a cleaning cloth, a screwdriver, a drift, and a hairpin from the pencil case.
Separate the cleaning rod. Using tools (from a pencil case), you can pry the cleaning rod through the hole at the end.
We press the thumb on the heel protruding from the receiver until it comes out of the hole. This allows you to remove the receiver cover. Then we separate the return mechanism itself from the bolt frame channel.
Separate the bolt frame with the bolt. To do this, we move the frame all the way back, lift it along with the bolt, and separate it from the receiver.
We remove the shutter.
Remove the gas pipe. To do this, it is convenient to use a special tool made from a pencil case that has a rectangular hole. We put the tool on the protrusion of the gas tube shutter, turn the contactor, and remove the part.
Unscrew the muzzle brake-compensator by holding its locking pin with your finger.
Preparation
Equipment for zeroing a carbine
You will definitely need binoculars or a monocular. If you plan to shoot your rifle at a shooting range or in hunting grounds, you will definitely need a travel mat to make it soft and comfortable to lie on. Soft support, or as it is also called a shooting cushion, if possible, it is better to purchase a special machine. If necessary, you can also use a special height-adjustable chair.
The cartridges you will need are those that you specifically intend to use when shooting. Don’t forget about the PRB (combat control device, front sight corrector, front sight corrector, front sight corrector, whatever you like, call it that).
In addition, you need to take a felt-tip pen, a construction stapler, and earplugs, or special headphones, but this is optional. A felt-tip pen to indicate hits, a stapler to more conveniently attach the target, earplugs or headphones to protect your hearing.
Preparing the site
If the shooting of a rifled gun takes place at a shooting range, or at a specialized training ground in most cases, they will do everything for you. The places are prepared in advance, after all, you pay money for this. But when you go out on your own, first of all you bear a great responsibility. Check the area for closed spaces, preferably a quarry, to avoid hitting anyone. Position the mat so that it is comfortable for you to shoot; the prone position is considered the most effective, as the weapon twitches less. The distance from the sight to the shooter must be even.
You can limit the loss of cartridges by hanging an awning on the side of the bolt.
Targets
Take whatman paper or light paper measuring 75 by 75 cm. Next, draw a circle with a diameter of 20-25 cm, which you paint over with black. This target is for shooting without optics. To shoot with optics, everything is the same, but only the diameter of the circle is 10 cm. Such targets are suitable for distances of over a hundred meters. If you don’t want to waste your time, you can buy targets at a hunting store, or order them online.
Shooting range or open space?
The question is controversial, because everyone has their own, especially since in a shooting range, in an open space, there are pros and cons:
- There is little ventilation in the shooting range; fresh air is needed in order to avoid lead poisoning (a sign is a sweetish taste in the mouth, the more the worse).
- There is a lot of strain on hearing, if you shoot in an open space, then there will be no problems with this.
- In terms of weather conditions, the shooting range wins, because not everyone wants to walk around with a gun in -25. And in winter it’s harder to shoot without proper lighting, but at the shooting range you will definitely have it.
- Again, the shooting range wins in terms of comfort; they have a normal toilet, washbasin, and in some, a locker room and even a shower.
- Another plus in favor of the shooting range is the room for storing weapons and equipment. There are practically no such opportunities at the shooting range.
- Shooting distance. In a shooting range, the distance is usually 50-100 meters, in each city it is different. But at the shooting range you can find a distance of up to 300 meters, here it certainly wins.
- A shooting gallery is usually set up in a city. It's usually a long drive to get to the shooting range.
- There is skeet shooting in the open space, not to mention the shooting range.
In general, look at what is most convenient for you, in some cities there is neither a shooting range nor a shooting range, and you only have to travel to the hunting grounds during the hunting season. True, there has long been a debate about whether it is possible to shoot weapons in hunting grounds or not.
If you went out for shooting and took with you a permit to store and carry weapons, but outside the hunting season, you will have a violation in any case, even if you walk with a sheathed weapon (Administrative violation, Federal Law No. 512 (hunting rules), clause 3.2 ). During the hunting season, you can take a license for at least a hazel grouse, and calmly move around and shoot in the grounds, the main thing, remember, transportation of weapons must be carried out in a sheathed and unloaded form, if an inspector catches you with an uncovered weapon, then you will be charged with Article 8.39, paragraph 1 of the Administrative Code RF. But if you have all the relevant documents for the right to hunt, then even during the shooting they won’t tell you anything. Follow the rules and everything will be fine.
Selecting the rifle zeroing distance
Without optics, you can start from a distance of 50 meters, after you shoot straight at 50 meters, go to 100 meters, the maximum distance without optics is 200 meters. If you are shooting with an optical sight, then start at 100 meters and end at 300.
Using other cartridges after zeroing
Different manufacturers, but the same bullet weight
The first thing that may differ is the different materials that manufacturers use. Foreigners use bullets coated with tombak (an alloy of copper and zinc). And domestic ones are made of bimetal. Ours do not have a protective shell, which has a bad effect on the barrel. And if they do, they inflate the price; domestically produced cartridges, according to some owners, can harm imported weapons.
Same manufacturer, but different bullet weight
Everything here is trivial, the less weight, the less recoil, the time spent in the barrel is less. Range and accuracy depend on lightness. Adjustments also depend on weight.
Bullets of the same caliber, but different weights, have the same diameter, and differ only in their length, which is longer for a heavy bullet. Heavier bullets require more twist in the rifling than short or light bullets. Then an accurate and stable flight path is obtained.
When hunting, you need to use exactly the same cartridges that you used when shooting, since different cartridges may have different weights of gunpowder and bullets. And this will greatly affect long distances: a light bullet may not reach the target exactly, or will be blown away by the wind, while a heavy bullet, on the contrary, may fly over. In general, use only the cartridges that you used when shooting!
So we looked at the basic concepts associated with zeroing. Where and how best to shoot a rifle. We hope that the article was useful for everyone and will bring you success in shooting, and in the future in hunting or in competitions.
Record
Do not think that 36 seconds (13+23) is the minimum time in which the AK-74 can be assembled and disassembled. The record is much lower than these figures. Today, many military school cadets, professional soldiers and ordinary weapons lovers are challenging the world championship, but the official winner has not been announced. The matter is complicated by the fact that there are clear requirements for recognition of a record. Firstly, spare parts of the machine gun should not fly apart in all directions, much less fall to the floor, and many potential record holders do not take this rule entirely responsibly. Secondly, the order of assembly and disassembly should not be violated. In addition, the record will not be counted if at least one part is separated from the machine gun in any way not regulated by the “Firing Course”. If a fighter makes at least one mistake that could result in injury to a person or damage to a machine gun, then we cannot talk not only about a record, but also about passing the standard itself.
Zeroing a carbine without an optical sight
Features of long-range shooting without optics
Birds of central Russia
There are many nuances here. The first key to success is that the more you shoot, the better. Breathing plays a big role, you need to feel it. You need to learn how to aim the front sight correctly, but no matter how hard the shooter tries, it will still move. We must learn to reduce the movement of the front sight and choose the moment of the shot between heartbeats, so that the breath holding is minimal, and so that just at this moment the front sight looks exactly at the target and manages not to pull the trigger, but to smoothly press it (the trigger should already be pressed so much that the slightest pressure will result in a shot).
Front sight adjustment
To adjust the front sight horizontally, that is, left or right, as well as in height, we need a front sight guide. With it you can easily adjust the sight. Some people use a vice, but this greatly increases the adjustment time. It’s better to watch the video on how to use the fly remover.
To adjust the height of the front sight, you need to turn the fly rod counterclockwise. And vice versa, clockwise - the front sight will lower. Example: if the hits go up and to the left, then the front sight must be raised and pushed to the left. How many revolutions you need to make depends specifically on your situation. That is, in which direction we need to adjust the fire, we adjust accordingly in that direction.
Rear sight adjustment
Everything is simple here. But adjusting the rear sight can also take a lot of time. It should be adjusted depending on the distance and hits.
Let's say you were aiming at the middle, but the hits went higher, then you should release the rear sight a little. Or, conversely, if the hits are lower, then the rear sight should be raised, and it can also be adjusted in different directions. If hits go to the right, the rear sight needs to be turned to the left and vice versa, if hits go to the left, then the rear sight needs to be turned to the right.
Is cold zeroing effective without optics?
It would seem that this is a high-tech, convenient device, but, unfortunately, it will only be effective if you are going to shoot at paper. Let's say you're going hunting, but at the same time you did a cold sighting, then hitting the animal will be 50/50. This thing is suitable for beginners, but for the most part it will be a waste of money. It is mainly necessary at the initial stage to make it easier to set the rear sight and front sight for further “hot” zeroing.