Correct aiming from PM (Makarov pistol)
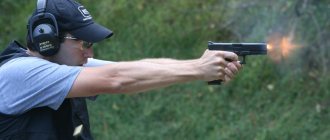
Weapons , as a means of destruction, can be separated into a separate concept. Using a firearm as an example, it is classified as a melee weapon for direct attack or defense. There is a wide range of uses for varieties of firearms . If you have not had to deal with shooting from it, perhaps for starters, you should familiarize yourself with the correct aiming and firing. And it’s best if you start your acquaintance with the initial base, namely pistol shooting.
Here we will look at the most common abbreviation among the people (PM), in other words, Makarov Pistol . The pistol is very simple to use; in order to fire a correct shot from it, you need to have at least the minimum basic technique, which I will try to introduce you to in this article. So where should you start?
The entire start is conditionally divided into several stages, namely 5:
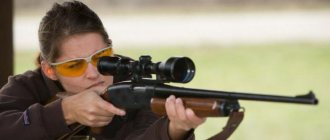
1. Aim only with your dominant eye, that is, with the eye with which you will see the outline of the target best and most clearly. This component already gives you a low chance of hitting.
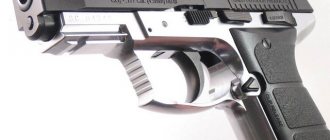
2. When aiming, the front sight and rear sight of the pistol must be in line. The pistol has a rear sight and a front sight. When you aim, the front sight should be exactly centered between the two edges of the rear sight slot. The front sight is located on top of the pistol bolt on its front part, or rather above the muzzle of the barrel. Rear sight - located on the top of the bolt at the rear, where the firing pin is located.
When drawing the shooting line between the front sight and the rear sight, the following nuances arise:
1) There should be the same distance between the front sight and the edges of the rear sight slot.
2) The top of the front sight should also be flush with the edges of the rear sight.
3. Take aim. When you aim a pistol, you will need to look at the rear sight and front sight, the target should be a little blurry. You should be able to see it, but it should be in the background and less clear than the front and rear sights. At this moment, pay more attention to the front sight, it will help you determine the relative position of the weapon to your target.
4. Choosing where to hit the target. The target has three impact locations: 1) You can aim right at the center of the target 2) You can aim right under the bull's eye 3) Or you can aim just below the bull's eye. During practical shooting, the front sight should be aimed approximately at the middle of the white part of the target field below the bull's eye. None of the listed places is a priority or preferable to another. You determine for yourself where you are most comfortable shooting for the most effective result.
5. Concentration. If you don't concentrate on all aspects of your aim, you will probably miss. To do this: 1) Before shooting, it’s better to take another look that the front sight is installed clearly in the rear sight slot. 2) Take your time, be calm. Your stress may cause you to pull the trigger too hard, or squeeze the weapon too hard in your hand, and the shaking will begin, and then you will lose your aim.
The number on the rear sight is PM – Amaraen Finder
Apr 11, 2012 · Hello everyone!!! Please tell me what the number on the PM rear sight means, thanks in advance!
https://forum.guns.ru/forummessage/17/1052184.html
indicates the height of the rear sight, try typing in “Number on the rear sight PM” in Yandex and everything will become clear.
https://popgun.ru/viewtopic.php?t=518561
The number indicates the vertical deviation from the 10 of a standard chest target. If it’s 1, hit the center; mine was set to 3, aiming for the area of 8. They were shot only horizontally.
https://otvet.mail.ru › Other
May 04, 2009 · After that, many years passed, I myself became a gunsmith, I began to shoot well, I shot from many pistols, but I will say one thing, no matter what the number on the rear sight is, when aiming at the target, having worked the trigger correctly, you always hit it.
https://forum.guns.ru/forum/51/441737.html
Checking the engagement of a PM pistol is carried out from a standing position from the hand or from a rest. When shooting from a rest, the hand with the pistol must be suspended and not touch the rest.
https://vsk-kalibr.narod.ru/index1.2.html
On my PM-e 60g. There is no number on the rear sight. Shot at the center. The ones I saw were with four. I think that's it. Pistols 89 and 91
https://popgun.ru/viewtopic.php?t=49440
WHAT WILL “FORGIVE” PM, WILL NOT “FORGIVE” PM. Accuracy values at 25 meters for PM and TT are 7.5 cm (that is, all bullets will fall into a circle with a diameter of 15 cm), and for a revolver of the 1895 model - 6.8 cm (respectively 13.6 cm).
https://www.modernarmy.ru/article/229
The article describes the method of shooting and correct aiming from a Makarov pistol (PM) in both amateur and practical shooting. If you haven't had to deal with shooting from it, perhaps for...
https://good-shoot.ru/pistolet/pravilnoe-pricelivanie-iz-pm-pistolet…
Sergey Kalugin 09/19/2012 20:36. indicates the height of the rear sight, try typing in “Number on the rear sight PM” in Yandex and everything will become clear.
https://guns.allzip.org/topic/17/1052184.html
The Makarov pistol (PM) has been in service since 1951 in some countries of the former Warsaw Pact, China, etc. It is designed for close combat fire and is a personal weapon...
https://www.shooting-ua.com/arm-books/arm_book_11.11.htm
amaraen.com
Basic pistol shooting technique
What will you need?
Grip (hold) of a pistol
Hold the gun in your dominant hand. Your dominant hand should wrap around the handle of the gun with your thumb resting on the inside of the barrel.
- Your middle finger, ring finger, and little finger should wrap around the outside and front of the handle.
- The index finger should be on the outside of the trigger guard.
- Holding the gun this way will give you the maximum amount of leverage you need to reduce the amount of swing in your hand during recoil.
Place your non-dominant hand on the other side of the handle. It will support the other hand and provide additional leverage when shooting.
- Place your hand as high as possible on the handle.
- All four fingers should be under the trigger guard, with your index finger firmly resting on the bottom of the trigger guard.
- The thumb should point forward and touch the other thumb.
Pistol shooting stance
Assume your shooting position. Stand up straight with your feet firmly planted on the ground and point the gun at your target. Your feet should be shoulder-width apart with your knees slightly bent.
- This position will allow you to move easily while providing stability to your body.
- Raise the gun in front of you. Your arms should be extended forward and slightly bent at the elbows. The gun should not be near your face.
- Lean your torso forward a little, imagine as if you are “drilling” a wall with a drill. This way you can maintain balance despite the recoil when shooting.
Exercises to develop correct aiming skills
Exercises must be performed opposite a wall or target, at a distance of 1.5 m or more.
Exercise No. 1. “Concentration”
For a Makarov pistol or similar pistol with a distance of less than 15 cm between the front sight and rear sight.
Take the pistol, assume a shooting position, raise the weapon to eye level and sequentially perform the following steps:
- Focus your gaze on the target/wall. Please note that in this case, not only the upper edges of the rear sight “blur”, but also the front sight. And they “blur” so much that it is impossible to align their upper edges with each other.
- Turn your gaze to the front sight. Please note that in this case the upper edges of the rear sight have “blurred” a little, and a halo has appeared above them.
- Focus your gaze on the rear sight. And remember this aiming picture. Sights must be sharp.
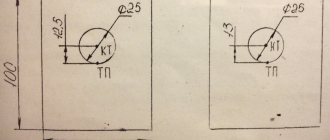
Pay attention to the location of the sights relative to the shoulders of the “chest figure” target (the sight is located in the center of the target) and relative to the black circle of the sports target. The sights are located under the black circle (approximately in the area of dimensions 4, 3).
Options for focusing on various objects when shooting from a Makarov pistol
Aiming at the chest target (focus on target / focus on front sight / focus on rear sight)
Aiming at a sports target (focus on target / focus on front sight / focus on rear sight)
Options for focusing on various objects when shooting from a Yarygin pistol
Aiming at the chest target (focus on target / focus on rear sight / focus on front sight)
Aiming at a sports target (focus on target / focus on rear sight / focus on front sight)
Exercise No. 2. “Even front sight”
When performing this exercise, the focus of your gaze should always be on the sighting devices (PM and analogues - in the rear sight / FP and analogues - on the front sight). The sights must be sharp when performing the exercise.
Take the pistol, assume a shooting position, raise the weapon to eye level and sequentially perform the following steps:
- Focus your gaze on the sights.
- Raise the front sight above the upper edges of the rear sight by 0.5-1 mm.
- Align the front sight with the rear sight.
- Lower the front sight below the upper edges of the rear sight by 0.5-1 mm.
- Align the front sight with the rear sight.
- Move the front sight to the left by 0.5-1 mm (the gap on the left will almost disappear).
- Align the front sight with the rear sight.
- Move the front sight to the right by 0.5-1 mm (the gap on the right will almost disappear).
- Align the front sight with the rear sight. And remember this aiming picture. Sights must be sharp, and the upper edges of the rear sight and front sight must be at the same level. It is this picture that they say that the sights are level.
Sequence of performing exercises for the Makarov pistol
Vertical displacement of the front sight in the rear sight (front sight up / front sight down / level front sight)
Horizontal displacement of the front sight in the rear sight (front sight on the left / front sight on the right / level front sight)
Sequence of performing exercises for the Yarygin pistol
Vertical displacement of the front sight in the rear sight (front sight up / front sight down / level front sight)
Horizontal displacement of the front sight in the rear sight (front sight on the left / front sight on the right / level front sight)
The duration of each exercise is 10 - 15 seconds.
The number of repetitions per workout is at least 5.
The number of training sessions with exercises is at least 7.
It is recommended to repeat the exercises at least 2 - 3 times a month.
Visually, the eye perceives a deviation of the front sight to the right or left by 1 mm as the disappearance of the gap between it and the vertical wall of the rear sight slot on one side and an increase in the width of the gap by 2 times on the other.
A deflection of the front sight by 1 mm in the rear sight slot when shooting from a Makarov pistol at a distance of 25 m leads to a deflection of the bullet in the same direction by 19 cm from the center of the target.
When shooting from a Yarygin pistol, deflecting the front sight in the rear sight slot by 1 mm will cause the bullet to deflect in the same direction from the center of the target at a distance of approximately 15 cm.
By completing these exercises, you have learned to align the front sight with the rear sight and see the sights sharply.
You can often hear the question of how to aim with one eye or two? The answer is as follows - preferably two, since in this case visual acuity is higher.
However, when aiming with both eyes, the effect of a “second front sight” may occur. Typically, this effect manifests itself if the shooter is right-handed, and his dominant eye is left, with a left-hander, respectively, vice versa.
This raises two questions:
- How to determine which eye is dominant?
- If the leading eye and the strong hand are not the same, then what to do about it?
To determine the dominant eye, perform the following steps:
- At a distance of several meters from you, 3 m and beyond, find a stationary object.
- Stretch your arms forward and connect your thumbs and index fingers so that they form a closed contour.
- Place your hands between your face and the selected object. Look through the outline with both eyes.
- Keep your eyes on the selected object and alternately close one eye and then the other.
- The leading eye will be the eye during which the object does not change its position in space relative to the contour of the fingers (while the second eye is closed).
Determination of the dominant eye
If the strong hand is right (the shooter is right-handed), and the dominant eye is left, then there are several options for solving the problem:
- When shooting, place the weapon in front of your left eye.
- Use a shooting monocle and lower the curtain that will cover your left eye; if you are using glasses, then cover the left glass with an opaque material.
- Learn to shoot with your weak (left) hand.
For a left-handed person, the same actions are required, performed in a mirror image.
Another question that concerns most people who decide to learn how to shoot at a sports target on their own is “Where to aim?”
The position of the sights relative to the target's aiming dome (left is correct / right is not)
Please note that the sights are located below the black circle by approximately the size of its radius. This ensures almost identical aiming with a significant difference in target illumination, be it bright sun or dense clouds, as well as for a target printed on paper of different quality (from matte cardboard color to glossy white).
Experienced athletes may object and say that the clearance between the scope and the black circle should be kept to a minimum. But we should not forget that sporting weapons are distinguished by the ability to make adjustments using micrometric screws on the rear sight; this is not possible on military weapons and their analogues. It follows from this that you will most likely have to “remove” the aiming area. In sunny weather, you will approach the black circle, and if you initially “shot in” with a small clearance, you will have to “crawl” into the field of the black circle.
It will not be possible to really assess the degree of “impingement” of the target into the field of the aiming dome due to the influence of diffraction (the phenomenon of a light wave bending around obstacles).
Another significant aspect when aiming with a black circle is the inability to guarantee consistency of aim from shot to shot.
We should also not forget that differences in visual acuity and anthropometric data (height, arm length) can significantly influence the perceived aiming pattern.
The first skill a shooter develops is proper aiming. The importance of proper aiming cannot be overstated. Not only because it is a fundamental skill, but because it provides a means by which the sniper can check for proper shooting position and trigger pull. The aiming process includes the following phases: the relationship between the eye and the sights, the “flat front sight”, the aiming point, the breathing and aiming process, and exercises to develop correct aiming.
Aiming the pistol at the target is carried out using the pistol's sighting device. The sighting device used on a pistol consists of a front sight and rear sight.
When aiming, the shooter, closing his left eye, places the front sight in the middle of the slot, and its top is level with the upper edges of the rear sight slot.
Holding the front sight in this position in relation to the rear sight slot, the shooter, with a movement of his hand, aligns the top of the front sight with the aiming point. Installing the front sight above the upper edges of the rear sight slot or below, holding it to the right side or to the left when aiming is certainly unacceptable.
To accurately aim the pistol at the target, you need to correctly install the front sight in the rear sight slot and align the top of the front sight with the aiming point. But this is not as simple as it seems at first glance, because the weapon oscillates in an outstretched hand, the rear sight slot, the front sight and the aiming point are at different distances from the shooter’s eye. Since when aiming the middle of the rear sight slot, the top of the front sight and the aiming point must be placed on the same straight line - on the aiming line, you need to see the sighting device of the pistol and the target with the same sharpness (clarity). Let us consider the properties of the human eye to find out how possible it is to fulfill this condition.
The organ of vision—the human eye—is a complex optical system consisting of a number of refractive media and surfaces. For the clearest image, it should be obtained in the area of the macula. The macula is the place of the clearest (central) vision, the most important part of the retina, and a detailed examination of an object by a person consists in gradually transferring individual details of the observed object precisely to the area of the macula. With different distances of observed objects, the curvature of the lens of the eye changes under the action of muscles, which causes a change in the refractive power of the eye. This is necessary to obtain an image specifically in the area of the macula. The property of the lens to change curvature depending on the distance to the observed object is called accommodation. As a result of this property, the human eye is not able to simultaneously see objects at different distances with the same sharpness (clarity). It follows that it is impossible to see the aiming point, the front sight and the rear sight slot with equal clarity at the same time. This is the practical difficulty in aiming accurately.
However, it is possible to adapt to these conditions. The rear sight and front sight of the pistol are located about 15 cm apart and can be seen quite clearly at the same time. Consistent fixation of the rear sight slot, the top of the front sight and the aiming point can ensure the necessary accuracy of aiming the weapon at the target. With long-term systematic training, sequential fixation of the rear sight slot and the top of the front sight almost merges into one process, which significantly speeds up aiming.
Since the rear sight slot and the top of the front sight are located close to each other and, when observed, are as if in the same plane, one has to make a choice between two points - the sighting device of the pistol and the aiming point. As experience shows, the most important thing at the beginning of training is to focus attention on the sighting device and you can, to a certain extent, neglect the clear visibility of the aiming point, because errors in installing the front sight in the rear sight slot cause significantly greater deflections of the bullet than some easily fixed misalignment of the top of the straight front sight with the point aiming.
So, the accuracy of aiming depends on: the accuracy of installing the front sight in the rear sight slot and the alignment of the top of the straight front sight with the aiming point.
"Smooth fly."
Aiming with open sights involves holding the so-called “flat front sight.” When aiming, the pistol is held so that the front sight is located exactly in the middle of the rear sight slot, and the upper edge of the front sight is flush with the top cut of the rear sight. The shooter's attention is concentrated on the rear sight, that is, the rear sight slot should be clearly visible. Due to the fact that the eye has a certain depth of vision, the front sight in the slot will also be visible quite sharply. The target should be visible indistinctly, vaguely.
Typical mistakes when aiming
At the initial stage of training, when shooting with the right hand, you need to aim with your right eye, and close your left eye, and vice versa, when shooting with your left hand, you need to aim with your left eye, and close the right. When shooting live, it is recommended to shoot with both eyes open. As you know, most people have a right hand while a minority (up to 10%) have a left hand. It is less known that similar dominance is also inherent in vision - one eye is leading (main), the other is slave. There are people without a pronounced dominance of one eye or another. Note that the dominant eye of the dominant eye may change with age. When shooting, this can be a real problem, preventing you from achieving good results. The fact is that the leading eye may not coincide with the leading hand. This can be corrected when shooting a pistol, but when shooting from a rifle the problem is often insoluble. There are techniques for reducing the dominance of the dominant eye, but for some people they do not give a noticeable result.
Aiming point.
After the shooter has been trained to take the “straight front sight”, it is necessary to begin studying the choice of the aiming point. This element differs from the “flat front sight” only in that a point on the target is added to it, to which the front sight is brought.
The aiming point used by the shooter is the center of the target. All novice shooters should know this, as it is the most commonly used and more understandable, unlike others.
The process of breathing and aiming.
Breath control is very important for the aiming process. If the shooter is breathing while aiming, the up and down movements of his chest will cause the weapon to move in a vertical plane. The “straight sight” is taken while breathing, but the shooter must hold his breath to complete the aiming process. To hold your breath correctly, you need to inhale, then exhale and hold your breath during the natural respiratory pause. If the “straight front sight” is not on the target, it is necessary to change the position of the body.
The respiratory cycle lasts 4 - 5 seconds. Inhalation and exhalation take approximately 2 seconds. Thus, between cycles there is a pause lasting 2 - 3 seconds. It can be increased to 12 - 15 seconds without much effort or discomfort. It is during this extended pause that the sniper must fire the shot. Arguments in favor of this: during a respiratory pause, the respiratory muscles are relaxed; thus, the shooter avoids stressing the diaphragm.
The shooter must assume a shooting position and breathe normally until the “flat sight” begins to approach the desired aiming point on the target. Many shooters then take a deeper breath, exhale, pause, and fire the shot during the pause. If the sighting devices do not take the desired position on the target, the shooter resumes breathing and repeats the process.
A respiratory pause should not cause discomfort. If the pause is prolonged, the body begins to lack oxygen and sends a signal to the brain to resume breathing. These signals cause slight involuntary contractions of the diaphragm and affect the shooter's ability to concentrate. In general, the safest possible period for a respiratory pause is 8-10 seconds.
As mentioned above, the eye plays a very important role in the aiming process. While exhaling and moving the front sight up towards the target, the focus should alternately move from the front sight to the target until the shooter determines that the sights are in the correct position on the target. Once the correct aiming pattern has been achieved, focus must be placed on the front sight to accurately determine the position of the sights relative to the aiming point at the time of the shot and to identify variations in aiming variations.
Some inexperienced shooters fail to understand that the final focus should be on the front sight; In poor lighting conditions, when the target is not clearly visible, an inexperienced shooter tends to focus his eye on the target. Shooting at a “blank” target (a target that does not have any outline or a regular target with its white side facing the shooter) can prove to the shooter the need to concentrate his vision on the front sight.
Correct aiming from PM (Makarov pistol)
Weapons , as a means of destruction, can be separated into a separate concept. Using a firearm as an example, it is classified as a melee weapon for direct attack or defense. There is a wide range of uses for varieties of firearms . If you have not had to deal with shooting from it, perhaps for starters, you should familiarize yourself with the correct aiming and firing. And it’s best if you start your acquaintance with the initial base, namely pistol shooting.
Here we will look at the most common abbreviation among the people (PM), in other words, Makarov Pistol . The pistol is very simple to use; in order to fire a correct shot from it, you need to have at least the minimum basic technique, which I will try to introduce you to in this article. So where should you start?
Shooting safety
- Be sure to keep your index finger on the brace before shooting.
- Point the gun in a safe direction. You should always point the gun away from people to avoid injuring anyone or damaging other people's property. If you're at a shooting range, hold the gun pointing downwards.
- Consider your gun loaded even if it isn't. This is necessary to prevent a possible tragedy.
- You must clearly see where your target is, as well as the entire area around and beyond it. It is important to ensure that all precautions are taken and that no one is caught in the line of fire. The target must be positioned so as not to pose a danger to anyone or anything in its vicinity. If you are going to shoot on private property, make sure there are no homes or businesses nearby.
According to the rules and regulations of the International Confederation of Practical Shooting (ICPS), or in English the International Practical Shooting Confederation (IPSC), since its founding, THREE “golden” basic safety rules for shooting have been established, also called the ARROW CODE:
Instructions for filling out the PM statistics form
Title page
The title page of the form includes standard data: name, address, organization codes. In this case, you should indicate the full name of the company according to the registration documents, and write a short name in brackets. The address line must reflect the full legal address and the actual address (if it differs from the legal address).
In columns 2 and 3 of the title page, you need to note the OKPO and OKVED codes, respectively. Column 4 should be left blank.
All indicators in sections 1 and 2 are entered on an accrual basis.
First section
If the company uses the simplified tax system, you need to put “1” in column 3 of section 1 “Questionnaire”.
If the company did not conduct business during the reporting period, then fill out only the title page and this section.
Second section
The second section is filled out based on the number of employees and their salaries.
The table includes indicators for average headcount, wage fund and social benefits. Line 02 reflects the average number of employees. Line 02 is equal to the sum of lines 03, 04 and 05. It must include employees on the payroll, external part-time workers and employees under GPC contracts.
The accrued wage fund (WF) by employee category is reflected in thousand rubles in lines 06-09. Line 06 is the resulting line, it includes data from lines 07, 08 and 09.
Clause 2.2 of Rosstat Order No. 22 dated January 23, 2019 describes in detail what amounts need to be taken into account when determining the full salary.
In line 10 you need to show the total amount of social payments to employees for the reporting period.
3 months free use all the features of Kontur.Externa
Try it
Third section
This section reflects information on the movement of goods and investments.
In column 3 for each line you must indicate the amount excluding VAT, excise taxes and other mandatory payments.
Line 11 indicates the sold goods (works, services) of own production.
In line 12, from the amount indicated in line 11, the cost of goods sold to the population in retail trade is distinguished.
Line 13 reflects the sale of non-owned goods purchased for resale. Goods sold at retail are reflected in line 14.
Revenue from the sale of public catering products is shown in line 15 (this amount is taken into account in the total on line 11).
Line 16 reflects investments in fixed assets: purchase, construction, reconstruction, etc. In terms of new and imported fixed assets. From this amount in line 17 you need to highlight fixed assets purchased from budget funds.
(1 rating, average 4 out of 5)