Assembling and Disassembling an Air Gun: A Collection of Guides
All owners of air guns sooner or later reach into the back drawer for tools to sort out their favorite toy. For many, the disassembly process has become a habit; for some, this process is just yet to take place. Going through any more or less complex subject for the first time can raise many questions, and the action itself can turn into an impossible task. Here, with a reserve for the future, we will try to post a collection of detailed instructions for assembling and disassembling air pistols and rifles for those who have already lost hope of finishing the work to the end.
Recommendations
Assembly/disassembly of the PM is carried out on a flat surface
This could be a table or bench, the surface of which must be covered with clean oilcloth. When disassembling the PM, it is very important to ensure that the mechanism being removed and its spare parts are placed on the table surface in a certain order. It is recommended to place them in the same order as they were removed, excluding their impacts against each other
The work should be carried out very carefully and carefully, without excessive effort. If not one firearm, but several PM pistols are assembled/disassembled, then in this case the spare parts and mechanisms must be numbered. This will make assembly work easier, since the parts being assembled cannot be mixed up.
Repair of Gletcher PM air pistol - stages
You can repair the Gletcher PM air pistol using a Phillips, flat-head screwdriver, neutral oil, gauze, or a multi-faceted wrench.
1. Using a multi-faceted wrench, unscrew the handle bolt located at the end. We remove the cheeks. Using a Phillips screwdriver, unscrew the seven screws located on the right side of the product.
2. Use a flat screwdriver to separate the air gun in half.
3. Holding the spring, remove the barrel. Remove the barrel casing and disconnect the trigger rod lock.
4. Loosen the trigger mechanism. We remove the false trigger, the main trigger. We take out the first spring, take out the main spring.
5. We lubricate parts and pins with neutral oil. You can assemble pneumatic weapons, the prices for which are low in Minsk in the ReZon.by online store, in the reverse order.
Specifications
Technical characteristics of the Crosman TT air pistol:
| Characteristics | Indicators |
| Manufacturer | Crosman (USA) |
| Pneumatic type | Gas cylinder |
| Blowback system | No |
| Trunk | Smooth |
| Material of manufacture | Body and bolt – metal, Handle pads – plastic |
| Nutrition | 12 gram CO2 cylinder |
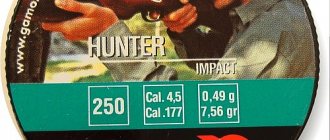
| Caliber, mm | 4.5 mm |
| Ammunition | BB balls |
| Muzzle energy, J | Until 3 |
| Departure speed, m/s | 122 |
| Magazine capacity | 18 |
| Length, mm | 197 |
| Weight, g | 980 |
Advantages and disadvantages
The undoubted advantages of Gletcher TT-P include the following facts:
- does not require registration and the owner of a license;
- good indicators of shooting accuracy and combat accuracy;
- reliable resemblance to the original;
- economical gas consumption;
- low cost.
The model also has a number of disadvantages:
- plastic case;
- tight trigger mechanism, quick response to pressure;
- lack of blowback mechanism.
The lightweight pistol is comfortable to carry and hold when shooting, but at the same time it feels like a toy in your hand.
Price list with prices for repairs in the workshop:
- Diagnostics of technical condition from 150 rub.
- Installation of a swivel from 300 rub.
- Cleaning and lubrication of the gun from 200 rubles.
- Minor repairs of pistols from 200 rubles.
- Sighting from 250 rub.
- Power boost from 500 rub.
- Replacement of piston cuff from 800 rub.
- Replacement of a set of gaskets from 400 rubles.
- Re-preservation of pneumatics from 800 rub.
- Replacement of gaskets in CO2 guns from 450 rubles.
- Adjustment and repair of the store from 1200 rubles.
- Repair of USM pneumatics and all types of pistols from RUB 1,500.
- Elimination of undershooting and sticking (pistol) from 1500 rub.
- Gun cleaning from RUB 1,150.
- Removing stuck bullets from RUB 900.
- Measurement of bullet departure speed from 150 rubles.
The site lists only a small part of the work that we perform daily. The exact cost depends on many factors: how complex the breakdown is, whether this part is in stock or needs to be ordered, on the complexity of the design and condition of the weapon, etc.
Therefore, in order to determine the exact amount, it is best to come to the workshop immediately. And then you can decide whether you need to repair the product or whether it’s not worth it.
Advantages of our workshop
- 1. We have an experienced team - craftsmen constantly improve their skills, which directly affects the quality of repairs,
- 2. Convenient work schedule - you can come to the service after work or on weekends,
- 3. Convenient location and free parking next to the workshop,
- 4. Low prices for spare parts, subject to repair of pneumatics in our workshop,
- 5. There are extras. services - for example, tuning, preservation and maintenance of pneumatic and airsoft weapons,
- 6. All types of work are provided with an official guarantee.
Additional information on service, as well as spare parts, can be found on the official website of the TT brand manufacturer on the Internet.
Service center technicians:
1. Viktor Vladimirovich Orekhov
Turner - mechanic. 7 years of experience in repairing air guns. Conducts diagnostics and carries out the entire range of work.
2. Sergei Nikolaevich Borodin
Chief Specialist. He is a retired military man and has been repairing weapons for more than 10 years. He is well versed in both pneumatics and airsoft, signal and cooled weapons.
3. Igor Petrovich Voznesensky
Technician, electrician. A universal specialist, well versed in the operating features of airsoft weapon drives. 9 years of experience in repairing air rifles and pistols.
What kind of breakdowns occur in TT pneumatics?
Weapons are manufactured by different gun factories around the world, so problems may vary between models. Problems with the trigger mechanism are unlikely, since its design in the TT is as simple and reliable as possible.
Design and principle of operation
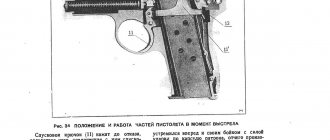
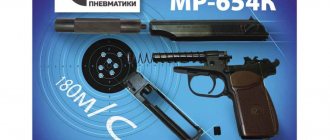
1. The mechanism diagram of the MP 654K pistol is shown in Fig. 1.
2. The bullet ejects from the barrel due to the energy of compressed carbon dioxide placed in the can. The cutoff of a portion of gas, to give the bullet a certain speed, occurs due to the operation of the firing mechanism.
3. The multi-charging capability of the pistol is ensured by placing bullets in the magazine accumulator, which, under the action of the feeder spring, enter the barrel line.
4. The trigger mechanism of the pistol allows firing both by self-cocking and by pre-setting the trigger to cock the sear.
5. Safe handling of the pistol is ensured by a reliably functioning safety lock. The pistol has a safety lever located on the left side of the slide. When the safety is moved to the “safety” position, the hammer is released from cocking, without hitting the firing pin, while the trigger is simultaneously intercepted by the locking protrusion of the safety. In the “safety” position, it is ensured that the trigger does not hit the firing pin.
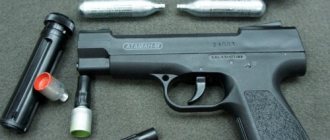
6. The design of the MP 654K pistol allows the use of two standard sizes of cans - with a gas mass of 7 g (cans for household siphons) and a gas mass of 12 g. In the case of using cans with a gas mass of 7 g, adapter 16 is used (Fig. 2), put on the neck of the can.
Rice. 1. Diagram of the MP-654K pistol 1 - bolt; 2 — return spring; 3 — frame with barrel; 4 — barrel gasket; 5 — rod with cocking lever; 6 - store; 7 - sear; 8 - drummer; 9 - trigger; 10 — mainspring; 11 — handle screw; 12 - valve; 13 — handle; 14 — trigger; B - magazine latch.
Crosman C-TT Air Pistol Review
Crosman is an American company that produces high-quality air guns. In this case, the S-TT pistol was no exception. It is an almost complete copy of the original, with the exception of only a few small details. However, in this case the bolt frame does not move during the shot, which is why there is no feeling of a real weapon. This solution allows you to make more shots from one cylinder.
It is also worth noting the all-metal body and the weight and size of the weapon close to the original. The pistol fires using canisters of compressed CO2 gas, and it is installed in the pistol grip, as in most similar pistols.
The bullet ejection speed of the Crosman pistol is quite high, and the accuracy, due to the rather long barrel, will certainly please those who like to shoot.
Advantages and disadvantages
Advantages of the Crosman TT pistol:
- Good resemblance to the original;
- Full metal body;
- Good workmanship;
- Good accuracy;
- The pistol fits perfectly in the hand;
- Fairly high ball release speed;
- The paint is resistant to mechanical stress;
- Possibility of firing both self-cocking and pre-cocking;
- Weighty, which gives the impression of an original firearm model.
There are also disadvantages:
- After purchasing it is better to sort through;
- The fuse is plastic, which makes its reliability and durability questionable;
- The pistol, although metal, is made of silumin, which cracks quite easily;
- There is no Blowback system, due to which the bolt carrier does not move and there is no imitation of recoil;
- Extraneous inscriptions on the trunk that spoil the appearance;
- Although the gun is similar to the original, the appearance is mixed with elements from different versions.
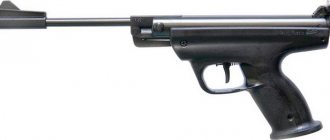
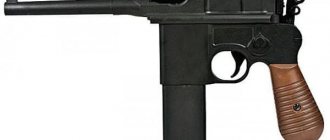
Photo of the Crosman C-TT air pistol
Purpose
This pistol is well suited for lovers of historical weapons, as it is similar to the original firearm. Also, it will not disappoint those who simply like to shoot at cans, since this pneumatic gun has a high ball release speed, as well as fairly high shooting accuracy. The pistol is also well suited for the shooting range, thanks to its unpretentiousness, low gas consumption and interesting appearance.
Due to the lack of a Blowback system and frame movement when firing, this pistol cannot be recommended for familiarization with the operation of military weapons.
Similar chapters from other books:
Complete creative freedom
Complete freedom of creativity Now general provisions, but all about the same thing - about the exclusive right and obligation to make decisions only yourself. “Article 37. The decision follows from the task and the situation. If the task as a basis for action is no longer sufficient, or if
“Almost a complete surprise for intelligence”
“Almost a complete intelligence surprise” When the CIA finally discovered the Soviet missiles ten days later, it was billed as a triumph. But at that time only a few of those in power thought so. “It was almost a complete surprise for our intelligence, with which
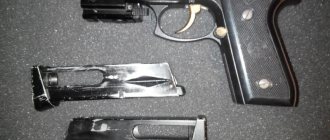
Pneumatic Makarov pistol Borner PM 49 and its complete disassembly/assembly
To completely disassemble a product such as a pneumatic PM, follow the step-by-step instructions:
1. Unscrew the Borner PM clamping screw with a hex key.
2. Take a Phillips screwdriver and unscrew the 8 screws of the PM 49 pneumatic housing. 7 are located on the right side of the pneumatic, and one, the longest, is under the barrel.
3. Take a flathead screwdriver and remove the barrel plug that is firmly in place.
4. The body of the Makarov Borner PM 49 air pistol consists of two parts. Once they are not fixed by anything, you can separate them.
5. Separately, I would like to note the story with the trigger rod, which flies off immediately after the parts of the pistol are separated. When assembling the PM 49 pistol, install it as shown in the photo.
6. During further disassembly and removal of the trigger, pay attention to how it is installed relative to the pistol barrel. When you remove it, the trigger spring immediately flies out of place.
7. Remove the trigger guard and trigger spring.
8. Remove the pistol trigger and the part with the spring that supports it.
9. Remove the barrel and gas chamber of the Borner PM 49 air pistol.
10. Unscrew the screw, remove the silumin part inside the housing that secures the weapon safety and remove it. Be careful not to lose the gasket that is located between the safety and the outside of the gun body.
Disassembly
The disassembly process for the Crosman C-TT model occurs in the following order:
- First you need to remove the plastic covers on the pistol grip and remove the gas cylinder, and then unload the pistol. The magazine also needs to be removed. After this, you can proceed to further disassembly.
- On the front of the gun, you need to knock out two pins that hold the plug.
- Now, holding the plug, move the frame to the rearmost position. Hold the frame and remove the plug with the spring. Then lift the back of the shutter up and remove it through the front.
- Now use a screwdriver to unscrew the piston and firing pin, which are located on the inside of the bolt frame.
- On the right side of the gun you need to unscrew the 7 bolts that hold the halves together. They remove this very half.
- Next, you need to unscrew three more bolts that hold the barrel with the valve. One is on the outside, and the rest are on the inside.
- We remove the part and disassemble it into three parts: the valve, the feeder and the barrel itself.
- The feeder consists of two parts and does not need to be disassembled at all.
- We unscrew the valve chamber from the back, after which you can carefully remove the remaining parts, namely the valve itself with a spring, washer and seal.
On the right side, carefully remove the trigger. Be careful, as it is mounted on an axle and is held in place by a spring. They are quite small and can easily get lost. We also remove the trigger, the trigger rod and the axle pin that connects them.
Disassembly process for the Crosman TT model:
Tuning
To make the gun look more believable, it is necessary to erase all the inscriptions from the barrel. This can be done using fine-grained sandpaper. Buy the finest one and rub very carefully so as not to damage the base paint.
After disassembly, it is necessary to remove debris; if any, the threaded connections can be sealed with FUM tape. Remove all excess grease.
You can drill out the hole on the valve a little to get an increase in speed. This is not recommended, since such an operation will only lead to an increase in gas consumption, and will also significantly reduce accuracy due to excess gas at the outlet of the barrel.
To make it yourself, you need to buy a 5-cc syringe with a rubber seal. We cut off the conical part from it and sand it. Next, remove the elastic band and cut off approximately 0.05 mm from the back. We pierce a hole and put a piston on the needle. There is no need to remove the retaining ring.