Recommendations
The basic recommendations for disassembling a Makarov pistol are identical to those for all types of weapons: All maintenance work should be performed only on a flat surface that does not allow loss of parts; it is also recommended to choose a surface whose color differs from the color of the pistol and components. Place the components and parts of the weapon carefully, in the order in which they were removed.
When disassembling and assembling a weapon, perform all actions with smooth movements, avoiding impacts, squeezing parts and using unnecessary force to remove mechanisms.
When assembling weapons, be sure to check the serial numbers of the product (in case of simultaneous assembly by several people).
Device
The pneumatic copy is made on the basis of the original combat pistol; many parts and mechanisms remain unchanged. Therefore, the design of the Makarov air pistol largely coincides with the original. Before entering, I suggest you look at the interactive diagram of the combat PM:
PM work plan. Click "DEVICE" to begin
Now we apply the Makarov bus scheme. A little different, but overall still the same.
Diagram of the Makarov MP-654k air pistol (general structure and magazine)
Key points about the design of the real Makarov:
- The general diagram of all Makarov pneumatic mechanisms is presented in the figure above.
- The ejection of a bullet from the hole occurs due to the energy of the compressed gas of the cartridge located in the magazine. The gas portion per shot is cut off due to the operation of the firing mechanism.
- The bullet is fed into the barrel line by a spring in the magazine.
- The USM allows you to fire both from your own weapons and from a preliminary platoon.
- There is a fuse on the left side of the bolt. When placed in safe mode, the trigger is safely released without firing, ensuring that the trigger cannot strike the firing pin.
- The gun can use two types of cans - 7 g. (when using a full adapter) and 12 g.
Police weapons. Part 1 | Page 1 | Online library
Police weapons
Part 1
Each internal affairs officer must own a service weapon, that is, a weapon in service with the police department.
Possession of a service weapon includes: knowledge of the combat capabilities and design of the weapon, the ability to disassemble and reassemble it in a limited time, clean, inspect, and check the combat.
This manual examines the design and operation of pistols and revolvers in service with the Department of Internal Affairs, their combat properties, the procedure and rules for handling them.
Introduction
In terms of combat capabilities, pistols and revolvers are distinguished as a separate type of weapon. This type of weapon has pronounced differences from other types (machine guns, rifles, machine guns, etc.). Pistols and revolvers ensure destruction of manpower only at short distances - up to 50 m (sometimes up to 100 m), have a small mass, usually less than 1 kg, and dimensions that allow you to carry the weapon constantly with you and quickly open fire from it from various provisions.
Pistols and revolvers have many common features arising from their purpose, and differ fundamentally only in the design of the mechanisms. A pistol, in the general sense of the word, is a firearm that is held with one (or two) hands while firing. This definition does not provide for the design features of the weapon, therefore a revolver, in essence, is also a pistol, but uniquely designed. The revolver's charges (cartridges) are located in a rotating drum, and this design feature turned out to be so significant that it gave it the right to an independent name (revolver - from the English revolve - to rotate). A number of innovations, the main one being the rotating drum, made revolvers qualitatively different from their predecessors, pistols.
General characteristics of revolvers
As mentioned above, a characteristic part of a revolver is a drum with chambers for cartridges. The drum rotates around its axis, and at the same time its chambers are alternately combined with a fixed barrel, acting as a chamber. The drum turns are carried out mechanically using the muscular strength of the shooter. This force is transmitted to the drum through the trigger mechanism. In this case, the shooter’s efforts are mainly spent on compressing the mainspring when cocking the hammer, which is carried out either by pressing a finger on the trigger spoke or on the trigger. This pressure causes the trigger mechanism to work, and it operates the device that turns the drum. Once all the cartridges are used up, the spent cartridges remain in the drum. To load, you need to free the drum from the cartridges, and then re-equip it with cartridges.
Based on the design of the trigger mechanisms, revolvers are divided into simple or single action revolvers, double action revolvers and self-cocking only ones.
Single-action revolvers allow you to fire a shot only after pre-cocking the hammer. In this case, the shooter must pull the trigger back with his finger each time, that is, put it in combat cock. When cocking the hammer, the drum automatically rotates, aligning the chamber with the next cartridge with the barrel. Pulling the trigger releases the hammer and fires the weapon.
Double-action revolvers have become much more widespread, the mechanisms of which, in addition to the method of firing described above, also allow self-cocking shooting, that is, by pressing the trigger without first cocking the hammer. In this case, the trigger moves back, and the drum rotates until it aligns with the barrel of the next chamber. Having reached the rearmost position, the trigger, without being cocked, is released and strikes the cartridge primer. For the next shot, you need to release the hook and press it again. Self-cocking shooting significantly increases the rate of fire, but reduces the accuracy of fire, as it requires the use of more force when pressing the trigger. Double-action revolvers allow the shooter, depending on the situation, to choose one or another type of fire.
Some systems have a trigger mechanism that allows only self-cocking fire. In most cases, the trigger in such systems is hidden inside.
The trigger mechanisms of the vast majority of revolvers have a so-called return trigger. The meaning of this device is that the trigger, after breaking the cartridge primer, moves back somewhat, allowing the drum to rotate freely when loading. In addition, in the lowered state, the trigger, which has a return device, does not touch the cartridge primer with its striker and guarantees against firing a shot in the event that an accidental blow is applied to the trigger from behind, since the trigger can only reach its extreme position when the trigger is pressed all the way.
The indisputable advantage of the revolver is the simplicity of its design, and, consequently, reliability in operation. A good revolver - in good working order, properly lubricated - is almost trouble-free in shooting. Almost every thousand shots there is no more than one delay, mainly due to misfire, and the design of the revolver allows you to immediately repeat the trigger by pressing the trigger. It is unlikely that the next cartridge will misfire.
The revolver is also supported by the fact that, as a mechanical weapon, it is not dangerous to use in inexperienced hands.
You can judge the presence of cartridges in the drum by externally examining the revolver, and the cocked hammer is clearly visible right away. In systems with a hidden trigger, where only self-cocking firing is possible, the danger of a shot as a result of accidentally pressing the trigger, for example, in a pocket, is eliminated, since self-cocking firing requires pressing the hook with great force, exceeding the weight of the weapon.
The constant readiness of a revolver to fire is one of its most important qualities. To start shooting from a self-cocking revolver, you do not need to perform any preliminary operations. The ability to almost instantly fire a shot from a revolver just picked up meets one of the main requirements for a weapon of personal self-defense.
A positive quality of revolvers is their unpretentiousness to cartridges. Hence the possibility of using cartridges with black powder, which is much less susceptible to damage than smokeless gunpowder. The possibility of using black powder is also due to the fact that powder gases are used in a revolver only to eject a bullet, do not penetrate the mechanism and do not pollute it.
The disadvantages of revolvers include their less compact shape with a protruding drum and a handle protruding back, almost empty of any mechanisms, and most importantly, a smaller number of charges compared to pistols, reloading time and, as a result, a lower rate of fire.
The last drawback applies to all revolvers, and especially to systems with alternate extraction (ejection) of cartridges (Fig. 1).
Special shields are mounted on the bodies of such revolvers, blocking access to the chambers of the drum from the rear. One of the shields is attached movably, forming a door. When loading the revolver, the door swings back, revealing the entrance to one of the chambers of the drum. A cartridge is inserted into this chamber. The drum is turned by hand, and a cartridge is also inserted into the next chamber. And so on until the drum is full. After this, the door closes - the revolver is loaded. After firing, to remove the cartridges, you need to open the door and, using a special rod - a ramrod, available on the revolver, push them out of the chambers one by one.
Rice. 1. Alternately extracting the cartridges.
Attempts to enhance the combat power of revolvers were carried out in two directions. One of them provided for an increase in the number of chambers in the drum, without the use of any devices that speed up reloading. This is how even 30-round revolvers appeared. But this path led to excessive bulkiness and weight of the weapon.
Another way was to introduce devices that speed up recharging. The solution to the problem was the simultaneous extraction of cartridges, the essence of which was that the entire rear part of the drum was first opened, and then all the cartridges were pushed out of the chambers at once using an extractor (Fig. 2).
Tactical and technical characteristics of the Makarov pistol
Makarov managed to significantly reduce the dimensions of his pistol, as he used Walter's layout scheme, developed in 1929. The weapon's automatic operation is based on the recoil energy of the bolt. The internal structure of PM has nothing in common with Walter's system, so Makarov's development cannot be considered a copy of Walter.
Makarov received an excellent gun, which was very cheap to produce and at the same time had good combat characteristics. 9 mm cartridges for the Makarov pistol could provide this weapon with excellent stopping power. Blunt PM bullets provide more energy to the body than 7.65 mm bullets from a TT pistol. The low price of the PM is due to the fact that the parts of the trigger mechanism perform several functions at once, which made it possible to reduce their total number. The abandonment of the rear wall frame significantly reduced the overall weight of the gun.
PM cartridges, equipped with blunt bullets, are fed from an 8-round box magazine (magazine). The magazine is equipped with a special device that locks the bolt in the rear position when the last cartridge is empty, which indicates the arrow required to insert a new magazine. Experienced shooters require 3 seconds to change magazines, making the PM a very fast-firing pistol. Since the Makarov pistol uses internal organs that must account for all shots and ammunition used, do not forget to collect spent cartridges.
The PM's sights are open, which does not prevent good shooters from firing at a distance of up to 50 meters, since the pistol barrel is rigidly fixed. The pistol fits perfectly in the hand, the magazine does not pop out spontaneously, as sometimes happened with the TT.
Many believe that there is a special modification of the PM with a silencer. This information is not true, since the PM is the simplest and most inexpensive pistol possible. Using a muffler on it is a waste of money. The PM with a muffler was produced in Bulgaria, but this is rather a manual repair. In addition, extended barrels for the Makarov pistol were produced in China, on which a silencer could be installed. These long barrels were exported to the USA. At the same plant, according to rumors, a batch of PMs with silencers was produced, but the silencer impaired the overall survivability of the mechanisms and did not lead to the expected reduction in noise when fired.
General structure and operation of parts of the Makarov pistol (PM)
The pistol is simple in design and handling, small in size, comfortable to carry and always ready for action. The pistol is a self-loading weapon, since it is reloaded automatically during shooting. The operation of the automatic pistol is based on the principle of using the recoil of a free shutter. The bolt and barrel have no clutch. The reliability of locking the barrel bore when fired is achieved by the large mass of the bolt and the force of the return spring. Thanks to the presence of a hammer-type self-cocking trigger mechanism in the pistol, you can quickly open fire by directly pressing the tail of the trigger without first cocking the hammer.
Safe handling of the pistol is ensured by reliably operating fuses. The pistol has a safety located on the left side of the slide. In addition, the trigger is automatically cocked under the action of the mainspring after the trigger is released ("recline" of the hammer) and when the trigger is released.
The trigger, under the action of the curved (rebound) end of the wide feather of the mainspring, is rotated at a certain angle from the bolt (this is the “release” of the trigger) so that the nose of the sear is in front of the safety cocking of the hammer.
After the trigger is released, the trigger rod, under the action of the narrow feather of the mainspring, will move to the rear extreme position. The cocking lever and the sear will go down, the sear, under the action of its spring, will press against the trigger and the trigger will automatically engage the safety cock.
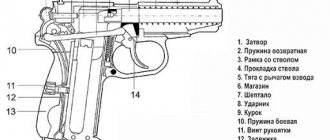
Rice. 2. Main parts and mechanisms of the pistol: 1 - frame with barrel and trigger guard; 2 - bolt with firing pin, ejector and fuse: 3 - return spring: 4 - parts of the trigger mechanism; 5 — handle with screw; 6 - shutter stop; 7 - store
The PM pistol consists of the following main parts and mechanisms (Fig. 2):
- frames with barrel and trigger guard;
- bolt with firing pin, ejector and fuse;
- return spring;
- trigger mechanism;
- handles with screw;
- shutter stop;
- store.
Each pistol comes with accessories: a spare magazine, a wiper, a holster, a pistol strap.
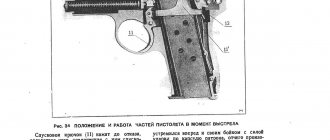
To fire a shot, you must press the trigger with your index finger. At the same time, the trigger strikes the firing pin, which breaks the cartridge primer. As a result, the powder charge ignites and a large amount of powder gases is formed. The bullet is ejected from the barrel by the pressure of the powder gases. The bolt, under the pressure of gases transmitted through the bottom of the sleeve, moves back, holding the sleeve with the ejector and compressing the return spring. When the cartridge meets the reflector, it is thrown out through the shutter window.
When the bolt moves to the rearmost position, it turns the trigger on the trunnions back and puts it in cocking position. Having moved back all the way, the bolt returns forward under the action of the return spring. When moving forward, the bolt rammer pushes the next cartridge out of the magazine and sends it into the chamber. The bore is locked with a blowback bolt; the gun is ready to fire again.
Disassembling and assembling the pistol
Analysis of the Makarov pistol can be complete or incomplete.
Complete disassembly of the Makarov pistol is carried out for the purpose of maintenance, oil change and cleaning of the weapon after being in aggressive environments.
Partial disassembly of the PM is carried out to clean the weapon from soot from gunpowder, to study the condition, as well as in sports and competitive discipline among employees of various law enforcement agencies at various competitions.
The procedure for incomplete disassembly of the PM.
1. Remove the magazine from the handle base. Holding the pistol by the handle with your right hand, with your left thumb, pull the magazine latch back until it stops, while simultaneously pulling the protruding part of the magazine cover with your left index finger, remove the magazine from the take-up base. Check whether there is a cartridge in the chamber, to do this, turn off the safety (move the flag down), move the bolt to the rear position with your left hand, put on the bolt stop and inspect the chamber. Release the shutter by pressing the shutter delay button with your right thumb.
2. Separate the sash from the frame. Taking the pistol by the handle with your right hand, lower the trigger guard with your left hand and, turning it to the left, position the frame so that it is held in this position. With your left hand, move the bolt to its rearmost position and, lifting the rear end, allow it to move forward under the action of the return spring. Detach the shutter from the frame.
3. Remove the recoil spring from the barrel. Holding the frame with your right hand by the handle and turning the return spring toward you with your left hand, remove it from the barrel. Reinstall the trigger guard.
Question 19. The procedure for assembling the PM after incomplete disassembly.
1. Place the return spring on the barrel. Taking the frame by the handle with your right hand, with your left hand push the return spring into the barrel with an extreme turn of a smaller diameter.
2. Attach the sash to the frame. Holding the grip frame with your right hand and the bolt with your left, insert the free end of the recoil spring into the breech bore and move the breech to the far rear position so that the muzzle of the barrel passes through the breech bore and protrudes outward. Lower the rear end of the bolt onto the frame so that the longitudinal projections of the bolt fit into the grooves in the frame, and, pressing the bolt against the frame, release it. The bolt, under the action of the return spring, vigorously returns to the forward position. Turn on the fuse (raise the flag).
3. Insert the magazine into the base of the handle. While holding the pistol with your right hand, use the thumb and index finger of your left hand to insert the magazine into the base of the grip through the lower window of the grip. Press down on the magazine cover until the latch snaps into place over the tab on the magazine wall.
4. Check that the gun is assembled correctly after partial disassembly.
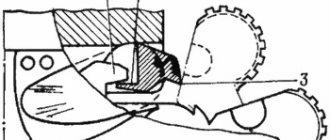
Purpose and design of the trigger rod with cocking lever, trigger and main spring.
The trigger rod with the cocking lever serves to release the trigger from combat cocking and cock the trigger when the tail trigger is pressed. The trigger rod has pins at the ends. The front pin connects it to the trigger, and the rear pin connects to the cocking lever. The cocking lever has: a trigger protrusion, with the help of which it disengages from the lever during the reverse movement of the bolt: a recess for the protrusion of the lever; a self-igniting protrusion that arms the hammer when the tail trigger is pulled; the heel on which the thin feather of the spring rests. The heel of the cocking lever is located in the annular recess of the trigger.
I - trigger; 2 — cocking lever; 3 — trigger rod pins; 4 — trigger protrusion of the cocking lever; 5 — clipping; 6 — self-armoring protrusion; 7 — cocking lever heel
The trigger is used to release the hammer from cocking and cock the trigger when firing with self-cocking. 1 - pin; 2 - hole; 3 - Shank: pins that fit into the sockets of the frame pins; hole for connecting to
trigger and tail. The trigger is inserted with the head into the frame jamb window.
The mainspring is used to operate the trigger, cocking lever, and trigger. Has: a large feather for the trigger; a narrow feather for acting on the cocking lever and trigger; in the central part there is a hole for putting the spring on the handle with a threaded hole in the base of the handle. The lower end of the mainspring is the magazine release. The wide end of the mainspring is bent to allow the trigger to "bounce", for example to set the trigger on the safety in the deflated position. 1 - wide feather; 2 - narrow feather; 3 — cantilever ends; 4 - hole; 5 - latch
The spring retainer is used to secure the spring to the base of the handle.
Cheat sheets for exams and tests
| See also... |
| Cheat sheets for the exam in the discipline of fire training |
| Use of firearms |
| Purpose, design and principle of operation of the UZRGM fuse |
| History of the creation and development of hand fragmentation grenades |
| Initial bullet speed and its practical significance |
| Phenomena occurring when fired from a small weapon |
| The influence of shooting conditions on bullet flight |
| Reasons for bullet scattering |
| The procedure for incomplete disassembly of the PM |
| Purpose and design of the striker, ejector and fuse (PM) |
| Purpose and device of the shutter |
| Procedure for inspection, cleaning and lubrication of PM |
| Purpose and device of the pistol accessory |
| The operation of pistol parts and mechanisms to expend cartridges from the magazine |
| Operation of parts and mechanisms of a loaded pistol when the safety is turned on |
| Checking the pistol's combat and bringing it to normal combat |
| Conditions and procedure for performing exercises from PM |
| Delays when firing from an MCM pistol and ways to eliminate them |
| Design and purpose of TOZ-36 and TOZ-49 revolvers |
| Design of a 5.6 mm small-caliber cartridge |
| Purpose, design and technical characteristics of the TOZ-18 carbine |
| Purpose and combat properties and design of the RGD-5 grenade |
| Handling pomegranates, care and conservation |
| Purpose and combat properties of the AK-74 assault rifle |
| Delays when firing the AK-74 and how to eliminate them. |
| Operation of parts and mechanisms of the AK-74 assault rifle |
| Design of 5.45 mm and 7.62 mm (model 1943) cartridges |
| All Pages |
PM mainspring repair
If the spring were of poor quality, it would bend, which is typical for molded PMs currently produced.
I rent and rent, same thing twice a week. I have no right to keep it and wear it constantly; they were given for training - so please pass. So I unload - I don’t recharge very often. But training without ammunition occurs and takes up 50 percent of the total shooting time.
This is exactly what happened to me during the last replacement: I tightened the screw too much, the magazine was difficult to insert; Unscrewed it half a turn. So maybe this should be okay.
The magazine will fit, but the screw should. Relaxed."
but on lazy descents, etc. described above: when I was studying, 2 years in fire training, about 19 o'clock in the evening, quite normal, workers were constantly used, but for some reason they decided to train them then, all the assembly, disassembly, and testing of descents were worked out on them , shooting without weapons-trigger is all I need: our platoon had training 2 times a week, in addition there were platoons that also practiced shooting - imagine a load on a gun, and I have never heard of them having anything it was broken, the drummers were lost, it was
but the rest don’t matter and how long they were “tormented” before us - I don’t know.
in this case, most likely, either the hardware is faulty or the user is making a mistake, although I can’t even imagine how the Makar could have been assembled incorrectly.
If the spring were of poor quality, it would bend, which is typical for molded PMs currently produced.
Incomplete disassembly of PM
Partial disassembly of the pistol is carried out by the owner of the weapon in accordance with the schedule or other documents. The order of partial disassembly is as follows:
- Hold the pistol by the handle, release the latch and remove the magazine.
- Slide the safety down.
- After sliding the bolt cover, inspect the barrel for ammunition. If a cartridge is present, then pull the bolt all the way, remove the ammunition, then release the cartridge case, which returns to the firing position under the action of the bolt spring.
- Pull the jumper down and move it to the left, rotating it until it rests against the body of the gun. In addition, it is recommended to hold the bracket with your finger until the end of disassembly.
- Having pushed the bolt housing all the way up, lift the back and, taking the housing, allow the spring to return it to the firing position, then manually complete the movement, finally disconnecting it from the mechanisms.
- Remove the return spring using a rotating motion.
Clean and lubricate the main parts of the gun only after complete disassembly. The procedure for assembling the PM after incomplete disassembly occurs in the reverse order. At the end, you need to check the quality of the work done: cock and release the trigger, turn the cocking safety on and off, check the magazine latch.
Disassembly and cleaning
In order to completely disassemble the pistol, the usual operating instructions are not enough. It is best to observe the entire procedure from the outside. If there is no one to show this process in practice, training videos can help.
Complete disassembly of the weapon may be necessary after accidentally dropping the pistol into the mud. It is not worth disassembling pneumatics unless absolutely necessary.
During routine lubrication or cleaning, partial disassembly and maintenance of components and mechanisms can be performed. For disassembly you will need:
- remove the clip;
- pull the trigger guard down - it becomes delayed on the left side and allows you to remove the bolt frame;
- Pull the shutter towards you all the way and lift the rear part up. The front of the bolt carrier is then released from the hook and it is removed through the barrel;
- the return spring, which is located on the barrel, is removed.
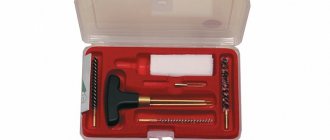
To clean the barrel you will need a metal cleaning rod. Cleaning the barrel consists of wiping it with a rag soaked in silicone oil with a cleaning rod, which is pushed into the bore. Then, when there are no dirty spots or residues from lead bullets on the rag, the barrel is wiped dry.
To clean different parts, use a regular toothbrush. A small amount of oil should be dropped into the contact areas of the moving mechanisms using an aerosol liquid or an oil can with an extended tip.
When disassembling pneumatics, you must follow the manufacturer's instructions, which are indicated in the operating manual. Lubrication and cleaning are carried out in several stages:
- treating the surface of the case with oil, without wiping dry. This will allow the oil to create a small film that will protect the steel surface from corrosive processes;
- USM lubricant. It is more convenient to do this if you add a little oil on top of the moving mechanisms, then fire 2-3 blank shots. There is no need to completely disassemble the firing mechanism once again;
- cleaning the barrel with a rag on a cleaning rod until foreign deposits are completely removed (especially after using lead shot). At the end, the remaining lubricant is wiped dry with a rag.
The pistol is assembled in the reverse order.
Complete disassembly of the PM
A full analysis is carried out if it is necessary to remove serious contaminants (ingress into liquid clay, silt), repair weapons with replacement of parts, change lubricants (when changing the climatic zone). The steps to completely disassemble a weapon are as follows:
- Hold the pistol by the handle, release the latch and remove the magazine.
- Disable the security platoon.
- After sliding the bolt cover, inspect the barrel for ammunition. If a cartridge is present, then pull the bolt all the way, remove the ammunition, then release the cartridge case, which returns to the firing position under the action of the bolt spring.
- Pull the jumper down and move it to the left, rotating it until it rests against the body of the gun. In addition, it is recommended to hold the bracket with your finger until the end of disassembly.
- After sliding the latch cover all the way, lift the backrest and, holding the cover, allow the spring to return it to the forward position, then complete the movement by hand, finally disengaging it from the mechanisms.
- Using a circular motion around the barrel, remove the recoil spring.
- While pressing the trigger with your thumb, release the spring by pressing the trigger.
- Use a metal rod - a screwdriver or any thin object - to disconnect the trigger spring from the bolt stop. Rotate the lever by hand until it contacts the notched tabs in the bolt seat. Pull the burn out of your body.
- Unscrew the locking screw and remove the jaws from the handle body.
- While pressing the mainspring housing against the handle body, slide the mainspring lock down, after which it can be disassembled.
- Rotate the trigger until the tabs on the pin line up with the slots in the frame, then slide it toward the barrel to remove the trigger from its housing. While holding the body, pull out the rear of the trigger, then pull the hinge pin out of the trigger groove.
- Slide the safety clip down while holding the housing. Pull the trigger until the tabs line up with the cutouts on the body, then remove the trigger.
- Move the safety catch to the up position, then use your fingers or a tool to move the flag to the left of the housing and, by turning the flag counterclockwise upward, remove the housing.
- Gently tap the back of the bolt against your palm to remove the bolt firing pin.
- After placing the bolt cap on a flat surface with the extractor window up and to the right (as shown on the installed gun), using a cleaning attachment or other tool, press down on the oppressor remover, grasping the extractor with your fingers and, rotating the ejector along its axis, remove it from the groove.
- Carefully pull the spring and stops out of the seat.
After completing maintenance, reassemble in reverse order.
Be especially careful when installing the trigger - the rod must be installed by pulling the trigger back, then insert the pressure pin into the trigger slot and lower the other end onto the frame of the weapon. Then check the travel of the trigger and link.
Check the quality of the assembly by checking all components of the pistol in action: the safety, the magazine stop for possible fall from the handle, the movement of the trigger and its contact with the firing pin.
PM device and circuit
Loading is carried out using the recoil energy of the shutter. The trigger mechanism provides for firing in two ways. This can be done by pre-cocking the hammer or using self-cocking. The trigger for the next shot is cocked automatically.
The design uses a flag fuse. It is located on the left side of the shutter. In the closed position, it locks the hammer, trigger, firing pin and bolt. If the hammer was cocked before this, it is automatically de-cocked. Uses a single-stack magazine that holds 8 rounds.
When you press the trigger, the firing pin is released from the sear and, under the influence of the mainspring, hits the firing pin. After this, the firing pin breaks the primer and as a result the charge ignites and a shot is fired.
The spent powder gases discard the cartridge case. She pulls the shutter back. In this case, the spent cartridge is removed and the return spring is compressed. In this case, the sleeve hits the reflector and is thrown out. The shutter in the rearmost position turns the hammer back and cocks it.
Next, the spring begins to move forward. At this time, the bolt snatches the cartridge from the magazine and sends it into the chamber. When the bolt moves to the forward position, it locks and closes the barrel. The weapon is now ready for the next shot.
You must first release the trigger and then press it. As a result, a shot will be fired. These actions will be repeated until the last cartridge in the magazine is expended. When all the ammunition is loaded, the bolt will engage the slide stop and remain locked in the rear position.
Cleaning and Lubrication - General Recommendations
Time needs to be devoted to weapons, including pneumatic ones. If it is not cleaned or lubricated, the quality of the shot will deteriorate over time. After each shot, a visual inspection of the firearm must be performed. If it gets wet, wipe it with a dry cloth and disassemble it if necessary. Check for rust, cracks, chips.
We start cleaning from the trunk. There is always lead in the grooves. The body must be freed from it with a stick and rags. Apply some lubricant. The barrel has been cleaned.
The trigger mechanism must be lubricated after 1500-2000 shots. Don't put too much oil as dirt will accumulate on it.
Caution must be used when using firearms.
Application
The PM is considered a classic pistol intended for civilian and police use. Despite the fact that the Makarov pistol is not capable of conducting 100% aimed and high-speed fire, it is widely used both at firing range and in combat situations. The Makarov pistol is still in service with the Russian Federation Army, with a gradual transition from more advanced weapon designs such as the Yarygin pistols.
But the strongest competitor to the PM pistol is the PMM - a modernized Makarov pistol, equipped with an enlarged magazine for twelve high-pulse cartridges (there are eight in the PM), with more power than standard PM cartridges.
Bullets for the Makarov pistol are endowed with increased stopping power - they do not have a hard core. This ensures that the Makarov pistol can be used by law enforcement agencies when working in the city.
Disassembly and assembly of PM: types, when used
Testing the ability to use a Makarov pistol, knowledge of its design and the purpose of all its constituent elements is carried out by carrying out complete and incomplete disassembly of the weapon. These procedures are also performed in some emergency situations when the gun needs to be cleaned.
Partial disassembly of the PM is carried out if the weapon needs to be cleaned, lubricated all parts, and also checked for its effectiveness in battle.
Complete disassembly is only recommended if the gun is heavily soiled, has been exposed to rain or snow, or has been dropped into water. The mechanism of a weapon exposed to such influences urgently needs thorough cleaning and inspection.
Complete disassembly of the PM is a very rare procedure. This is due to the fact that it significantly reduces the wear resistance of the mechanism and its components, which reduces the service life of the weapon.
Complete disassembly of the PM is also carried out when switching to a new pistol lubricant. If necessary, repairs of the entire mechanism of the gun or its individual parts are also carried out.
How is the incomplete assembly of a Makarov pistol assessed?
The pistol lies on the table, the subject is at the table, hands do not touch the weapon; At a signal, the subject partially disassembles the weapon according to the established rules; The appraiser monitors the correct disassembly of the units, checks the item - it is necessary to perform the actions smoothly, without throwing parts or scattering them across the surface; Upon completion of disassembly, the subject places the barrel of the pistol and lowers the weapon along the body. The pistol remains disassembled; At the evaluator’s signal, the subject assembles the weapon, after which he checks the functionality of the weapon.
It is prohibited to disassemble a weapon if there is ammunition in the magazine.
The evaluation of the subject's actions is assessed by the evaluation combined for both processes.
How to assemble an air pistol
Assembly and disassembly of the Makarov air pistol (Borner PM 49) occurs differently than its combat counterpart. In this case, it is necessary to comply with the general requirements for this procedure. A clean area has been prepared for disassembly and reassembly.
The parts are arranged in the order they were removed. For complete disassembly, follow these steps:
- The log is being restored.
- Remove the plastic cheeks from the handle.
- Use a hex wrench to unscrew the fastening screw to release the gas cylinder.
- The weapon is placed on the table right side up. Next, seven bolts are unscrewed. Turn the air gun so that the pointing device is facing down. Another bolt is unscrewed from the barrel.
- To complete the next step, you will need a flat blade screwdriver. With its help, you need to disconnect the receiver coupling, and then disconnect it by hand.
- The weapon is divided into two halves.
- Disconnect the spring trigger.
- Remove the trigger with the spring plate.
- The barrel and gas chamber have been dismantled.
- Now you need to unscrew the screw that secures the safety to the gun body. There is a thin rubber seal between the safety and the body of the weapon that must be removed.
To reassemble the airgun, follow these steps in reverse order.
Technical characteristics of TT pneumatics
Before moving on to the main topic, let's first get acquainted with the pneumatic "Tula Tokarev" in a little more detail. To do this, the easiest way is to look at the passport with technical characteristics, which is necessarily included with the weapon. Here's what information you can find there:
| Characteristic | Parameter |
| Caliber | 4.5 mm |
| Barrel length | 190 mm |
| Barrel type | threaded |
| Ammunition type | BB balls |
| Magazine capacity | 18 + 1 balls |
| Shot speed | up to 120 m/s |
| Rate of fire | 78 rounds per minute |
| Power | 3 J |
| Aim | front sight, dovetail |
| Energy source | gas cylinder |
| Weight | 740 grams |
Thus, it immediately becomes clear that the air TT is a pistol designed for recreational purposes and airsoft. The power of the muzzle energy is not enough to hunt even small game. But a fairly spacious magazine allows you to effectively use the model for training purposes. In addition, this is also evidenced by the possibility of modifying the weapon - on the receiver there is an 11-mm dovetail sighting rail, suitable for attaching almost any existing body kit.
Pneumatic Makarov pistol Borner PM 49 complete disassembly and assembly of weapons
The process of disassembling the Borner 49 air pistol differs significantly from disassembling its combat counterpart. The pneumatic model has no external moving parts other than the hammer and trigger.
Complete disassembly
Complete disassembly of the Borner 49 is much simpler than the original. The tools you will need are a Phillips and slotted screwdriver and a flat surface. The pneumatic disassembly process occurs as follows:
- Remove the magazine from the pistol grip;
- Carefully remove the plastic cheeks of the handle without damaging the cheek-mounting antennas;
- Use a hex wrench to unscrew the fastening screw, freeing the gas cylinder;
- With the weapon on the table, unscrew the seven bolts on the right side, then turn the weapon with the sights down and unscrew the eighth bolt under the barrel;
- Taking a slotted screwdriver, pry up the barrel sleeve, then pull it out with your hands;
- Separate the weapon into two halves;
- Remove the trigger with the spring;
- Remove the trigger along with the spring pressure plate;
- Disassemble the barrel and gas chamber of the weapon;
- Remove the screw that secures the safety to the gun body. It is necessary to preserve the rubber gasket between the fuse housing and the weapon body.
Assembly of the Makarov air pistol occurs in the reverse order.
Repair of TT air pistol
The Tula Tokarev air pistol is largely loved due to the fact that it can be repaired at home without having much knowledge in the field of weapon design. Here is a list of the main problems, as well as recommendations to get rid of them:
- Elimination of defects or deformation of the sighting device. A crooked rear sight and front sight is one of the main problems that TT owners encounter during operation. However, even if you come across a defective model, this is not a reason to hang your nose. You can deal with the defect yourself by making an additional slot in the rear sight using a file. This will expand the horizontal adjustment function.
- Repair of the trigger mechanism. Problems of this kind are usually associated with wear of the mainspring (the standard version is enough for no more than 5 thousand shots). The problem is resolved by replacing the part with a new one. As for other parts of the trigger, they almost never break, since they are made of high-quality weapons-grade alloy. The most important thing is not to damage anything yourself in the process.
- Troubleshooting problems with the store. The main problem with the TT is that its cartridge reservoir is made according to a different design than the pistol itself. Because of this, the tightness of the puncture unit in the gas cylinder is often broken. To prevent this from happening, it is necessary to monitor the amount of air being released. If a problem does arise, then it will be cheaper to replace the magazine with a new one than to try to repair it.
- Air valve depressurization. Unlike the Makarov pistol, the TT uses a system with a large number of screws and pins. This simplifies the weapon manufacturing process, but increases the risk of depressurization. However, in most cases, the problem is resolved by replacing the fastener with a larger one (you will also have to create a new fastener).
- Deformation of the mainspring. Any owner of a TT air pistol will sooner or later encounter this problem. The best option would be to replace the element. However, if you have the opportunity to take the gun to a service center, then you can do without radical measures. Craftsmen will be able to put the old part back into service if the level of damage allows this.
As you can see, you can cope with most problems even at home. The most important thing is to have a good repair kit on hand and follow advice from the professionals. However, you should not go to extremes when a cheap part breaks. It is much easier and faster to replace it with a new one than to try to fix a complex defect.
Pneumatic Makarov pistol Borner PM 49 complete disassembly and assembly of weapons
The process of disassembling the Borner 49 air pistol differs significantly from disassembling its combat counterpart. The pneumatic model has no external moving parts other than the hammer and trigger.
Complete disassembly
Complete disassembly of the Borner 49 is much simpler than the original. The tools you will need are a Phillips and slotted screwdriver and a flat surface. The pneumatic disassembly process occurs as follows:
- Remove the magazine from the pistol grip;
- Carefully remove the plastic cheeks of the handle without damaging the cheek-mounting antennas;
- Use a hex wrench to unscrew the fastening screw, freeing the gas cylinder;
- With the weapon on the table, unscrew the seven bolts on the right side, then turn the weapon with the sights down and unscrew the eighth bolt under the barrel;
- Taking a slotted screwdriver, pry up the barrel sleeve, then pull it out with your hands;
- Separate the weapon into two halves;
- Remove the trigger with the spring;
- Remove the trigger along with the spring pressure plate;
- Disassemble the barrel and gas chamber of the weapon;
- Remove the screw that secures the safety to the gun body. It is necessary to preserve the rubber gasket between the fuse housing and the weapon body.
Pistol characteristics (TTX)
The technical characteristics of the Makarov pistol are as follows:
Its weight without cartridges is 0.73 kg, the loaded gun is 0.81 kg.
The length of the pistol in millimeters is 161.5, including the barrel length - 93.5. Width and height are 30.5 and 126.75, respectively.
This is a pistol with a rate of fire of 30 rounds per minute. The initial bullet speed is 315 meters per second.
Characteristics of the PM relative to the firing range, in meters: aiming point - 50, maximum - up to which the bullet retains its lethal effect - 350. The pistol has an open sight.
A standard Makarov pistol magazine holds 8 rounds.
To find out exactly how many cartridges are in the store, pay attention to the PM modification, as this number may vary. The Makarov pistol uses the 9x18 mm PM cartridge. The rifle caliber of the Makarov pistol is 9.27 ± 0.075; for margin - 9.00 ± 0.06. The barrel has 4 grooves 4.5 ± 0.2 mm wide, rifling pitch 260 ± 20 mm. Cartridge weight 10 g, bullet 6.1 g. Cartridge length 25 mm. For firing from the PM, cartridges with conventional or tracer bullets can be used. Shooting is carried out with single shots.
When indicating the tactical and technical characteristics of the Makarov pistol, it is worth noting its good accuracy. When shooting at 25 meters with standard 57-N-181 cartridges, the dispersion radius of the R100 will be 75 mm. When shooting at 50 meters, this figure is 160 mm, at 10 meters - only 35 mm. To control the battle from a gun, a 25 shot is used in a black circle with a diameter of 25 cm, which is mounted on a shield, the height of which is 1 m and the width is 50 cm. The norm with 4 holes is within a 15 cm circle. However, to comply with the requirements, the midpoint of impact must deviate from maximum control by 5 cm.
Technical characteristics of PM49
| Characteristic | Parameter |
| Caliber | 4.5 mm |
| Shot source | CO2 gas cartridge |
| Ammunition | Copper-plated balls |
| Trunk | Metal, no rifling |
| Bullet speed | 125 m/s |
| Shots per cylinder | 60 |
| Number of cartridges in the magazine | 17 pieces |
| Shot strength | No more than 3 Joules |
| Material of manufacture | Aluminium alloy |
| Blowback system | absent |
| Weight | 0.65 kg |
| total length | 16.5 cm |
This is a classic design of a short-barreled pistol, where a CO2 gas cylinder is used as the source of the shot. Shoots copper-plated steel balls with a caliber of 4.5 mm. It is almost completely similar to the Makarov combat pistol. Manufactured in Taiwan under license from Borner.
Pneumatics are used for entertainment and shooting at short (no more than 15 m) distances. But due to its similarity with combat PM, it can also be used for self-defense purposes - if a conflict arises, an ordinary person will not be able to determine whether it is a real pistol or a pneumatic one. Due to its low power, the bullet will not cause serious harm (only if it hits the eye), especially if the attacker is wearing thick clothing, but the weapon has a psychological effect.
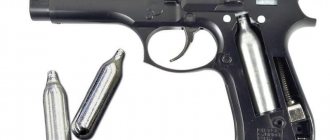
The operating principle of the pistol is simple. It contains an air chamber into which part of the gas enters when the can is pierced with a needle, and a bypass valve with a rod, which is hit by the trigger when the sear breaks. The gas mechanism is connected to the barrel with a plastic attachment (this is the only plastic element in the pistol). The charging chamber is connected to the magazine. From the chamber, the bullet is fed into the barrel by the needle of the bypass valve when the trigger hits the gas valve rod.
The magazine for loading bullets is removed after pressing the button, which is a design element of the clip. There are no buttons or flags directly on the pistol body for this. The magazine holds 17 copper-plated steel balls with a caliber of 4.5 mm.
After installing a magazine loaded with bullets and a gas can into the handle (clamped with a hexagon, which is included in the package), the gun is ready for use.
Complete/partial disassembly of the Gletcher TT NBB pistol
Many tire owners, I think, are familiar with such a wonderful gun as the Gletcher TT NBB, some just heard it correctly, some bought it for themselves, some had the opportunity to see/hold it between their hands while looking at it in the store or in friend's collections.
Wandering through the pages of our favorite site, I have repeatedly read user comments that, they say, I completely disassembled the gun, and now I can’t put it back together, help.
In fact, I myself encountered such a problem during the first disassembly, but, fortunately, reason and logic are not distant concepts for me, and the explosion diagram on the box was enough to disassemble everything in my mind and reassemble it without any problems.
However, I am quoting an article with relatively detailed instructions on how to disassemble and reassemble the product below.
(To my great shame, I do not know the anatomy of the pneumatics of gas cylinders, so I will name some parts not in accordance with the terminology, but either according to the description related to the photograph, or I will give my names and indicate them in the photographs)
In fact, the patient himself. We will need: tweezers (optional, I find it more convenient to take small parts for them), an awl (another thin and hard tool), a small Phillips screwdriver, straight arms.
ALWAYS REMOVE CYLINDER AND STORAGE before starting work. Remove both jaws of the gripper.
Step 1. Use an awl to compress the pins located in front of the barrel. Remove from oven and set aside.
Step 2: While holding the pin, move the bolt to its rearmost position. Attention, the pin may be pushed out with force under the action of compressed spring 1. Gently pull back, remove from bolt body, remove spring 1. Hold bolt in full rearward position, lift rear, then slide it forward toward barrel and remove bolt.
Partial disassembly completed. To reverse the process (from partial disassembly to reassembly), skip to step 27 below.
Step 3: Using a Phillips screwdriver, unscrew the bolts and remove the part.
We put the bolts together with the part separately from other parts.
Step 4. On the right side of the gun, unscrew the 7 mounting bolts. Set aside separately from other parts.
Step 5. Carefully separate the upper part (pictured on the right) of the gun body from the lower part (pictured on the left).
Trigger mechanism (trigger, trigger spring, trigger rod). PAY ATTENTION to the position of spring 2 in relation to the trigger rod.
| Armed position | Trigger in lowered position |
Fuse (plastic part with a protrusion on the left side, plastic plate at the bottom, springs under the plate). The switching is carried out by moving the plastic part along the surface of the plate, while the springs are compressed under pressure on them due to the plate and the part when the part is pressed with a finger (the fuse is removed / installed according to the “push and slide left / right” scheme).
Step 6. Remove the trigger with the trigger from the axle, disconnect it, and pull out the axle with tweezers (this will give some convenience during assembly). Fold the pieces separately.
Step 7: Remove the 3 bolts from the left side of the gun body. Two inside and one outside.
Step 8. Pull out the part.
Step 9: Disconnect the gun valve.
Step 10. Take out the part (pictured in the center).
Step 11. Remove the tube located in the recess of the housing from the indicated part.
The chamber where the ball comes directly from the warehouse and from where it is directed through the hole towards the target (hereinafter referred to as the “bullet chamber”)
Step 12. Unscrew the back of the valve (in the photo: the wire is wrapped with tape. Branded additive)
Step 13: Remove the valve and spring directly from the body. ATTENTION, inside the left part (pictured) of the valve body there is a washer with a rubber gasket.
Step 14: Place the spring on the valve, insert the frame into the valve body, inserting it into the washer and gasket located inside. Tighten the valve body halves along the threads.
Step 15. Insert the tube into the groove in the body of the part.
Step 16. Place the part on the chamber so that the tube fits into the chamber hole and the part's tooth points towards us (as in the following photos)
Step 17: Connect the valve to the barrel body.
Step 18. Insert the system (valve + chamber + barrel) into the left half of the gun body so that the guide pins fit into the holes. Install the bolts (see Step 7).
Step 19. Take the trigger, insert the previously removed pin (see Step 6) on the right side (pictured above). CAUTION, the pin goes through the spring housing.
Step 20: Insert the trigger pin into the appropriate hole on the LEFT half of the gun body. The prong on the top of the hook should fit into the prong of the insert above the chamber (see Step 16). Place the trigger rod on the hook; the spring should be under the trigger rod body, slightly protruding from below with its bending angle.
| Example of incorrect installation (X) Spring in front (top) of link | Example of correct installation (V) Spring at rear connection (bottom |
Step 21. The trigger rod should engage the outermost tooth of the trigger (the trigger should be in the deflected position).
Step 22: Install the fuse (place the plastic piece on the plastic plate to the far right).
Step 23: Position the right side of the gun body on the left (bottom). ATTENTION! Install carefully so that the pin on the trigger fits into the corresponding hole on the housing. The trigger rod should be exactly as shown in the pictures above (the eye of the rod is fixed by the trigger, the end of the rod by the trigger tooth). The (push button) part of the fuse must be in the corresponding hole when the fuse is removed. This may not work the first time, there will be large gaps between the halves, try again according to the last steps given.
Step 24: Tighten the bolts (see Step 4).
Step 25: Check:
1. Fuse (Off / On)
2. Hammer (cocked / deflated)
3. Trigger mechanism (trigger cocked / fired: the trigger, under the action of the pressed trigger, moves forward and upward relative to the pistol body).
Step 26. Install the part into the valve body and secure with bolts.
Step 27. We thread the bolt through the barrel of the pistol to the far rear position.
Step 28. Place spring 1 on the gun barrel.
Step 29. We put the plug on the barrel, pressing the spring. Insert the pins into the holes in the front of the valve (see Step 1).
Complete disassembly of the Makarov pistol
10. Complete disassembly of the pistol is carried out in the following order.
1) Carry out partial disassembly of the pistol, guided by art. 7
.
2) Separate the sear and bolt stop from the frame. Take the gun in your left hand; holding the trigger head with the thumb of your left hand and pressing the tail of the trigger with your index finger, smoothly release the trigger.
Use the rubbing protrusion to remove the hook of the sear spring from the bolt stop (Fig. 9).
Using the index finger and thumb of your right hand, turn the sear forward until the flat on the right trunnion coincides with the slot of the trunnion socket in the frame; then lift the sear and slide stop up and separate them from the frame (Fig. 10). Rice. 9. Removing the sear spring hook from the bolt stop Fig. 10. Separating the sear and bolt stop from the frame
3) Separate the handle from the base of the handle and the mainspring from the frame. Using a cleaning blade, unscrew the screw and, moving the handle back, separate it from the base of the handle (Fig. 11).
Rice. 11. Separating the handle from the base of the handle Fig. 12. Separating the mainspring from the frame
Pressing the mainspring to the base of the handle with the thumb of your left hand, move down and separate the mainspring bolt from the base of the handle and remove the mainspring from the boss of the base of the handle (Fig. 12).
Notes:
- In combat conditions, if there is no wiping at hand, the screw can be unscrewed with a bolt stop reflector.
- In pistols of the first releases, the mainspring is attached without a bolt.
4) Separate the trigger from the frame. Holding the frame in your left hand and turning the trigger to the extreme forward position, use the index finger and thumb of your right hand
Fig. 13. Separating the trigger from the frame,
turn the trigger forward until the flats on its trunnions coincide with the slots in the trunnion sockets in the frame, move the trigger towards the barrel and remove it (Fig. 13).
5) Separate the trigger rod with the cocking lever from the frame. Holding the frame in your left hand with your right hand, lift the rear end of the trigger rod (Fig. 14) and remove the pin from the trigger hole.
6) Separate the trigger from the frame. Holding the frame in your left hand, with your right hand
Fig. 14. Separating the trigger rod with the cocking lever from the frame Fig. 15. Separating the safety from the bolt,
pull the trigger guard down, as is done when partially disassembling the pistol; turning the tail of the trigger forward, remove the trigger pins from the pin sockets in the frame and separate the trigger from the frame. Place the trigger guard in its place.
7) Separate the safety and firing pin from the bolt . Taking the bolt in your left hand, turn the safety lever upward with the thumb of your right hand; then, using the index finger and thumb of your right hand, move the flag out of the socket slightly to the side, turn it further back and remove it from the shutter socket (Fig. 15).
Lightly strike the palm of your right hand with the back end of the bolt to remove the firing pin from the bolt.
Rice. 16. Separating the ejector from the bolt Separate the ejector from the bolt (Fig. 16). Place the bolt on the table (bench), press the ejector brushes with your right hand using the rubbing protrusion and, at the same time, pressing the front part of the ejector with the index finger of your left hand and turning it around the hook, remove it from the groove; After this, carefully remove the bend with the spring from the bolt socket.
9) Disassemble the store. Taking the magazine in your left hand, with the thumb and forefinger of this hand press the feeder spring towards the feeder, with your right hand remove the magazine cover by its protruding part (Fig. 17) and remove the feeder spring and feeder from the magazine body.
Fig. 17. Disassembling the magazine 11
After complete disassembly, reassemble the pistol in the reverse order.
1) Assemble the store. Holding the magazine body in your left hand so that the protrusion for the magazine latch is in front and at the top, insert the feeder into the magazine body with your right hand.
Insert the feeder spring into the magazine body with the unbent end down and, pressing the spring with the thumb of your left hand (Fig. 18), with your right hand, push the cover onto the curved ribs of the body so that the bent end of the spring pops into the hole in the cover. Rice. 18. Store assembly Fig. 19. Attaching the ejector to the bolt
2) Attach the ejector to the bolt (Fig. 19).
Place the bolt on the table (bench), and with your right hand insert the ejector spring with the bend (with the bend outward) into the bolt socket. Place the ejector in the groove with the hook to the shutter cup and, holding it with the index finger of your left hand at the hook, press the oppression wiper into the socket; simultaneously pressing the ejector towards the bend and down (turning around the hook), lower its heel into the bolt socket so that the head of the bend is located above the ledge of the ejector heel. 3) Attach the firing pin and safety to the bolt. Take the bolt in your left hand with the back end facing you and insert the firing pin into the bolt channel so that its cut at the rear faces the fuse socket. Using the thumb and forefinger of your right hand, insert the fuse into the bolt socket (Fig. 20) and turn its flag down until it stops. Rice. 20. Attaching the safety to the bolt
4) Attach the trigger to the frame.
Holding the frame in your left hand, pull the trigger guard with your right hand and skew it as is done when partially disassembling the pistol;
insert the trigger head into the window of the frame stand so that its trunnions fit into the trunnion sockets of the frame;
put the trigger guard in its place.
5) Attach the trigger rod with the cocking lever to the frame. Holding the frame in your left hand and pulling the tail of the trigger back, insert the trigger rod pin into the trigger hole and lower the rear end of the rod into the ramp onto the back wall of the base of the handle.
Rice. 21. Attaching the trigger to the frame
6) Attach the trigger to the frame. Holding the frame by the base of the handle with your left hand and turning the trigger to the extreme forward position, tilt the trigger head forward with your right hand, insert its pins into the pin sockets in the frame (Fig. 21) and turn the trigger head back.
7) Attach the mainspring to the frame and the handle to the base of the handle. Place the gun on the palm of your left hand;
turning the trigger forward and the cocking lever up, insert the feathers of the mainspring into the frame window with your right hand and put the spring with the hole on the boss of the base of the handle so that the wide feather of the mainspring is located in the recess of the trigger, and the narrow feather is on the heel of the cocking lever. Turn the pistol so that the back wall of the base of the handle is facing towards you, and, holding the mainspring by the magazine latch with the thumb of your left hand, and the front wall of the base of the handle with your index finger, put on the mainspring bolt with the thumb and forefinger of your right hand (Fig. 22 and 23) . Rice. 22. Attaching the mainspring to the frame Fig. 23. Securing the mainspring with a latch.
Check that the mainspring is installed correctly by lightly pressing the tail of the trigger several times. If the trigger moves back, then the spring is installed correctly.
Place the handle on the base of the handle and screw in the screw all the way, then loosen the screw half a turn,
Fig. 24. Attaching the slide stop and sear to the frame Attach the slide stop and sear to the frame. Holding the frame in your left hand, insert the slide stop into the cutout of the frame with your right hand (Fig. 24); take the sear so that the flat on its right trunnion faces forward; first insert the left sear pin (on which the spring is located) into the trunnion socket of the frame, and then insert the right sear pin into the trunnion socket in the frame. Turn the sear back with the rubbing protrusion and place the hook of the sear spring on the bolt stop.
Note.
It is forbidden to cock the hammer by pressing the tail of the trigger and release the hammer when the bolt is not attached to the frame.
9) Carry out further assembly, guided by Art. .
10) Check the correct operation of the parts and mechanisms of the gun after assembly , as specified in Art. .
12. The pistol must always be kept clean and in good working order. This is achieved by timely and proper cleaning and lubrication, careful handling of the gun and proper storage of it.
13. Cleaning of pistols is carried out:
- in a combat situation, during maneuvers and long exercises in the field - every day during a lull in the battle or in breaks between classes;
- after exercises, orders and training in the field without firing - immediately after the end of the exercises, orders or classes;
- after shooting - immediately after shooting, it is necessary to clean and lubricate the barrel bore and chamber; Perform final cleaning of the pistol upon returning from shooting; in the next 3 - 4 days, clean the gun daily;
- if the gun is not in use - at least once every 7 days.
14. Apply lubricant only to a well-cleaned and dry metal surface immediately after cleaning to prevent moisture from affecting the metal.
15. Soldiers and sergeants armed with pistols clean and lubricate pistols under the direction of the platoon commander (company sergeant major, battery sergeant). He determines the degree of disassembly of the gun, the correctness and quality of cleaning, gives permission for lubrication and assembly, and checks the correctness of lubrication and assembly.
Officers clean and lubricate pistols themselves.
16. In a barracks or camp setting, pistols are cleaned in specially designated places on tables equipped or adapted for this purpose, and in a combat or field situation - on mats, boards, plywood, etc., previously cleaned of dirt and dust.
17. To clean and lubricate the gun, use:
- liquid gun lubricant - for cleaning the gun and lubricating its parts and mechanisms at air temperatures from +5 to -50 ° C;
- gun lubricant - for lubricating the bore, parts and mechanisms of the gun after cleaning them; this lubricant is used at air temperatures from +5 ° C and above,
- RFC solution (barrel cleaning solution) - for cleaning barrel bores and other parts of the pistol exposed to powder gases;
- rags or paper KV-22 for wiping, cleaning and lubricating the gun;
- tow (short flax fiber), cleared of kernels, - only for cleaning the bore.
To make it easier to clean grooves, cutouts and holes, you can use wooden sticks.
Cleaning the pistol with an RFS solution is carried out only after shooting at the shooting range or in the barracks. If after shooting the pistol was cleaned with liquid gun lubricant, then upon returning to the barracks, clean the pistol with an RFC solution.
In field conditions, the pistol can be cleaned only with liquid gun lubricant.
Note. The RHS solution is prepared in the department in the following composition:
- water suitable for drinking - 1 l;
- ammonium carbonate - 200 g;
- potassium dichromate (chrompic) - 3 - 5 g.
The solution is prepared in the amount necessary to clean the weapon within one day. A small amount of RFS solution can be stored for no more than 7 days in bottles, sealed with a stopper in a dark place and away from heating devices. It is prohibited to pour RFC solution into oil cans.
18. Clean the gun in the following order.
1) Prepare cleaning materials and lubricants.
2) Inspect the accessory as specified in Art. , and prepare it for use when cleaning.
3) Disassemble the gun.
4) Clean the bore. Pass tow or rags through the wiping slot; The thickness of the tow layer should be such that the wipe with tow is introduced into the barrel bore with a slight hand effort. Soak the tow with liquid gun lubricant. Introduce the rub into the bore from the muzzle. Place the pistol frame on the table and, holding it with your left hand, smoothly move the wipe along the entire length of the barrel several times with your right hand. Change the tow and repeat the cleaning again.
Rub thoroughly.
Wipe the bore dry first with tow and then with a clean, dry rag. Inspect the rags; If traces of soot or rust are noticeable on the rags, wipe the barrel bore again with tow soaked in liquid gun lubricant, and then with dry tow or rags. Repeat cleaning the bore until the rag removed from the bore is clean. Clean the chamber in the same way. The chamber must be cleaned only from the breech by rotating the wiper with tow (rags) pressed against the ledge of the chamber.
Cleaning with the RFS solution is carried out in the same order as with liquid gun lubricant, and continues until carbon deposits are completely removed and tombaked, i.e., until a brush or tow moistened with the solution comes out of the barrel bore without signs of carbon deposits or greenery. After this, wipe the bore with dry tow or a rag. The next day, check the quality of the cleaning performed and, if carbon deposits are found on it when wiping the barrel bore with a clean rag, clean again in the same order. After cleaning the rifled part of the bore, clean the chamber in the same manner.
Carefully inspect the bore and chamber against the light. When inspecting, pay special attention to the chamber and the corners of the rifling, in which no dirt or carbon deposits should remain.
5) Clean the pistol frame with barrel and trigger guard. Wipe the parts dry with a rag until dirt and moisture are completely removed. Remove rust with tow or rags soaked in liquid gun lubricant.
6) Clean the bolt, return spring, bolt stop and parts of the trigger mechanism. If the pistol is cleaned after shooting, then clean the bolt cup with tow or rags soaked in liquid gun lubricant or RFC solution until the carbon deposits are completely removed. After cleaning, wipe it dry. If the pistol has not been fired and there is no carbon deposits or rust on the bolt cup, then wipe it with a dry cloth.
Wipe the remaining metal parts and mechanisms dry with a rag until dirt and moisture are completely removed, using wooden sticks for this.
Clean the bolt, bolt stop and parts of the trigger mechanism in assembled form after training and training without shooting, and in disassembled form after shooting, leaving the pistol in the rain and heavily soiled.
7) Wipe the handle with a dry rag or tow.
Clean out the store. The magazine is cleaned after training and training in assembled form, and after shooting, the pistol is exposed to the rain and is heavily soiled - in disassembled form. After outfits and activities, wipe the store dry with a rag until dirt and moisture are completely removed. After firing, remove carbon deposits from the feeder with tow or rags soaked in liquid gun lubricant or RSF solution. After cleaning, wipe the feeder dry.
9) Wipe the holster with a dry cloth, both from the inside and outside until dirt and moisture are completely removed.
10) Wipe the wipe dry.
19. Lubricate the gun in the following order.
1) Lubricate the bore. Pass a rag through the wiping slot. Soak a rag with lubricant. Introduce the rub into the barrel bore from the muzzle and smoothly move it two or three times along the entire length of the barrel bore to evenly cover the rifling and bore margins with a thin layer of lubricant. Lubricate the chamber from the breech by rotating and wiping with a rag.
2) Lubricate the remaining metal parts and mechanisms of the gun. Lubricate the outer surfaces using an oiled rag. To lubricate channels, sockets and holes, use an oiled rag wound on a wooden stick. Apply the lubricant in a thin, even layer. Excessive lubrication on gun parts will cause contamination and may cause gun malfunction.
Do not lubricate the holster, but only wipe it dry with a rag and dry it.
3) Lubricate the wipe.
4) After lubrication is completed , assemble the gun, inspect it, check the correct assembly and operation of the parts and mechanisms of the gun.
20. A gun brought from frost into a warm room cannot be lubricated until it “sweats” - when drops of water appear, you need to, without waiting for the moisture to dry, wipe the parts and mechanisms of the gun dry and lubricate them.
21. A pistol handed over for long-term storage must be thoroughly cleaned, the barrel bore and trigger mechanism lubricated with liquid gun lubricant, wrapped in one sheet (layer) of inhibited paper and two sheets (layers) of waxed paper and sealed in a cardboard box.
22. Lubricate the parts and mechanisms of the gun at an outside temperature of +5 ° C and below only with liquid gun lubricant.